Herunterladen Inhalt Inhalt Diese Seite drucken
Inhaltsverzeichnis

Werbung

Verfügbare Sprachen
  • DE

Verfügbare Sprachen

  • DEUTSCH, seite 34
English - Instructions manual
EN
IT
Italiano - Manuale di istruzioni
FR
Français - Manuel d'instructions
DE
Deutsch - Bedienungslanleitung
RU
Русский - Руководство по эксплуатации
Large-sized camera housing
HEG

Werbung

Inhaltsverzeichnis
loading

Inhaltszusammenfassung für videorec HEG

  • Seite 1 Large-sized camera housing English - Instructions manual Italiano - Manuale di istruzioni Français - Manuel d’instructions Deutsch - Bedienungslanleitung Русский - Руководство по эксплуатации...
  • Seite 3 Large-sized camera housing English - Instructions manual...
  • Seite 4: Inhaltsverzeichnis

    Contents ENGLISH 1 About this manual ......................3 1.1 Typographical conventions ..........................3 2 Notes on copyright and information on trademarks ..........3 3 Safety rules........................3 4 Identification ........................4 4.1 Product description and type designation..................... 4 4.2 Product markings ..............................4 5 Preparing the product for use ..................
  • Seite 5: About This Manual

    1 About this manual 3 Safety rules Before installing and using this unit, please read this CAUTION! The device must be installed manual carefully. Be sure to keep it handy for later only and exclusively by qualified technical reference. personnel. 1.1 Typographical conventions •...
  • Seite 6: Identification

    4 Identification 5.2 Unpacking and contents 5.2.1 Unpacking 4.1 Product description and type When the product is delivered, make sure that the designation package is intact and that there are no signs that it has been dropped or scratched. Robust and large aluminum housing designed to fit 1/2", 1/3"...
  • Seite 7: Assembling And Installing

    6 Assembling and installing 6.1.2 How to install the camera Power supply can be provided by the board The assembly and installation must be supplied with the product. Make sure the performed only by skilled personnel. voltage values are appropriate. 6.1 Installation Open the housing as described previously (6.1.1 How to open the housing, page 5).
  • Seite 8: Board Description

    6.1.3 Board description 6.1.4 Connection of the power supply line Connect the safety earth to the relative Insert the cables for the connection to the power terminal of the power supply connector. supply line inside the housing through the cable glands.
  • Seite 9: Installation Of The Version With Double Filter For Air Renewal

    7 Accessories 6.1.5 Installation of the version with double filter for air renewal For further details on configuration and use, During installation pay attention to the refer to the relative manual. orientation of the air inlet filter fins. 7.1 Heater 7.1.1 Heater installation At the end of istallation, connect the wiring to the terminal (heater power supply, 6.1.3 Board...
  • Seite 10: Instructions For Normal Operation

    8 Instructions for normal 10 Disposal of waste operation materials Do not use the wiper when the outside This symbol mark and recycle system are temperature is below 0°C or in case of ice. applied only to EU countries and not applied to the countries in the other area of the 9 Maintaining and cleaning world.
  • Seite 11: Technical Data

    11 Technical data Power supply/Current consumption (version with triple heater, continuous duty fan , Ton 15°C±3°C (59°F ±5°F), Toff 22°C±3°C (77°F±5°F)): 11.1 General • 120Vac, 1A max, 50/60Hz Constructed from aluminium • 230Vac, 0.52A max, 50/60Hz Epoxypolyester powder painting, RAL9002 colour Power supply/Current consumption (version with Stainless steel external screws blower and thermostat for models with double...
  • Seite 12: Technical Drawings

    493 / 590 USABLE AREA B - B Fig. 8 HEG. Headquarters Italy Videotec S.p.A. France Videotec France SARL Via Friuli, 6 - I-36015 Schio (VI) - Italy Immeuble Le Montreal, 19bis Avenue du Québec, ZA de Courtaboeuf Tel. +39 0445 697411 - Fax +39 0445 697414 91140 Villebon sur Yvette - France Email: info@videotec.com...
  • Seite 13 Custodia per telecamera di grandi dimensioni Italiano - Manuale di istruzioni...
  • Seite 14 Sommario ITALIANO 1 Informazioni sul presente manuale ................3 1.1 Convenzioni tipografiche ............................. 3 2 Note sul copyright e informazioni sui marchi commerciali ........3 3 Norme di sicurezza ......................3 4 Identificazione ....................... 4 4.1 Descrizione e designazione del prodotto ....................... 4 4.2 Marcatura del prodotto ............................
  • Seite 15: Informazioni Sul Presente Manuale

    1 Informazioni sul presente 3 Norme di sicurezza manuale ATTENZIONE! L'installazione e la manutenzione del dispositivo deve Prima di installare e utilizzare questa unità, leggere essere eseguita solo da personale tecnico attentamente questo manuale. Conservare questo qualificato. manuale a portata di mano come riferimento futuro. •...
  • Seite 16: Identificazione

    4 Identificazione 5.2 Disimballaggio e contenuto 5.2.1 Disimballaggio 4.1 Descrizione e designazione Alla consegna del prodotto verificare che l'imballo del prodotto sia integro e non abbia segni evidenti di cadute o abrasioni. Robusta e spaziosa custodia in alluminio adatta ad alloggiare telecamere da 1/2", 1/3"...
  • Seite 17: Assemblaggio E Installazione

    6 Assemblaggio e 6.1.2 Installazione della telecamera installazione L'alimentazione può essere fornita dalla scheda in dotazione al prodotto. Accertarsi che i valori di tensione siano adeguati. L'assemblaggio e l'installazione vanno eseguiti solo da personale qualificato. Aprire la custodia come descritto precedentemente ( 6.1.1 Apertura della custodia, pagina 5).
  • Seite 18: Descrizione Della Scheda

    6.1.3 Descrizione della scheda 6.1.4 Collegamento della linea di alimentazione Collegare la terra di sicurezza al relativo Introdurre i cavi di collegamento alla linea di morsetto del connettore di alimentazione. alimentazione all'interno della custodia attraverso i pressacavi. I pressacavi sono adatti per conduttori L'aspetto della scheda potrebbe differire da con diametro compreso tra 5mm e 10mm.
  • Seite 19: Installazione Della Versione Con Doppio Filtro Per Ricambio Dell'aria

    7 Accessori 6.1.5 Installazione della versione con doppio filtro per ricambio dell'aria Per ulteriori dettagli sulla configurazione Durante l'installazione prestare attenzione e l’utilizzo fare riferimento al manuale del all'orientamento delle alette del filtro di relativo accessorio. ingresso dell'aria. 7.1 Riscaldamento 7.1.1 Installazione del riscaldamento Terminata l'installazione, collegare il cablaggio al morsetto (alimentazione del riscaldamento, 6.1.3...
  • Seite 20: Istruzioni Di Funzionamento Ordinario

    8 Istruzioni di 10 Smaltimento dei rifiuti funzionamento ordinario Questo simbolo e il sistema di riciclaggio sono validi solo nei paesi dell'EU e non Non utilizzare il tergicristallo quando la trovano applicazione in altri paesi del mondo. temperatura esterna è inferiore a 0°C o in Il vostro prodotto è...
  • Seite 21: Dati Tecnici

    11 Dati tecnici Tensione di alimentazione/Corrente assorbita (versione con triplo riscaldamento, ventola a ciclo continuo , Ton 15°C±3°C, Toff 22°C±3°C): 11.1 Generale • 120Vac, 1A max, 50/60Hz Costruzione in alluminio • 230Vac, 0.52A max, 50/60Hz Verniciatura a polveri di epossipoliestere, colore Tensione di alimentazione/Corrente assorbita RAL9002 (versione con ventilatore e termostato per modelli...
  • Seite 22: Disegni Tecnici

    493 / 590 AREA UTILE B - B Fig. 8 HEG. Headquarters Italy Videotec S.p.A. France Videotec France SARL Via Friuli, 6 - I-36015 Schio (VI) - Italy Immeuble Le Montreal, 19bis Avenue du Québec, ZA de Courtaboeuf Tel. +39 0445 697411 - Fax +39 0445 697414 91140 Villebon sur Yvette - France Email: info@videotec.com...
  • Seite 23 Caisson pour caméra de grandes dimensions Français - Manuel d’instructions...
  • Seite 24 Sommaire FRANÇAIS 1 À propos de ce mode d’emploi ..................3 1.1 Conventions typographiques ..........................3 2 Notes sur le copyright et informations sur les marques de commerce ..... 3 3 Normes de securité ......................3 4 Identification ........................4 4.1 Description et désignation du produit ......................
  • Seite 25: Propos De Ce Mode D'emploi

    1 À propos de ce mode 3 Normes de securité d’emploi ATTENTION! L’installation et l’entretien du dispositif doivent être exclusivement Avant d’installer et d’utiliser cet appareil, veuillez être effectués par un personnel technique lire attentivement ce mode d’emploi. Conservez-le à qualifié.
  • Seite 26: Identification

    4 Identification 5.2 Déballage et contenu 5.2.1 Déballage 4.1 Description et désignation du Lors de la livraison du produit, vérifier que produit l’emballage est en bon état et l’absence de tout signe évident de chute ou d’abrasion. Caisson robuste et spacieux en aluminium adapté pour loger des caméras de 1/2", 1/3"...
  • Seite 27: Assemblage Et Installation

    6 Assemblage et installation 6.1.2 Installation de la caméra L'alimentation peut être dotée de la carte L’assemblage et l’installation doivent être fournie avec le produit fournie. S'assurer que effectués par un personnel qualifié. les valeurs de tension soient appropriées. 6.1 Installation Ouvrir le caisson comme décrit précédemment (6.1.1 Ouverture du caisson, page 5).
  • Seite 28: Description De La Carte

    6.1.3 Description de la carte 6.1.4 Connexion de la ligne d'alimentation Brancher la terre de sécurité à la Introduire les câbles de branchement à la ligne borne correspondante du connecteur d'alimentation à l'intérieur du caisson à l'aide des d'alimentation. presse-étoupes. Les presse-câbles sont prévus pour des conducteurs avec un diamètre compris entre L'aspect de la carte pourrait être différer de 5mm et 10mm.
  • Seite 29: Installation De La Version Avec Double Filtre Pour Le Changement D'air

    7 Accessoires 6.1.5 Installation de la version avec double filtre pour le changement d'air Pour de plus amples informations sur la Durant l'installation prêter l'installation à configuration et l'utilisation, consulter le l'orientation des ailettes du filtre d'entrée de manuel de l'accessoire correspondant. l'air.
  • Seite 30: Instructions De Fonctionnement Courant

    8 Instructions de 10 Élimination des déchets fonctionnement courant Ce symbole et le système de recyclage ne sont appliqués que dans les pays UE et non dans Ne pas utiliser l’essuie-glace lorsque la les autres pays du monde. température extérieure est inférieure à 0°C Votre produit est conçu et fabriqué...
  • Seite 31: Données Techniques

    11 Données techniques Tension d’alimentation/Courant absorbé (version avec triple chauffage, ventilateur à cycle continu , Ton 15°C±3°C, Toff 22°C±3°C): 11.1 Généralités • 120Vac, 1A max, 50/60Hz Construction en aluminium • 230Vac, 0.52A max, 50/60Hz Vernissage avec poudres époxypolyester, couleur Tension d’alimentation/Courant absorbé (version RAL9002 avec ventilateur et thermostat avec double filtre Visserie extérieure en acier inox...
  • Seite 32: Dessins Techniques

    493 / 590 SURFACE UTILE B - B Fig. 8 HEG. Headquarters Italy Videotec S.p.A. France Videotec France SARL Via Friuli, 6 - I-36015 Schio (VI) - Italy Immeuble Le Montreal, 19bis Avenue du Québec, ZA de Courtaboeuf Tel. +39 0445 697411 - Fax +39 0445 697414 91140 Villebon sur Yvette - France Email: info@videotec.com...
  • Seite 33: Grosses Kameragehäuse

    Grosses Kameragehäuse Deutsch - Bedienungslanleitung...
  • Seite 34 Inhaltsverzeichnis DEUTSCH 1 Allgemeines ........................3 1.1 Schreibweisen ................................3 2 Anmerkungen zum Copyright und Informationen zu den Handelsmarken ..... 3 3 Sicherheitsnormen ......................3 4 Identifizierung ....................... 4 4.1 Beschreibung und Bezeichnung des Produktes ................... 4 4.2 Kennzeichnung des Produkts..........................4 5 Vorbereitung des Produktes auf den Gebrauch............
  • Seite 35: Allgemeines

    1 Allgemeines 3 Sicherheitsnormen Lesen Sie bitte vor dem Installieren und dem ACHTUNG! Die Installation und Wartung Verwenden dieses Gerätes die Bedienungsanleitung der Vorrichtung ist technischen Fachleuten sorgfältig durch. Bewahren Sie sie zum späteren vorbehalten. Nachschlagen auf. • Der Hersteller lehnt jede Haftung für eventuelle 1.1 Schreibweisen Schäden ab, die aufgrund unsachgemäßer Anwendung der in diesem Handbuch erwähnten...
  • Seite 36: Identifizierung

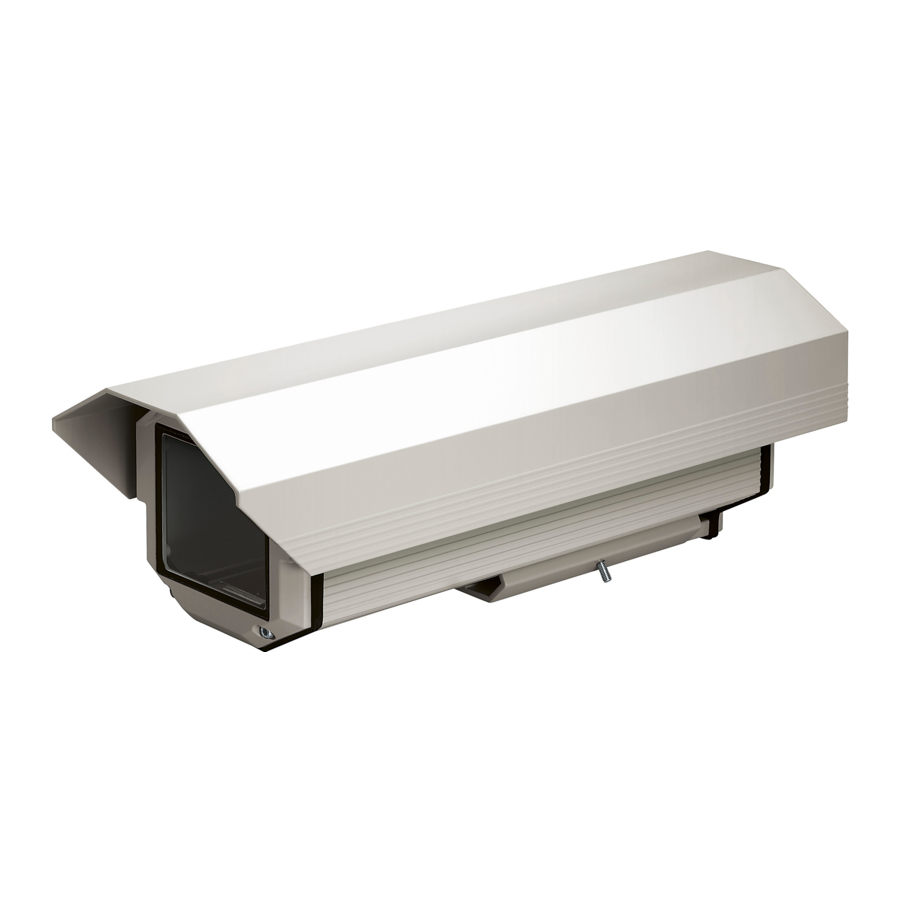
    4 Identifizierung 5.2 Entfernen der Verpackung und Inhalt 4.1 Beschreibung und 5.2.1 Entfernen der Verpackung Bezeichnung des Produktes Bei der Lieferung des Produktes ist zu prüfen, ob die Robustes, geräumiges Aluminiumgehäuse für die Verpackung intakt ist oder offensichtliche Anzeichen Aufnahme von Kameras der Typen 1/2", 1/3" und 1/4" von Stürzen oder Abrieb aufweist.
  • Seite 37: Zusammenbau Und Installation

    6 Zusammenbau und 6.1.2 Installation der Kamera Installation Die Stromversorgung muss über die Karte erfolgen, die im Lieferumfang des Geräts enthalten ist. Prüfen, dass die Zusammenbau und Installation sind Spannungswerte angemessen sind. qualifizierten Fachleuten vorbehalten. Das Gehäuse öffnen, wie vorstehend beschrieben ( 6.1 Installation 6.1.1 Öffnung des Schutzgehause, Seite 5).
  • Seite 38: Beschreibung Der Karte

    6.1.3 Beschreibung der Karte 6.1.4 Anschluss der Stromversorgung Die Kabel für den Anschluss an die Den Erdungsschutzleiter an die zugehörige Versorgungsleitung durch die Kabelverschraubungen Stromversorgungsklemme anschließen. ins Gehäuseinnere führen. Die Kabelverschraubungen eignen sich für Leiter mit Durchmesser zwischen Die Abbildung kann von der tatsächlichen 5mm und 10mm.
  • Seite 39: Installation Der Version Mit Doppelfilter Für Den Luftaustausch

    7 Zubehör 6.1.5 Installation der Version mit Doppelfilter für den Luftaustausch Für weitere Details zur Konfiguration und Während der Installation auf die Ausrichtung zum Gebrauch beachten Sie bitte das der Luftklappen am Lufteinlassfilter achten. Handbuch des entsprechenden Geräts. 7.1 Heizung 7.1.1 Installation der Heizung Am Ende der Montage die Verkabelung an die Klemme verinden (Heizungsversorgung, 6.1.3...
  • Seite 40: Anleitung Für Den Normalen Betrieb

    8 Anleitung für den 10 Müllentsorgungsstellen normalen Betrieb Dieses Symbol und das entsprechende Recycling-System gelten nur für EULänder Der Scheibenwischer ist bei und finden in den anderen Ländern der Welt Aussentemperaturen unter 0°C oder bei Glas keine Anwendung. nicht zu betätigen. Ihr Produkt wurde entworfen und hergestellt 9 Wartung und Reinigung aus qualitativ hochwertigen Materialien und...
  • Seite 41: Technische Daten

    11 Technische Daten Versorgungsspannung/Stromaufnahme (Ausführung mit Dreifacheheizung, Lüfter im Dauerbetrieb , Ton 15°C±3°C, Toff 22°C±3°C): 11.1 Allgemeines • 120Vac, 1A max, 50/60Hz Aus Aluminium • 230Vac, 0.52A max, 50/60Hz Pulverlackierung mit Epoxydpolyester, Farbe RAL9002 Versorgungsspannung/Stromaufnahme (Version Externe Schrauben aus rostfreiem Stahl mit Lüfter und Thermostat mit Doppelfilter für Luftwechsel, Ton 35°C±3°C, Toff 20°C±3°C): 11.2 Mechanik...
  • Seite 42: Technische Zeichnungen

    493 / 590 NUTZ- FLÄCHE B - B Abb. 8 HEG. Headquarters Italy Videotec S.p.A. France Videotec France SARL Via Friuli, 6 - I-36015 Schio (VI) - Italy Immeuble Le Montreal, 19bis Avenue du Québec, ZA de Courtaboeuf Tel. +39 0445 697411 - Fax +39 0445 697414 91140 Villebon sur Yvette - France Email: info@videotec.com...
  • Seite 43 Кожух большого размера Русский - Руководство по эксплуатации...
  • Seite 44 Индекс РУССКИЙ 1 Информация о настоящем руководстве ..............3 1.1 Типографские обозначения ..........................3 2 Примечания по авторскому праву и торговым маркам ........3 3 Правила безопасности ....................3 4 Идентификация ......................4 4.1 Описание и назначение изделия........................4 4.2 Маркировка изделия ............................4 5 Подготовка...
  • Seite 45: Информация О Настоящем Руководстве

    1 Информация о 3 Правила безопасности настоящем руководстве ПРЕДУПРЕЖДЕНИЕ! Следует использовать только кронштейны или принадлежности, Перед монтажом и использованием настоящего рекомендуемые для монтажа. блока, внимательно прочитать настоящее руководство. Хранить данное руководство под • Производитель снимает с себя какую-либо рукой для будущих консультаций. ответственность...
  • Seite 46: Идентификация

    4 Идентификация 5.2 Распаковка и содержание 5.2.1 Распаковка 4.1 Описание и назначение При поставке изделия убедитесь в том, что изделия упаковка не повреждена и не имеет явных признаков падений или царапин. Крепкий и просторный алюминиевый футляр подходит для содержания телекамер 1/2", 1/3" и В...
  • Seite 47: Сборка И Установка

    6 Сборка и установка 6.1.2 Установка телекамеры Питание может обеспечиваться платой, Монтаж и установка оборудования прилагающейся к изделию. Убедитесь в должны выполняться только адекватности значений напряжения. квалифицированным для этого персоналом. Откройте футляр, как описано ранее (6.1.1 Открытие корпуса, страница 5). 6.1 Монтаж Прикрепите...
  • Seite 48: Описание Платы

    6.1.3 Описание платы 6.1.4 Подключение к линии питания Введите кабели подключения к линии питания Подключите защитное заземление внутрь футляра через кабельные муфты. к соответствующей клемме разъема Кабельные муфты подходят к проводам, питания. имеющим диаметр от 5 до 10mm. Участок кабеля внутри...
  • Seite 49: Установка Версии С Двойным Фильтром Для Воздухообмена

    7 Аксессуары 6.1.5 Установка версии с двойным фильтром для воздухообмена Для дополнительной информации Во время установки обратите внимание по конфигурации и использованию на ориентировку ребер фильтра на входе обращаться к руководству по воздуха. эксплуатации соответствующего оборудования. 7.1 Нагреватель 7.1.1 Установка системы нагревания По...
  • Seite 50: Инструкции По Обычному Функционированию

    8 Инструкции по обычному 10 Вывоз в отходы функционированию Этот символ и система утилизации имеют значение только в странах ЕС и не находят Не пользуйтесь стеклоочистителем, применения в других странах мира. когда внешняя температура ниже 0°C или Ваше изделие были изготовлено из материалов имеется...
  • Seite 51: Технические Параметры

    11 Технические параметры Питание/Потребление тока (версия с тройным нагреванием, вентилятор с непрерывным циклом , Ton 15°C±3°C, Toff 22°C±3°C): 11.1 Общее • 120Vac, 1A max, 50/60Hz Корпус из алюминия • 230Vac, 0.52A max, 50/60Hz Эпоксиполиэстеровое порошковое покрытие, Питание/Потребление тока (версия с цвет...
  • Seite 52: Технические Чертежи

    493 / 590 ПОЛЕЗНАЯ ОБЛАСТЬ B - B Рис. 8 HEG. Headquarters Italy Videotec S.p.A. France Videotec France SARL Via Friuli, 6 - I-36015 Schio (VI) - Italy Immeuble Le Montreal, 19bis Avenue du Québec, ZA de Courtaboeuf Tel. +39 0445 697411 - Fax +39 0445 697414 91140 Villebon sur Yvette - France Email: info@videotec.com...
  • Seite 54 Headquarters Italy Videotec S.p.A. France Videotec France SARL Via Friuli, 6 - I-36015 Schio (VI) - Italy Immeuble Le Montreal, 19bis Avenue du Québec, ZA de Courtaboeuf Tel. +39 0445 697411 - Fax +39 0445 697414 91140 Villebon sur Yvette - France Email: info@videotec.com Tel.

Inhaltsverzeichnis