Herunterladen Inhalt Inhalt Diese Seite drucken

Werbung

Verfügbare Sprachen
  • DE

Verfügbare Sprachen

  • DEUTSCH, seite 21
INSTALLATION GUIDE
AXIS T96B05 Outdoor Housing
Installation Guide

Werbung

Inhaltsverzeichnis
loading

Inhaltszusammenfassung für Axis T96B05

  • Seite 1 INSTALLATION GUIDE AXIS T96B05 Outdoor Housing Installation Guide...
  • Seite 2 Every care has been taken in the preparation of this When this product has reached the end of its document. Please inform your local Axis office of useful life, dispose of it according to local laws any inaccuracies or omissions. Axis Communications and regulations.
  • Seite 3 • find answers to resolved problems in the FAQ database. Search by product, category, or phrase • report problems to Axis support staff by logging in to your private support area • chat with Axis support staff • visit Axis Support at www.axis.com/techsup/ Learn More! Visit Axis learning center www.axis.com/academy/ for...
  • Seite 5: Hazard Levels

    AXIS T96B05 Outdoor Housing Safety Information Read through this Installation Guide carefully before installing the product. Keep the Installation Guide for future reference. Hazard Levels Indicates a hazardous situation which, if not DANGER avoided, will result in death or serious injury.
  • Seite 6 Safety Instructions NO TICE TICE TICE • The Axis product shall be used in compliance with local laws and regulations. • Store the Axis product in a dry and ventilated environment. • Use only applicable tools when installing the Axis product.
  • Seite 7: Installation Steps

    AXIS T96B05 Outdoor Housing Installation Guide This Installation Guide provides instructions for AXIS T96B05. Installation Steps Make sure the package contents, tools and other materials necessary for the installation are in order. See page 7 . Study the hardware overview. See page 7 .
  • Seite 8: Specifications

    (-22°F to 131°F) (condensing) Install the Hardware Important AXIS T96B05 must be mounted on a flat surface. Use the supplied drill template and drill four holes for the bottom cover screws and one hole for the network cable. Note When using the drill template, make sure it conforms to the desired angle of the camera installation.
  • Seite 9 For optimal performance, a 6 mm or 8 mm lens is recommended. For more information about lenses see www.axis.com Attach the bottom cover from the P39 Series camera to AXIS T96B05 bottom cover. Thread the network cable through the hole and connect it.
  • Seite 10 AXIS T96B05 Outdoor Housing NO TICE TICE TICE When mounting AXIS P3905-RE, make sure to use appropriate screws for the surface. Optionally insert an microSD card. See image 4. If necessary adjust focus and other camera settings. Note See the products User Manual for more information about camera settings.
  • Seite 11: Warranty Information

    AXIS T96B05 Outdoor Housing 12. Remove and discard the protection tape from the glass (top cover outside). Warranty Information For information about Axis’ product warranty and thereto related information, see www.axis.com/warranty/...
  • Seite 13: Niveaux De Risques

    AXIS T96B05 Outdoor Housing Informations sur la sécurité Lisez attentivement ce guide d'installation avant d'installer l'appareil. Conservez le guide d'installation pour toute référence ultérieure. Niveaux de risques Indique une situation dangereuse qui, si elle n'est DANGER pas évitée, entraînera le décès ou des blessures graves.
  • Seite 14 AXIS T96B05 Outdoor Housing Consignes de sécurité A A A VIS • Le produit Axis doit être utilisé conformément aux lois et règlementations locales en vigueur. • Conserver ce produit Axis dans un environnement sec et ventilé. • Utiliser uniquement des outils recommandés pour l'installation de l'appareil Axis.
  • Seite 15: Guide D'installation

    AXIS T96B05 Outdoor Housing Guide d’installation Ce guide d’installation vous donne des instructions sur l'AXIS T96B05. Procédures d’installation Assurez-vous que les outils et autres matériels nécessaires à l'installation sont inclus dans l'emballage. Cf. page 15. Consultez la description du matériel. Cf. page 16.
  • Seite 16: Aperçu Du Matériel

    Humidité relative de 10 à 100 % (condensation) Installation du matériel Important La caméra AXIS T96B05 doit être montée sur une surface plane. Utilisez le gabarit de perçage fourni pour percer quatre trous pour les vis du couvercle inférieur et un trou pour le câble réseau.
  • Seite 17 Pour une performance optimale, un objectif de 6 mm ou 8 mm est recommandé. Pour plus d'informations sur les objectifs, consultez le site www.axis.com Fixez le couvercle supérieur de la caméra série P39 au couvercle inférieur de l'AXIS T96B05. Passez le câble réseau à travers l’orifice et connectez-le. Voir image 2.
  • Seite 18 < 4mm (3/16 in) A A A VIS Lors de l’installation de la caméra AXIS P3905-RE, assurez-vous d’utiliser des vis adaptées à la surface de montage. Si vous le souhaitez, insérez une carte microSD. Voir image 4. Le cas échéant, réglez la mise au point et configurez les autres...
  • Seite 19: Informations Sur La Garantie

    12. Enlevez et éliminez le ruban de protection de la vitre (extérieur du couvercle supérieur). Informations sur la garantie Pour obtenir de plus amples informations sur la garantie du produit AXIS et des renseignements connexes, allez sur le site www.axis.com/warranty/...
  • Seite 21: Gefährdungsstufen

    AXIS T96B05 Outdoor Housing Sicherheitsinformation Lesen Sie das Installationshandbuch sorgfältig durch bevor sie das Produkt installieren. Bewahren Sie das Installationshandbuch für zukünftige Zwecke auf. Gefährdungsstufen GEFAHR Weist auf eine gefährliche Situation hin, die, falls nicht verhindert, zu Tod oder schweren Verletzungen führt.
  • Seite 22 HINWEIS • Die Anwendung des Axis Produkts muss unter Beachtung der örtlich geltenden rechtlichen Bestimmungen erfolgen. • Lagern Sie das Axis Produkt in einer trockenen und belüfteten Umgebung. • Verwenden Sie bei der Installation des Axis Produkts ausschließlich passende Werkzeuge. Ein zu großer Kraftaufwand mit elektrischen Werkzeugen kann das Produkt beschädigen.
  • Seite 23: Installationsschritte

    AXIS T96B05 Outdoor Housing Installationsanleitung In dieser Installationsanleitung wird die Installation des AXIS T96B05 beschrieben. Installationsschritte Stellen Sie sicher, dass die Packungsinhalte, Werkzeuge und andere notwendige Materialien für die Installation in Ordnung sind. Siehe Seite 23. Machen Sie sich mit der Hardware-Übersicht vertraut. Siehe Seite 24.
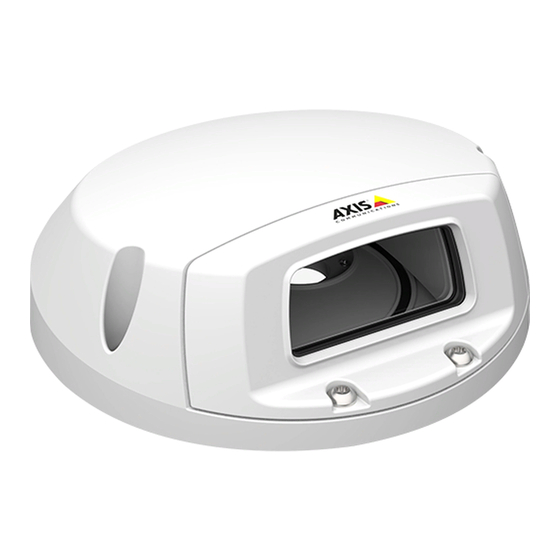
  • Seite 24: Übersicht Über Die Hardware

    10 % bis 100 % relative Luftfeuchtigkeit (kondensierend) Installieren der Hardware Wichtig Das AXIS T96B05 muss auf einer glatten Fläche montiert werden. Bohren Sie mithilfe der im Lieferumfang enthaltenen Bohrschablone vier Löcher für die Schrauben der unteren Abdeckung und ein Loch für das Netzwerkkabel.
  • Seite 25 Entfernen Sie die obere Abdeckung mithilfe des entsprechenden Werkzeugs von der P39-Kamera. Beachten Für optimale Leistung wird ein 6-mm- oder 8-mm-Objektiv empfohlen. Unter www.axis.com finden Sie weitere Informationen zu Objektiven. Bringen Sie die untere Abdeckung der P39-Kamera an der unteren Abdeckung des AXIS T96B05 an.
  • Seite 26 4mm (3/16 in) HINWEIS HINWEIS HINWEIS Achten Sie bei der Montage der AXIS P3905-RE darauf, die für die jeweilige Oberfläche passenden Schrauben zu verwenden. Sie können eine optionale SD-Speicherkarte einsetzen. Siehe Bild 4. Passen Sie ggf. Fokus und Kameraeinstellungen an.
  • Seite 27: Gewährleistungsinformationen

    11. Drücken Sie die obere Abdeckung vorsichtig auf die untere Abdeckung, bevor Sie die sechs Schrauben festziehen. Siehe Bild 5. 12. Entfernen Sie die Schutzfolie vom Glas (Außenseite der oberen Abdeckung). Gewährleistungsinformationen Informationen zur Gewährleistung der Axis Produkte und andere, hierzu relevante Informationen, finden Sie unter www.axis.com/warranty/...
  • Seite 29: Livelli Di Pericolo

    AXIS T96B05 Outdoor Housing Informazioni di sicurezza Leggere con attenzione questa guida all'installazione prima di installare il dispositivo. Conservare questo documento per usi futuri. Livelli di pericolo Indica una situazione pericolosa che, se non PERICOLO evitata, provoca morte o lesioni gravi.
  • Seite 30 A A A VVISO VVISO VVISO • Il dispositivo Axis deve essere utilizzato in conformità alle leggi e alle disposizioni locali. • Conservare il dispositivo Axis in un ambiente asciutto e ventilato. • Utilizzare solo strumenti applicabili quando si installa il dispositivo Axis.
  • Seite 31: Guida All'installazione

    Consultare pagina 31. Studiare la descrizione dell'hardware. Consultare pagina 32. Studiare le specifiche. Consultare pagina 32. Installare l’hardware. Consultare pagina 32. Contenuto della confezione • Alloggiamento per esterni AXIS T96B05 • Strumento per la copertura superiore • Strumento per l'obiettivo •...
  • Seite 32: Panoramica Dell'hardware

    (umidità relativa con condensa) Installazione dell'hardware Importante L'unità AXIS T96B05 deve essere montata su una superficie piana. Usare la maschera di foratura fornita e praticare quattro fori per le viti della copertura inferiore e un foro per il cavo di rete.
  • Seite 33 8 mm. Per maggiori informazioni sugli obiettivi, visitare il sito www.axis.com. Fissare la copertura inferiore della telecamera serie P39 alla copertura inferiore dell'unità AXIS T96B05. Far passare il cavo di rete attraverso il foro e collegarlo. Vedere l'immagine 2.
  • Seite 34 A A A VVISO VVISO VVISO Durante il montaggio dell'unità AXIS P3905-RE, assicurarsi di utilizzare le viti appropriate per la superficie. È possibile inserire la scheda microSD. Vedere l'immagine 4. Se necessario, regolare la messa a fuoco e altre impostazioni...
  • Seite 35: Informazioni Sulla Garanzia

    (6). Vedere l'immagine 5. 12. Rimuovere ed eliminare il nastro di protezione dal vetro (esterno della copertura superiore) Informazioni sulla garanzia Per informazioni sulla garanzia del dispositivo Axis e informazioni ad esso relative, consultare la pagina www.axis.com/warranty/...
  • Seite 37 AXIS T96B05 Outdoor Housing Información de seguridad Lea esta Guía de instalación con atención antes de instalar el producto. Guarde la Guía de instalación para poder consultarla en otro momento. Niveles de peligrosidad Indica una situación peligrosa que, si no se evita, PELIGRO provocará...
  • Seite 38 A A A VISO VISO VISO • El producto de Axis debe utilizarse de acuerdo con la legislación y la normativa locales. • Almacene el producto de Axis en un entorno seco y ventilado. • Utilice solo las herramientas correspondientes cuando instale el producto de Axis.
  • Seite 39: Guía De Instalación

    AXIS T96B05 Outdoor Housing Guía de instalación Esta guía de instalación incluye instrucciones para AXIS T96B05. Pasos de la instalación Asegúrese de que dispone del contenido del paquete, las herramientas y los demás materiales necesarios para la instalación. Vea página 39.
  • Seite 40: Información General Del Hardware

    (con condensación) Instalación del hardware Importante La cámara AXIS T96B05 debe instalarse en una superficie plana. Utilice la plantilla de perforado suministrada y perfore cuatro agujeros para los tornillos de la cubierta inferior y uno para el cable de red.
  • Seite 41 8 mm. Para obtener información sobre los objetivos, visite www.axis.com. Acople la cubierta inferior de la cámara de la serie P39 a la cubierta inferior de la AXIS T96B05. Pase el cable de red a través del orificio y conéctelo. Vea la imagen 2.
  • Seite 42 A A A VISO VISO VISO Al instalar la AXIS P3905-RE, asegúrese de utilizar los tornillos adecuados para la superficie. Opcionalmente, inserte una tarjeta microSD. Vea la imagen 4. Si es necesario, configure el enfoque y otros ajustes de la...
  • Seite 43: Información De Garantía

    (6). Vea la imagen 5. 12. Retire la cinta protectora del cristal (exterior de la cubierta superior) y deséchela. Información de garantía Para obtener más detalles sobre la garantía del producto de Axis y la información relacionada con ella, consulte www.axis.com/warranty/...
  • Seite 45 AXIS T96B05 Outdoor Housing 安 安 安 全 全 全 情 情 情 報 報 報 本製品を設置する前に、このインストールガイドをよくお読 みください。 インストールガイドは、後で参照できるよう に保管しておいてください。 危 危 危 険 険 険 レ レ レ ベ ベ ベ ル ル ル 回避しない場合、死亡または重傷につな 危 危 危 険 険 険...
  • Seite 46 AXIS T96B05 Outdoor Housing 安 安 安 全 全 全 手 手 手 順 順 順 注 注 注 記 記 記 • 本製品は、お使いになる地域の法律や規制に準拠して 使用してください。 • 本製品は乾燥した換気のよい環境に保管してくださ い。 • 本製品を設置する際には、適切な工具のみを使用して ください。 電動工具を使用して過剰な力をかけると、 製品が損傷することがあります。 • 化学薬品、腐食剤、噴霧式クリーナーは使用しないで ください。 • 清掃には、きれいな水に浸した清潔な布を使用して ください。 • 製品の技術仕様に準拠したアクセサリーのみを使用...
  • Seite 47 AXIS T96B05 Outdoor Housing イ イ イ ン ン ン ス ス ス ト ト ト ー ー ー ル ル ル ガ ガ ガ イ イ イ ド ド ド このインストールガイドでは、AXIS T96B05を設置する手順につ いて説明しています。 設 設 設 置 置 置 手 手 手 順 順 順...
  • Seite 48 AXIS T96B05 Outdoor Housing ハ ハ ハ ー ー ー ド ド ド ウ ウ ウ ェ ェ ェ ア ア ア の の の 概 概 概 要 要 要 仕 仕 仕 様 様 様 動 動 動 作 作 作 条 条 条 件 件 件...
  • Seite 49 AXIS T96B05 Outdoor Housing 上蓋ツールを使用し、上蓋を裏蓋から取り外します。 図1を参照してください。 上蓋ツールを使用し、上蓋をP39シリーズカメラか ら取り外します。 注意 最適なパフォーマンスを得るには、6 mmまたは8 mm のレンズを使用することをお勧めします。 レンズの詳 www.axis.com 細については、 を参照してください。 4. P39シリーズカメラの裏蓋をAXIS T96B05の裏蓋に取 り付けます。 ネットワークケーブルを穴に装着し、それに接続し ます。 図2を参照してください。...
  • Seite 50 AXIS T96B05 Outdoor Housing ネ ジ (×4) で 裏 蓋 を 取 り 付 け ま す 。 図3を参照してください。 < 4mm (3/16 in) 注 注 注 記 記 記 AXIS P3905‑REの取り付けには、表面に合った適切なネ ジを使用してください。 必要に応じて、microSDカードを装着します。 図4を参照してください。...
  • Seite 51 10. 裏蓋に上蓋を取り付けます。 11. ネジ (×6) を締める前に、上蓋を裏蓋にやさしく押し 込みます。 図5を参照してください。 12. ガラスから保護テープを外して破棄してください (上蓋の外側)。 保 保 保 証 証 証 情 情 情 報 報 報 Axis の 製 品 保 証 と 関 連 情 報 に つ い て www.axis.com/warranty/ は、 をご覧ください...
  • Seite 52 Installation Guide Ver. M1.3 AXIS T96B05 Outdoor Housing Date: April 2015 © Axis Communications AB, 2015 Part No. 63141...

Inhaltsverzeichnis