Herunterladen Inhalt Inhalt Diese Seite drucken
Vorschau ausblenden Andere Handbücher für T90C10:

Werbung

Verfügbare Sprachen
  • DE

Verfügbare Sprachen

  • DEUTSCH, seite 26
USER GUIDE
AXIS T90C10 Fixed Dome IR-LED
AXIS T90C20 Fixed Dome IR-LED

Werbung

Inhaltsverzeichnis
loading

Inhaltszusammenfassung für Axis T90C10

  • Seite 1 USER GUIDE AXIS T90C10 Fixed Dome IR-LED AXIS T90C20 Fixed Dome IR-LED...
  • Seite 3 • Only use accessories and spare parts provided or recommended by Axis. • Do not attempt to repair the product by yourself, contact Axis or your Axis reseller for service matters. IMPORTANT! • This Axis product must be used in compliance with local laws and regulations.
  • Seite 5: Package Contents

    AXIS T90C10/T90C20 Fixed Dome IR-LED User Guide Page 5 AXIS T90C10/T90C20 Fixed Dome IR-LED This guide provides instructions for installing the AXIS T90C10/ AXIS T90C20 IR-LED with the following fixed dome cameras: • AXIS P3343-VE • AXIS P3344-VE • AXIS P3346-VE.
  • Seite 6: Hardware Overview

    Page 6 AXIS T90C10/T90C20 Fixed Dome IR-LED User Guide Hardware Overview AXIS P33 Fixed Dome camera Photocell PoE Cat 5 or 18-56 V DC Power 5-meter cable (pre-mounted) IR-LED Specifications subject to change without notice. Installation to be carried out by trained and qualified personnel.
  • Seite 7 AXIS T90C10/T90C20 Fixed Dome IR-LED User Guide Page 7 Recommendations This Axis product is delivered with the LED block facing the front and this positioning is appropriate for most installations; it is however possible to move the LED block to face other directions. See page 10.
  • Seite 8: Installation

    Page 8 AXIS T90C10/T90C20 Fixed Dome IR-LED User Guide Installation Notes: • When the IR-LED is installed, the camera cables can only be routed through the wall (not along the wall). IR-LED • The is controlled by the level of ambient light which is detected by the unit's photocell. Ensure that the photocell is not obstructed or covered.
  • Seite 9 Screw here Screw here 9. Connect the network cable from the IR-LED to the PoE switch or midspan (AXIS T90C20); or connect the DC cable to the PSU (AXIS T90C10). 10. To complete the camera installation please refer to the installation guide provided with the...
  • Seite 10 Page 10 AXIS T90C10/T90C20 Fixed Dome IR-LED User Guide AXIS T90C20 When camera lens faces left 1. Remove 2 screws located on the top on either side of the LED block. 2. Unscrew the ground wire from the screw hole to the left and attach to a screw hole to the right.
  • Seite 11 AXIS T90C10/T90C20 Fixed Dome IR-LED User Guide Page 11 AXIS T90C10 When camera lens faces left 1. Remove 2 screws located on the top on either side of the LED block and detach the LED block. 2. Move the ferrite to the center (see image below).
  • Seite 12: Specifications

    Page 12 AXIS T90C10/T90C20 Fixed Dome IR-LED User Guide Specifications AXIS T90C10 IR-LED Model AXIS T90C10 Fixed Dome IR-LED Power 18 - 56 V DC input, consumption: 13W Type 850 nm semi-covert Casing IP66- and NEMA 4X-rated, impact-resistant aluminium casing and lexan cover Angle 120°...
  • Seite 13: Troubleshooting

    AXIS T90C10/T90C20 Fixed Dome IR-LED User Guide Page 13 Troubleshooting Problem Solution IR-LED will not turn on • Check RJ45 connector is securely inserted (AXIS T90C20 IR-LED) • Check that supply voltage of PSU is 18-56V DC; ensure correct polarity (AXIS T90C10 IR-LED) •...
  • Seite 14: Mesures De Sécurité

    • Utilisez uniquement des accessoires et des pièces de rechange fournis ou recommandés par Axis. • Ne tentez pas de réparer le produit vous-même, contactez Axis ou votre revendeur Axis pour tout problème lié au service. IMPORTANT ! •...
  • Seite 15: Contenu De L'emballage

    AXIS T90C10/T90C20 DEL infrarouges pour dôme fixe Vous trouverez dans ce guide les instructions nécessaires à l’installation du système d’éclairage à DEL infrarouges AXIS T90C10 / AXIS T90C20 sur les modèles suivants de caméras à dômes fixes : • AXIS P3343-VE •...
  • Seite 16: Présentation Du Matériel

    Page 16 Guide d’utilisation de l’AXIS T90C10/T90C20 DEL infrarouges pour dôme fixe Présentation du matériel Caméra à dôme fixe AXIS P33 Cellule photoélectrique PoE Cat-5 ou alimentation 18-56 V CC Câble de 5 mètres (prémonté) DEL infrarouges Installer dans un en Ne pas regarder conti- mellement le bloc à...
  • Seite 17 Page 17 Recommandations Ce produit Axis est livré avec le bloc à DEL orienté vers l’avant. Ce positionnement est approprié pour la plupart des installations. Il est cependant possible de déplacer ce bloc pour l’orienter dans d’autres directions. Reportez-vous à la page 21.
  • Seite 18 Page 18 Guide d’utilisation de l’AXIS T90C10/T90C20 DEL infrarouges pour dôme fixe Installation Remarques : • Après l’installation des DEL infrarouges, les câbles de la caméra peuvent seulement être acheminés à travers le mur (pas le long du mur). DEL infrarouges •...
  • Seite 19 Guide d'utilisation de l’AXIS T90C10/T90C20 DEL infrarouges pour dôme fixe Page 19 3. Retirez le joint de l’un des trous latéraux ainsi que Joints des trous latéraux celui du trou arrière correspondant sur le boîtier de et du trou arrière l’unité...
  • Seite 20 9. Connectez le câble réseau du module à DEL infrarouges au commutateur ou à l’injecteur PoE (AXIS T90C20), ou raccordez le câble CC au bloc d’alimentation (AXIS T90C10). 10. Pour terminer l’installation de la caméra, reportez-vous au guide d’installation fourni avec la...
  • Seite 21 Guide d'utilisation de l’AXIS T90C10/T90C20 DEL infrarouges pour dôme fixe Page 21 AXIS T90C20 Lorsque l’objectif de la caméra est orienté vers la gauche 1. Retirez les 2 vis situées sur la partie supérieure, de part et d’autre du bloc à DEL.
  • Seite 22 Page 22 Guide d’utilisation de l’AXIS T90C10/T90C20 DEL infrarouges pour dôme fixe AXIS T90C10 Lorsque l’objectif de la caméra est orienté vers la gauche 1. Retirer les 2 vis situées sur le dessus de chaque côté du bloc de LED et de détacher le bloc de LED.
  • Seite 23: Caractéristiques Techniques

    Guide d'utilisation de l’AXIS T90C10/T90C20 DEL infrarouges pour dôme fixe Page 23 Caractéristiques techniques AXIS T90C10 DEL infrarouges pour dôme fixe Modèle AXIS T90C10 DEL infrarouges pour dôme fixe Alimentation Entrée 18 - 56 V CC, consommation : 13 W...
  • Seite 24: Dépannage

    Page 24 Guide d’utilisation de l’AXIS T90C10/T90C20 DEL infrarouges pour dôme fixe Dépannage Problème Solution Le module à DEL • Vérifiez que le connecteur RJ45 est correctement inséré. infrarouges ne s’allume (AXIS T90C20 à DEL infrarouges) pas. • Vérifiez que le bloc d’alimentation est bien sous une tension de 18-56 V CC.
  • Seite 26: Sicherheitsvorkehrungen

    Tuch. • Verwenden Sie nur Zubehör und Ersatzteile, die von Axis empfohlen bzw. bereitgestellt wurden. • Versuchen Sie nicht, das Produkt selbst zu reparieren. Wenden Sie sich bei Service-Angelegenheiten an Axis oder an Ihren Axis-Händler. WICHTIG! • Verwenden Sie dieses Axis-Produkt unter Beachtung der geltenden rechtlichen Bestimmungen.
  • Seite 27 AXIS T90C10/T90C20 Fixed-Dome-IR-LED Bedienungsanleitung Seite 27 AXIS T90C10/T90C20 Fixed-Dome-IR-LED In dieser Anleitung wird die Anbringung des AXIS T90C10/ AXIS T90C20 IR-LED-Strahlers an folgende unbewegliche Dome-Kameras beschrieben: • AXIS P3343-VE • AXIS P3344-VE • AXIS P3346-VE. Anweisungen zur Installation der Kamera finden Sie in der Installationsanleitung zu Ihrer Kamera.
  • Seite 28: Hardwareübersicht

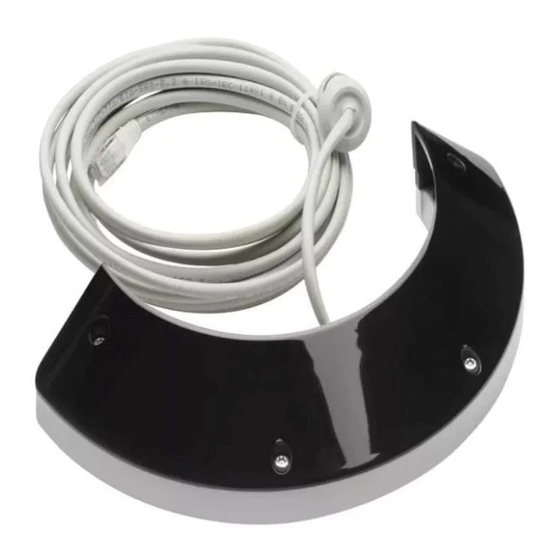
    Seite 28 AXIS T90C10/T90C20 Fixed-Dome-IR-LED Bedienungsanleitung Hardwareübersicht AXIS P33 Fixed-Dome-Kamera Fotozelle PoE-Cat 5- oder 18-56 V Gleichstrom- Kabel (5 Meter) (vormontiert) IR-LED Zur Installation in gut Bitte nicht direkt in die belüfteten Bereichen! Lampe schauen Die Spezifikationen können jederzeit ohne Vorankündigung geändert werden.
  • Seite 29 AXIS T90C10/T90C20 Fixed-Dome-IR-LED Bedienungsanleitung Seite 29 Empfehlungen Der im Axis Produktpaket enthaltene LED-Block ist nach vorne ausgerichtet. Diese Position eignet sich für die meisten Installationen. Sie können den LED-Block jedoch auch in andere Positionen ausrichten. Siehe Seite 33. 20-30m 120°...
  • Seite 30 Seite 30 AXIS T90C10/T90C20 Fixed-Dome-IR-LED Bedienungsanleitung Installation Hinweise: • Wenn der IR-LED-Strahler montiert ist, können die Kamerakabel nur durch und nicht entlang der Wand verlegt werden. IR-LED-Strahler • Der wird durch das Umgebungslicht gesteuert, das von der Fotozelle des Geräts erkannt wird.
  • Seite 31 AXIS T90C10/T90C20 Fixed-Dome-IR-LED Bedienungsanleitung Seite 31 3. Entfernen Sie zur Verkabelung die Dichtung aus Dichtungen in den seitlichen einem Seitenloch und dem entsprechenden und rückseitigen Kabellöchern rückseitigen Kabelloch des Kameragehäuses. (Das Kabel des IR-LED-Strahlers muss durch das linke rückseitige Kabelloch im Kameragehäuse geführt werden).
  • Seite 32 Hier drehen Hier drehen 9. Schließen Sie das Netzwerkkabel am IR-LED und am PoE-Switch bzw. Midspan (AXIS T90C20) an oder verbinden Sie das Gleichstromkabel mit der Stromversorgungseinheit (AXIS T90C10). 10. Schließen Sie die Installation der Kamera gemäß den Anweisungen in der Installationsanleitung...
  • Seite 33 AXIS T90C10/T90C20 Fixed-Dome-IR-LED Bedienungsanleitung Seite 33 AXIS T90C20 Wenn das Kameraobjektiv nach links zeigt: 1. Entfernen Sie die zwei Schrauben auf beiden Seiten auf dem LED-Block. 2. Lösen Sie den Erdungsdraht aus dem Schraubenloch links und befestigen Sie ihn an einem Schraubenloch auf der rechten Seite.
  • Seite 34 Seite 34 AXIS T90C10/T90C20 Fixed-Dome-IR-LED Bedienungsanleitung AXIS T90C10 Wenn das Kameraobjektiv nach links zeigt: 1. Entfernen Sie die zwei Schrauben auf beiden Seiten auf dem LED-Block und entfernen danch den LED-Block. 2. Bewegen Sie den Ferrit in die Mitte (siehe Bild unten).
  • Seite 35: Spezifikationen

    AXIS T90C10/T90C20 Fixed-Dome-IR-LED Bedienungsanleitung Seite 35 Spezifikationen AXIS T90C10 IR-LED Modell AXIS T90C10 Fixed-Dome-IR-LED Betrieb Netzeingang: 18 - 56 V Gleichstrom, Stromverbrauch: 13 W 850 nm halb verdeckt Gehäuse IP66- und NEMA 4X-zertifiziert, schlagfest Aluminiumgehäuse mit Abdeckung aus Lexan Winkel 120°...
  • Seite 36: Fehlerbehebung

    (AXIS T90C20 IR-LED) • Stellen Sie sicher, dass die SVE 18 bis 56 V Gleichstrom liefert und die richtige Polarität eingestellt ist (AXIS T90C10 IR-LED) • Stellen Sie die Fotozelle ein (+ erhöht die Empfindlichkeit; - verringert die Empfindlichkeit) •...
  • Seite 38 • Utilizzare solo accessori e parti di ricambio forniti o consigliati da Axis. • Non tentare di riparare da soli il prodotto, ma contattare Axis o il rivenditore Axis per qualsiasi argomento relativo all'assistenza tecnica. IMPORTANTE! • Questo prodotto Axis deve essere utilizzato in conformità alle leggi e alle regolamentazioni locali.
  • Seite 39: Contenuto Della Confezione

    Guida per l'utente del LED IR per cupola fissa AXIS T90C10/T90C20 Pagina 39 LED IR per cupola fissa AXIS T90C10/T90C20 Questa guida fornisce le istruzioni per installare il LED IR per AXIS T90C10/ AXIS T90C20 con le seguenti telecamere fisse a cupola: •...
  • Seite 40: Panoramica Dell'hardware

    Pagina 40 Guida per l'utente del LED IR per cupola fissa AXIS T90C10/T90C20 Panoramica dell'hardware Telecamera a cupola fissa AXIS P33 Fotocellula PoE Cat 5 o alimentazione 18-56 V CC Cavo da 5 metri (pre-montato) LED IR Non fissare lo sguardo...
  • Seite 41 Guida per l'utente del LED IR per cupola fissa AXIS T90C10/T90C20 Pagina 41 Raccomandazioni Questo prodotto Axis viene fornito con il blocco LED sulla parte anteriore e questo posizionamento è adatto alla maggior parte delle installazioni; è comunque possibile spostare il blocco LED nelle altre direzioni. Vedere pagina 45.
  • Seite 42: Installazione

    Pagina 42 Guida per l'utente del LED IR per cupola fissa AXIS T90C10/T90C20 Installazione Note: • Quando il LED IR è installato, i cavi della telecamera possono essere fatti passare solo attraverso la parete (non lungo la parete). LED IR •...
  • Seite 43 Guida per l'utente del LED IR per cupola fissa AXIS T90C10/T90C20 Pagina 43 3. Rimuovere la guarnizione da uno dei fori laterali e dal foro posteriore corrispondente nell’involucro Guarnizioni nei fori laterali e posteriori dell’unità, per il cablaggio. (Il cavo del LED IR deve entrare nel foro sulla sinistra dell’involucro...
  • Seite 44 Pagina 44 Guida per l'utente del LED IR per cupola fissa AXIS T90C10/T90C20 9. Collegare al cavo di rete dal LED IR allo switch o midspan PoE (AXIS T90C20); oppure collegare il cavo CC alla PSU (AXIS T90C10). 10. Per completare l'installazione della telecamera, fare riferimento alla guida per l'installazione...
  • Seite 45 Guida per l'utente del LED IR per cupola fissa AXIS T90C10/T90C20 Pagina 45 AXIS T90C20 Quando l’obiettivo della telecamera è rivolto a sinistra 1. Rimuovere le 2 viti situate sulla parte superiore di ciascun lato del blocco dei LED. 2. Svitare il cavo di terra dal foro della vite sulla sinistra e collegarlo al foro filettato sulla destra.
  • Seite 46 Pagina 46 Guida per l'utente del LED IR per cupola fissa AXIS T90C10/T90C20 AXIS T90C10 Quando l’obiettivo della telecamera è rivolto a sinistra 1. Rimuovere le 2 viti situate sulla parte superiore di ciascun lato del blocco dei LED e staccare il blocco dei LED.
  • Seite 47 Guida per l'utente del LED IR per cupola fissa AXIS T90C10/T90C20 Pagina 47 Specifiche LED IR per AXIS T90C10 Modello LD IR per cupola fissa AXIS T90C10 Alimentazione Ingresso 18 - 56 V CC, consumo: 13W Tipo 850 nm, semi-discreto...
  • Seite 48: Risoluzione Dei Problemi

    Pagina 48 Guida per l'utente del LED IR per cupola fissa AXIS T90C10/T90C20 Risoluzione dei problemi Problema Soluzione Il LED IR non si accende • Controllare che il connettore RJ45 sia inserito saldamente (LED IR per AXIS T90C20) • Controllare che la tensione di alimentazione della PSU sia 18-56V CC;...
  • Seite 50: Medidas Preventivas

    Lea atentamente la Guía del usuario antes de instalar el producto. Guarde la Guía del usario para futuras consultas. ¡PRECAUCIÓN! • A la hora de transportar el producto Axis, utilice el embalaje original o uno equivalente para no dañar el producto. • Guarde el producto Axis en un entorno seco y ventilado.
  • Seite 51: Contenido Del Paquete

    Guía del usuario de LED infrarrojo AXIS T90C10/T90C20 para cámara domo fija Página 51 LED infrarrojo AXIS T90C10/T90C20 para cámara domo fija Esta guía proporciona instrucciones acerca de la instalación de AXIS T90C10/ AXIS T90C20 con LED infrarrojo con las siguientes cámaras domo fijas: • AXIS P3343-VE •...
  • Seite 52: Presentación Del Hardware

    Página 52 Guía del usuario de LED infrarrojo AXIS T90C10/T90C20 para cámara domo fija Presentación del hardware Cámara domo fija AXIS P33 Célula fotoeléctrica Alimentación PoE Cat 5 o 18-56 V CC Cable de 5 metros (preinstalado) LED infrarrojo Installar en una zona...
  • Seite 53 Página 53 Recomendaciones Este producto de Axis se entrega con el bloque de LED mirando hacia el frente y esta posición es adecuada para la mayoría de las instalaciones; sin embargo, es posible mover el bloque de LED hacia otras direcciones. Consulte la página 57.
  • Seite 54: Instalación

    Página 54 Guía del usuario de LED infrarrojo AXIS T90C10/T90C20 para cámara domo fija Instalación Notas: • Una vez instalado el LED infrarrojo, sólo podrá guiar los cables de la cámara a través de la pared (no a lo largo de la pared).
  • Seite 55 Guía del usuario de LED infrarrojo AXIS T90C10/T90C20 para cámara domo fija Página 55 3. Para realizar el cableado, retire la junta de uno de los Juntas en orificios laterales orificios laterales y del orificio trasero y orificios traseros correspondiente en la carcasa de la unidad. (El cable para el LED infrarrojo debe entrar en el orificio en la parte izquierda de la carcasa de la unidad.)
  • Seite 56 Atornille aquí Atornille aquí 9. Conecte el cable de red desde el LED infrarrojo al switch o midspan PoE (AXIS T90C20); o conecte el cable de CC a la fuente de alimentación (AXIS T90C10). 10. Para finalizar la instalación de la cámara, consulte la guía de instalación proporcionada con la...
  • Seite 57 Guía del usuario de LED infrarrojo AXIS T90C10/T90C20 para cámara domo fija Página 57 AXIS T90C20 Cuando el objetivo de la cámara está orientado hacia la izquierda 1. Retire 2 tornillos ubicados en la parte superior en el lado del bloque de LED.
  • Seite 58 Página 58 Guía del usuario de LED infrarrojo AXIS T90C10/T90C20 para cámara domo fija AXIS T90C10 Cuando el objetivo de la cámara está orientado hacia la izquierda 1. Retire 2 tornillos ubicados en uno de los lados de la parte superior del bloque de LED y desmóntelo.
  • Seite 59: Especificaciones

    Guía del usuario de LED infrarrojo AXIS T90C10/T90C20 para cámara domo fija Página 59 Especificaciones AXIS T90C10 con LED infrarrojo Modelo Cámara domo fija AXIS T90C10 con LED infrarrojo Alimentación Entrada 18-56 V CC, consumo: 13 W Tipo 850 mm semicubierto...
  • Seite 60: Solución De Problemas

    Página 60 Guía del usuario de LED infrarrojo AXIS T90C10/T90C20 para cámara domo fija Solución de problemas Problema Solución El LED infrarrojo no se • Compruebe que el conector RJ45 está insertado de forma segura enciende (AXIS T90C20 con LED infrarrojo) •...
  • Seite 63 User Guide Ver.1.1 AXIS T90C10/T90C20 Fixed Dome IR-LED Printed: June 2011 © Part No. 43109 Axis Communications AB, 2011...

Diese Anleitung auch für:

T90c20

Inhaltsverzeichnis