vogel's NEXT 7356 Montageanleitung

Verwandte Anleitungen für vogel's NEXT 7356


Inhaltszusammenfassung für vogel's NEXT 7356
- Seite 1 VOGEL'S SUPPORT TV NEXT 7356 MANUEL D'UTILISATION PROLINE REFRIGERATEUR BRF40 Besoin d'aide ? Rendez-vous sur votre communauté https://sav.darty.com...
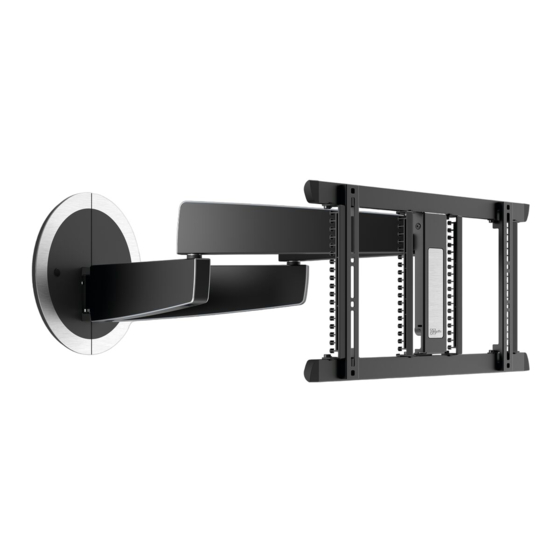
- Seite 2 Parts list NEXT 7356 5 mm /13/64" 10 mm /25/64" 4 mm /5/32" no. 4 no.13...
- Seite 3 Warning Avvertenze Предупреждение Avertisment Please read the warning and mounting instructions carefully before using this product. Be aware Leggere attentamente le avvertenze e le istruzioni di montaggio prima di usare questo prodotto. Необходимо внимательно прочитать предупреждения и инструкции по монтажу перед Citiţi cu atenţie avertismentul şi instrucţiunile de montare înainte de a utiliza acest produs.
-
Seite 4: Need Help
Need help? Scan the QR-code to find the installation movie on NEXT 7356 YouTube: Mounting instructions Инструкция по сборке и установке Montageanleitung CZE Návod k montáži Consignes d’installation Návod na montáž Montagevoorschrift HU Szerelési előírás Instrucciones de montage Montaj kılavuzu Istruzioni di montaggio RO Instrucţiuni de montaj... - Seite 5 Important Before mounting the wall mount, first read the warnings at the back of the supplied parts list (separate card). - Önemli Duvar montesini monte etmeden önce, (ayrı kart olarak) DE - Wichtig Lesen Sie vor der Montage des Wandhalters zuerst die verilen parça listesinin arkasında bulunan uyarıları...
- Seite 6 Check the mounting hole pattern on the screen. If necessary, adapt the width of the frame (A). - Prüfen Sie das Lochmuster am Bildschirm. Passen Sie nötigenfalls die Breite des Rahmens (A) an. CZE - Zkontrolujte montážní otvory na obrazovce. V případě nutnosti přizpůsobte šířku - Contrôlez le gabarit de montage de l’écran.
- Seite 7 Optional Mount the frame (A) onto the screen. Refer to the user manual of your screen for the correct bolt size (G). - Bringen Sie den Rahmen (A) am Bildschirm an. CZE - Upevněte rám (A) k obrazovce. Die richtige Schraubengröße (G) finden Sie im Benutzerhandbuch Ihres Bildschirms. Správnou velikost šroubů...
- Seite 8 Centerline Wallmount Dimension is only Bo om Template for drilling applicable when Hole in wall NEXT 7356 Vogel’s Holding BV 2016 © all rights reserved. Bottom interface interface Cable Column NEXT 7840 is in alled. Determine where the wall mount (C) should be •...
- Seite 9 Remove the covers (D). - Entfernen Sie die Abdeckungen (D). - Déposez les capots (D). - Verwijder de afdekkappen (D). - Retire las cubiertas embellecedoras (D). - Togliere i coperchi (D). - Retire as coberturas (D). - Αφαιρέστε τα καλύμματα (D). - Ta bort skydden (D).
- Seite 10 +/- 0.5˚ ø 5mm 20mm/0.8" ø 13/64" 80mm/3.2" ø 10mm 20mm/0.8" ø 25/64" Use the drilling template to drill the holes. - Verwenden Sie die Bohrschablone zum Bohren der Löcher. - Utilisez le gabarit de perçage pour forer les trous. - Gebruik de sjabloon om de gaten op de juiste plaats te boren.
- Seite 11 +/- 0.5˚ 45mm/1.8" ø 4mm ø 5/32" Use the drilling template to drill the holes. Make sure to drill the smallest hole (X) in the middle of the stud. - Verwenden Sie die Bohrschablone zum Bohren der Löcher. Achten Sie darauf, CZE - Pomocí...
- Seite 12 Screw the wall mount (C) onto the wall. Make sure to start with the smallest hole (X). - Schrauben Sie den Wandhalter (C) an die Wand. CZE - Nástěnnou jednotku (C) namontujte na stěnu. Achten Sie darauf, mit dem kleinsten Loch (X) zu beginnen. V každém případě...
- Seite 13 Screw the wall mount (C) onto the wall. Make sure to start with the smallest hole (X). - Schrauben Sie den Wandhalter (C) an die Wand. CZE - Nástěnnou jednotku (C) namontujte na stěnu. Achten Sie darauf, mit dem kleinsten Loch (X) zu beginnen. V každém případě...
- Seite 14 Place the covers (D) back. - Bringen Sie die Abdeckungen (D) wieder an. - Remettez les capots (D) en place. - Plaats de afdekkappen (D) terug. - Vuelva a colocar las cubiertas embellecedoras (D). - Rimontare i coperchi (D). - Volte a colocar as coberturas (D). - Επανατοποθετήστε...
-
Seite 15: Break Out The Tab (X) When Using In Combination With Cable Column
• Install the cable cover wall (E). Break out the tab (X) when using in combination with Cable Column NEXT 7840. - Installieren Sie die Kabelkanalwand (E). Brechen Sie bei Verwendung in Kombina- - Установите кабель-канал на стене (E). Отогните петельку (X) при tion mit der Kabelsäule NEXT 7840 die Lasche (X) heraus. - Seite 16 8.1 Remove the thumbscrew. - Entfernen Sie die Flügelschraube. - Enlevez la vis papillon. - Verwijder de duimschroef. - Retira el tornillo de pulgar. - Rimuovere la vite a testa zigrinata. - Retire o parafuso borboleta. - Αφαιρέστε το χειροκοχλία. - Ta bort tumskruven.
- Seite 17 8.2 Hook the TV onto the wall mount (C). - Haken Sie das Fernsehgerät am Wandhalter (C). - Accrochez le téléviseur dans le support mural (C). - Haak de tv op de wandsteun (C). - Enganche la televisión en el soporte de pared (C). - Agganciare la TV sul fissaggio a parete (C).
- Seite 18 8.3 Level the screen and tighten the thumb screw. - Richten Sie den Bildschirm waagerecht aus und ziehen Sie die Flügelschraube an. - Réglez le niveau de votre écran et serrez la vis papillon. - Hang het scherm recht en draai de duimschroef aan. - Nivela la pantalla y ajusta el tornillo de pulgar.
-
Seite 19: Power Cable
Optional Power cable AV cable(s) 9.1 Connect the power cable and the AV cable(s) to the TV. Guide the cables through the velcro. - Schließen Sie das Netzkabel und das/die AV-Kabel am Fernseher an. CZE - Připojte silový kabel a AV kabel(kabely) k TV. Ved´te kabely přes Velcro. Führen Sie die Kabel durch den Klettverschluss. - Seite 20 9.2 Place the cable cover plate (F). - Bringen Sie die Kabelkanalplatte an (F). - Installez la plaque du cache fil (F). - Plaats de plaat van de kabelgoot (F). - Coloca la placa de la canalización de cables (F). - Posizionare la piastra del copricavo (F).
- Seite 21 10.1 Slide the covers (X) from both arms. 10.2 Guide your other cables through the cable ties (Z) in the left arm. Do not tighten the cable ties yet! - Schieben Sie die Abdeckungen (X) von beiden Armen. - Führen Sie die anderen Kabel durch die Kabelbinder (Z) im linken Arm. Ziehen Sie die Kabelbinder noch nicht fest! - Faites pivoter les capots (X) des deux bras.
- Seite 22 10.3 Connect the power cable (w) to the socket in the right arm. - Schließen Sie das Netzkabel (w) an die Steckdose im rechten Arm an. - Connectez le câble d’alimentation (w) à la prise dans le bras gauche. - Sluit het netsnoer (w) aan op de aansluiting in de rechtersteun. - Conecte el cable de alimentación (w) a la toma del brazo derecho.
- Seite 23 10.4 Make sure that the TV can rotate freely with the cables attached. 0.5 If the TV can rotate freely, tighten the cable ties. - Vergewissern Sie sich, dass das Fernsehgerät bei angeschlossenen Kabeln frei bewegt - Wenn das Fernsehgerät frei bewegt werden kann, ziehen Sie die werden kann.
- Seite 24 10.6 Cut the cable ties to the correct length. 10.7 Slide the covers back on both arms. - Schneiden Sie die Kabelbinder auf die richtige Länge ab. - Schieben Sie die Abdeckungen wieder auf beide Arme. - Coupez les serre-câbles à la longueur correcte. - Repositionnez les capots sur les deux bras.
- Seite 25 • For tilt correction, turn knob X . - Wenn Sie die Neigung korrigieren möchten, drehen Sie Knopf X. - Corrigez l’inclinaison à l’aide du bouton rotatif X. - Draai aan knop X voor kantelcorrectie. - Para corregir la inclinación, gira el mando X. - Per correggere la pendenza, ruotare la manopola X.
- Seite 26 1 1.1 Connect the wall mount to a wall socket. 1 1.2 Turn on the TV. • Connecting your device to an electric wall socket. - Schließen Sie den Wandhalter an der Wandsteckdose an. - Schalten Sie den Fernseher ein. - Connectez le support mural à...
- Seite 27 Back Se ings Manual remote Wall Right Front MotionMount Controller Connect your MotionMount Save position Support > 1 1.3 Set the viewing position manually. 1 1.3 Download the app and use the app to set the viewing position. For more information, see next pages. - Stellen Sie die Sichtposition manuell ein.
-
Seite 28: When The Initial Viewing Position Is Set In Step
1 1.3 Download the app and use the app to set the viewing • When the initial viewing position is set in step 1 1.3: position. For more information, see next pages. - the TV will automatically move towards the wall when it is turned off. - the TV will automatically move towards the initially set viewing position - Stáhněte si aplikaci a použijte ji k nastavení... - Seite 29 - Quando a posição de visualização inicial está definida no passo 1 1.3: - Adım 1 1.3’te ilk izleme pozisyonu ayarlandığında: - o televisor irá deslocar-se automaticamente na direção da parede quando - televizyon kapandığı zaman otomatik olarak duvara doğru ilerleyecektir. for desligado.
- Seite 30 • For extra functionality and extra/advanced settings, download the Motion Mount app. - Direct control for left/right, and forward/backward movement. - Up to 10 programmable preset positions. - Чтобы получить дополнительную функциональность и более подробные - Laden Sie sich die MotionMount-App für Zusatzfunktionen und extra/erweiterte рекомендации...
- Seite 31 • Download the app at: - www.vogels.com/motionmount-ios for iOS. - www.vogels.com/motionmount-android for Android. - Laden Sie die App hier herunter: - Uygulamayı aşağıdaki adresten indirebilirsiniz: - www.vogels.com/motionmount-ios für iOS. - iOs için www.vogels.com/motionmount-ios. - www.vogels.com/motionmount-android für Android. - Android için www.vogels.com/motionmount-android. - Vous pouvez télécharger l’app sur : - Descărcați aplicația de pe: - www.vogels.com/motionmount-ios for iOS.
- Seite 32 • If the TV does not move automatically when it is turned ON/ OFF, then change the power setting. See ‘Power management’ in the app. - Wenn sich der Fernseher nicht automatisch bewegt, wenn er EIN/AUS ist, ändern - Ако телевизорът не се придвижи автоматично, когато се ВКЛЮЧИ/ИЗКЛЮЧИ, Sie die Leistungseinstellung.
-
Seite 33: Garantiebedingungen
Guarantee terms and conditions Soll die Garantie in Anspruch genommen werden, muss das Poids maximal de l’écran TV: 30 kg / 66 lbs Congratulations on the purchase of this Vogel’s product! The Produkt zusammen mit dem Original-Kaufbeleg (Rechnung, VOGEL’S, HONDSRUGLAAN 93, 5628 DB EINDHOVEN, PAYS-BAS product you now have in your possession is made of durable Kassenzettel oder Quittung) an Vogel’s eingeschickt werden. - Seite 34 Όροι και προϋποθέσεις εγγύησης Vogel’s garantiza que durante el período de garantía de un • Se il difetto è conseguenza di cause esterne al prodotto producto, reparará los fallos que se produzcan a causa de quali,per esempio, fulmine, allagamento, incendio, Συγχαρητήρια...
-
Seite 35: Warunki Gwarancyjne
Сроки и условия гарантии Vogel’s garanti upphör att gälla i följande situationer: Společnost Vogel’s zaručuje, že pokud se během záruční doby • Om produkten inte har installerats eller använts enligt Благодарим Вас за приобретение изделия компании Vogel’s! vyskytnou u výrobku poruchy způsobené vadami ve výrobním anvisningarna;... -
Seite 36: Garanciális Feltételek
• Ak porucha vznikla dôsledkom vonkajšej príčiny (mimo Vogel’s, satın alınan ürünü garanti müddeti içinde üretim • dacă produsul este utilizat pentru un echipament diferit de výrobku), ako napríklad blesk, voda, oheň, odretie, ve/veya malzeme eksikliklerden doğan hatalarda kendi cel menţionat pe sau în ambalaj. vystavenie extrémnym teplotám, meteorologické... - Seite 37 次に該当する場合Vogel’s 社の保証は無効となります。 Гаранциите на Vogel’s, че ако през гаран- ционния срок на • お買い上げの製品が使用説明書の説明に沿って設置 ・ 使用されてい даден продукт възникнат неизправности, дължащи се на WEEE disposal instructions なかった場 合。 дефекти в Do not dispose of this device, the remote control or its battery •...
- Seite 38 電子および電子機器の廃棄について Instruções de eliminação de resíduos de equipamentos Pokyny na likvidáciu zariadení podľa smernice WEEE 本デバイス、 およびリモートコントロール、 またはその電 池類を、 無分別の eléctricos e electrónicos Toto zariadenie, diaľkové ovládanie ani batériu nevyhadzujte do 家庭ごみとし て排出しないでください。 Não elimine este dispositivo, o comando à distância e a pilha netriedeného domového odpadu.
- Seite 39 Loudspeaker solutions Universal tablet mounts Sound bar solutions Cable solutions & multi AV supports More from Vogel’s www.vogels.com...