Inhaltsverzeichnis
Werbung
Verfügbare Sprachen
Verfügbare Sprachen
Quicklinks
Werbung
Inhaltsverzeichnis

Verwandte Anleitungen für NAMCO TEKKEN 5 Super DX


Inhaltszusammenfassung für NAMCO TEKKEN 5 Super DX
-
Seite 1: Operators Manual
TEKKEN 5 SUPER DX OPERATORS MANUAL T IS THE RESPONSIBILITY OF THE OPERATOR TO MAINTAIN CUSTOMER SAFETY AT ALL TIMES AND IT IS IMPERATIVE THAT THE DETAILS SET OUT IN THIS MANUAL ARE FOLLOWED PRECISELY Part No 90500157 Issue 1... - Seite 2 NOTICE is a term to describe a copyright protection technology created by Sony Group. This mark does not necessarily guarantee compatibily with other products bearing the “MagicGate” trademark. is a trademark of Sony Corporation. est une terme décrivant une technique de protection de copyright crééé...
-
Seite 3: Inhaltsverzeichnis
Contents OPERATORS MANUAL ........................1 GENERAL SAFETY CONSIDERATIONS ..................4 ALLGEMEINE SICHERHEITSHINWEISE ..................6 GENERELLE SIKKERHEDSOVERVEJELSER ................8 CONSIDERACIONES GENERALES DE SEGURIDAD.............. 10 CONSIGNES GENERALES DE SECURITE ................12 ΕΞΕΤΑΣΗ ΓΕΝΙΚΗΣ ΑΣΦΑΛΕΙΑΣ ....................14 CONSIDERAZIONI GENERALI SULLA SICUREZZA ..............16 VANLIGE SIKKERHETSTILTAK ....................18 ALGEMENE VEILIGHEIDSOVERWEGINGEN ................20 AVISOS DE PERIGO ........................ -
Seite 4: Safety Warning
This equipment is for indoor use only and should only be used for the purpose intended. Namco Europe Ltd. bears no responsibility for accidents, injury or damage resulting from unauthorized changes to, or improper use of this equipment. -
Seite 5: Moving The Equipment
Do not make any alteration to this equipment without prior approval. Doing so could cause unforeseeable danger. Only parts specified by Namco Europe Ltd. should be used when replacing parts. (Including screws) Ensure that the power to the equipment is turned OFF before commencing any maintenance work. -
Seite 6: Allgemeine Sicherheitshinweise
(Suchsysteme), die Weitergabe oder sonstiges Kopieren für den gewerblichen und privaten Gebrauch sind untersagt und bedürfen der vorherigen Genehmigung durch NAMCO EUROPE LIMITED. Die informationen in diesem Handbuch entsprechen den Tatsachen bei Drucklegung. NAMCO EUROPE LIMITED behält sich jedoch das Recht zu Änderungen ohne vorherige Bekanntgabe vor. -
Seite 7: Aus- Und Einbau Von Komponenten Und Teilen
Es dürfen keierlei Veränderungen ohne vorherige Genehmigung am Gerät vorgenommen werden. Zuwiderhandlungen stellen eine Gefahrenquelle dar. Für die Repartur dürfen nur Originalersatzteile (incl. Schrauben) von NAMCO EUROPE LTD. verwendet werden. Vor Beginn aller Wartungsarbeiten (Fehlersuche, Reparaturen etc.) muß der Netzstecker gezogen werden. -
Seite 8: Generelle Sikkerhedsovervejelser
Denne rnaskine er kun til indendørs brug og bør kun bruges til det beregnede formål. Namco Ltd. bærer intet ansvar for ulykker eller skader som er et resultat af uautoriserede ændringer eller fejlagtig brug af denne rnaskine. - Seite 9 Justeringer eller vedligehold af denne maskine bør kun udføres af kvalificeret personale. Skift ikke noget på maskinen uden godkendelse, det kan føre til uforudset fare. Der bør kun bruges dele specificeret af Namco Europe Limited når der skiftes eller repareres dele (inklusiv skruer).
-
Seite 10: Consideraciones Generales De Seguridad
NAMCO EUROPE LIMITED. Si bien la información contenida en este manual se da de buena fe y es correcta en el momento de su impresión, NAMCO EUROPE LIMITED se reserva el derecho de hacer cambios y alteraciones sin previo aviso. - Seite 11 No realice alteraciones en esta máquina sin aprobación previa. De hacerlo así, pueden causar peligros imprevisibles. Sólo deben usarse las partes especificadas por Namco Europe Ltd. para reparaciones o reemplazos (incluidos los tornillos). Asegúrese de que la máquina está desconectada antes de comenzar cualquier trabajo de mantenimiento (reparaciones, resolución de problemas, etc.)
-
Seite 12: Consignes Generales De Securite
Malgré le fait que les informations contenues dans ce manuel soient données de bonne foi et étaient actualisées au moment de leur impression, NAMCO EUROPE LIMITED se réserve le droit de procéder à des changements ou à des modifications sans avis préliminaire. - Seite 13 Ne pas apporter de modifications sur cette machine sans autorisation préalable, faute de quoi cela pourrait entraîner un danger. Seules les pièces détachées Namco Europe Ltd. doivent être utilsées pour le remplacement ou la réparation de pièces (y compris les vis) S’assurer que l’interrupteur soit sor OFF avant de commencer tout travail de maintenance (localisation...
-
Seite 14: Ο∆Ηγιεσ Ασφαλειασ
Αυτ το µηχάνηµα είναι για χρήση µ νο σε εσωτερικ χώρο και θα πρέπει να χρησιµοποιείται µ νο για τους λ γους για τους οποίους κατασκευάστηκε. Η εταιρεία NAMCO Ltd δεν φέρει καµία ευθύνη για ατυχήµατα , πληγές ή καταστροφές που µπορεί να προκληθούν απ αλλαγές χωρίς άδεια σε ή εισαγωγείς αυτού του µηχανήµατος. - Seite 15 ∆εν πρέπει να γίνονται µετατροπές στα µηχανήµατα ωρίς έγκριση . Μπορεί να προκληθεί απρ βλεπτος κίνδυνος. Μ νο µέρη που διευκρινίζονται απ την εταιρεία NAMCO EUROPE Ltd µπορούν να χρησιµοποιηθούν για αντικατάσταση ή επιδι ρθωση. (συµπεριλαµβάνοντε και οι βίδες) Να είναι σίγουρα κλειστ το ρεύµα πριν οποιαδήποτε δουλειά στο µηχάνηµα.
-
Seite 16: Considerazioni Generali Sulla Sicurezza
Quest macchina deve essere usata solo in interni e deve essere usata solo per gli scopi per cui è progettata. Namco Europe Ltd non si assume responsabilità per incidenti, ferite o damni risultanti da cambiamenti non autorizzati o da uso improprio della macchina. - Seite 17 Quando si rimpiazza o si riparano delle parti (incluse le viti) si possono usare solo parti approvate dalla Namco Europe Ltd. Assicurarsi che la macchina sia SPENTA prima di incominciare qualsiasi lavoro di manutenzione (guasti, riparazioni etc.) Se state per iniziare un lavoro non descritto in questo manuale, contattate il vostro distributore per instruzioni poichè...
-
Seite 18: Vanlige Sikkerhetstiltak
NAMCO EUROPE LIMITED. Da informasjonen i denne manualen er gitt i god tru og var korrekt da den ble utgitt, tillegger NAMCO EUROP LIMITED seg retten til å lage forandringer uten varsel. - Seite 19 Installasjon, service, justering eller rutine vedlikehold skal bare utføres av kvalifiserte personer. Ikke lag noen forandringer på denne maskinen uten godkjenning. Dette kan medføre uforutsette farer. Bare deler spesifisert av Namco Europe Ltd. skal benyttes ved utskifting eller reparasjon av deler (dette gjelder også skruer).
-
Seite 20: Algemene Veiligheidsoverwegingen
Deze machine is alleen bedoeld voor gebruik binnenshuis en dient alleen gebruikt te worden voor bedoelde doeleinden. Namco Ltd. is niet verantwoordelijk voor ongelukken, letsel of schade die voortkomt uit ongeoorloofde veranderingen aan of onjuist gebruik van deze machine. - Seite 21 Maak geen veranderingen aan deze machine zonder goedkeuring vooraf. Dit kan onvoorzien gevaar opleveren. Alleen onderdelen die door Namco Europe Ltd. zijn gespecificeerd dienen gebruikt te worden bij het vervangen of repareren van onderdelen (incl. schroeven). Zorg ervoor dat de machine UITgeschakeld is voordat er enig onderhoudswerk wordt verricht (troubleshooting, reparaties etc.)
-
Seite 22: Avisos De Segurança
NAMCO EUROPA LIMITADA. A informação contida neste manual foi fornecida de boa fé, sendo rigorosa na altura da sua publicação. A NAMCO EUROPA LIMITADA, reserva-se o direito de proceder a mudanças e alterações sem qualquer aviso prévio. - Seite 23 A substituição ou reparação de peças deverá ser feita apenas com peças de origem ou especificadas pela “Namco Europa Ltd.” (incluindo parafusos) Certifique-se que a maquina se encontra desligada sempre que iniciar qualquer tipo de trabalho de manutenção.
-
Seite 24: Allmänna Säkerhetsbeaktanden
återvinningssystem, översändas eller på annat sätt kopieras för offentlig eller privat användning, utan tillstånd från NAMCO EUROPE LIMITED. Eftersom informationen i denna manual lämnas ut i god tro och var korrekt när den trycktes, reserverar sig NAMCO EUROPE LIMITED för ändringar. - Seite 25 Gör inga ändringar på denna maskin utan ett godkännande i förväg. Detta kan förorsaka oförutsägbar fara. Endast delar som är specificerade av Namco Europe Ltd. ska användas vid utbyten eller reparation av delar (inklusive skruvar). Försäkra dig om att strömmen är avstängd innan underhållsarbete påbörjas (felsökning, reparationer etc.)
-
Seite 26: Turvallisuusohjeet
Tästä julkaisusta ei saa ottaa missään muodossa kopioita yksityis- tai julkiseen käyttöön ilman NAMCO EUROPE LIMITED:in lupaa. Tässä ohjekirjassa olevat tiedot pitävät julkaisuhetkellä paikkansa. NAMCO EUROPE LIMITED:illä on kuitenkin oikeus muutoksiin ilman erillistä ilmoitusta. Tämä laite on valmistettu EC direktiivien mukaisesti. Se on testattu ja todettu noudattavan seuraavia direktiivejä: 89/336/EEC ja 72/23/EEC (EN55014-1, EN55014-2 ja EN 60335-2-82 standardit). - Seite 27 Tälle laitteelle ei saa tehdä mitään hyväksymättömiä muutoksia. Se voi aiheuttaa ennalta-arvaamattomia vaaroja. Vain Namco Europe Ltd:n määrittelemiä varaosia saa käyttää vaihtaessasi tai korjatessasi osia. (sisältäen ruuvit). Varmista, että laite on kytketty POIS PÄÄLTÄ ennen työn aloittamista.
-
Seite 28: Specifications
SPECIFICATIONS 230Volts AC INPUT VOLTAGE:- AMBIENT OPERATING +5°C to +35°C TEMPERATURE GPM-51A Projection Monitor MONITOR:- COIN ACCEPTOR:- Game Mars CashFlow 340 - Single Channel Card Read/Write (where fitted) Mars CashFlow 330 Asahi Seiko CD-200 - 230mm CARD READ/WRITER (Where Fitted):- DIMENSIONS:- Assembled 1230(w) -
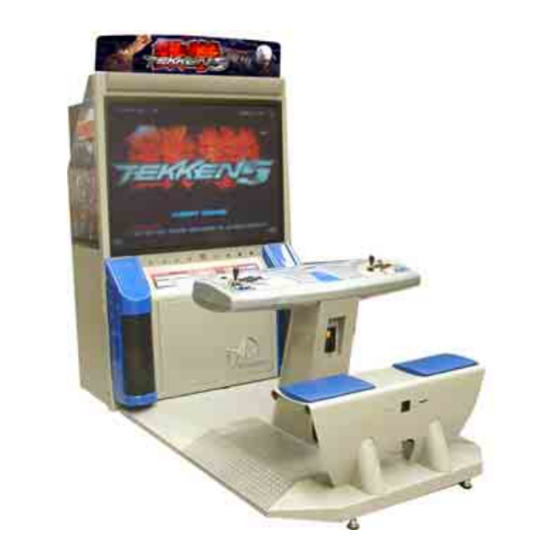
Seite 29: Main Components
MAIN COMPONENTS Header Projection Monitor Player Controls Card Read/Write Assy (where fitted) Control Assy Coin Entry Page 29... -
Seite 30: Installation
INSTALLATION Joining the Monitor Cabinet and Control Assy Slide the Control Assy up to the Monitor Cabinet, taking care not to trap any wires. Fit 2off hex head screws, with flat washer. Hex head screw (with Flat washer) Connect the connectors. Adjusting the Level Adjusters When the game is in it’s final position lower the six (6) (4off Monitor Cabinet, 2off Control Assy), Level Adjusters,with a spanner, so that all castors are raised from... -
Seite 31: Installing The Cd-Rom
Installing the CD-ROM • The DVD-ROM Disc must be inserted with the power switched on. To prevent an electric shock, accident or injury, do not touch any parts other than those specified below. • The supplied DVD-ROM Disc is designed exclusively for this product. Never use the DVD-ROM Disc in any other product. -
Seite 32: Insertion Of Dongle
Insertion of Dongle The supplied dongle is designed exclusively for this product. Do not use it • with any other product. Also, do not use a dongle of another product for this product. Not using a proper dongle results in a malfunction. •... -
Seite 33: Adjustments And Settings
ADJUSTMENTS AND SETTINGS The Game PC Board Assy is fitted with 4 Option Switches. Option Switches The JAMMA (B) PCB has the Volume Control fitted. JAMMA (B) PCB Volume Control Option Switches Switch 1 is used to change between Test Mode and Game Mode. ON: Test Mode OFF: Game Mode Switch 2 is used to set the output level of the video signal. -
Seite 34: Test Mode
Test Mode To enter Test Mode set the Test switch in the cabinet (if fitted) to ON, or if no Test switch is fitted to the cabinet, set Option switch 1 ON Note: The test mode is activated only when the cabinet Test switch or Option switch 1 is moved from OFF to ON. - Seite 35 4-2-1 Display Test This test allows the following checks and adjustments to be made. • Colour Edit Adjust contrast and brightness of each colour to match video output from the PCB to the Monitor. Note: This adjustment should only be made if the correct picture quality cannot be achieved by using the normal monitor adjustments.
-
Seite 36: Colour Edit
4-2-2 Colour Edit Ensure that the Colour Edit Adjustment Box is showing. (Press P1 Button 3 if the Adjustment box is not displayed. Use the Joystick UP/DOWN to step to the required adjustment. (Contrast, Brightness (red), Brightness (green), Brightness (blue)). Use the Joystick LEFT/RIGHT to adjust the value. -
Seite 37: Input Test
4-2-4 Input Test Select Input Test from the Main Test Menu. The following screen is displayed. INPUT TEST P1 Start switch P2 Start switch Start Start Service Service Down Down P1 8-direction lever P2 8-direction lever Left Left Right Right TEST TEST Button 1 Button 2... -
Seite 38: Game Options
4-2-5 Game Options Select Game Options from the Main Test Menu. The following screen is displayed. GAME OPTIONS < D e f a u l t s i n G r e e n > > D i f f i c u l t y l e v e l : H A R D F i g h t c o u n t <... - Seite 39 c i f c i f < > < > e f i < > e f i < > ) f ( i t c i t ( ) i ( l b i ) j ( l b i ) l ( ) j ( Page 39...
-
Seite 40: Coin Options
4-2-6 Coin Options Select Coin Options from the Main Test Menu. The following screen is displayed. COIN OPTIONS D e f a u l t s i n G r e e n > Start cost: 1Credit to START Continue cost: 1Credit to CONTINUE Coin chute 1 mechanical value: 1Coin count as 1coin Coin chute 2 mechanical value:... -
Seite 41: Sound Test
4-2-7 Sound Test Select Sound Test from the Main Test Menu. The following screen is displayed. SOUND TEST POSITION:off Displays which speaker is playing SPEAKER:stereo Displays monaural/stereo setting C h e c k S o u n d : P 1 - B u t t o n 1 C h a n g e S p e a k e r : P 1 - L e f t / R i g h t EXIT... -
Seite 42: Bookkeeping
4-2-9 Bookkeeping Select Bookkeeping from the Main Test Menu. The following screen is displayed. Bookkeeping ON TIME 0:00:00 Coin 1 Total Play Ratio Coin 2 Total 1P Play Ratio Service Total VS Play Ratio Freeplay Total Count Total Time Average 1P Play 0:00:00 0:00:00... - Seite 43 i t f c t i i t f l a t i t f Page 43...
-
Seite 44: Data Clear
4-2-10 Data Clear Select Data Clear from the Main Test Menu. The following screen is displayed. D A T A C L E A R Cancel Bookkeeping clear Ranking data clear FlashROM data clear Set defaults all options Initialization of the card data for recovery All clear C L E A R : P 1 - B u t t o n 1... -
Seite 45: Card Options (Where Fitted)
4-2-11 Card Options (Where Fitted) This test is used to set the Read/Write unit and TEKKEN-NET IDcard. Select Card Options from the Main Test Menu. The following screen is displayed. CARD OPTIONS P1 card R/W found P2 card R/W found Sensor Sensor Solenoid... - Seite 46 , t i Display after card insertion If a card is inserted in the P1-side card R/W unit, press the P1 Button switch 1 to conduct the card read/write test. If a card is inserted in the P2-Side card R/W unit, press the P2 Button switch1 to conduct the card read/write test.
- Seite 47 Card data may or may not be restored depending on the condition of the card, as described below. Data may only restored with the card that was used to play the game with the • Game PC board that you are working on and has been set to the test mode. It should be noted that there is a limit to the amount of data saved (10 cases max.).
-
Seite 48: Close Setting
4-2-12 Close Setting This mode is used to set the site closing time, and prevents the card from being used from 15 minutes before the set time. This ensures that data is not lost if the game is powered-down during game play. The time can be set between 19:00 and 31:00 (7:00 am on the following day), or 24 hour operation. - Seite 49 Select “Time Setting” and press the P1 Button switch to display the time setting screen shown below. CLOSE SETTING(CARD) Defaults in Green 2004 /10 / 04 (MON) 19:00:00 >Year : 2004 Month : 10 : 04 Hour : 19 Minute : 00 Modify: P1-Left / Right...
-
Seite 50: Using The Data Card (Where Fitted)
USING THE DATA CARD (Where Fitted) By using a Tekken 5 Data Card, players can earn fight money, enter their name, customize their character, develop their rank, and more. In order to use the card, players must press the Start button and then insert their card. - Seite 51 If ITEM SHOP & EQUIPMENT is selected the following message is displayed on the screen. HEAD HEAD Pigtails FACE FACE BODY 1 BODY 1 BODY 2 BODY 2 COLOR 1 COLOR 1 CANCEL COLOR 2 COLOR 2 COLOR 3 COLOR 3 Total EXIT EXIT...
-
Seite 52: Maintenance And Adjustments
MAINTENANCE AND ADJUSTMENTS Replacing the Push Button Switches Remove 4off security screw, and remove the Bottom Cover (Left). Play Panel Bottom Cover Security Screw Security Screw Repeat (1) and remove the Bottom Cover (Right). Remove 6off Whizz nuts (3off left side,3off right side) and remove the Play Panel. Whizz Nut Whizz Nut Page 52... - Seite 53 Disengage the lug of the long retaining arm from the microswitch, lift the front of the switch up, and remove from the switch holder. Microswitch Long retaining arm Reassemble in reverse order. Page 53...
-
Seite 54: Removing The Card Read/Write Assemblies
Removing the Card Read/Write Assemblies Remove 4off security screw and withdraw the Card Read/Write Assemblies. Disconnect the connectors, and remove the Card Read/Write Assemblies. Card Read/Write Assemblies Security Screw Security Screw Re-assemble in reverse order. Page 54... -
Seite 55: Parts
PARTS c i l t i n c t i e l l t i n t i n Page 55... - Seite 56 t s i t s i Page 56...
- Seite 57 i t s c t i Page 57...
- Seite 58 Copies of Namco Game Manuals can be downloaded from our website: www.namco.co.uk They are located under Components, Sales and Service For all Parts or Technical Support contact: Brent Electronic, Namco House, Units 5-8, Acton Park Estate, The Vale, London. W3 7QE www.brentelectronic.co.uk...