Bifinett KH 1157 Bedienungsanleitung
Vorschau ausblenden
Andere Handbücher für KH 1157:
- Bedienungsanleitung (22 Seiten) ,
- Bedienungsanleitung (42 Seiten) ,
- Bedienungsanleitung (53 Seiten)
Inhaltsverzeichnis
Werbung
Verfügbare Sprachen
Verfügbare Sprachen
Werbung
Kapitel
Inhaltsverzeichnis

Verwandte Anleitungen für Bifinett KH 1157


Inhaltszusammenfassung für Bifinett KH 1157
- Seite 1 BALANZA DE COCINA BILANCIA DA CUCINA KH 1157 BALANZA DE COCINA Instrucciones de uso BILANCIA DA CUCINA Istruzioni per l'uso KITCHEN SCALES Operating instructions KÜCHENWAAGE KOMPERNASS GMBH · BURGSTRASSE 21 · D-44867 BOCHUM Bedienungsanleitung www.kompernass.com ID-Nr.: KH1157-10/08-V2...
- Seite 2 KH 1157...
-
Seite 3: Inhaltsverzeichnis
ÍNDICE PÁGINA Uso previsto Datos técnicos Indicaciones de seguridad Elementos de mando Volumen de suministro Puesta en servicio Ajustar la hora ..........................3 Colocación............................3 Manejo Ajuste de la unidad de medida ......................3 Pesar ..............................4 Adición al producto que se pesa (función tara) ................4 Retirar el producto que se pesa......................4 Ajustar el cronómetro........................4 Indicación de temperatura ......................5... -
Seite 4: Uso Previsto
BALANZA DE COCINA • Al introducir las pilas tenga en cuenta la polaridad KH 1157 correcta y no aplique demasiada fuerza al hacerlo. • No coloque más de 5 kg sobre la báscula. • Asegúrese de que no entre ningún líquido en Uso previsto la báscula. -
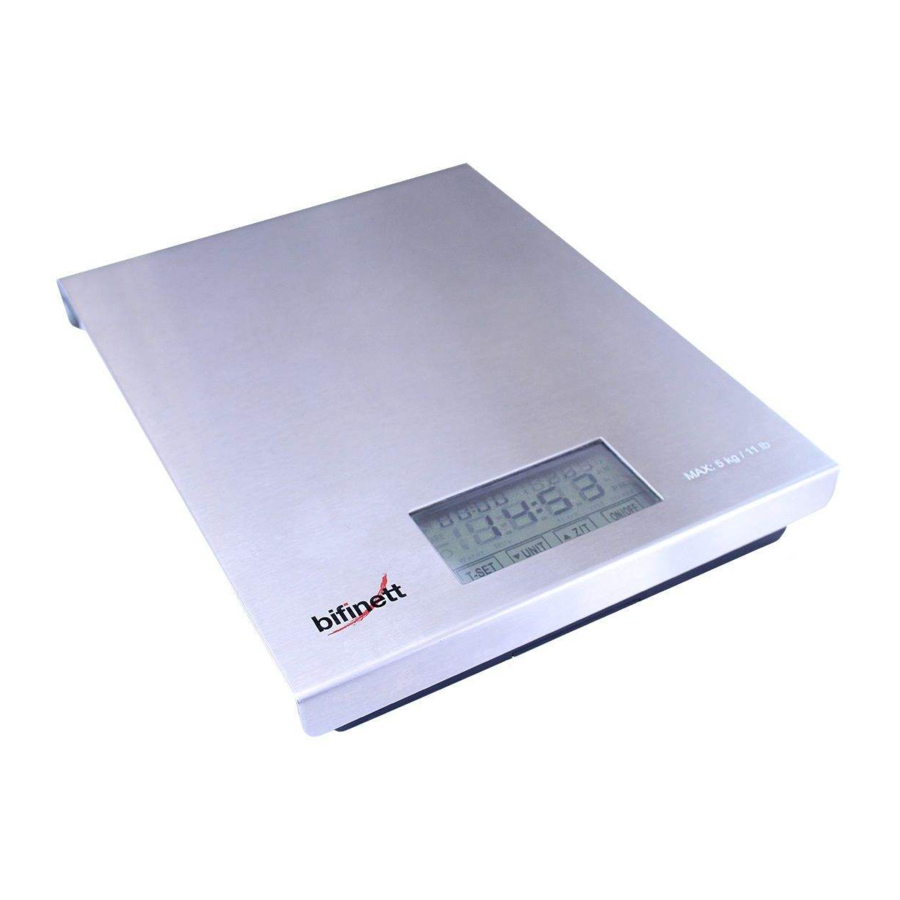
Seite 5: Elementos De Mando
Elementos de mando Presione el campo de sensor o bien la tecla UNIT , hasta que se hayan ajusta- Colgador do los minutos. Zona de pesaje Presione el campo de sensor T-SET Pantalla La hora está ahora ajustada. Compartimiento de pilas Campo de sensor ON/OFF Si posteriormente usted desea modificar la hora, (encendido/apagado) -
Seite 6: Pesar
Pulse sobre el campo de sensor ON/OFF En la pantalla se mostrará el peso del producto La báscula se encuentra ahora en el modo pe- añadido. sar. La unidad ajustada aparecerá debajo o a la derecha de la indicación del peso en la pan- Puede repetir varias veces este paso. -
Seite 7: Indicación De Temperatura
Pulse una vez el campo de sensor T-SET Si en la pantalla aparece brevemente "Err" y A través del campo de sensor o bien no se puede conectar el modo pesar, la báscula UNIT , ajuste los minutos individuales está sobrecargada. Retire el producto a pesar de-seados. -
Seite 8: Conservación
Conservación ¡Evacuación de las pilas! Las pilas no deben evacuarse en la basura domésti- Cuando no utilice la báscula puede colgarla, por ca. Por lo tanto, retire siempre las pilas/baterías de ejemplo en un listón de cocina, gracias al colgador los aparatos antes de su evacuación. -
Seite 9: Garantía Y Servicio
Garantía y servicio Con este aparato recibe usted 3 años de garantía desde la fecha de compra. El aparato ha sido fabri- cado cuidadosamente y ha sido probado antes de su entrega. Guarde el comprobante de caja como justificante de compra. Si necesitara hacer uso de la garantía, póngase en contacto por teléfono con su punto de servicio habitual. - Seite 10 - 8 -...
- Seite 11 INDICE PAGINA Destinazione d'uso Dati tecnici Avvertenze di sicurezza Elementi di comando Fornitura Messa in funzione Impostazione dell'ora ........................11 Installazione............................11 Funzionamento Impostazione dell'unità di misura....................11 Pesatura............................12 Pesare il prodotto (funzione taratura) ..................12 Rimuovere il prodotto pesato......................12 Impostazione Timer........................12 Visualizzazione della temperatura....................13 Disattivazione della funzione di pesatura ...................13 Soluzioni in caso di malfunzionamenti Sostituzione delle pile...
-
Seite 12: Destinazione D'uso
BILANCIA DA CUCINA • Fare attenzione alla polarità corretta delle pile e KH 1157 non esercitare alcuna forza all'atto dell'inseri- mento. • Non collocare sulla bilancia più di 5 kg di peso. Destinazione d'uso • Impedire la penetrazione di liquidi nella bilancia. -
Seite 13: Elementi Di Comando
Elementi di comando Se successivamente si desidera modificare l'ora, premere e tenere premuto il tasto sensore T-SET Sospensione fino a quando l'indicazione dell'ora lampeggia. Campo di pesatura Procedere come descritto precedentemente. Display Installazione Vano pile Tasto sensore ON/OFF (acceso/spento) Collocare la bilancia su una superficie piana e Tasto sensore Z/T (ZERO/TARA) antisdrucciolo. -
Seite 14: Pesatura
Rimuovere il prodotto pesato Per passare nell'ambito dello stesso sistema di misura da Premere ancora una volta il tasto sensore Z/T g/kg - ml Water - ml Milk . A sinistra nel display viene visualizzato „TARE". oz/lb:oz - fl´oz Water - fl´oz Milk La bilancia indica nuovamente "0"... -
Seite 15: Visualizzazione Della Temperatura
qualche secondo. Premere sul tasto sensore T-SET , per avviare Se la bilancia non funziona come dovrebbe, la misurazione del tempo. sostituire le pile. Se l'errore non viene eliminato dopo tale procedura, contattare l'assistenza Il timer può essere azzerato. (v. „Garanzia e assistenza“). Premere sul tasto sensore T-SET , per riazzerare il Sostituzione delle pile... -
Seite 16: Pulizia
Pulizia Importatore KOMPERNASS GMBH Attenzione! BURGSTRASSE 21 Impedire la penetrazione di liquidi nella bilancia. D-44867 BOCHUM I liquidi infiltrati potrebbero danneggiare la bilancia. www.kompernass.com Pulire la bilancia con un panno leggermente inumidito con una soluzione delicata o utilizzare un detergente Garanzia &... - Seite 17 CONTENT PAGE Intended use Technical data Safety information Operating Elements Items supplied Commissioning Setting the time..........................17 Setup ...............................17 Operation Setting the units of measurement ....................17 Weighing ............................18 Adding & Weighing (Tare Function) ....................18 Removing Weighed Items ......................18 Setting the Timer..........................18 Temperature Display........................19 Switching the weighing function off .....................19 Troubleshooting...
-
Seite 18: Intended Use
KITCHEN SCALES • Ensure that the batteries are inserted with the KH 1157 correct polarity and do not apply excessive force when inserting them. • Never place more than 5 kg on the scale. Intended use • Ensure that no fluids can enter the scale. -
Seite 19: Operating Elements
Operating Elements If you need to re-adjust the time display (e.g. for Summer/Winter Time) press and hold the T-SET Suspension frame button until the hour indicator blinks. Then pro- Weighing area ceed as described above. Display Setup Battery compartment Sensor area ON/OFF Place the kitchen scales on a level and slip-free Sensor area Z/T (ZERO/TARE) -
Seite 20: Weighing
Removing Weighed Items To switch within a measurement system, g/kg - ml water - ml milk Press the sensor area Z/T once. "TARE" is indicated in the left of the display oz/lb:oz - fl´oz water - fl´oz milk The scales indicate a weight of "0" again. briefly press the sensor area UNIT until the Remove the desired amount of material. -
Seite 21: Temperature Display
Changing the batteries You can reset the timer. Press the sensor area T-SET to re-set the timer. Warning! As soon as the programmed time has expired, an Pay attention to the correct polarity when exchan- acoustic signal sounds. This signal can be switched ging batteries. -
Seite 22: Disposal
Warranty & Service Wipe the scale clean with a cloth lightly moistened by a mild detergent solution or use a special stain- less steel cleaner. Do not use abrasive or solvent The warranty for this appliance is for 3 years from cleaners. - Seite 23 INHALTSVERZEICHNIS SEITE Verwendungszweck Technische Daten Sicherheitshinweise Bedienelemente Lieferumfang Inbetriebnahme Uhrzeit einstellen..........................23 Aufstellen............................23 Bedienen Einstellen der Maßeinheit......................23 Wiegen ............................24 Wiegegut zuwiegen (Tarierfunktion) ...................24 Wiegegut entnehmen ........................24 Timer einstellen..........................24 Temperaturanzeige ........................25 Wiegefunktion ausschalten ......................25 Fehlfunktionen beseitigen Batterien wechseln Aufbewahrung Reinigen Entsorgen Importeur Garantie &...
-
Seite 24: Verwendungszweck
KÜCHENWAAGE Achtung! KH 1157 Beachten Sie die folgenden Sicherheitshinweise ge- nau. Bei Nichtbeachtung kann die Waage beschä- digt werden und Ihre Gewährleistungsansprüche Verwendungszweck können erlöschen. Die Küchenwaage dient zum Wiegen von nicht • Achten Sie beim Einlegen der Batterie auf die ätzenden, aggressiven oder scheuernden Flüssig-... -
Seite 25: Bedienelemente
Uhrzeit einstellen • Bei ausgelaufenen Batterien, ziehen Sie Schutz- handschuhe an. Reinigen Sie das Batteriefach Bei der ersten Inbetriebnahme oder nach einem Bat- und die Batteriekontakte mit einem trockenen teriewechsel muss die Uhrzeit eingestellt werden. Tuch. Sobald die Batterien eingesetzt werden, blinkt •... -
Seite 26: Wiegen
• Milliliter (ml) Wasser (Water) Drücken Sie dazu einmal auf das Sensorfeld Z/T • Milliliter (ml) Milch (Milk). . Im Display erscheint links „TARE“. Die Im angloamerikanischen System: Waage zeigt wieder „0“ Gramm an. • Flüssigunze (fl´oz) Wasser (Water) Füllen Sie die zu wiegende Teilmenge in das Ge- •... -
Seite 27: Temperaturanzeige
Fehlfunktionen beseitigen Sie können die Zeit sekundengenau einstellen. Wenn Sie das Sensorfeld bzw. UNIT gedrückt halten, laufen die Zahlen Wenn das Display „Err“ anzeigt, ist die Waa- schneller durch. ge überlastet. Entnehmen Sie Wiegegut. Stellen Sie nie mehr als 5 kg auf die Waage. Stellen Sie mit dem Sensorfeld bzw. -
Seite 28: Aufbewahrung
Entsorgen Um die Batterien zu wechseln, öffnen Sie den Batteriefachdeckel auf der Unterseite der Waage. Drücken Sie die Metalllasche an der Batteriehal- Werfen Sie das Gerät keinesfalls in den terung nach außen, so dass die Batterie heraus normalen Hausmüll. Dieses Produkt springt. -
Seite 29: Garantie & Service
Garantie & Service Sie erhalten auf dieses Gerät 3 Jahre Garantie ab Kaufdatum. Das Gerät wurde sorgfältig produziert und vor Anlieferung gewissenhaft geprüft. Bitte bewahren Sie den Kassenbon als Nachweis für den Kauf auf. Bitte setzen Sie sich im Garantiefall mit Ihrer Servicestelle telefonisch in Verbindung.