Applicable products bear the FCC logo, and/or an FCC ID in the format FCC ID: GSS- VS15197 on the product label.This device complies with part 15 of the FCC Rules. Operation is subject to the following two conditions: (1) This device may not cause harmful interference, and (2) This device must accept any interference received, including interference that may cause undesired operation.
Seite 3
Canada Statement This device complies with Industry Canada licence-exempt RSS standard(s). Operation is subject to the following two conditions: (1) this device may not cause interference, and (2) this device must accept any interference, including interference that may cause undesired operation of the device.
Seite 4
ENERGY STAR This ENERGY STAR qualified product saves your money by reducing energy cost and protecting the environment without sacrificing features or performance. We are proud to offer our customers products with the ENERGY STAR mark. What is ENERGY STAR? Products that are ENERGY STAR qualified use less energy and prevent greenhouse gas emissions by meeting strict energy efficiency guidelines set by the U.S.
Seite 5
Declaration of RoHS2 Compliance This product has been designed and manufactured in compliance with Directive 2011/65/ EU of the European Parliament and the Council on restriction of the use of certain hazardous substances in electrical and electronic equipment (RoHS2 Directive) and is deemed to comply with the maximum concentration values issued by the European Technical Adaptation Committee (TAC) as shown below: Proposed Maximum...
Important Safety Instructions DO NOT place objects on top of the device, as objects may scratch the screen. DO NOT expose the device to dirty or dusty environments. DO NOT place the device on an uneven or unstable surface. DO NOT insert any foreign objects into the device. DO NOT expose the device to strong magnetic or electrical field.
Seite 7
® Disclaimer: ViewSonic Corporation shall not be liable for technical or editorial errors or omissions contained herein; nor for incidental or consequential damages resulting from furnishing this material, or the performance or use of this product.In the interest of continuing product improvement, ViewSonic Corporation reserves the right to change product specifications without notice.
_______________________________ Product disposal at end of product life ViewSonic respects the environment and is committed to working and living green. Thank you for being part of Smarter, Greener Computing. Please visit ViewSonic website to learn more. USA & Canada: http://www.viewsonic.com/company/green/recycle-program/ Europe: http://www.viewsoniceurope.com/uk/support/recycling-information/...
Table of Contents Table of Contents 1 VSD241 Smart Display Features 1.1 Installing wall mount bracket ..........4 2 Set Up Your VSD241 Smart Display 2.1 Connection ................. 5 2.2 Get Your Smart Display Ready for Use ......5 2.3 Power on Your Device ............6 2.3.1 Wake on LAN (WOL) Function ......
Seite 10
Table of Contents 4.4 Managing Your Device Settings ........21 4.4.1 Check storage spaces ......... 21 4.4.2 Remove the SD card safely ......... 22 4.4.3 Erase all data from your device ......22 4.5 Connecting to HDMI-compliant Devices via HDMI Input .. 23 4.6 Bluetooth Connection ............
Seite 11
Table of Contents 7.3 Protect Your Device Data with a PIN ........ 39 7.3.1 Disable or change PIN ......... 39 7.4 Protect Your Device Data with a Password ...... 40 7.4.1 Disable or change the password ......40 7.5 Protect Your Device Data with Face Unlock ....... 41 7.6 Power Saving Feature ............
VSD241 is a Smart Display with 24-inch quad-core display running on Android 4.2.1 Jelly Bean. Comes with 1920x1080p HD multi-touch resolution, allow you to work with HDMI via MHL, full-sized USB, Bluetooth connectivity as well. 1 VSD241 Smart Display Features This section introduces you to the features of your Smart Display.
Seite 13
VSD241 Smart Display Features No. Components Descriptions Touch Screen Touch the screen to control the on-screen configurations including menu items, applications, buttons, keyboard and so on. OSD Menu / Exit Touch this button to launch the OSD configuration menu and touch again to exit. Power button Touch to power on / lock the smart display. (LED indicator) - Touch about 0.5 seconds to power on the power (LED in blue)
Seite 14
VSD241 Smart Display Features Back View No. Components Descriptions DC in Port Connect to power adaptor. HDMI Connect to digital high quality device for video and audio configurations (e.g. DVD Player, BD Player VPG or Notebook). RJ45 Connect to a RJ45 cable for network connection. Connector USB Ports x 2 Used for keyboard, mouse, flash disk ( supports FAT32 format only) or printer connections.
VSD241 Smart Display Features 1.1 Installing wall mount bracket The VSD241 supports wall mount bracket installation. We recommend using mounting interface that comply with Video Electronics Standards Association (VESA) standard. Please follow the steps to install your bracket: Turn off your monitor and unplug its power cord. Lay the monitor face-down on a flat surface.
Set Up Your VSD241 Smart Display 2 Set Up Your VSD241 Smart Display 2.1 Connection Keyboard Printer Mouse USB Storage Mini USB Micro USB Earphone External Computer SD card HDMI Power Earphone Outlet DVD Player Bluetooth Devices Wi-Fi Devices Notebook 2.2 Get Your Smart Display Ready for Use Insert the SD card Open the compartment cover on the...
Set Up Your VSD241 Smart Display Connect the Power Cord Connect the included power cord to the power jack. Connect the other end of the power cord to a suitable power outlet. 2.3 Power on Your Device Touch the power button gently to power on your device Slide the lock icon to unlock the screen (if the lock screen function with slide is enabled) After connecting the power cord, you can touch the power button about...
Set Up Your VSD241 Smart Display 2.3.1 Wake on LAN (WOL) Function To Enable the Wake on LAN (WOL) Function: • Touch Settings icon on the screen. • Check Ethernet is ON. • Choose More… under Data usage row. • Enable Wakeup on Lan on the right-hand side of screen. 2.4 Power Off Your Device Touch and hold the power button for about 3 seconds.
About Your VSD241 Smart Display 3 About Your VSD241 Smart Display 3.1 Touch Screen The main way to control the device is using your finger to touch the sensitive surface of the screen directly. You can manipulate icons, buttons, menu items, on-screen keyboard and other items on the touch screen with below methods: Methods...
About Your VSD241 Smart Display 3.2 Applications, Widgets and Shortcuts The soft buttons or icons offer a variety of functions and shortcuts. On the Home screen, it is your starting point to access all the features on your device. It displays application icons, widgets, shortcuts and so on. Applications: Software allows you to perform a specific task.
Seite 21
About Your VSD241 Smart Display Items Descriptions Google Use the Google Search application to search Google Search the web faster and easier from Google. Navigation Flick and drag the screen horizontally until Area the desired Home screen is displayed. Back Return to the previous screen or option.
About Your VSD241 Smart Display 3.4 Navigation buttons On the bottom of the screen (system bar), you can find the navigation buttons described as below: Buttons Descriptions - Touch this button to go back to the previous screen or option. Back - If the on-screen keyboard is displayed, the button changes to...
About Your VSD241 Smart Display Items Descriptions Time Displays the current time. Specified Icon Show you the enabled icon just like enabled Bluetooth. Show you the current state of your device just like Owner, Status Menu Brightness, Settings, WIFI, Auto Rotate, Battery Charging Status, Airplane Mode and Bluetooth Settings.
About Your VSD241 Smart Display 3.6.2 Move an Item • On the Home screen, touch and hold the item that you want to move. • Move the item to the specified position. • Then release your finger to add the item to the new position. 3.6.3 Delete an Item •...
About Your VSD241 Smart Display 3.7 Navigating the Applications You can find applications available on your device in the all Apps menu: 3.7.1 Apps screen Open the Apps screen You can access Apps screen from any Home screen by touching the Apps button located on the bottom of your screen.
About Your VSD241 Smart Display Use the shortcut to open an application Touch the Home button on the system bar. If the desired application shortcut displays on the Home screen, touch the shortcut to launch the application. 3.7.3 Recent Applications Open a recently used application Touch the Recent Applications button to view the recently used...
Using Your VSD241 Smart Display 4 Using Your VSD241 Smart Display 4.1 Managing Contacts Touch Home button│Apps button│People to view and manage your contacts. 4.1.1 Add a new contact Touch New. Select the account where you want to add this contact, such as your Gmail account.
Using Your VSD241 Smart Display 4.1.2 Find a contact To locate a contact, you can either: • Flick the All tab contacts list on the up- per left of screen until you find the con- tact. Or, drag the scroll bar on the left of the screen to scroll through the con- tacts list.
Seite 29
Using Your VSD241 Smart Display Share a contact On the contacts list, find a desired contact. Touch the contact entry to view the contact details. Touch the Menu button on the upper right of screen, then select Share contact. From the Share contact via menu that appears, select the way you want to share the contact information with your friends, such as through Bluetooth or Gmail.
Using Your VSD241 Smart Display From the Join contacts list, touch another contact to link, and then touch Done. The joined contact’s information is displayed with the original Contacts settings. In People, touch the Menu button on the device or the Menu button on the screen.
Using Your VSD241 Smart Display Select an option or item on the pop-up menu Touch the Menu button on the device or the Menu button on the screen to open the pop-up menu. Touch the desired item on the pop-up menu. 4.3 Google Search You can use the Google Search widget to find websites and information on Google, applica-...
Using Your VSD241 Smart Display Search by voice Touch the microphone that appears beside the search box. Say the name or keyword of the item you want to search. The browser with matching web links opens. 4.4 Managing Your Device Settings 4.4.1 Check storage spaces Touch the Home button │...
Using Your VSD241 Smart Display 4.4.2 Remove the SD card safely Touch the Home button │ Apps button │ Settings │ Storage. Touch Unmount SD card under the SD Card section. Press and hold the Power button until the Power off menu appears. Then, touch OK to turn off the device.
Using Your VSD241 Smart Display NOTE • Ensure that you have back up all the required data before erasing all data from your device. 4.5 Connecting to HDMI-compliant Devices via HDMI Input HDMI (High-Definition Multimedia Interface) is a compact audio/video interface for transferring uncompressed digital audio/video data.
Using Your VSD241 Smart Display 4.6 Bluetooth Connection Bluetooth is a short-range wireless communi- cations technology that allows your device to connect to other Bluetooth-enabled devices over a wireless network. Bluetooth on your device operates in three different modes: Status Descriptions Bluetooth is turned on.
Using Your VSD241 Smart Display You may be prompted to enter a password to authenticate. Enter the same password on both devices, or enter the password provided by the device manufacturer. Ensure that you read the documentation of the pairing device to check if it requires a default password. When the pairing is successful, paired but not connected devices are displayed under the “PAIRED DEVICE”.
Internet 5 Internet 5.1 Connecting to the Internet To browse the web and access web-based utilities such as instant messaging, you can connect VSD241 to a LAN network via RJ45 cable on LAN connector or set up a Wi-Fi connection. 5.1.1 Wi-Fi connection Touch the Home button │...
Internet 5.1.2 Check the current Wi-Fi network connection From the status area of the system bar: When your device is connected to a wireless network, the Wi-Fi icon in the status area of the system bar indi- cates the signal strength (number of bands that light up). If Settings│Wi-Fi│ Network notification is enabled, the “?”...
Internet 5.2 Synchronizing Your Google Data Through a web connection, your device can synchronize your Google data including Gmail, calendar, and contacts with your com- puter or any other device that you use to ac- cess your Google account. Select the applications to synchronize Touch the Home button │...
Seite 40
Internet How to begin Authenticate your Google account You can do this by opening up Google Talk and then signing in to your Google Account. Before using video chat, you must first sign in to your Google Account. Invite the person Open Google Talk application.
Customizing Your VSD241 Smart Display 6 Customizing Your VSD241 Smart Display You can customize your device using the options available in the Settings ap- plication. 6.1 Display Settings Change the display settings: Touch the Home button │ Apps button │ Settings │ Display. You can configure the Wallpaper, Sleep and Font size here.
Customizing Your VSD241 Smart Display 6.2 Sound and Ringtone Settings Change the sound and ringtone settings: Touch the Home button │ Apps button │ Settings │ Sound. Select the list to locate and touch a desired option. To enable a setting, touch the setting option to select the checkbox; to disable a setting, touch the setting option to clear the check box.
Customizing Your VSD241 Smart Display 6.2.3 ViewSound enhancement Items Descriptions ViewSound 1. Set mode with ViewSound effect. enhancement 2. Select Pop / Theater / Game / Jazz / Classical or Disable ViewSound effect. 6.3 Date, Time, and Time Zone New function added: The clock has been totally redesigned with an all new look which includes both a digital and analog clock style.
Customizing Your VSD241 Smart Display Items Descriptions Automatic date & Use network-provide time zone automatically. time Set date 1. Touch Set date item to adjust the day, month, and year; you can also touch the day, month, or year to flick to the desired value.
Customizing Your VSD241 Smart Display Set the Keyboard & Input: Touch the Home button │ Apps button │ Settings │Language & input │ Keyboard & input methods. To enable a setting, touch the setting option to select the check box; to disable a setting, touch the setting option to clear the check box.
Customizing Your VSD241 Smart Display 6.5.1 Adjustment Bars Contrast/Brightness: Contrast: Touch and drag the slider on the Contrast bar to adjust the contrast of screen display. Drag the slider to the right, the contrast is larger. By default, the contrast is set to 80. Brightness: Touch and drag the slider on the Brightness bar to adjust the brightness of your screen.
Customizing Your VSD241 Smart Display 6.5.3 OSD Notice idling: The OSD menu will close and go back to the original processing screen automatically during your OSD menu is idling that reached to the OSD time out value. No signal: • The connection for your HDMI is not ready. •...
Protecting Your VSD241 Smart Display 7 Protecting Your VSD241 Smart Display 7.1 Protect Your Device Data with a Screen Unlock Pattern You can protect your device data against unauthorized access by locking the touch screen with a screen unlock pattern. Once the unlock pattern is en- abled and the screen is locked, you need to draw the correct unlock pattern to unlock the screen.
Protecting Your VSD241 Smart Display 7.1.1 Create a screen unlock pattern Touch the Home button │ Apps button │ Settings │ Security. Touch Screen Lock section → Pattern. Read the instructions on the screen and study the animated example of how to draw a pattern. Then, touch Next when you are ready to draw your own pattern.
Protecting Your VSD241 Smart Display 7.2 Disable the screen unlock security Touch the Home button │ Apps button │ Settings │ Security. Select None to disable screen unlock security. 7.3 Protect Your Device Data with a PIN Touch the Home button │ Apps button │ Settings │ Security. Touch Screen Lock section →...
Protecting Your VSD241 Smart Display 7.4 Protect Your Device Data with a Password Touch the Home button │ Apps button │ Settings │ Security. Touch Screen Lock section → Password. On the Choose your password screen appears, enter a password in the text box.
Protecting Your VSD241 Smart Display 7.5 Protect Your Device Data with Face Unlock From Android 4.0 Ice Cream Sandwich, Google had been introduced a new way to unlock your devices via front camera. The facial recognition unlock feature called Face Unlock will be an integral part of Android OS. Follow the steps to get the Face Unlock feature set up on your device: Touch the Home button │...
Protecting Your VSD241 Smart Display 7.6 Power Saving Feature In order to save energy, this device supports power saving mode (sleeping mode). The device will enter power saving mode when you idle without processing. Then, the screen will go off. You can set the duration of screen to remain on before entering sleeping mode, touch the Home button │...
VSD241 located under the cover - Check the power socket with another device (i.e. table lamp) - If there is still no power then contact ViewSonic support or the Reseller from whom the device was purchased No display Check external HDMI device and connections.
Appendix 9 Appendix Specification LCD Spec. Size 61cm (23.8”) Resolution 1920x1080 Brightness 250 cd/m2 Backlight Thickness 11.2 mm Touch screen Optical touch type, with glass Hardware Buttons Power button *1 Control keys *4 Power LED Indicator Blue (on) / Orange (saving) I/O ports HDMI *1 USB type A *2, mini *1, micro *1 (OTG)
Appendix Android 4.2.1 JellyBean Support multi- language Driver and user’s manual in HDD image Application Google GMS and VSC consigned System ® CPU/SoC nVidia Tegra Speed 1.7GHz Cores Quad-core Graphic Embedded Memory DDR3 1GB, Speed to 800Mbps Storage eMMC (NAND), 8G WLAN/Bluetooth 801.11b/g/n, Bluetooth Environment...
Renta y Datos, 29 SUR 721, COL. LA PAZ, 72160 PUEBLA, PUE. Tel: 01.222.891.55.77 CON 10 LINEAS Electroser, Av Reforma No. 403Gx39 y 41, 97000 Mérida, Yucatán. Tel: 01.999.925.19.16 Other places please refer to http://www.viewsonic.com/la/soporte/index.htm#Mexico Latin America (Peru) www.viewsonic.com/la/ T= 0800-54565 soporte@viewsonic.com...
Seite 58
How long the warranty is effective: ViewSonic Smart Display products are warranted for at least 1 year for labor from the date of the first customer purchase. User is responsible for the back up of any data before returning the unit for service.
Seite 59
Exclusion of damages: ViewSonic’s liability is limited to the cost of repair or replacement of the product. ViewSonic shall not be liable for: 1. Damage to other property caused by any defects in the product, damages based...
Manufacturer’s Declaration of Conformity The ViewSonic brand Product VS15006 (Model name: VSD220) has been designed and manufactured in accordance with the Directive 1999/5/EC of European Parliament and the Council on Radio equipment and Telecommunication Terminal equipment. The product is in conformity with the following standards and/or other normative documents: 1.
Seite 61
3. SPECTRUM Standard Title Testing Body Report No. EN301489-1 V1.8.1 Electromagnetic compatibility and Radio EC/2012/70005 EN301489-17 spectrum Matters (ERM); Electromagnetic V2.1.1 Compatibility (EMC) standard for radio equipment and services. Part 1: Common technical requirements. Part 17: Specific conditions for Wideband data and HIPERLAN equipment.
Seite 62
(EC) 278/2009 Eco-design requirements for no-load condition Delta Electronics electric power consumption and average Inc. active efficiency of external power suppliers __________________________ August 23, 2012 Sophia Wu, Compliance Manager Date ViewSonic Corporation...
L'énoncé suivant s'applique à tous les produits qui ont été agrées FCC. Les produits concernés portent le logo FCC, et/ou un identifiant FCC du type : FCC ID: GSS-VS15197 sur l'étiquette du produit.Cet appareil portable est conforme à l’article 15 des Règlements FCC.
Seite 64
Informations SAR de la FCC Cet appareil est conforme aux limites d'exposition au rayonnement RF de la FCC établies pour un environnement non contrôlé. Les utilisateurs finaux doivent suivre les instructions de fonctionnement spécifiques pour respecter le seuil d'exposition aux radiofréquences (RF).
Seite 65
ENERGY STAR Ce produit ayant obtenu le label ENERGY STAR vous fait économiser de l'argent en réduisant les coûts d'énergie et en protégeant l'environnement sans pour autant sacrifier les fonctionnalités ou la performance. Nous sommes fiers d'offrir à nos clients des produits homologués ENERGY STAR.
Seite 66
Déclaration de conformité RoHS2 (LSDEEE2) Ce produit a été conçu et fabriqué dans le respect de la directive 2011/65/EU du Parlement Européen et du Conseil relative à la limitation de l’utilisation de certaines substances dangereuses dans les équipements électriques et électroniques (Directive RoHS2 - LSDEEE2) et il est déclaré...
Importantes instructions de sécurité NE PAS placer d'objet sur l'appareil. Les objets peuvent le rayer ou pénétrer dans l'écran. NE PAS exposer l'appareil à la saleté ou à la poussière. NE PAS placer l'appareil sur une surface instable ou irrégulière. NE PAS faire pénétrer un objet étranger dans l'appareil.
Seite 68
ViewSonic Corp. décline également toute responsabilité vis-à- vis des performances ou de l’utilisation de ce produit.Dans un souci amélioration constant de ses produits, ViewSonic Corporation se réserve le droit de modifier les spécifications du produit sans avis préalable. Les informations contenues dans ce document peuvent changer sans préavis.
_______________________________ Elimination du produit en fin de vie ViewSonic respecte l’environnement et fait des efforts allant dans le sens d’un environnement de travail et de vie écologiques. Merci d’oeuvrer aussi pour une informatique plus intelligente et plus écologique. Pour en savoir plus, veuillez visiter le site web de ViewSonic.
Seite 70
Table des matières Table des matières 1 Caractéristiques du Smart Display (Écran intelligent) VSD241 1.1 Installation d'un support de montage mural ......4 2 Configurer votre Smart Display VSD241 2.1 Connection (Connexion) ............. 5 2.2 Préparer votre Smart Display avant de l'utiliser ....5 2.3 Allumez votre appareil ............
Seite 71
Table des matières 4.3 Recherche Google ............20 4.4 Gérer les paramètres de l'appareil ........21 4.4.1 Vérifier les espaces de rangement ...... 21 4.4.2 Enlever la carte SD en toute sécurité ....22 4.4.3 Effacer toutes les données de l'appareil....22 4.5 Connexion à...
Seite 72
Table des matières 7 Protéger votre Smart Display VSD241 7.1 Protéger les données de l'appareil avec un Motif de déverrouillage de l'écran ..........37 7.1.1 Créez un motif de déverrouillage d'écran .... 38 7.1.2 Modifier les réglages de motif de déverrouillage . 38 7.2 Désactivez la sécurité...
Le VSD241 est un Smart Display doté d'un écran quadricœur de 24 pouces s'exécutant sur Android 4.2.1 Jelly Bean. Il est fourni avec une résolution tactile multipoint HD de 1920 x 1080p, ce qui vous permet de travailler avec : HDMI via MHL, USB normal et aussi une connectivité...
Seite 74
Caractéristiques du Smart Display (Écran intelligent) VSD241 Non. Composants Descriptif Ecran tactile Touchez l'écran pour contrôler les configurations d'écran, dont les éléments de menu, les applications, les boutons, le clavier, etc. Menu OSD / Touchez ce bouton pour lancer le menu de configuration Quitter OSD et touchez-le de nouveau pour le quitter.
Seite 75
Caractéristiques du Smart Display (Écran intelligent) VSD241 Vue arrière Non. Composants Descriptif Port d'entrée Sert à connecter à un adaptateur d'alimentation. (IN) CC HDMI Connecter à un appareil numérique de qualité élevée pour des configurations vidéo et audio (par exemple, un lecteur de DVD, un lecteur de disque Blu-ray VPG ou un ordinateur portable).
Caractéristiques du Smart Display (Écran intelligent) VSD241 1.1 Installation d'un support de montage mural Le VSD241 peut être monté au mur avec un support de montage mural. Nous vous recommandons d'acheter un support de montage mural respectant la norme VESA (Video Electronics Standards Association). Veuillez suivre les étapes ci-dessous pour installer votre support : Éteignez le moniteur et débranchez le cordon d’alimentation.
Configurer votre Smart Display VSD241 2 Configurer votre Smart Display VSD241 2.1 Connection (Connexion) Keyboard Printer Mouse USB Storage Mini USB Micro USB Earphone External Computer SD card HDMI Power Earphone Outlet DVD Player Bluetooth Devices Wi-Fi Devices Notebook 2.2 Préparer votre Smart Display avant de l'utiliser Insérez la carte SD Ouvrez le couvercle du compartiment à...
Configurer votre Smart Display VSD241 Branchez le cordon d'alimentation Branchez le cordon d'alimentation fourni à la prise électrique. Branchez l'autre extrémité du cordon d'alimentation à une prise de courant adaptée. 2.3 Allumez votre appareil Touchez le bouton d'alimentation doucement pour allumer votre appareil Faites glisser l'icône de verrouillage pour déverrouiller l'écran (si la fonction d'écran de verrouillage avec glissière est activée) Après avoir raccordé...
Configurer votre Smart Display VSD241 2.3.1 Fonction Wake on LAN (WOL) Pour activer la fonction Wake on LAN (WOL) : • Touchez l'icône Settings (Réglages) sur l'écran. • Vérifiez qu'Ethernet est bien ALLUMÉ. • Choisissez More… (Plus...) sous la rangée Data usage (Utilisation de données).
À propos de votre Smart Display VSD241 3 À propos de votre Smart Display VSD241 3.1 Ecran tactile Pour contrôler l'appareil, la méthode principale est d'utiliser votre doigt pour toucher directement la surface sensible de l'écran. Vous pouvez manipuler les icônes, les boutons, les éléments du menu, le clavier à l'écran et d'autres éléments sur l'écran tactile à...
À propos de votre Smart Display VSD241 3.2 Applications, widgets et raccourcis Les boutons programmables ou icônes offrent multiples fonctionnalités et raccourcis. Sur l'écran Home (Accueil), ils servent de point de départ pour accéder à toutes les fonctionnalités de votre appareil. Ils affichent des icônes d'applications, des widgets, des raccourcis, etc.
Seite 82
À propos de votre Smart Display VSD241 Non. Éléments Descriptif Utilisez l'application de recherche Google Recherche Google pour rechercher le Web plus rapidement et Google plus facilement à partir de Google. Feuilletez et déplacez l'écran de gauche à Zone de droite jusqu'à...
À propos de votre Smart Display VSD241 3.4 Boutons de navigation Sur le bas de l'écran (la barre système), vous pouvez trouver les boutons de navigation décrits ci-dessous : Boutons Descriptif - Touchez ce bouton pour retourner à l'écran ou à l'option précédent(e).
À propos de votre Smart Display VSD241 Éléments Descriptif Heure Affiche l'heure actuelle. Icône spécifiée Vous montre l'icône activée, comme le Bluetooth activé. Vous montre l'état actuel de votre appareil, comme Owner (Propriétaire), Brightness (Luminosité), Settings (Réglages), Menu État WIFI, Auto Rotate (Rotation automatique), Battery Charging Status (État de chargement de la batterie), Airplane Mode (Mode avion) et les réglages Bluetooth.
À propos de votre Smart Display VSD241 3.6.2 Déplacer un élément • Sur l'écran Home (Accueil), touchez pendant quelques secondes l'élément que vous souhaitez déplacer. • Déplacez l'élément sur la position précisée. • Puis relâchez votre doigt pour ajouter l'élément sur la nouvelle position. 3.6.3 Supprimer un élément •...
À propos de votre Smart Display VSD241 3.7 Navigation des applications Vous pouvez trouver des applications disponibles sur votre appareil dans le menu All Apps (Toutes les apps) : 3.7.1 Écran des apps Ouvrez l'écran des apps Vous pouvez accéder à l'écran des Apps depuis n'importe quel écran Home (Accueil) en touchant le bouton Apps situé...
À propos de votre Smart Display VSD241 Utilisez le raccourci pour ouvrir une application Touchez le bouton Home (Accueil) sur la barre système. Si le raccourci de l'application souhaitée s'affiche sur l'écran Home (Accueil), touchez-le pour lancer l'application. 3.7.3 Applications récentes Ouvrez une application récemment utilisée Touchez le bouton Recent Applications (Applications récentes)
Utilisation de votre Smart Display VSD241 4 Utilisation de votre Smart Display VSD241 4.1 Gestion des contacts Touchez le bouton Home (Accueil)│le bouton Apps│People (Personnes) pour consulter et gérer vos contacts. 4.1.1 Ajouter un nouveau contact Touchez New (Nouveau). Choisissez le compte sur lequel vous voulez ajouter ce contact, par exemple votre compte Gmail.
Utilisation de votre Smart Display VSD241 4.1.2 Trouver un contact Pour localiser un contact, vous pouvez soit : • Feuilleter l'onglet All (Tous) de la liste de contacts dans le coin supérieur gauche de l'écran jusqu'à ce que vous trouviez le contact. Ou bien vous pou- vez déplacer la barre de défilement de l'écran pour faire dérouler la liste de contacts.
Seite 90
Utilisation de votre Smart Display VSD241 Partager un contact Sur la liste des contacts, trouvez un contact de votre choix. Touchez l'entrée du contact pour visionner ses détails. Touchez le bouton Menu dans le coin supérieur droit de l'écran, puis sélectionnez Share (Partager) un contact.
Utilisation de votre Smart Display VSD241 Depuis la liste de contacts à Relier, touchez un autre contact pour effectuer le lien, puis touchez Done (OK). L'information du contact relié s'affichera avec les Contacts settings (Paramètres contacts). Dans People (Personnes), touchez le bouton Menu sur l'appareil ou le bou- ton Menu à...
Utilisation de votre Smart Display VSD241 Sélectionnez une option ou un élément sur le menu contextuel Touchez le bouton Menu sur l'appareil ou le bouton Menu à l'écran pour ouvrir le menu contextuel. Touchez l'élément de votre choix sur le menu contextuel. 4.3 Recherche Google Vous pouvez utiliser le widget de recherche Google pour trouver des sites Web et des in-...
Utilisation de votre Smart Display VSD241 Recherche vocale Touchez le microphone qui apparaît à côté de la case de recherche. Dites le nom ou le mot-clé de l'élément que vous souhaitez rechercher. Le navigateur dans lequel les liens Web correspondants se trouvent s'ouvre.
Utilisation de votre Smart Display VSD241 4.4.2 Enlever la carte SD en toute sécurité Touchez le bouton Home (Accueil) │ bouton Apps │ Settings (Réglages) │ Storage (Stockage). Touchez Unmount SD card (Retirer la carte SD) dans la rubrique SD Card (Carte SD).
Utilisation de votre Smart Display VSD241 REMARQUE • Assurez-vous que vous avez sauvegardé toutes les données nécessaires avant d'effa- cer toutes les données de votre appareil. 4.5 Connexion à des appareils compatibles HDMI via une entrée HDMI HDMI (High-Definition Multimedia Interface) est une interface compacte audio/vidéo pour transférer des données audio/vidéo numériques non compressées.
Utilisation de votre Smart Display VSD241 4.6 Connexion Bluetooth Bluetooth est une technologie de communi- cation sans fil de portée courte, qui permet à votre appareil d'être connecté à d'autres ap- pareils compatibles Bluetooth sur un réseau sans fil. Bluetooth opère de trois façons diffé- rentes sur votre appareil : Statut Descriptif...
Utilisation de votre Smart Display VSD241 Il vous sera demandé d'entrer un mot de passe pour authentification. Saisissez le même mot de passe sur les deux appareils, ou saisissez le mot de passe fourni par le fabricant de l'appareil. Assurez-vous de lire la documentation relative à...
Internet 5 Internet 5.1 Connexion à Internet Pour parcourir le Web et accéder à des uti- litaires sur le Web, comme la messagerie instantanée, vous pouvez connecter l'écran VSD241 à un réseau LAN, via un câble RJ45 raccordé à un connecteur LAN, ou configurer une connexion Wi-Fi.
Internet 5.1.2 Vérifier la connexion réseau Wi-Fi actuelle Depuis la zone d'état de la barre système : Quand votre appareil est connec- té à un réseau sans fil, l'icône Wi-Fi dans la zone d'état de la barre système indique la force du signal (nombre de bandes qui s'allument). Si la notifica- tion Settings (Réglages) │Wi-Fi│...
Internet 5.2 Synchronisation de vos données Google Avec une connexion Web, votre appareil peut synchroniser vos données Google, notam- ment Gmail, le calendrier et les contacts, avec votre ordinateur ou tout autre appareil que vous utilisez pour accéder à votre compte Google.
Seite 101
Internet Comment démarrer Authentifiez votre compte Google Vous pouvez le faire en ouvrant Google Talk, puis en vous connectant à votre compte Google. Avant d'utiliser la conversation vidéo, vous devez d'abord vous connecter à votre compte Google. Invitez la personne Ouvrez l'application Google Talk.
Personnalisation de votre Smart Display VSD241 6.2 Réglages Sound (Son) et Ringtone (sonnerie) Changez les paramètres du son et de la sonnerie : Touchez le bouton Home (Accueil) │ bouton Apps │ Settings (Réglages) │ Sound (Son). Sélectionnez la liste où trouver et toucher une option de votre choix. Pour activer un paramètre, touchez l'option de paramétrage pour cocher la case ;...
Personnalisation de votre Smart Display VSD241 6.2.3 ViewSound amélioré Éléments Descriptif ViewSound 1. Définir un mode avec un effet ViewSound. amélioré 2. Sélectionnez Pop / Cinéma / Jeux / Jazz / Classique ou désactivez l'effet ViewSound. 6.3 Date, Heure et fuseau horaire Ajout d'une nouvelle fonction : L'horloge a été...
Personnalisation de votre Smart Display VSD241 Éléments Descriptif Automatic date & Utilisez le fuseau horaire fourni automatiquement par le réseau. time (Date & heure automatique) Set date (Régler la 1. Touchez l'élément Set date (Régler la date) pour régler le jour, le mois et l'année. Vous pouvez aussi date) toucher le jour, le mois ou l'année pour feuilleter jusqu'à...
Personnalisation de votre Smart Display VSD241 Régler le Keyboard & Input (Clavier et saisie) : Touchez le bouton Home (Accueil) │ bouton Apps │ Settings (Réglages) │Language & input (Langue et saisie) │ Keyboard & input methods (Clavier et méthodes de saisie). Pour activer un paramètre, touchez l'option de paramétrage pour cocher la case ;...
Personnalisation de votre Smart Display VSD241 6.5.1 Barres de réglage Contrast/Brightness (Contraste/Luminosité) : Contraste : Touchez et déplacez le curseur de défilement sur la barre de Contrast (Contraste) pour régler le contraste d'affichage de l'écran. Délacez le curseur de défilement vers la droite, le contraste est plus élevé. Par défaut, le contraste est réglé...
Personnalisation de votre Smart Display VSD241 6.5.3 Notice OSD ralenti : Le menu OSD se fermera et retournera automatiquement à l'écran de traitement d'origine quand menu OSD est au ralenti et a atteint la valeur de limite de l'OSD. Aucun signal : •...
Protéger votre Smart Display VSD241 7 Protéger votre Smart Display VSD241 7.1 Protéger les données de l'appareil avec un Motif de déverrouillage de l'écran Vous pouvez protéger les données de l'appareil contre un accès non autorisé en verrouillant l'écran tactile avec un Motif de déverrouillage d'écran. Une fois que le motif de déverrouillage est activé...
Protéger votre Smart Display VSD241 7.1.1 Créez un motif de déverrouillage d'écran Touchez le bouton Home (Accueil) │ bouton Apps │ Settings (Réglages) │ Security (Sécurité). Touchez la rubrique Screen Lock (Verrouillage d'écran) → Pattern (Motif). Lisez les instructions sur l'écran et étudiez l'exemple animé de la façon de dessiner un motif.
Protéger votre Smart Display VSD241 7.2 Désactivez la sécurité du déverrouillage d'écran Touchez le bouton Home (Accueil) │ bouton Apps │ Settings (Réglages) │ Security (Sécurité). Sélectionnez None (Aucune) pour désactiver la sécurité de déverrouillage d'écran. 7.3 Protéger les données de l'appareil avec un PIN Touchez le bouton Home (Accueil) │...
Protéger votre Smart Display VSD241 7.4 Protéger les données de l'appareil avec un mot de passe Touchez le bouton Home (Accueil) │ bouton Apps │ Settings (Réglages) │ Security (Sécurité). Touchez la section Screen Lock ( Verrouillage d'écran) → Password (Mot de passe).
Protéger votre Smart Display VSD241 7.5 Protégez les données de votre appareil avec la fonction « Face Unlock » (Déverrouillage par reconnaissance faciale) Depuis Android 4.0 Ice Cream Sandwich, Google a lancé une nouvelle façon de déverrouiller vos appareils à l'aide de la caméra frontale. La fonction de déverrouillage par reconnaissance faciale s'intitulant Face Unlock (Déverrouillage par reconnaissance faciale) fera partie intégrante d'Android OS.
Protéger votre Smart Display VSD241 7.6 Fonction d'économie d'énergie Afin d'économiser de l'énergie, cet appareil prend en charge un mode d'économie d'énergie (mode veille). L'appareil va se mettre en mode d'économie d'énergie quand aucune action n'est exécutée pendant un certain temps.
- Vérifiez la prise d'alimentation avec un autre appareil (comme une lampe de table) - S'il n'y a toujours aucun courant, contactez l'assistance ViewSonic ou le Revendeur auprès duquel l'appareil a été acheté Aucun affichage Vérifiez l'appareil HDMI externe et les connexions.
Annexes 9 Annexes Spécifications Spécifications de l'affichage LCD. Taille 61 cm (23,8”) Résolution 1920 x 1080 Luminosité 250 cd/m2 Rétroéclairage Épaisseur 11,2 mm Ecran tactile Type touche optique, avec verre Matériel Boutons Bouton d'alimentation *1 Touches de contrôle *4 Voyant DEL Bleu (allumé) / Orange (économie) d’alimentation Ports E/S...
Seite 117
Annexes Système d’exploitation Android 4.2.1 JellyBean Prise en charge de plusieurs langues Pilote et guide de l'utilisateur par image Application Google GMS et VSC consignés Système ® CPU/SoC nVidia Tegra Vitesse 1,7GHz Cœurs Quadricœur Graphique Incorporé Mémoire DDR3 1 Go, vitesse jusqu'à 800 Mbps En stockage eMMC (NAND), 8G WLAN (LAN sans fil)/...
Pays /Région Site Internet Courrier électronique F= Fax France et autres pays www.viewsoniceurope. www.viewsoniceurope.com/fr/ service_fr@viewsoniceurope.com francophones en Europe com/fr/ support/call-desk/ T (Numéro vert)= 1-866-463-4775 Canada www.viewsonic.com T= 1-424-233-2533 service.ca@viewsonic.com F= 1-909-468-3757 www.viewsoniceurope. www.viewsoniceurope.com/de/ Suisse service_ch@viewsoniceurope.com com/de/ support/call-desk/ www.viewsoniceurope. www.viewsoniceurope.com/fr/ Belgique (Français) service_be@viewsoniceurope.com...
Seite 119
® Étendue de la garantie : ViewSonic garantit que ses produits sont exempts de vices de fabrication ou de malfaçon pendant toute la durée de la période de garantie. Si un produit présente un défaut matériel ou de malfaçon pendant cette période, ViewSonic devra, à sa discrétion, réparer le produit ou le remplacer par un produit similaire.
Seite 120
Exclusion des dommages : La responsabilité de viewsonic se limite au coût de réparation ou de remplacement du produit. La sociéte viewsonic ne pourra pas être tenue pour responsable: 1. Des dommages causés à d’autres biens en raison d’un défaut du produit, les dom- mages résultant d’une gêne, de l’impossibilité...
La siguiente declaración se aplica a todos los productos que han recibido la aprobación FCC. Los productos correspondientes llevan el logotipo FCC y/o un identificador FCC con el formato FCC ID: GSS-VS15197 en la etiqueta del producto.Este dispositivo cumple el Apartado 15 de las Normas FCC. La operación está sujeta a las siguientes...
Seite 122
Información SAR de la FCC Este equipo cumple los límites FCC de exposición a la radicación fijados para un entorno no controlado. Los usuarios finales deben seguir las instrucciones de funcionamiento específicas para cumplir la normativa de exposición de radiofrecuencia. Este transmisor no debe ubicarse ni trabajar junto con ninguna otra antena o transmisor.
Seite 123
ENERGY STAR Este producto con la homologación ENERGY STAR le ahorra dinero reduciendo el coste energético y protegiendo el medio ambiente sin que ello afecte a sus funciones o rendimiento. Estamos orgullosos de ofrecer a nuestros clientes productos con la marca ENERGY STAR.
Seite 124
Declaración de Cumplimiento de RoHS2 Este producto ha sido diseñado y fabricado cumpliendo la Directiva 2011/65/EU del Parlamento Europeo y el Consejo para la restricción del uso de ciertas sustancias peligrosas en equipos eléctricos y electrónicos (Directiva RoHS2) y se considera que cumple con los valores de concentración máximos publicados por el European Technical Adaptation Committee (Comité...
Seite 125
Importantes Instruciones de Seguridad NO coloque ningún objeto sobre el dispositivo. Los objetos pueden arañar la pantalla o entrar en ella. NO exponga el dispositivo a entornos sucios o polvorientos. NO coloque el dispositivo en una superficie irregular o inestable. NO inserte ningún objeto extraño en el dispositivo.
Seite 126
La información contenida en este documento puede cambiar sin previo aviso.Queda prohibida la copia, reproducción o transmisión de este documento por ningún medio ni para ningún fin, sin el previo consentimiento por escrito de ViewSonic Corporation. Información de derechos de propiedad intelectual Los derechos de todas las tecnologías y productos que componen este dispositivo son...
ViewSonic es respetuoso con el medioambiente y está comprometido a trabajar y vivir de una manera que sea respetuosa con el medioambiente. Gracias por ser parte de una forma de Computación más Inteligente y más Verde. Visite el sitio web de ViewSonic para saber más.
Seite 128
Índice Índice 1 Funciones de la pantalla inteligente VSD241 1.1 Instalar el soporte para montaje en pared ......4 2 Configurar la pantalla inteligente VSD241 2.1 Conexión ................5 2.2 Preparar la pantalla inteligente para utilizarla ....5 2.3 Encender el dispositivo ............6 2.3.1 Función Reactivación en LAN (WOL, Wake on LAN) ..............
Seite 129
Índice 4.2 Menú emergente .............. 19 4.3 Google Search ..............20 4.4 Administrar la configuración del dispositivo ..... 21 4.4.1 Comprobar espacios de almacenamiento ... 21 4.4.2 Extraer la tarjeta SD de forma segura ....22 4.4.3 Borrar todos los datos del dispositivo ....22 4.5 Conectar dispositivos HDMI a través de la entrada HDMI ..............
Seite 130
Índice 7 Proteger la pantalla inteligente VSD241 7.1 Proteja los datos de su dispositivo con un patrón de desbloqueo de pantalla ............ 37 7.1.1 Crear un patrón de desbloqueo de pantalla ..38 7.1.2 Cambiar la configuración de patrón de desbloqueo ............
VSD241 es una pantalla inteligente de 24 con pulgadas y cuatro núcleos que tiene instalado Android 4.2.1 Jelly Bean. Cuenta con una resolución multitáctil HD de 1920x1080p, permite trabajar con HDMI a través de MHL y tiene opciones de conectividad USB de tamaño completo y Bluetooth. 1 Funciones de la pantalla inteligente VSD241 En esta sección se exponen las funciones de la pantalla inteligente.
Seite 132
Funciones de la pantalla inteligente VSD241 No. Componentes Descripciones Pantalla táctil Toque la pantalla táctil para controlar las configuraciones en pantalla, como por ejemplo elementos de menú, aplicaciones, botones, teclado, etc. Menú OSD / Salir Toque este botón para iniciar el menú de configuración OSD;...
Funciones de la pantalla inteligente VSD241 Vista posterior No. Componentes Descripciones Puerto Entrada Permite conectar el adaptador de alimentación. de CC HDMI Permite conectar dispositivos digitales de alta calidad para configuraciones de vídeo y audio (por ejemplo reproductores de DVD, reproductores BD, VPG o equipos portátiles).
Funciones de la pantalla inteligente VSD241 1.1 Instalar el soporte para montaje en pared La pantalla VSD241 admite la instalación de un soporte para montar en pared. Le recomendamos que utilice la interfaz de montaje que cumple el estándar Video Electronics Standards Association (VESA). Siga estos pasos para instalar el soporte: Apague el monitor y desenchufe su cable de alimentación.
Configurar la pantalla inteligente VSD241 2 Configurar la pantalla inteligente VSD241 2.1 Conexión Keyboard Printer Mouse USB Storage Mini USB Micro USB Earphone External Computer SD card HDMI Power Earphone Outlet DVD Player Bluetooth Devices Wi-Fi Devices Notebook 2.2 Preparar la pantalla inteligente para utilizarla Insertar la tarjeta SD Abra la tapa del compartimento de las pilas situada en la parte posterior...
Configurar la pantalla inteligente VSD241 Conectar el cable de alimentación Conecte el cable de alimentación incluido a la toma de alimentación. Conecte el otro extremo del cable de alimentación a la toma de corriente adecuada. 2.3 Encender el dispositivo Toque el botón de alimentación suavemente para encender el dispositivo. Desplace el icono de candado para desbloquear la pantalla (si la función pantalla bloqueada con deslizamiento está...
Configurar la pantalla inteligente VSD241 2.3.1 Función Reactivación en LAN (WOL, Wake on LAN) Para habilitar la función Reactivación en LAN (WOL, Wake on LAN): • Toque el icono Settings (Configuración) de la pantalla. • Compruebe que el elemento Ethernet tiene la opción ON (ACTIVADO). •...
Información acerca de la pantalla inteligente VSD241 3 Información acerca de la pantalla inteligente VSD241 3.1 Pantalla táctil La principal forma de controlar el dispositivo es con los tocando directamente la superficie sensible de la pantalla. Puede manipular iconos, botones, elementos de menú, el teclado en pantalla y otros elementos de la pantalla táctil con los métodos que se indican a continuación: Métodos...
Información acerca de la pantalla inteligente VSD241 3.2 Aplicaciones, widgets y accesos directos Los botones en pantalla o los iconos ofrecen una gran variedad de funciones y accesos directos. La pantalla Home (Inicio), es su punto de partida para acceder a todas las funciones del dispositivo. En ella se muestran iconos de aplicación, widgets, accesos directos, etc.
Seite 140
Información acerca de la pantalla inteligente VSD241 Elementos Descripciones Utilice la aplicación Google Search de Google Google Google para navegar por Internet más Search rápido y fácil. Pase y arrastre la pantalla horizontalmente Área de hasta que aparezca la pantalla Home navegación (Inicio) que desee.
Información acerca de la pantalla inteligente VSD241 3.4 Botones de navegación En la parte inferior de la pantalla (barra del sistema) se encuentran los botones de navegación que se describen a continuación: Botones Descripciones - Toque este botón para volver a la pantalla u opción anterior.
Información acerca de la pantalla inteligente VSD241 Elementos Descripciones Hora Muestra la hora actual. Icono Muestra el icono habilitado, como por ejemplo la función especificado Bluetooth habilitada. Muestra el estado actual del dispositivo, como por ejemplo Owner (Propietario), Brightness (Brillo), Settings (Configuración), Menú...
Información acerca de la pantalla inteligente VSD241 3.6.2 Mover un elemento • En la pantalla Home (Inicio) toque sin soltar el elemento que desea mover. • Mueva el elemento a la posición especificada. • A continuación, suelte el dedo para agregar el elemento a la nueva posición.
Información acerca de la pantalla inteligente VSD241 3.7 Recorrer las aplicaciones Puede buscar aplicaciones disponibles en el dispositivo en el menú All Apps (Todas las aplicaciones): 3.7.1 Pantalla Apps (Aplicaciones) Abrir la pantalla Apps (Aplicaciones) Puede acceder a la pantalla Apps (Aplicaciones) desde cualquier pantalla Home (Inicio) tocando el botón Apps (Aplicaciones)
Información acerca de la pantalla inteligente VSD241 Utilizar el acceso directo para abrir una aplicación Toque el botón Home (Inicio) de la barra del sistema. Si el acceso directo de la aplicación que desea aparece en la pantalla Home (Inicio) tóquelo para iniciar dicha aplicación. 3.7.3 Aplicaciones recientes Abrir una aplicación usada recientemente Toque el botón Recent Applications...
Utilizar la pantalla inteligente VSD241 4 Utilizar la pantalla inteligente VSD241 4.1 Administrar contactos Toque el botón Home (Inicio) │botón Apps (Aplicaciones)│People (Gente) para ver y administrar sus contactos. 4.1.1 Agregar un nuevo contacto Toque New (Nuevo). Seleccione la cuenta en la que desea agregar este contacto, como por ejemplo su cuenta de Gmail.
Utilizar la pantalla inteligente VSD241 4.1.2 Buscar un contacto Para buscar un contacto, puede llevar a cabo una de las acciones siguientes: • Pasar la lista de contactos de la ficha All (Todos) que se encuentra en la parte superior izquierda de la pantalla hasta que encuentra el contacto.
Seite 148
Utilizar la pantalla inteligente VSD241 Compartir un contacto En la lista de contactos, busque el contacto que desee. Toque la entrada del contacto para ver los detalles de este. Toque el botón Menu (Menú) situado en la esquina superior derecha la pantalla y, a continuación, seleccione Share (Compartir).
Utilizar la pantalla inteligente VSD241 Desde la lista de contactos Join (Unir), toque otro contacto para vincular y, a continuación, toque Done (Hecho). La información del contacto unido se mostrará con la Contacts settings (configuración del contacto) original. En People (Gente), toque el botón Menu (Menú) en el dispositivo o en la pantalla.
Utilizar la pantalla inteligente VSD241 Seleccionar una acción o elemento en el menú emergente Toque el botón Menu (Menú) del dispositivo o de la pantalla para abrir el menú emergente. Toque el elemento que desee en el menú emergente. 4.3 Google Search Puede utilizar el widget Google Search para buscar sitios Web e información en Google, aplicaciones instaladas en el dispositivo...
Utilizar la pantalla inteligente VSD241 Buscar por voz Toque el micrófono que aparece al lado del cuadro de búsqueda. Diga el nombre o palabra clave del elemento que desea buscar. El explorador con vínculos Web coincidentes se abrirá. 4.4 Administrar la configuración del dispositivo 4.4.1 Comprobar espacios de almacenamiento Toque el botón Home (Inicio) │...
Utilizar la pantalla inteligente VSD241 4.4.2 Extraer la tarjeta SD de forma segura Toque el botón Home (Inicio) │ botón Apps (Aplicaciones) │ Settings (Configuración) │ Storage (Almacenamiento). Toque Unmount SD (Desmontar tarjeta SD) bajo la sección SD Card (Tarjeta SD). Presione sin soltar el botón de alimentación hasta que aparezca el menú...
Utilizar la pantalla inteligente VSD241 NOTA • Asegúrese de que ha hecho una copia de seguridad de todos los datos necesarios an- tes de borrarlos del dispositivo. 4.5 Conectar dispositivos HDMI a través de la entrada HDMI HDMI (High-Definition Multimedia Interface, es decir, Interfaz multimedia de alta definición) es una interfaz de audio y vídeo compacta que permite transferir datos de audio y vídeo digitales sin comprimir.
Utilizar la pantalla inteligente VSD241 4.6 Conexión Bluetooth Bluetooth es una tecnología de comunicación inalámbrica de corto alcance que permite al dispositivo conectarse a otros dispositivos Bluetooth a través de una red inalámbrica. La tecnología Bluetooth del dispositivo funciona de tres modos diferentes: Estado Descripciones Activado...
Utilizar la pantalla inteligente VSD241 Puede que se le pida una contraseña para autenticarse. Introduzca la misma contraseña en ambos dispositivos o la contraseña proporcionada por el fabricante del dispositivo. Asegúrese de que ha leído la documentación del dispositivo de asociación para saber si necesita una contraseña determinada.
Internet 5 Internet 5.1 Conectarse a Internet Para navegar por la Web y acceder a utilidades basadas en Internet, como por ejemplo mensajería instantánea, puede conectar su VSD241 a una red LAN a través de un cable RJ45 en el conector LAN o configurar una conexión Wi-Fi.
Internet 5.1.2 Comprobar la conexión de red Wi-Fi actual Desde el área de estado de la barra del sistema: Cuando el dispositivo esté conectado a una red inalámbrica, el icono Wi-Fi del área de estado de la barra del sistema indicará la intensidad de la señal (número de bandas que se iluminan).
Internet 5.2 Sincronizar sus datos de Google A través de una conexión Web, su dispositivo puede sincronizar sus datos de Google, como por ejemplo la cuenta de correo de Gmail, el calendario y los contactos, con su PC o con cualquier otro dispositivo que utilice para acceder a su cuenta de Google.
Seite 159
Internet Cómo empezar Autenticar su cuenta de Google Puede hacer esto o abriendo Google Talk y, a continuación, iniciando sesión en su cuenta de Google. Antes de utilizar la conversación con vídeo, primero debe iniciar sesión en su cuenta de Google. Invitar a una persona Abra la aplicación Google Talk.
Personalizar la pantalla inteligente VSD241 6 Personalizar la pantalla inteligente VSD241 Puede personalizar su dispositivo utilizando las opciones disponibles de la aplicación Settings (Configuración). 6.1 Configuración de la visualización Cambie la configuración de la pantalla: Toque el botón Home (Inicio) │ botón Apps (Aplicaciones) │ Settings (Configuración) │...
Personalizar la pantalla inteligente VSD241 6.2 Configuración del sonido y de los tonos de llamada Cambie la configuración del sonido y de los tonos de llamada: Toque el botón Home (Inicio) │ botón Apps (Aplicaciones) │ Settings (Configuración) │ Sound (Sonido). Seleccione la lista y toque la opción que desee.
Personalizar la pantalla inteligente VSD241 6.2.3 Mejora de ViewSound Elementos Descripciones Mejora de 1. Establezca el modo con el efecto ViewSound. ViewSound 2. Las opciones disponibles son: Pop, Theater (Teatro), Game (Juego), Jazz, Classical (Clásica) o Disable ViewSound effect (Deshabilitar efecto ViewSound). 6.3 Fecha, hora y zona horaria Nueva función agregada: El reloj se ha rediseñado totalmente con un aspecto completamente...
Personalizar la pantalla inteligente VSD241 Elementos Descripciones Automatic date & Se utiliza la zona horaria proporcionada por la red automáticamente. time (Fecha y hora automáticas) Set date (Establecer 1. Toque el elemento Set date (Establecer fecha) para fecha) ajustar el día, el mes y el año; también puede tocar el día, el mes o el año para pasar al valor que desee.
Personalizar la pantalla inteligente VSD241 Establezca el teclado y la entrada: Toque el botón Home (Inicio) │ botón Apps (Aplicaciones) │ Settings (Configuración) │ Language & input (Idioma y entrada) | Keyboard & input methods (Métodos de teclado y de entrada). Para habilitar o deshabilitar una configuración, toque su opción para activar o desactivar la casilla, respectivamente.
Personalizar la pantalla inteligente VSD241 6.5.1 Barras de ajuste Contraste y brillo: Contraste: Toque y arrastre el control deslizante de la barra Contrast (Contraste) para ajustar el contraste de la pantalla. Si arrastra el control deslizante hacia la derecha, el contraste aumentará. De forma predeterminada, el valor del contraste se establece en 80.
Personalizar la pantalla inteligente VSD241 6.5.3 Aviso sobre el menú OSD Inactividad: El menú OSD se cerrará y regresará a la pantalla de procesamiento original automáticamente si dicho menú ha estado inactivo durante el tiempo establecido en la opción OSD Time Out (Tiempo de espera OSD). No signal (No hay señal): •...
Proteger la pantalla inteligente VSD241 7 Proteger la pantalla inteligente VSD241 7.1 Proteja los datos de su dispositivo con un patrón de desbloqueo de pantalla Puede proteger los datos de su dispositivo contra acceso no autorizado bloqueando la pantalla táctil mediante un patrón de desbloqueo de pantalla. Una vez habilitado el patrón de desbloqueo y la pantalla bloqueada, tendrá...
Proteger la pantalla inteligente VSD241 7.1.1 Crear un patrón de desbloqueo de pantalla Toque el botón Home (Inicio) │ botón Apps (Aplicaciones) │ Settings (Configuración) │ Security (Seguridad). Toque la sección Screen Lock (Bloqueo de pantalla) → Pattern (Patrón). Lea las instrucciones de la pantalla y observe el ejemplo animado sobre cómo dibujar un patrón.
Proteger la pantalla inteligente VSD241 7.2 Deshabilitar la seguridad de desbloqueo de la pantalla Toque el botón Home (Inicio) │ botón Apps (Aplicaciones) │ Settings (Configuración) │ Security (Seguridad). Seleccione None (Ninguna) para deshabilitar la seguridad de desbloqueo de la pantalla. 7.3 Proteger los datos del dispositivo con un código Toque el botón Home (Inicio) │...
Proteger la pantalla inteligente VSD241 7.4 Proteger los datos del dispositivo con una contraseña Toque el botón Home (Inicio) │ botón Apps (Aplicaciones) │ Settings (Configuración) │ Security (Seguridad). Toque la sección Screen Lock (Bloqueo de pantalla) → Password (Contraseña). En la pantalla Choose your password (Elegir contraseña), escriba una contraseña en el cuadro de texto .
Proteger la pantalla inteligente VSD241 7.5 Proteger los datos del dispositivo con desbloqueo facial A partir de Android 4.0 Ice Cream Sandwich, Google ha presentado una nueva forma de desbloquear los dispositivos a través de la cámara frontal. La función de desbloqueo mediante reconocimiento facial denominada Face Unlock (Desbloqueo facial) será...
Proteger la pantalla inteligente VSD241 7.6 Función de ahorro de energía Para ahorrar energía, este dispositivo admite el modo de ahorro de energía (modo de suspensión). El dispositivo entrará en el modo de ahorro de energía cuando permanezca inactivo sin realizar ninguna operación. A continuación, la pantalla se apagará.
- Compruebe la toma de corriente con otro dispositivo, como por ejemplo con una lámpara de mesa. - Si sigue sin haber corriente, entonces póngase en contacto con el servicio de soporte técnico de ViewSonic o con el revendedor a quien adquirió el dispositivo. No se muestra Compruebe el dispositivo HDMI externos y las conexiones.
Apéndice 9 Apéndice Especificaciones Especificaciones de la pantalla LCD Tamaño 61 cm (23,8”) Resolución 1920x1080 Brillo 250 cd/m2 Retroiluminación Grosor 11,2 mm Pantalla táctil Tipo táctil óptico, con cristal Hardware Botones Botón de alimentación *1 Botones de control *4 Indicador LED de Azul (encendido) / Naranja (guardando) encendido Puertos de E/S...
Seite 175
Apéndice Sistema operativo Android 4.2.1 JellyBean Disponible en varios idiomas Controlador y manual del usuario en imagen de disco duro Aplicación Google GMS y VSC consignadas Sistema ® CPU/SoC nVidia Tegra Velocidad 1,7GHz Núcleos Cuatro núcleos Tarjeta gráfica Incrustada Memoria DDR3 1 GB, 800 Mbps de velocidad Almacenamiento eMMC (NAND), 8 GB...
Latinoamérica (México) www.viewsonic.com/la/ T= 001-8882328722 soporte@viewsonic.com Renta y Datos, 29 SUR 721, COL. LA PAZ, 72160 PUEBLA, PUE. Tel: 01.222.891.55.77 CON 10 LINEAS Electroser, Av Reforma No. 403Gx39 y 41, 97000 Mérida, Yucatán. Tel: 01.999.925.19.16 Other places please refer to http://www.viewsonic.com/la/soporte/index.htm#Mexico...
Seite 177
Los productos o las piezas sustituidos pueden incluir componentes o piezas reparadas o recicladas. Duración de la garantía: ViewSonic Smart Display tiene una garantía de al menos 1 año en mano de obra a partir de la fecha de compra del primer cliente. Destinatario de la garantía: Esta garantía sólo es válida para el primer comprador de este producto.
Seite 178
Exclusión de daños: La responsabilidad de viewsonic se limita al coste de la reparación o sustitución del producto. Viewsonic no se hace responsable de: 1. Daños a otras pertenencias causados por defectos del producto, inconvenientes, pérdida de uso del producto, de tiempo, de beneficios, de oportunidades comer-...
Die folgende Erklärung gilt für alle Produkte, die eine FCC-Zulassung erhalten haben. Entsprechende Produkte tragen das FCC-Logo und/oder eine FCC-Kennung im Format FCC ID: GSS-VS15197 am Produktetikett. Dieses Gerät erfüllt alle Anforderungen des Teils 15 der FCC-Bestimmungen. Der Betrieb muss die folgenden zwei Bedingungen erfüllen: (1) Das Gerät darf keine schädlichen Interferenzen verursachen, und (2) das...
Seite 180
FCC SAR-Hinweis Dieses Gerät hält die FCC-Strahlungsaussetzungsgrenzwerte ein, die für unbestimmte Umgebungen festgelegt wurden. Endanwender müssen sich an bestimmte Betriebshinweise zur Erfüllung der Vorschriften zur Strahlungsaussetzung halten. Dieser Sender darf nicht in der Nähe einer anderen Antenne oder eines anderen Senders aufgestellt und nicht gemeinsam mit solchen Einrichtungen genutzt werden.
Seite 181
ENERGY STAR Dieses ENERGY STAR-qualifizierte Produkt spart durch geringere Energiekosten echtes Geld und leistet einen Beitrag zum Umweltschutz, ohne dass Funktionsumfang oder Leistung darunter leiden. Daher freuen wir uns sehr, unseren Kunden Produkte mit dem ENERGY STAR-Kennzeichen anbieten zu können. Was ist ENERGY STAR? ENERGY STAR-qualifizierte Produkte verbrauchen weniger Energie und wirken der Entstehung von Treibhausgasen entgegen –...
RoHS2-Konformitätserklärung Dieses Produkt wurde gemäß den Anforderungen der EG-Richtlinie 2011/65/EU zur Beschränkung der Verwendung bestimmter gefährlicher Stoffe in Elektro- und Elektronikgeräten (RoHS2-Richtlinie) entworfen und hergestellt und hat sich als mit den maximalen Konzentrationswerten, die der europäischen Ausschuss für die technische Anpassung (Technical Adaptation Committee;...
Wichtige Sicherheitsanweisungen Platzieren Sie keine Gegenstände auf dem Gerät. Gegenstände könnten die Bildschirmoberfläche zerkratzen oder in das Gerät eindringen. Setzen Sie das Gerät keinen schmutzigen oder staubigen Umgebungen aus. Platzieren Sie das Gerät nicht auf einer unebenen oder unstabilen Oberfläche. Stecken Sie keine Fremdkörper in das Gerät.
Seite 184
Die in diesem Dokument enthaltenen Informationen können ohne vorherige Ankündigung geändert werden.Kein Teil dieses Dokuments darf in irgendeiner Form für irgendeinen Zweck ohne die vorherige schriftliche Zustimmung der ViewSonic Corporation kopiert, reproduziert oder übertragen werden. Hinweise zum Recht am geistigen Eigentum Das Recht an allen Technologien und Produkten, die in diesem Gerät enthalten sind,...
Kaufdatum: _______________________________ Produktentsorgung am Ende der Produktlebenszeit ViewSonic achtet die Umwelt und verpflichtet sich zu einer umweltbewussten Arbeits- und Lebensweise. Vielen Dank, dass Sie einen Beitrag zu einem intelligenteren, umweltfreundlicheren Umgang mit EDV-Produkten leisten. Weitere Einzelheiten finden Sie auf der ViewSonic-Webseite.
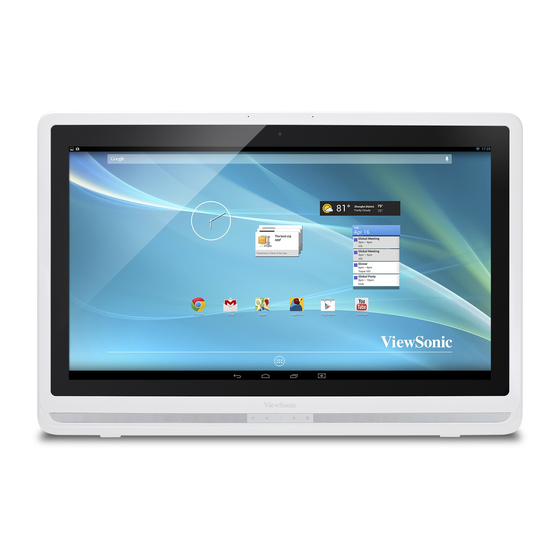
Der VSD241 ist ein Smart-Display mit Quad-core-Prozessor und 24-Zoll- Bildschirm unter Android 4.2.1 Jelly Bean. Das Gerät bietet 1920 × 1080 Punkte HD-Bildschirmauflösung (1080p), Multitouch, HDMI-Ausgabe über MHL, normalgroße USB-Ports und Bluetooth-Konnektivität. 1 VSD241 Smart-Display – Eigenschaften Dieser Abschnitt stellt Ihnen die Eigenschaften Ihres Smart-Displays vor. HINWEIS •...
Seite 190
VSD241 Smart-Display – Eigenschaften Komponenten Beschreibungen Touchscreen Durch Berühren des Bildschirms konfigurieren Sie das System, wählen Menüelemente, Applikationen, Schaltflächen, Buchstaben und so weiter aus. OSD-Menü/Beenden Mit dieser Taste rufen Sie das OSD- Konfigurationsmenü auf. Durch erneute Berührung blenden Sie das Menü wieder aus. Ein-/Austaste (LED- Zum Einschalten/Sperren des Smart- Anzeige)
VSD241 Smart-Display – Eigenschaften Rückansicht Komponenten Beschreibungen Netzteilanschluss Hier schließen Sie das Netzteil an. HDMI Zum Anschluss hochwertiger Video- und Audiogeräte (z. B. DVD-Player, Blu-ray-Player, Notebooks). RJ45-Anschluss Zur Netzwerkanbindung über RJ45-Kabel. 2 USB-Ports Zum Anschluss von Tastaturen, Mäusen, Flash- Laufwerken (nur im FAT32-Format) oder Druckern. Mini-USB-Port Externer Anzeigemodus für USB-Upstream, Webcam- und Touchscreen-Bedienung.
VSD241 Smart-Display – Eigenschaften 1.1 Wandhalterung anbringen Mit der passenden Halterung können Sie den VSD241 auch an der Wand anbringen. Wir empfehlen eine Halterung nach VESA-Vorgaben. Mit den folgenden Schritten bringen Sie die Halterung an: Schalten Sie den Monitor aus, trennen Sie das Netzkabel. Legen Sie den Monitor mit der Bildseite nach unten auf eine flache Unterlage.
VSD241 einrichten 2 VSD241 einrichten 2.1 Verbindung Keyboard Printer Mouse USB Storage Mini USB Micro USB Earphone External Computer SD card HDMI Power Earphone Outlet DVD Player Bluetooth Devices Wi-Fi Devices Notebook 2.2 Smart-Display einsatzbereit machen SD-Karte einlegen Öffnen Sie die Anschlussabdeckung an der Rückseite des Smart-Displays.
VSD241 einrichten Netzkabel anschließen Schließen Sie das das Kabel an den Netzteileingang an. Verbinden Sie den Netzstecker mit einer geeigneten Steckdose. 2.3 Einschalten Tippen Sie zum Einschalten des Gerätes kurz auf die Ein-/Austaste. Schieben Sie das Schlosssymbol zum Entsperren des Bildschirms zur Seite (wenn die Bildschirmfreigabe per Schieber aktiv ist) Nachdem das Netzteil angeschlossen wurde, können Sie das Gerät durch Angetippthalten (etwa eine halbe Sekunde lang) der Ein-/...
VSD241 einrichten 2.3.1 Aufwecken bei LAN-Aktivität (WOL) So aktivieren Sie das Aufwecken bei LAN-Aktivität (WOL): • Berühren Sie das Einstellungen-Symbol auf dem Bildschirm. • Sorgen Sie dafür, dass Ethernet auf EIN eingestellt ist. • Wählen Sie in der Zeile Datennutzung die Option Mehr..•...
Ihr Smart-Display VSD241 3 Ihr Smart-Display VSD241 3.1 Touchscreen In erster Linie steuern Sie Ihr neues Gerät mit den Fingerspitzen, indem Sie direkt auf den berührungsempfindlichen Bildschirm tippen. Mit den folgenden Aktionen können Sie Symbole, Schaltflächen, Menüelemente, die Bildschirm- tastatur und andere Dinge über den Touchscreen bedienen: Methoden Beschreibungen Berühren Sie die Elemente einfach mit dem Finger.
Ihr Smart-Display VSD241 3.2 Applikationen, Widgets und Verknüpfungen Die Schaltflächen und Symbole bieten Ihnen eine Vielzahl von Funktionen und Verknüpfungen. Der Startbildschirm ist der Ausgangspunkt, von dem aus Sie auf sämtliche Funktionen Ihres Gerätes zugreifen können. Unter ande- rem finden Sie hier Applikationssymbole, Widgets, Verknüpfungen usw. Applikationen: Dahinter verbirgt sich Software für bestimmte Aufgaben.
Seite 198
Ihr Smart-Display VSD241 Elemente Beschreibungen Über die Google-Suchapplikaton Google Google-Suche können Sie das Internet schnell und einfach durchforsten. Wischen Sie horizontal über den Navigationsbereich Bildschirm, bis der gewünschte Startbildschirm erscheint. Kehrt zum vorherigen Bildschirm oder Zurück zur letzten Option zurück. Mit dieser Schaltfläche können Startseite Sie jederzeit zum zentralen...
Ihr Smart-Display VSD241 3.4 Navigationsschaltflächen Am unteren Bildschirmrand (Systemleiste) finden Sie die nachstehend be- schriebenen Navigationsschaltflächen: Schaltflächen Beschreibungen - Mit dieser Schaltfläche gelangen Sie zum vorherigen Bildschirm oder zur vorherigen Option zurück. Zurück - Wenn die Bildschirmtastatur angezeigt wird, ändert sich diese Schaltfläche in .
Ihr Smart-Display VSD241 Elemente Beschreibungen Zeit Zeigt die aktuelle Uhrzeit. Zeigt an, dass bestimmte Funktionen wie Bluetooth Symbol aktiviert wurden. Zeigt den aktuellen Status Ihres Gerätes mit Angaben wie Eigentümer, Helligkeit, Einstellungen, WLAN, Statusmenü Auto-Drehung, Akkuladezustand, Flugzeugmodus und Bluetooth-Einstellungen. 3.5.1 Mit dem Statusmenü arbeiten Das Statusmenü...
Ihr Smart-Display VSD241 3.6.2 Ein Element verschieben • Halten Sie im Startbildschirm das Element angetippt, das Sie verschieben möchten. • Schieben Sie das Element an die gewünschte Position. • Zum Zufügen des Elementes an der neuen Positionen heben Sie anschlie- ßend den Finger ab.
Ihr Smart-Display VSD241 3.7 Applikationen verwenden Die Applikationen Ihres Gerätes finden Sie im Alle-Apps-Menü: 3.7.1 Apps-Bildschirm Apps-Bildschirm öffnen Den Apps-Bildschirm erreichen Sie aus sämtlichen Startbildschirmen durch Antippen der Apps-Schaltfläche im unteren Be- reich des Bildschirms. Der Apps-Bildschirm enthält sämtliche im Gerät installierten Ap- plikationen;...
Ihr Smart-Display VSD241 Applikationen über Verknüpfungen öffnen Berühren Sie die Startbildschirm-Schaltfläche in der Systemleiste. Wenn die gewünschte Applikationsverknüpfung im Startbildschirm erscheint, starten Sie die Applikation durch Antippen der Verknüpfung. 3.7.3 Letzte Applikationen Zuletzt verwendete Applikationen öffnen Berühren Sie die Letzte Applikationen- Schaltfläche –...
Smart-Display VSD241 verwenden 4 Smart-Display VSD241 verwenden 4.1 Kontakte verwalten Zum Anzeigen und Verwalten Ihrer Kontakte berühren Sie: Startseite-Schalt- fläche | Apps-Schaltfläche. 4.1.1 Neue Kontakte hinzufügen Tippen Sie auf Neu. Wählen Sie das Konto, dem Sie den Kontakt zufügen möchten; beispielsweise Ihr Gmail-Konto.
Smart-Display VSD241 verwenden 4.1.2 Kontakte finden Zum Auffinden eines Kontakte stehen Ihnen diese Möglichkeiten zur Verfügung: • Blättern Sie durch die Alle Kontakte- Liste oben links im Bildschirm, bis Sie den gewünschten Kontakt gefunden haben. Alternativ können Sie mit dem Scrollbalken links im Bild durch die Kontaktliste blättern.
Seite 206
Smart-Display VSD241 verwenden Kontakte teilen (freigeben) Suchen Sie den gewünschten Kontakt aus der Kontaktliste heraus. Rufen Sie die Kontaktdetails durch Antippen des Kontaktes auf. Berühren Sie die Menü-Schaltfläche oben rechts im Bildschirm, wählen Sie dann Teilen. Im nun angezeigten Kontakt teilen über-Menü wählen Sie aus, wie die Kontaktinformationen geteilt werden sollen;...
Smart-Display VSD241 verwenden Tippen Sie in der Kontakte zusammenführen-Liste auf einen weiteren Kontakt, berühren Sie dann Fertig. Die Daten des zusammengeführten Kontaktes werden mit den ursprünglichen Kontakteinstellungen angezeigt. Unter Personen berühren Sie die Menütaste am Gerät oder die Menü- Schaltfläche auf dem Bildschirm. Einstellungen Beschreibungen Konten...
Smart-Display VSD241 verwenden Optionen oder Elemente im Popup-Menü wählen Berühren Sie die Menütaste am Gerät oder die Menü-Schaltfläche auf dem Bildschirm; das Popup-Menü öffnet sich. Tippen Sie im Popup-Menü auf das gewünschte Element. 4.3 Google-Suche Mit dem Google-Suche-Widget können Sie Internetseiten und Informationen über Goog- le, in Ihrem Gerät installierte Applikationen und in der Kontaktliste sowie über die Gmail...
Smart-Display VSD241 verwenden Sprechen und suchen Tippen Sie auf das Mikrofonsymbol neben dem Suchfeld. Sprechen Sie den Namen oder das Schlüsselwort, nach dem Sie suchen möchten. Der Browser öffnet sich mit passenden Internet-Links. 4.4 Mit den Geräteeinstellungen arbeiten 4.4.1 Speicherplatz prüfen Berühren Sie: Startseite-Schaltfläche | Apps- Schaltfläche | Einstellungen | Speicher Auf dem Bildschirm erscheinen gesamter und...
Smart-Display VSD241 verwenden 4.4.2 SD-Karte sicher entfernen Berühren Sie: Startseite-Schaltfläche | Apps-Schaltfläche | Einstellungen | Speicher Tippen Sie im Bereich „SD-Karte“ auf „SD-Karte trennen“. Halten Sie die Ein-/Austaste gedrückt, bis das Abschaltmenü erscheint. Anschließend tippen Sie zum Abschalten des Gerätes auf OK. Öffnen Sie die Anschlussabdeckung, nehmen Sie dann die SD-Karte aus dem Gerät.
Smart-Display VSD241 verwenden HINWEIS • Vergessen Sie nicht, all Ihre wichtigen Daten zu sichern, bevor Sie sämtliche Daten aus dem Gerät löschen. 4.5 Per HDMI-Anschluss mit HDMI-fähigen Geräten verbinden HDMI (High-Definition Multimedia Interface – hochauflösende Multimediaschnittstelle) ist eine kompakte Audio-/Videoschnittstelle zur Übertragung unkomprimierter Audio-/Video-Digitaldaten.
Smart-Display VSD241 verwenden 4.6 Bluetooth-Verbindung Bluetooth ist eine Kommunikationstechnolo- gie zur Überbrückung kurzer Distanzen, mit der Sie Bluetooth-fähige Geräte kabellos an- schließen können. Die Bluetooth-Implemen- tierung Ihres Gerätes arbeitet in drei unter- schiedlichen Modi: Status Beschreibungen Bluetooth ist eingeschaltet. Ihr Gerät kann Bluetooth- Geräte in Reichweite erkennen, kann jedoch nicht selbst von diesen gefunden werden.
Smart-Display VSD241 verwenden Eventuell werden Sie nach einem Kennwort gefragt. Geben Sie dasselbe Kennwort bei beiden Geräten ein; oder geben Sie das vom Hersteller des Gerätes angegebene Kennwort ein. Lesen Sie unbedingt die Dokumentation des externen Gerätes und schauen Sie nach, ob ein Standardkennwort genutzt wird.
Internet 5 Internet 5.1 Mit dem Internet verbinden Wenn Sie im Internet surfen oder Internet- basierte Software wie Instant Messaging nut- zen möchten, können Sie das VSD241 per Netzwerkkabel (RJ45) am LAN-Anschluss mit einem lokalen Netzwerk verbinden oder eine WLAN-Verbindung aufbauen. 5.1.1 WLAN-Verbindung Berühren Sie: Startseite-Schaltfläche | Apps-Schaltfläche | Einstellungen | WLAN.
Internet 5.1.2 Aktuelle WLAN-Netzwerkverbindung prüfen Im Statusbereich der Systemleiste: Wenn Ihr Gerät mit einem WLAN-Netz- werk verbunden ist, zeigt das WLAN-Symbol im Statusbereich der System- leiste die Signalstärke an (je mehr Balken, desto besser das Signal). Wenn Einstellungen | WLAN | Netzwerkbenachrichtigung aktiv ist, erscheint das Symbol „?“...
Internet 5.2 Google-Daten synchronisieren Per Internetverbindung können Sie Ihre Google-Daten einschließlich Gmail, Kalender und Kontakten mit Ihrem Computer und sämt- lichen weiteren Geräten synchronisieren, mit denen Sie auf Ihr Google-Konto zugreifen. Applikationen zum Synchronisieren auswählen Berühren Sie: Startseite-Schaltfläche | Apps-Schaltfläche | Einstellungen | Konten Im Konten-Bereich tippen Sie zum Markieren des Kästchens zum Aktivieren sämtlicher Synchronisierungsoptionen auf das Symbol...
Seite 217
Internet So wirds gemacht Google-Konto authentisieren Dies können Sie erledigen, indem Sie Google Talk öffnen und sich anschließend an Ihrem Google-Konto anmelden. Sie müssen sich grundsätzlich zuerst an Ihrem Google-Konto anmelden, bevor Sie den Videochat nutzen können. Jemanden einladen Öffnen Sie die Google Talk-Applikation. Suchen Sie jemanden aus der Google Talk-Freundesliste heraus, den Sie zum Videochat einladen möchten.
VSD241 Smart-Display anpassen 6 VSD241 Smart-Display anpassen Mit den zahlreichen Einstellungsoptionen können Sie Ihr Gerät ganz an Ihren Geschmack anpassen. 6.1 Anzeigeeinstellungen Anzeigeeinstellungen ändern: Berühren Sie: Startseite-Schaltfläche | Apps-Schaltfläche | Einstellungen | Anzeige Hier können Sie Hintergrundbild, Energiesparmodus und Schriftgröße konfigurieren.
VSD241 Smart-Display anpassen 6.2 Ton- und Klingeltoneinstellungen So ändern Sie Ton- und Klingeltoneinstellungen: Berühren Sie: Startseite-Schaltfläche | Apps-Schaltfläche | Einstellungen | Klänge Tippen Sie die gewünschte Option in der Liste an. Zum Aktivieren und Deaktivieren markieren oder demarkieren Sie das jeweilige Kontrollkästchen;...
VSD241 Smart-Display anpassen 6.2.3 ViewSound-Klangverbesserung Elemente Beschreibungen ViewSound- 1. Zum Einstellen des gewünschten ViewSound-Effektes. Klangverbesserung 2. Wählen Sie den gewünschten ViewSound-Effekt: Pop, Kino, Spiel, Jazz, Klassik oder Aus 6.3 Datum, Uhrzeit und Zeitzone Neue Funktionen: Die Uhr wurde vollständig überarbeitet, bietet nun ein komplett neues Aussehen und ermöglicht digitale oder analoge Uhrendarstellung.
VSD241 Smart-Display anpassen Elemente Beschreibungen Datum & Uhrzeit Datum und Uhrzeit werden automatisch auf der Grundlage des verwendeten Netzwerks eingestellt. automatisch einstellen Datum einstellen 1. Tippen Sie zum Einstellen von Tag, Monat und Jahr auf Datum einstellen; dazu können Sie auch auf Datum, Monat oder Jahr tippen und den gewünschten Wert durch Wischen einstellen.
VSD241 Smart-Display anpassen Tastatur und Eingabemethoden festlegen: Berühren Sie: Startseite-Schaltfläche | Apps-Schaltfläche | Einstellungen | Sprache & Eingabe | Tastatur & Eingabemethoden Zum Aktivieren und Deaktivieren markieren oder demarkieren Sie das jeweilige Kontrollkästchen; dazu tippen Sie jeweils auf die gewünschte Einstellungsoption.
VSD241 Smart-Display anpassen 6.5.1 Einstellschieber Kontrast/Helligkeit: Kontrast: Zum Anpassen des Bildschirmkontrastes ziehen Sie den Kontrast- Einstellschieber in die gewünschte Position. Wenn Sie nach rechts ziehen, erhöht sich der Kontrast. Der Kontrast ist auf 80 voreingestellt. Helligkeit: Zum Einstellung der Helligkeit ziehen Sie den Helligkeit- Einstellschieber in die gewünschte Position.
VSD241 Smart-Display anpassen 6.5.3 OSD-Hinweis Leerlauf: Das OSD-Menü wird automatisch ausgeblendet und weicht dem ursprünglichen Bildschirm, wenn Sie das OSD-Menü eine bestimmte Zeit lang nicht benutzen. Die entsprechende Zeit können Sie unter OSD- Anzeigezeit einstellen. Kein Signal: • Es besteht keine Verbindung zum HDMI-Gerät. •...
VSD241 Smart-Display schützen 7 VSD241 Smart-Display schützen 7.1 Gerätedaten mit einem Bildschirmfreigabemuster schützen Sie können Ihr Gerät gegen nicht autorisierten Zugriff schützen, indem Sie den Touchscreen mit einem Bildschirmfreigabemuster blockieren. Wenn das Bildschirmfreigabemuster aktiv ist und der Bildschirm gesperrt wird, müssen Sie das richtige Freigabemuster zum Entsperren des Bildschirms zeichnen.
VSD241 Smart-Display schützen 7.1.1 Bildschirmfreigabemuster erstellen Berühren Sie: Startseite-Schaltfläche | Apps-Schaltfläche | Einstellungen | Sicherheit Tippen Sie auf den Sperrbildschirm-Bereich, wählen Sie Muster. Lesen Sie die Anleitung auf dem Bildschirm, schauen Sie sich das animierte Beispiel zum Zeichnen eines Musters an. Tippen Sie auf Weiter, wenn Sie zum Zeichnen Ihres eigenen Musters bereit sind.
VSD241 Smart-Display schützen 7.2 Sperrbildschirm abschalten Berühren Sie: Startseite-Schaltfläche | Apps-Schaltfläche | Einstellungen | Sicherheit Wählen Sie zum Abschalten des Sperrbildschirms die Option None (–). 7.3 Gerätedaten mit einer PIN schützen Berühren Sie: Startseite-Schaltfläche | Apps-Schaltfläche | Einstellungen | Sicherheit Tippen Sie auf den Bereich Sperrbildschirm, dann auf PIN.
VSD241 Smart-Display schützen 7.4 Gerätedaten mit einem Kennwort schützen Berühren Sie: Startseite-Schaltfläche | Apps-Schaltfläche | Einstellungen | Sicherheit Tippen Sie auf den Sperrbildschirm-Bereich, danach auf Kennwort. Im Wählen Sie Ihr Kennwort-Bildschirm geben Sie das gewünschte Kennwort in das Eingabefeld ein. Ein gültiges Kennwort muss aus mindestens vier Zeichen bestehen und mindestens einen Buchstaben enthalten.
VSD241 Smart-Display schützen 7.5 Gerätedaten per Gesichts-Entsperrung schützen Ab Android 4.0 Ice Cream Sandwich gibt es eine neue Möglichkeit zum Entsperren Ihres Gerätes über die Frontkamera. Die Freigabe des Gerätes durch Gesichtserkennung (Gesichts-Entsperrung genannt) ist ein fester Teil des Android-Betriebssystems. Mit den folgenden Schritten richten Sie die Gesichts-Entsperrung Ihres Gerätes ein: Berühren Sie: Startseite-Schaltfläche │...
VSD241 Smart-Display schützen 7.6 Energiesparmodus Um Energie zu sparen, kann Ihr Gerät in den Energiesparmodus (Schlafmodus) wechseln. Der Energiesparmodus wird aktiv, wenn Sie eine gewisse Zeit nicht mit dem Gerät arbeiten. Dabei erlischt der Bildschirm. Wenn Sie die Zeit vorgeben möchten, nach der das Gerät in den Schlafmodus wechseln soll, berühren Sie: Startseite-Schaltfläche │...
- Prüfen Sie die Steckdose durch Anschluss eines anderen Gerätes (zum Beispiel einer Tischleuchte). - Falls das Gerät dennoch nicht funktionieren sollte, wenden sich bitte an den ViewSonic-Kundendienst oder an den Händler, bei dem Sie das Gerät erworben haben. Kein Bild Überprüfen Sie externe HDMI-Geräte und die zugehörigen...
Anhang 9 Anhang Technische Daten LCD-Daten Größe 61 cm (23,8 Zoll) Auflösung 1920 x 1080 Helligkeit 250 cd/m2 Hintergrundbeleuchtung Dicke 11,2 mm Touchscreen Optischer Glas-Touchscreen Hardware Schaltflächen Ein-/Austaste 4 Steuertasten LED-Betriebsanzeige Blau (ein) / Orange (Energiesparen) I/O-Anschlüsse HDMI 2 x USB Typ A, 1 x Mini, 1 x Micro (OTG) 3,5-mm-Kopfhöreranschluss LAN (RJ45, nur 100 Mb/s) Netzteilanschluss...
Seite 233
Anhang Betriebssystem Android 4.2.1 Jelly Bean Mehrsprachenunterstützung Y Treiber und Bedienungsanleitung als Festplattenimage Applikation Google GMS und VSC System ® CPU/SoC nVidia Tegra Geschwindigkeit 1,7 GHz Kerne Quad-core Grafik Integriert Speicher DDR3, 1GB, bis 800 Mbps Speicher eMMC (NAND), 8 G WLAN/Bluetooth 801.11b/g/n, Bluetooth Umgebung...
Kundendienst Für technische Unterstützung oder Kundendienst für Ihr Gerät sehen Sie bitte in der unten stehenden Tabelle nach, oder wenden Sie sich an Ihren Händler. HINWEIS: Sie benötigen die Seriennummer Ihres Geräts. Land/Region Website Telefone E-mail www.viewsoniceurope. www.viewsoniceurope.com/de/ Deutschland service_deu@viewsoniceurope.com com/de/ support/call-desk/ www.viewsoniceurope.
Ersatzprodukte oder -teile können reparierte oder überholte Teile und Komponenten enthalten. Gültigkeitsdauer der Garantie: Das Smart Display von ViewSonic ist ab Kaufdatum des Erstkäufers durch eine mindestens einjährige Garantie auf die Verarbeitung abgedeckt. Die Garantie gilt für folgende Personen: Diese Garantie gilt nur für den Ersterwerb durch den Endverbraucher.
Seite 236
Garantie der Marktgängigkeit und der eignung für einen bestimmten Zweck, ausgeschlossen. Ausschluss von Schadensersatzansprüchen: Die Haftung von viewsonic ist auf die Kosten für die Reparatur oder den Ersatz des Produkts beschränkt. Viewsonic übernimmt keine Haftung für: 1. Sachschäden, die durch Produktfehler verursacht wurden, Schäden durch Hinder- nisse, Verlust des Produkts, Zeitverlust, entgangenen Gewinn, entgangene Geschäfte, Vertrauensschäden, Störungen von Geschäftsbeziehungen sowie andere...
Следующее положение относится ко всем продуктам, получившим одобрение Федеральной комиссии связи США (FCC). Соответствующие продукты имеют логотип FCC и/или идентификатор FCC в формате FCC ID: GSS-VS15197 на этикетке продукта. Данное устройство соответствует требованиям Части 15 Правил FCC. Работа должна соответствовать следующим двум условиям: (1) данные...
Seite 238
Информация FCC SAR Данное устройство соответствует требованиям FCC к ограничению радиационного излучения для нерегулируемого оборудования. Конечные пользователи должны следовать специальным инструкциям по обеспечению соответствия требованиям в отношении РЧ-излучения. Данный передатчик не должен использоваться совместно или эксплуатироваться с другой антенной или передатчиком. Это устройство следует устанавливать и использовать, обеспечим...
Seite 239
Соответствие нормативным требованиям Европейского союза Данное оборудование соответствует требованиям к воздействию радиочастотных излучений 1999/519/EC, рекомендации Совета от 12 июля 1999 г. по ограничению воздействия электромагнитных полей (с частотой 0–300 ГГц) на людей. Данное оборудование соответствует следующим стандартам: EN301489-1, EN301489-17, EN55022/24, EN60950-1, EN300328 Настоящим...
Seite 240
ENERGY STAR Это изделие, сертифицированное в соответствии со стандартами ENERGY STAR, экономит ваши средства за счет понижения энергопотребления, а также обеспечивает защиту окружающей среды без ущерба его функциональности и характеристикам. Мы рады предложить нашим покупателям изделия, с символом ENERGY STAR. Что...
Seite 241
Декларация про соответствие RoHS2 Данный продукт был разработан и произведен в соответствии с Директивой 2011/65/ EU Европейского парламента и Совета Европы про ограничение использования некоторых вредных веществ в электрическом и электронном оборудовании (Директива RoHS2), он также соответствует максимальным значениям концентрации, предложенным Техническим Комитетом Адаптации Европейской Комиссии...
Seite 242
Важные рекомендации по технике безопасности НЕ помещайте какие-либо предметы на устройство. Предметы могут поцарапать или разбить экран. ЗАПРЕЩАЕТСЯ использовать устройство в условиях повышенного загрязнения и в пыльных местах. НЕ ставьте устройство на неровную или неустойчивую поверхность. НЕ вставляйте какие-либо посторонние предметы в устройство. НЕ...
Seite 243
ответственности: корпорация ViewSonic не несет ответственности ни за какие технические или редакторские ошибки, равно как и за недостаточность информации в данном документе; ViewSonic также не несет ответственности за побочный или косвенный ущерб, связанный с использованием настоящего документа, а также с характеристиками и эксплуатацией изделия.
Дата покупки: _______________________________ Утилизация продукта по истечении срока эксплуатации Компания ViewSonic заботится о состоянии окружающей среды и обязуется направить все свои усилия на создание экологически чистых условий работы и жизни. Компания признательна за ваш вклад в более «умные» и экологически...
Seite 245
Содержание Содержание 1 Особенности беспроводного монитора VSD241 1.1 Установка кронштейна для крепления на стене .... 4 2 Подготовка беспроводного монитора VSD241 к работе 2.1 Подключение ..............5 2.2 Подготовка беспроводного монитора к использованию ..............5 2.3 Включение монитора ............6 2.3.1 Функция...
Seite 246
Содержание 4.2 Всплывающее меню ............19 4.3 Google Search (Поиск Google)........20 4.4 Управление настройками монитора ......21 4.4.1 Проверка свободного места в памяти ....21 4.4.2 Безопасное извлечение карты памяти SD ..22 4.4.3 Стирание всех данных из памяти монитора ..22 4.5 Подключение...
Seite 247
Содержание 7 Защита беспроводного монитора VSD241 7.1 Защита данных монитора с помощью фигуры разблокировки экрана ............ 37 7.1.1 Создание фигуры разблокировки экрана ..38 7.1.2 Изменение настроек фигуры разблокировки ... 38 7.2 Отключение защиты разблокировки экрана ....39 7.3 Защита данных монитора с помощью PIN-кода ... 39 7.3.1 Выключение...
VSD241 — это беспроводной 24-дюймовый монитор с 4-ядерным процессором, работающий под управлением ОС Android 4.2.1 Jelly Bean. Монитор имеет разрешение высокой четкости 1920x1080p, снабжен сенсорным экраном, способен работать с HDMI через основной загрузчик микропроцессора, имеет полноразмерные порты USB, а также может...
Seite 249
Особенности беспроводного монитора VSD241 № Компоненты Описания Сенсорный Сенсорное управление экранными настройками, экран включая элементы меню, приложения, кнопки, клавиатуру и т. д. Экранное меню Прикоснитесь к этой кнопке, чтобы запустить / выход экранное меню настроек. Для выхода из меню прикоснитесь к кнопке еще раз. Кнопка...
Seite 250
Особенности беспроводного монитора VSD241 Вид сзади № Компоненты Описания Разъем питания Подключение к адаптеру питания. постоянного тока HDMI Подключение к цифровому устройству для воспроизведения видео и аудио (например, DVD/ BD-плееру VPG или ноутбуку). Разъем RJ45 Подключение кабеля RJ45 для установления сетевого...
Особенности беспроводного монитора VSD241 1.1 Установка кронштейна для крепления на стене Монитор VSD241 можно крепить на стене при помощи кронштейна. Рекомендуем использовать крапление, соответствующее стандарту Video Electronics Standards Association (VESA). Установите кронштейн в порядке, приведенном ниже. Выключите монитор и извлеките вилку кабеля питания из розетки. Положите...
Подготовка беспроводного монитора VSD241 к работе 2 Подготовка беспроводного монитора VSD241 к работе 2.1 Подключение Keyboard Printer Mouse USB Storage Mini USB Micro USB Earphone External Computer SD card HDMI Power Earphone Outlet DVD Player Bluetooth Devices Wi-Fi Devices Notebook 2.2 Подготовка...
Seite 253
Подготовка беспроводного монитора VSD241 к работе Подключение кабеля питания Подключите поставляемый с монитором кабель питания к разъему питания. Подключите другой конец кабеля питания к электрической розетке. 2.3 Включение монитора Слегка прикоснитесь к кнопке питания, чтобы включить монитор. Переместите пиктограмму замка, чтобы разблокировать экран (если...
Подготовка беспроводного монитора VSD241 к работе 2.3.1 Функция Wake on LAN (WOL) (инициализация по сигналу из локальной сети) Чтобы включить функцию Wake on LAN (WOL): • Прикоснитесь к пиктограмме настроек на экране. • Убедитесь, что параметр Ethernet установлен на ON (ВКЛ.). •...
Сведения о беспроводном мониторе VSD241 3 Сведения о беспроводном мониторе VSD241 3.1 Сенсорный экран Основной способ управления монитором — это прямое касание паль- цем чувствительной поверхности экрана. Для работы с пиктограммами, кнопками, элементами меню, экранной клавиатурой и другими элемен- тами, расположенными на сенсорном экране, используются следующие способы: Способ...
Сведения о беспроводном мониторе VSD241 3.2 Приложения, виджеты и ярлыки Кнопки с программируемыми функциями или пиктограммы обеспечива- ют самые разнообразные функции и ярлыки. Получить доступ ко всем функциям монитора можно с главного экрана. На нем отображаются пик- тограммы, виджеты, ярлыки и т. д. Приложения: программное...
Seite 257
Сведения о беспроводном мониторе VSD241 № Элемент Описания Google Используйте приложение Google Search Search Google для быстрого и простого поиска из (Поиск Google. Google) Щелкните и перетащите экран Область горизонтально до отображения навигации необходимого главного экрана. Возврат к предыдущему экрану или Вид...
Сведения о беспроводном мониторе VSD241 3.4 Кнопки навигации В нижней части экрана (системная панель) расположены кнопки навига- ции, описанные ниже: Кнопки Описания - Прикоснитесь к этой кнопке, чтобы вернуться к предыдущему экрану или варианту. Назад - При отображении экранной клавиатуры кнопка меняется...
Сведения о беспроводном мониторе VSD241 Элемент Описания Время Отображение текущего времени. Указанная Показывает включенную пиктограмму, например пиктограмма включенной функции Bluetooth. Отображает текущее состояние монитора по таким параметрам, как владелец, яркость, настройки, Wi- Меню состояния Fi, автоповорот, уровень заряда батареи, режим «в самолете»...
Сведения о беспроводном мониторе VSD241 3.6.2 Перемещение элемента • На главном экране прикоснитесь к элементу, который хотите переме- стить, и не убирайте с него палец. • Переместите элемент в указанное положение. • Уберите палец, чтобы установить элемент в новое место. 3.6.3 Удаление...
Сведения о беспроводном мониторе VSD241 3.7 Навигация по приложениям Из меню «All Apps» (Все приложения) можно просмотреть все приложе- ния, доступные на мониторе: 3.7.1 Экран приложений Открытие экрана приложений Чтобы получить доступ к экрану прило- жений с главного экрана, прикоснитесь к кнопке...
Сведения о беспроводном мониторе VSD241 Открытие приложения при помощи ярлыка Прикоснитесь к кнопке главного экрана на системной панели. Если ярлык необходимого приложения отображается на главном экране, прикоснитесь к нему, чтобы запустить приложение. 3.7.3 Недавние приложения Открытие недавно использовавшегося приложения Прикоснитесь к кнопке недавних приложений...
Использование беспроводного монитора VSD241 4 Использование беспроводного монитора VSD241 4.1 Управление контактами Чтобы управлять контактами, прикоснитесь к кнопке главного экрана, нажми- те кнопку приложений и выберите пункт People to view (Просмотр людей). 4.1.1 Добавление нового контакта Прикоснитесь к кнопке (Создать). Выберите...
Использование беспроводного монитора VSD241 4.1.2 Поиск контакта Найти контакт можно двумя способами: • Щелкайте вкладку All (Все) списка контактов в верхней левой части экрана до тех пор, пока не найдете необходимый контакт. Или перетащи- те ползунок влево на экране, чтобы прокрутить...
Seite 265
Использование беспроводного монитора VSD241 Отправка контакта Найдите необходимый контакт в списке контактов. Чтобы просмотреть сведения о контакте, прикоснитесь к записи контакта. Прикоснитесь к кнопке Menu (меню) в верхней правой части экрана, а затем выберите Share (Отправить). В появившемся меню Share (Отправить) выберите способ для отправки...
Использование беспроводного монитора VSD241 В списке под строкой Join contacts (Объединить контакты) выберите другой контакт для объединения, а затем прикоснитесь к Done (Выполнено). Сведения об объединенном контакте отображаются с исходными Contacts settings (настройками контактов). Находясь на вкладке People (Люди), прикоснитесь к кнопке Menu (меню) на...
Использование беспроводного монитора VSD241 Выбор параметра или элемента всплывающего меню Прикоснитесь к кнопке меню на мониторе или экране, чтобы открыть выплывающее меню. Прикоснитесь к необходимому элементу всплывающего меню. 4.3 Google Search (Поиск Google) Виджет поиска Google можно использо- вать для поиска веб-сайтов и информа- ции...
Использование беспроводного монитора VSD241 Поиск с использованием голосовых команд Прикоснитесь к значку микрофона , расположенному рядом с полем поиска. Скажите название или ключевое слово элемента, который необходимо найти. Откроется браузер с соответствующими ссылками на веб-сайт. 4.4 Управление настройками монитора 4.4.1 Проверка свободного места в памяти Прикоснитесь...
Использование беспроводного монитора VSD241 4.4.2 Безопасное извлечение карты памяти SD Прикоснитесь к кнопке главного экрана, прикоснитесь к кнопке приложений и выберите Settings (Настройки), Storage (Хранилище). Прикоснитесь к Unmount SD (Демонтировать SD) под разделом SD Card (Карта памяти SD). Держите кнопку питания нажатой до появления меню выключения питания.
Использование беспроводного монитора VSD241 ПРИМЕЧАНИЕ • Перед стиранием всех данных из памяти монитора обязательно выполните копи- рование необходимых данных. 4.5 Подключение к совместимым с HDMI устройствам через вход HDMI HDMI (High-Definition Multimedia Interface = мультимедийный интерфейс высокой четкости) представляет собой компактный аудио/видео интерфейс...
Использование беспроводного монитора VSD241 4.6 Подключение Bluetooth Bluetooth — это технология беспроводной связи малого радиуса действия, позволя- ющая одному устройству подключаться к другому Bluetooth-устройству по беспро- водной сети. На мониторе Bluetooth рабо- тает в трех различных режимах: Состояние Описания Вкл интерфейс...
Использование беспроводного монитора VSD241 В целях аутентификации может быть выдан запрос на ввод пароля. Введите один и тот же пароль для обоих устройств или введите пароль, предоставленный производителем устройства. Прочтите документацию на коммутируемое устройство, чтобы узнать, нужен для него пароль по умолчанию или нет. При...
Интернет 5 Интернет 5.1 Подключение к Интернету Чтобы просматривать веб-страницы и по- лучить доступ к таким веб-инструментам, как служба мгновенных сообщений, под- ключите монитор VSD241 к разъему ЛВС при помощи кабеля RJ45 или настройте подключение Wi-Fi. 5.1.1 Подключение Wi-Fi Прикоснитесь к кнопке главного экрана, прикоснитесь к кнопке приложений...
Интернет 5.1.2 Проверка текущего подключения к сети Wi-Fi Из области состояния системной панели: если монитор подключен к бес- проводной сети, в области состояния системной панели отображается пиктограмма Wi-Fi, указывающая мощность сигнала (количество горя- щих полосок). При включенном параметре Network notification (Сетевые уведомления) элемента...
Интернет 5.2 Синхронизация данных Google По веб-соединению монитор может вы- полнять синхронизацию данных Google, включая данные электронной почты Gmail, календаря и контактов, с данными на ком- пьютере или любом другом устройстве, которое можно использовать для доступа к учетной записи Google. Выбор...
Seite 276
Интернет С чего начать Авторизуйте учетную запись Google Чтобы авторизовать учетную запись, откройте Google Talk, а затем войдите в свою учетную запись Google. Перед использованием видеочата необходимо войти в учетную запись Google. Пригласите друга в видеочат Откройте приложение Google Talk. В списке друзей Google Talk найдите...
Пользовательская настройка беспроводного монитора VSD241 6.2 Настройки звука и рингтона Изменение настроек звука и рингтона: Прикоснитесь к кнопке главного экрана, прикоснитесь к кнопке приложений и выберите «Settings» (Настройки), «Sound» (Звук). Выберите список с параметрами и прикоснитесь к необходимом параметру. Чтобы включить настройку, прикоснитесь к ее параметру и...
Пользовательская настройка беспроводного монитора VSD241 6.2.3 Расширение ViewSound Элемент Описания Расширение 1. Настройте режим с эффектом ViewSound. ViewSound 2. Выберите «Pop» (Поп-музыка), «Theater» (Театр), «Game» (Игра), «Jazz» (Джаз), «Classical» (Классическая музыка) или выключите эффект ViewSound . 6.3 Дата, время и часовой пояс Добавлена...
Пользовательская настройка беспроводного монитора VSD241 Элемент Описания Automatic date & time Автоматическое использование сведений о (Автоматическая часовом поясе, предоставляемых сетью. установка даты и времени) Set date (Установить дату) 1. Прикоснитесь к элементу Set date (Установить дату), чтобы настроить день, месяц и год. Чтобы установить необходимое...
Пользовательская настройка беспроводного монитора VSD241 Настройка клавиатуры и ввода Прикоснитесь к кнопке главного экрана, прикоснитесь к кнопке приложений и выберите «Settings» (Настройки), «Language & input» (Язык и ввод), «Keyboard & input methods» (Клавиатура и способ ввода). Чтобы включить настройку, прикоснитесь к ее параметру и...
Пользовательская настройка беспроводного монитора VSD241 6.5.1 Панели регулировок Контрастность/яркость: Контрастность Прикоснитесь к ползунку на панели «Contrast» (Контрастность) и перетащите его, чтобы отрегулировать контрастность экрана. Перетащите ползунок вправо, чтобы увеличить контрастность. По умолчанию контрастность установлена на 80. Яркость: Прикоснитесь к ползунку на панели Brightness (Яркость) и перетащите...
Пользовательская настройка беспроводного монитора VSD241 6.5.3 Уведомления экранного меню о бездействии: Экранное меню закроется и монитор вернется к исходному экрану обработки автоматически, если экранное меню не используется в течение заданного времени. No signal • Подключение HDMI монитора не готово. • Подключение между устройством HDMI и беспроводным монитором не...
Защита беспроводного монитора VSD241 7 Защита беспроводного монитора VSD241 7.1 Защита данных монитора с помощью фигуры разблокировки экрана Чтобы защитить данные монитора от несанкционированного доступа, используйте функцию блокировки сенсорного экрана с помощью фигуры разблокировки экрана. После активации фигуры разблокировки и блоки- ровки...
Защита беспроводного монитора VSD241 7.1.1 Создание фигуры разблокировки экрана Прикоснитесь к кнопке главного экрана, прикоснитесь к кнопке приложений и выберите «Settings» (Настройки), «Security» (Защита). Прикоснитесь к разделу Screen Lock (Блокировка экрана) → Pattern (Рисунок). Прочитайте отображаемые на экране инструкции и изучите пример рисования...
Защита беспроводного монитора VSD241 7.2 Отключение защиты разблокировки экрана Прикоснитесь к кнопке главного экрана, прикоснитесь к кнопке приложений и выберите «Settings» (Настройки), «Security» (Защита). Выберите None (Нет), чтобы отключить защиту разблокировки экрана. 7.3 Защита данных монитора с помощью PIN-кода Прикоснитесь к кнопке главного экрана, прикоснитесь к кнопке приложений...
Защита беспроводного монитора VSD241 7.4 Защита данных монитора с помощью пароля Прикоснитесь к кнопке главного экрана, прикоснитесь к кнопке приложений и выберите «Settings» (Настройки), «Security» (Защита). Прикоснитесь к разделу «Screen Lock» (Блокировка экрана) → «Password» (Пароль). На отобразившемся экране «Choose your password» (Выбрать пароль) введите...
Защита беспроводного монитора VSD241 7.5 Защита данных монитора с помощью функции Face Unlock Начиная с версии Android 4.0 Ice Cream Sandwich, Google ввела новый способ разблокировки устройств с помощью камеры. Функция разблокировки по распознаванию лица носит название «Face Unlock» и будет...
Защита беспроводного монитора VSD241 7.6 Функция энергосбережения В целях экономии электроэнергии монитор поддерживает режим энергосбережения («спящий» режим). Монитор переходит в режим энергосбережения при простое без обработки данных. При этом экран выключается. Чтобы настроить время до перехода монитора в «спящий» режим, прикоснитесь к кнопке главного экрана, нажмите кнопку приложений...
задней части монитора VSD241. - Проверьте розетку питания, подключив к ней другое устройство (например, настольную лампу). - Если питания нет и после этого, обратитесь в службу поддержки ViewSonic или в продавцу монитора. Нет изображения Проверьте внешнее устройство HDMI и подключения. Монитор...
Приложение 9 Приложение Спецификация Технические характеристики ЖК-дисплея Размер 61 см (23.8”) Разрешение 1920x1080 Brightness 250 кд/м2 Подсветка Индикатор Толщина 11,2 мм Сенсорный экран Оптический, сенсорный, со стеклом Оборудование Кнопки Кнопка питания *1 Клавиши управления *4 Светодиодный Синий (вкл.) / оранжевый (энергосбережение) индикатор...
Seite 292
Приложение ПО ОС Android 4.2.1 JellyBean Поддержка Да нескольких языков Образ с драйверами и инструкцией по Да эксплуатации на жестком диске Приложение Google GMS и VSC System ® ЦП/SoC NVIDIA EGRa Частота 1,7 Гц Количество ядер четыре Графическая система встроенная Память...
Служба поддержки Для получения технической поддержки или технического обслуживания изделия см. информацию, приведенную в таблице ниже, или обратитесь с организацией, в которой Вы приобрели монитор. ПРИМЕЧАНИЕ: Вам будет нужен серийный номер монитора. Страна или регион Веб-сайт Tелефон Телефон www.viewsoniceurope. www.viewsoniceurope.com/ service_ru@viewsoniceurope.
Seite 294
Smart Display ® Область действия гарантии: В течение гарантийного срока корпорация ViewSonic гарантирует отсутствие в своих изделиях дефектов в материалах и изготовлении. Если в течение гарантийного срока в изделии будут обнаружены дефекты в материалах и изготовлении, корпорация ViewSonic по своему усмотрению отремонтирует или заменит...
Seite 295
4. Ремонт или попытка ремонта лицом, не уполномоченным корпорацией ViewSonic. Отказ от ответственности за обновление ОТА: Корпорация ViewSonic не несет ответственность за любые ошибки или опущения в представленной информации. Данное обновление встроенного ПО предназначено для монитора ViewSonic Smart Display. ViewSonic не несет ответственность...