Inhaltsverzeichnis
Werbung
Verfügbare Sprachen
Verfügbare Sprachen
Quicklinks
CAMTVI13
HD CCTV DOME CAMERA - OUTDOOR
HD CCTV DOMECAMERA - GEBRUIK BUITENSHUIS
CAMÉRA DÔME HD CCTV - EXTÉRIEUR
CÁMARA HD CCTV DOMO - EXTERIORES
HD CCTV-DOME-KAMERA - AUßENBEREICH
KAMERA HD CCTV - ZEWNĘTRZNA - KOPULKOWA
CÂMARA HD CCTV - TIPO DOME - EXTERIOR
HD-TVI - VARIFOCAL - IR - 1080P
6
13
20
27
34
41
48
Werbung
Inhaltsverzeichnis

Verwandte Anleitungen für Velleman CAMTVI13


Inhaltszusammenfassung für Velleman CAMTVI13
-
Seite 1: Inhaltsverzeichnis
CAMTVI13 HD CCTV DOME CAMERA - OUTDOOR HD CCTV DOMECAMERA - GEBRUIK BUITENSHUIS CAMÉRA DÔME HD CCTV - EXTÉRIEUR CÁMARA HD CCTV DOMO - EXTERIORES HD CCTV-DOME-KAMERA - AUßENBEREICH KAMERA HD CCTV - ZEWNĘTRZNA - KOPULKOWA CÂMARA HD CCTV - TIPO DOME - EXTERIOR HD-TVI –... - Seite 2 CAMTVI13 V. 01 – 09/01/2017 ©Velleman nv...
- Seite 3 CAMTVI13 V. 01 – 09/01/2017 ©Velleman nv...
- Seite 4 CAMTVI13 V. 01 – 09/01/2017 ©Velleman nv...
- Seite 5 CAMTVI13 V. 01 – 09/01/2017 ©Velleman nv...
-
Seite 6: User Manual
Respect the local environmental rules. If in doubt, contact your local waste disposal authorities. Thank you for choosing Velleman! Please read the manual thoroughly before bringing this device into service. If the device was damaged in transit, do not install or use it and contact your dealer. -
Seite 7: General Guidelines
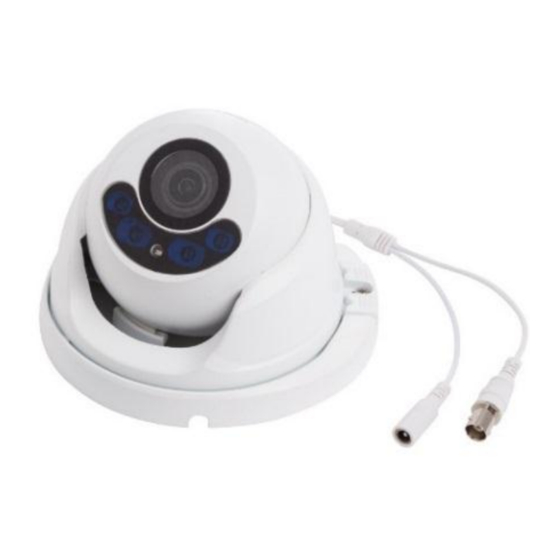
CAMTVI13 3. General Guidelines Refer to the Velleman® Service and Quality Warranty on the last pages of this manual. Keep this device away from dust and extreme temperatures. Protect this device from shocks and abuse. Avoid brute force when operating the device. - Seite 8 CAMTVI13 5. Installation Refer to the illustration on page 2 of this manual. lens fixation ring IR LEDs mounting ring light sensor power plug camera video plug 6. Installation Disassemble the camera. You should have three parts: the mounting plate, the fixation ring and the camera.
- Seite 9 CAMTVI13 7. Connection Connect the power terminal of the camera to a 12 VDC regulated power supply. Connect the video output of the camera to the video input of your DVR using a 75 Ω coaxial cable. Only use a regulated 12 VDC power adapter. Using any other type will damage this camera.
-
Seite 10: Camera Configuration
CAMTVI13 9. Camera Configuration On the DVR live view, right-click in the screen to display the DVR menu. Select ADVANCED CONFIG > DCCS. ADVANCED CONFIG CAMERA DETECTION OSD MENU SETUP ALERT DCCS MENU SETUP NETWORK DISPLAY RECORD F.W. DCCS DEVICE... -
Seite 11: Cleaning And Maintenance
This camera will only work with TVI-compatible DVRs (Velleman DVRxTx series). Velleman nv does not guarantee this camera will work with other types of DVRs and can therefore not be held responsible in this event. 10. Menu Refer to the illustration on page 3 of this manual. - Seite 12 The information in this manual is subject to change without prior notice. © COPYRIGHT NOTICE The copyright to this manual is owned by Velleman nv. All worldwide rights reserved. No part of this manual may be copied, reproduced, translated or reduced to any electronic medium or otherwise without the prior written consent of the copyright holder.
-
Seite 13: Handleiding
CAMTVI13 HANDLEIDING 1. Inleiding Aan alle ingezetenen van de Europese Unie Belangrijke milieu-informatie betreffende dit product Dit symbool op het toestel of de verpakking geeft aan dat, als het na zijn levenscyclus wordt weggeworpen, dit toestel schade kan toebrengen aan het milieu. Gooi dit toestel (en eventuele batterijen) niet bij het gewone huishoudelijke afval;... -
Seite 14: Algemene Richtlijnen
CAMTVI13 3. Algemene richtlijnen Raadpleeg de Velleman® service- en kwaliteitsgarantie achteraan deze handleiding. Bescherm het toestel tegen stof en extreme temperaturen. Bescherm tegen schokken. Vermijd brute kracht tijdens de bediening van het toestel. Leer eerst de functies van het toestel kennen voor u het gaat gebruiken. - Seite 15 CAMTVI13 5. Montage Raadpleeg de afbeeldingen op pagina 2 van deze handleiding. lens bevestigingsring IR-leds montageplaat lichtsensor voedingsstekker camera videostekker 6. Montage Demonteer de camera. U zou de volgende onderdelen moeten hebben: de montageplaat, de bevestigingsring en de camera. Kies een geschikte montageplaats voor de camera en houd rekening...
- Seite 16 CAMTVI13 7. Aansluiting Sluit de voedingsaansluiting van de camera aan op een gereguleerde voedingsadapter van 12 VDC. Sluit de video-uitgang van de camera aan op de video-ingang van uw DVR met een 75 Ω coaxiale kabel. Gebruik enkel een gereguleerde voedingsadapter van 12 VDC.
- Seite 17 CAMTVI13 9. Camera configureren Op de DVR live-weergave, klik met de rechtermuisknop om het DVR- menu weer te geven. Selecteer ADVANCED CONFIG > DCCS. ADVANCED CONFIG CAMERA DETECTION OSD MENU SETUP ALERT DCCS MENU SETUP NETWORK DISPLAY RECORD F.W. DCCS...
-
Seite 18: Reiniging En Onderhoud
Gebruik de knoppen rechtsonder om de cameraconfiguratie te veranderen. Deze camera werkt enkel met TVI-compatibele DVR's (Velleman DVRxTx-reeksen). Vellemannv biedt geen absolute zekerheid dat deze camera functioneert met een ander type DVR en kan hierdoor niet aansprakelijk worden gesteld in dit geval. - Seite 19 136.6 x 148.8 x 103.3 mm gewicht 560 g Gebruik dit toestel enkel met originele accessoires. Velleman nv is niet aansprakelijk voor schade of kwetsuren bij (verkeerd) gebruik van dit toestel. Voor meer informatie over dit product en de laatste versie van deze handleiding, zie www.velleman.eu.
-
Seite 20: Mode D'emploi
CAMTVI13 MODE D'EMPLOI 1. Introduction Aux résidents de l'Union européenne Informations environnementales importantes concernant ce produit Ce symbole sur l'appareil ou l'emballage indique que l’élimination d’un appareil en fin de vie peut polluer l'environnement. Ne pas jeter un appareil électrique ou électronique (et des piles éventuelles) parmi les déchets municipaux non sujets au tri sélectif... -
Seite 21: Directives Générales
CAMTVI13 3. Directives générales Se référer à la garantie de service et de qualité Velleman® en fin de ce mode d'emploi. Protéger cet appareil contre la poussière et les températures extrêmes. Protéger l’appareil des chocs et de l'abus. Traiter l'appareil avec circonspection pendant l’opération. - Seite 22 CAMTVI13 5. Installation Se référer aux illustrations en page 2 de ce mode d'emploi. lentille anneau de fixation LEDs IR plaque de montage capteur lumineux fiche d'alimentation caméra fiche vidéo 6. Installation Désassembler la caméra. Vous devriez avoir les pièces suivantes: la plaque de montage, l'anneau de fixation et la caméra.
- Seite 23 CAMTVI13 7. Connexion Connecter la borne d'alimentation de la caméra à une alimentation régulée de 12 VCC. Connecter la sortie vidéo de la caméra à l'entrée vidéo de votre DVR avec un câble coaxial de 75 Ω. Utiliser uniquement un adaptateur réseau régulé de 12 VCC.
- Seite 24 CAMTVI13 9. Configurer la caméra Sur l'affichage direct du DVR, cliquer avec le bouton droit de la souris pour afficher le menu DVR. Sélectionner ADVANCED CONFIG > DCCS. ADVANCED CONFIG CAMERA DETECTION OSD MENU SETUP ALERT DCCS MENU SETUP NETWORK...
-
Seite 25: Nettoyage Et Entretien
La caméra ne fonctionne qu'avec des DVR compatibles avec TVI (séries Velleman DVRxTx). La SA Velleman ne garantit pas que la caméra fonctionnera avec un autre type de DVR et ne peut être tenu responsable dans ce cas. - Seite 26 être modifiés sans notification préalable. © DROITS D’AUTEUR Velleman SA est l’ayant droit des droits d’auteur de ce mode d'emploi. Tous droits mondiaux réservés. Toute reproduction, traduction, copie ou diffusion, intégrale ou partielle, du contenu de ce mode d'emploi par quelque procédé...
-
Seite 27: Manual Del Usuario
Si tiene dudas, contacte con las autoridades locales para residuos. ¡Gracias por elegir Velleman! Lea atentamente las instrucciones del manual antes de usar el aparato. Si ha sufrido algún daño en el transporte no lo instale y póngase en contacto con su distribuidor. -
Seite 28: Normas Generales
CAMTVI13 3. Normas generales Véase la Garantía de servicio y calidad Velleman® al final de este manual del usuario. No exponga este equipo a polvo ni temperaturas extremas. Proteja el aparato contra choques y golpes. Evite usar excesiva fuerza durante el manejo. - Seite 29 CAMTVI13 5. Instalación Véase la figura en la página 2 de este manual del usuario. óptica anillo de fijación LEDs IR placa de montaje sensor conector de alimentación cámara conector de vídeo 6. Instalación Desmonte la cámara. Incluye las siguientes piezas: la placa de montaje, el anillo de fijación y la cámara.
- Seite 30 CAMTVI13 7. La conexión Conecte el terminal de alimentación de la cámara a una fuente de alimentación regulada de 12 VCC. Conecte la salida de vídeo de la cámara a la entrada de vídeo de su DVR con un cable coaxial de 75 Ω.
-
Seite 31: Configuración De La Cámara
CAMTVI13 9. Configuración de la cámara En la imagen en directo del DVR, haga clic con el botón derecho en la pantalla para mostrar el menú DVR. Seleccione ADVANCED CONFIG > DCCS. ADVANCED CONFIG CAMERA DETECTION OSD MENU SETUP ALERT... -
Seite 32: Limpieza Y Mantenimiento
Esta cámara sólo funciona con DVR compatibles con TVI (Velleman serie DVRxTx). La Velleman nv no garantiza que esta cámara trabajará con otros tipos de DVRs y, por tanto, no se hace responsable en este acontecimiento. 10. Menú... - Seite 33 © DERECHOS DE AUTOR Velleman NV dispone de los derechos de autor para este manual del usuario. Todos los derechos mundiales reservados. Está estrictamente prohibido reproducir, traducir, copiar, editar y guardar este manual del usuario o partes de ello sin el consentimiento previo por escrito del propietario del copyright.
-
Seite 34: Bedienungsanleitung
Falls Zweifel bestehen, wenden Sie sich für Entsorgungsrichtlinien an Ihre örtliche Behörde. Vielen Dank, dass Sie sich für Velleman entschieden haben! Lesen Sie diese Bedienungsanleitung vor Inbetriebnahme sorgfältig durch. Überprüfen Sie, ob Transportschäden vorliegen. Sollte dies der Fall sein, verwenden Sie das Gerät nicht und wenden Sie sich an Ihren Händler. -
Seite 35: Allgemeine Richtlinien
CAMTVI13 3. Allgemeine Richtlinien Siehe Velleman® Service- und Qualitätsgarantie am Ende dieser Bedienungsanleitung. Schützen Sie das Gerät vor Staub und vor extremen Temperaturen. Schützen Sie das Gerät vor harten Stößen und schütteln Sie es nicht. Wenden Sie bei der Bedienung keine Gewalt an. - Seite 36 CAMTVI13 5. Installation Siehe Abbildung, Seite 2 dieser Bedienungsanleitung. Objektiv Befestigungsring IR-LEDs Montageplatte Lichtsensor Netzstecker Kamera Videostecker 6. Installation Desmontieren Sie die Kamera. Diese sollte folgende Teile enthalten: Die Montageplatte, den Befestigungsring und die Kamera. Wählen Sie einen geeigneten Montageort für die Kamera und beachten...
-
Seite 37: Anschluss
CAMTVI13 Verbinden Sie alle Kabel. Regeln Sie die Position der Kamera, um die Überwachungszone zu bestimmen. Drehen Sie die Feststellschraube fest. 7. Anschluss Schließen Sie den Netzanschluss der Kamera an ein 12 V DC geregeltes Netzteil. Schließen Sie den Videoausgang der Kamera an einen DVR- Videoeingang mit einem 75 Ω... -
Seite 38: Kameraeinstellung
CAMTVI13 9. Kamera-Einstellung Klicken Sie während der Live-Anzeige mit der rechten Maustaste auf den Bildschirm, um das Menü anzuzeigen. Wählen Sie ADVANCED CONFIG > DCCS aus. ADVANCED CONFIG CAMERA DETECTION OSD MENU SETUP ALERT DCCS MENU SETUP NETWORK DISPLAY RECORD F.W. -
Seite 39: Reinigung Und Wartung
Verwenden Sie die Tasten unten rechts und ändern Sie die Kamera- Einstellungen. Diese Kamera ist nur kompatibel mit TVI-kompatibelen DVR (Velleman DVRxTx-Serie). Velleman NV gewährleistet nicht, dass die Kamera mit anderen DVR-Typen funktionieren wird und übernimmt dafür keine Haftung. 10. Menü... - Seite 40 Gewicht 560 g Verwenden Sie dieses Gerät nur mit originellen Zubehörteilen. Velleman NV übernimmt keine Haftung für Schaden oder Verletzungen bei (falscher) Anwendung dieses Gerätes. Mehr Informationen zu diesem Produkt und die neueste Version dieser Bedienungsanleitung finden Sie hier: www.velleman.eu. Alle Änderungen ohne vorherige Ankündigung vorbehalten.
-
Seite 41: Instrukcja Obsługi
W razie wątpliwości należy skontaktować się z lokalnym organem odpowiedzialnym za utylizację odpadów. Dziękujemy za zakup produktu Velleman! Prosimy o dokładne zapoznanie się z instrukcją obsługi przed użyciem urządzenia. Nie montować ani nie używać urządzenia, jeśli zostało uszkodzone podczas transportu - należy skontaktować... -
Seite 42: Informacje Ogólne
CAMTVI13 3. Informacje ogólne Proszę zapoznać się z informacjami w części Usługi i gwarancja jakości Velleman® na końcu niniejszej instrukcji. Chronić urządzenie przed pyłem i zbyt wysoką temperaturą. Chronić urządzenie przed wstrząsami i użytkowaniem niezgodnym z przeznaczeniem. Podczas obsługi urządzenia unikać... - Seite 43 CAMTVI13 5. Montaż Patrz rysunki na stronie 2 niniejszej instrukcji. obiektyw pierścień mocujący diody LED IR pierścień mocujący czujnik światła wtyczka zasilająca kamera wtyczka wideo 6. Montaż Demontaż kamery. Powinny być trzy elementy: płyta montażowa, pierścień mocujący i kamera. Wybrać miejsce do zainstalowania kamery, uwzględniając poniższe wskazówki:...
- Seite 44 CAMTVI13 7. Podłączanie Podłączyć końcówkę zasilania kamery do zasilacza stabilizowanego 12 VDC. Podłączyć wyjście video kamery do wejścia video urządzenia DVR przy użyciu kabla koncentrycznego 75 Ω. Stosować wyłącznie zasilacz stabilizowany 12 VDC. Stosowanie innych typów zasilaczy spowoduje uszkodzenie kamery.
-
Seite 45: Konfiguracja Kamery
CAMTVI13 9. Konfiguracja kamery Na podglądzie DVR w czasie rzeczywistym kliknąć na ekran prawym przyciskiem myszy, aby wyświetlić menu DVR. Wybrać ADVANCED CONFIG > DCCS [KONFIGURACJA ZAAWANSOWANA > DCCS]. ADVANCED CONFIG CAMERA DETECTION OSD MENU SETUP ALERT DCCS MENU SETUP... -
Seite 46: Czyszczenie I Konserwacja
Przyciskami w prawym dolnym rogu zmodyfikować konfigurację kamery według potrzeb. Kamera działa wyłącznie z DVR kompatybilnymi z TVI (seria DVRxTx firmy Velleman). Velleman nv nie gwarantuje, że kamera będzie działać z innymi typami DVR i w związku z tym nie ponosi odpowiedzialności za takie przypadki. - Seite 47 © INFORMACJA O PRAWACH AUTORSKICH Właścicielem praw autorskich do niniejszej instrukcji jest firma Velleman nv. Wszelkie prawa są zastrzeżone na całym świecie. Żadna część niniejszej instrukcji nie może być kopiowana, powielana, tłumaczona ani przenoszona na jakikolwiek nośnik elektroniczny (lub w inny sposób) bez wcześniejszej pisemnej zgody właściciela praw autorskich.
-
Seite 48: Manual Do Utilizador
CAMTVI13 MANUAL DO UTILIZADOR 1. Introdução Aos cidadãos da União Europeia Importantes informações sobre o meio ambiente no que respeita a este produto Este símbolo no aparelho ou na embalagem indica que, enquanto desperdícios, poderão causar danos no meio ambiente. Não coloque a unidade (ou as pilhas) no depósito de lixo municipal;... -
Seite 49: Normas Gerais
CAMTVI13 3. Normas gerais Consulte a Garantia de serviço e qualidade Velleman® na parte final deste manual do utilizador. Não exponha o equipamento ao pó nem a temperaturas extremas. Proteja o aparelho de quedas e má utilização. Evite usar força excessiva ao utilizar o aparelho. -
Seite 50: Instalação
CAMTVI13 5. Instalação Ver as figuras da página 2 deste manual do utilizador. lente anel de fixação LEDs IR anel de montagem Sensor de luz ficha de alimentação câmara ficha vídeo 6. Instalação Desmontar a câmara. Deverá ter três componentes: a placa de montagem, o anel de fixação e a câmara. - Seite 51 CAMTVI13 7. Ligação Ligue o terminal de alimentação da câmara a uma fonte de alimentação regulada de 12 VDC. Ligue a saída de vídeo da câmara à entrada de vídeo do seu DVR usanto o cabo coaxial 75 Ω. ...
-
Seite 52: Configuração Da Câmara
CAMTVI13 9. Configuração da Câmara Na visualização ao vivo do DVR, faça click com o botão direito para aceder ao menu do DVR Selecione ADVANCED CONFIG > DCCS. ADVANCED CONFIG CAMERA DETECTION OSD MENU SETUP ALERT DCCS MENU SETUP NETWORK... -
Seite 53: Limpeza E Manutenção
Esta câmara apenas funciona com DVRs com compatibilidade TVI (Série DVRxTx da Velleman). A Velleman nv não garante o funcionamento desta câmara com outros tipos de DVR e não será responsabilizada pelo facto de tal suceder. 10. Menu Consulte a ilustração da página 3 deste manual. - Seite 54 © DIREITOS DE AUTOR A Velleman NV detém os direitos de autor deste manual do utilizador. Todos os direitos mundiais reservados. É estritamente proibido reproduzir, traduzir, copiar, editar e gravar este manual do utilizador ou partes deste sem prévia autorização escrita por parte da...
- Seite 55 • Op alle consumentengoederen geldt een garantieperiode van date of purchase. 24 maanden op productie- en materiaalfouten en dit vanaf de • Velleman® can decide to replace an article with an equivalent oorspronkelijke aankoopdatum. article, or to refund the retail value totally or partially when the •...
- Seite 56 Velleman®; • tuyau : il est conseillé de consulter la notice et de contrôler - se calcula gastos de transporte de y a Velleman® si el câbles, piles, etc. avant de retourner l’appareil. Un appareil aparato ya no está cubierto por la garantía.
- Seite 57 Erlaubnis von Velleman® vorgenommen werden. obowiązywania gwarancji zostanie obniżony do 6 (sześć) miesięcy; • Im Fall einer Reparatur, wenden Sie sich an Ihren Velleman®- - Szkody wynikające ze źle zabezpieczonej wysyłki produktu; Verteiler. Legen Sie das Produkt ordnungsgemäß verpackt (vorzugsweise die Originalverpackung) und mit dem Original- - Wszelkie szkody spowodowane przez nieautoryzowaną...
- Seite 58 Wraz z niesprawnym sem a autorização de SA Velleman®; produktem należy dołączyć jasny i szczegółowy opis jego - despesas de transporte de e para Velleman® se o aparelho usterki, wady; não estiver coberto pela garantia. • Wskazówka: Aby zaoszczędzić na kosztach i czasie, proszę...