Herunterladen Inhalt Inhalt Diese Seite drucken

Werbung

Verfügbare Sprachen
  • DE

Verfügbare Sprachen

• LEVIGATRICE PEDICURE
- MANUALE DI ISTRUZIONI
• CALLOUS REMOVER
- USE INSTRUCTIONS
• PONCEUSE POUR PIEDS
- MANUEL D'INSTRUCTIONS
• SCHLEIF FUSS
- BETRIEBSANLEITUNG
REMOVEDOR DE KALLOS
- MANUAL DE INSTRUCCIONES
Cod.: 40.948

Werbung

Inhaltsverzeichnis
loading

Inhaltszusammenfassung für Beper 40.948

  • Seite 1 • LEVIGATRICE PEDICURE - MANUALE DI ISTRUZIONI • CALLOUS REMOVER - USE INSTRUCTIONS • PONCEUSE POUR PIEDS - MANUEL D’INSTRUCTIONS • SCHLEIF FUSS - BETRIEBSANLEITUNG REMOVEDOR DE KALLOS • - MANUAL DE INSTRUCCIONES Cod.: 40.948...
  • Seite 2 ITALIANO pag. 3 ENGLISH pag. 12 FRANÇAIS pag. 18 DEUTSCH pag. 26 ESPAÑOL pag. 33 For further information and/or for instructions for use in other languages , please visit: beper.com...
  • Seite 3 Levigatrice pedicure Manuale di istruzioni AVVERTENZE GENERALI LEGGERE QUESTE ISTRUZIONI PRIMA DI USARE L’APPARECCHIO. Prima e durante l’uso dell’apparecchio è necessario seguire alcune precauzioni elementari. Dopo aver tolto l’imballaggio assicurarsi dell’integrità dell’apparecchio. In caso di dubbio non utiliz- zare l’apparecchio e rivolgersi a personale professionalmente qualificato. Gli elementi dell’imbal- laggio (sacchetti di plastica, polistirolo, ecc.) non devono essere lasciati alla portata dei bambini, in quanto potenziali fonti di pericolo.
  • Seite 4: Componenti Principali

    Levigatrice pedicure Manuale di istruzioni COMPONENTI PRINCIPALI A. Coperchio protettivo B. Testina C. Tasti rimozione testine D. Blocco di sicurezza E. Tasto on/off Indicatore di ricarica F. Coperchio vano batterie G. Blocco vano batterie H. Spazzolina pulisci testina Avvertenze d’uso 1.
  • Seite 5 Levigatrice pedicure Manuale di istruzioni Prima di utilizzare l’apparecchio, leggere attentamente e completamente il presente manuale di istruzioni. Installazione della batteria fig.2 1. Rimuovere il coperchio della batteria ruotandolo di 90 gradi verso sinistra fino a quando non scatta in posizione (fig.
  • Seite 6 Levigatrice pedicure Manuale di istruzioni Cambio dei rulli della testina Cambiare il rullo della testina quando si rende necessario per un migliore risultato. I rulli durano a seconda della frequenza d’uso e le dimensioni della zona da trattare. Sostituire se necessario. Assicurarsi che l’unità...
  • Seite 7: Dati Tecnici

    Potenza: 3V Alimentazione: 2x AA (batterie non incluse) In un’ottica di miglioramento continuo Beper si riserva la facoltà di apportare modifiche e migliorie al prodotto in oggetto senza previo preavviso Il simbolo del cestino barrato riportato sull’apparecchio indica che il prodotto, alla fine...
  • Seite 8: Certificato Di Garanzia

    In ogni caso, se la parte da sostituire per difetto, rottura o malfunzionamento è un accessorio e/o una parte staccabile del prodotto, Beper si riserva la facoltà di sostituire solo il pezzo interessato e non l’intero prodotto. Assistenza tecnica Anche dopo il periodo di garanzia prestiamo molta attenzione alle riparazioni.
  • Seite 9 Callous remover Use instructions GENERAL SAFETY ADVICE READ THE OPERATING INSTRUCTIONS CAREFULLY BEFORE FIRST USE OF THE APPLIANCE. Read the following instructions carefully, since they give you useful safety information about installation, use and maintenance and help you avoid mishaps and possible acci- dents.
  • Seite 10 Callous remover Use instructions General description of parts A: Protective Cover B: Rollers grinding head C: Release Button D: Safety Switch Lock E: Slide ON/OFF switch F: Battery Cover G: Battery Cover Lock H: Cleaning brush Warning/Important 1. The Callous Remover is only for use on the feet and heels.
  • Seite 11 Callous remover Use instructions 22. Do not continually rub the unit on the same area or apply strong pressure. 23. Keep the protective cover on your unit when it is not in use. 24. Do not disassemble this device. Before using your Callous Remover, please read this instruction manual carefully and com- pletely.
  • Seite 12 Callous remover Use instructions Changing the rollers Grinding Head Change the rollers grinding head as needed for best result. the rollers grinding head last for a few sessions depending on frequency of use and size of area being treated. Replace as needed. Make sure the unit is turned off before replacing the Rollers Grinding Head.
  • Seite 13: Technical Data

    TECHNICAL DATA Power 3V Power supply 2x AA batteries (not included) For any improvement reasons, Beper reserves the right to modify or improve the product without any notice. The European directive 2011/65/EU on Waste Electrical and Electronic Equipment (WEEE), requires that old household electrical appliances must not be disposed of in the normal unsorted municipal waste stream.
  • Seite 14: Guarantee Certificate

    In any case, if the part to be replaced for defect, breakage or malfunction is an accessory and/or a detachable part of the product, Beper reserves the right to replace only the very part in question and not the entire product Technical assistance Even after the guarantee period we will always pay attention to repairs for defected appliances.
  • Seite 15 Ponceuse pour pieds Manuel d’instructions RECOMMANDATIONS GÉNÉRALES VEUILLEZ LIRE CES INSTRUCTIONS AVANT D’UTILISER L’APPAREIL Avant et pendant l’utilisation de l’appareil il est nécessaire de suivre quelques précautions de base. Après avoir enlevé l’emballage s’assurer de l’intégrité de l’appareil. En cas de doute ne pas utiliser l’appareil et s’adresser à...
  • Seite 16 Ponceuse pour pieds Manuel d’instructions PRINCIPAUX ÉLÉMENTS Fig. 1 A. Couvercle protectif B. Petite tête C. Pulsant pour enlever les petites têtes D. Bloc de sécurité E Pulsant on/off Indicateur de charge F. Couvercle du compartiment des piles G. Bloc du compartiment des piles H.
  • Seite 17 Ponceuse pour pieds Manuel d’instructions Avant d’utiliser l’appareil, lire attentivement et complètement le manuel d’instructions. Installation de la pile fig.2 1. Enlever le couvercle de la pile en tournant à 90 degrés vers la gauche jusqu’à ce qu’il s’enclenche dans sa position (fig.1) et puis tirer vers le bas (fig.2). 2.
  • Seite 18 Ponceuse pour pieds Manuel d’instructions Remplacement des rouleaux de la petite tête Remplacer le rouleau de la petite tête quand il est nécessaire pour un meilleur résultat. Les rou- leaux durent selon la fréquence d’utilisation et les dimensions de la zone à traiter. Remplacer si nécessaire.
  • Seite 19: Données Techniques

    Puissance: 3V Alimentation: 2x AA (piles non incluses) Pour une amélioration continue Beper se réserve la faculté d’apporter des modifications et des améliorations au produit en question sans préavis. Le produit en fin de vie doit être détruit selon les normes en vigueur relatives à l’élimination des déchets et ne peut être traité...
  • Seite 20: Certificat De Garantie

    Si un défaut survient lors de la période de garantie et ne peut être réparé, l’appareil sera remplacé gratuitement. Si la partie qui doit être remplacer parce que ne marche pas bien ou puor défaut ou rupture est une pièce détachée ou un accessoire, Beper remplacera seulement l’accessoire/la pièce mais non l’appareil entier. Assistance technique Même après la fin de la garantie, nous accordons toujours une grande importance à...
  • Seite 21: Allgemeine Anleltungen

    7. Gerät bei beschädigtem Anschlußkabel oder Stecker nicht benutzen. 8. Bei Störung und/oder Fehlbetrieb Gerät ausschalten und nicht eingreifen. Zur even- tuellen Reparatur das Gerät nur zu einer Beper Vertragsservicestelle bringen und nur den Einsatz von Originalersatzteiler, verlangen. Die Nichtbeachtung dieser Anleitungen kann die Sicherheit des Gerätes beeintrachtigen.
  • Seite 22: Produktbeschreibung

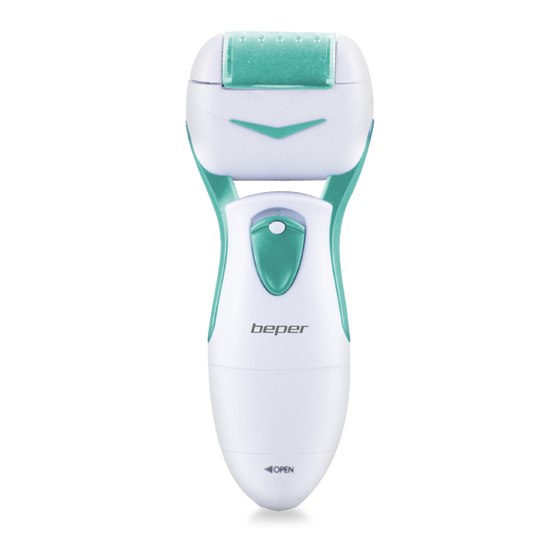
    Schleif Fuß Betriebsanleitung 23. Achten Sie darauf, dass alle die das Gerät benutzen, diese Anleitungen lesen. 24. Diese Anleitungen aufbewahren. PRODUKTBESCHREIBUNG A. Schutzkappe B. Aufsatz C. Knopf zur Aufsatzentfernung D. Sicherheitstaste E. ON/OFF-Taste Led-Anzeige F. Deckel Batteriefach G. Sicherheitstaste Batteriefach H.
  • Seite 23 Schleif Fuß Betriebsanleitung 21. Um Unfälle, Personen- und Geräteschäden zu vermeiden, Einheit während des Gebrauchs von Haaren, Brauen, Augenbrauen, Kleidungen, Bürsten, Fäden, Schnürsenkeln, usw. fernhalten. 22. Fußteile nicht zu lange behandeln. Gerät nicht mit einem starken Druck verwenden. 23. Schutzkappe immer einsetzen, wenn Sie das Gerät nicht verwenden. 24.
  • Seite 24 Schleif Fuß Betriebsanleitung Das Gerät betreibt nicht, wenn es zu fest gedrückt wird. Prüfen Sie, ob die Haut genug weich ist ansonsten behandeln Sie die Haut noch 2-3 Sekunden und nochmals prüfen. Beachten Sie diese Schritte, bis Sie die gewünschte Weichheit erreicht haben. Hinweis: bei Irritationen und Entzündungen Gerät nicht verwenden.
  • Seite 25: Technische Daten

    TECHNISCHE DATEN Leistung: 3V Batterien: 2 Typ AA (nicht inbegriffen) Im Hinblick auf eine Verbesserungsperspektive behält sich Beper das Recht vor, das betref- fende Produkt ohne Voranmeldung zu ändern bzw. umzubauen. Die WEEE-Richtlinie (von engl.: Waste Electrical and Electronic Equipment; deutsch: (Elektro- und Elektronikgeräte-Abfall) ist die EG-Richtlinie 2011/65/EU zur Reduktion der...
  • Seite 26: Garantiebedingungen

    Gerät kostenlos gewechselt. In jedem Fall, wenn der Ersatzteil, ein Zubehör ist, der wegen Brechen, Mängel oder Fehlfunktion umgetauscht werden soll, behält Beper sich das Recht vor, nur das Stück in Frage und nicht das gesamte Produkt zu ersetzten. Nach der Garantie Auch nach Ablauf der Garantiezeitraums zahlen wir viel Aufmerksamkeit auf Reparaturen.
  • Seite 27 Removedor de kallos Manual de instrucciones INFORMACIONES DE CARÁCTER GENERAL LEA ESTAS INSTRUCCIONES ANTES DE UTILIZAR EL APARATO Antes y después del uso del aparato es necesario seguir algunas precauciones elementales. Después de haber quitado el embalaje se asegure de la integridad del aparato. En caso de duda no utilice el aparato y se diriga a personal especializado.
  • Seite 28 Removedor de kallos Manual de instrucciones COMPONENTES PRINCIPALES Fig. 1 A. Tapa de protección B. Cabezal C. Botones para la remoción de los cabezales D. Bloque de seguridad E. Botón encendido/apagado F. Indicador de recarga G. Tapa del compartimiento de las pilas H.
  • Seite 29 Removedor de kallos Manual de instrucciones Antes de utilizar el aparato, lea atentamente y completamente este manual de instrucciones. Instalación de la pila Fig. 2 1. Quitar la tapa del compartimiento de las pilas haciendo un giro de 90 grados a la izquierda hasta que esta no salte en su posición (fig.1) y luego tirar hacia abajo (fig.2).
  • Seite 30 Removedor de kallos Manual de instrucciones Sustitución de los rodillos del cabezal Sustituir el rodillo del cabezal cuando es necesario para un mejor resultado. Los rodillos dependen según la frecuencia de uso y de las dimensiones del área que se trata. Sustituir si es necesario. Verifiar que el aparato sea apagado antes de sustituir los rodillos del cabezal.
  • Seite 31 Potencia: 3V Alimentación: 2x AA (pilas no incluidas). En una óptica de mejoramiento continuo Beper se reserva la facultad de realizar modifica- ciones y mejoras a este producto sin previo aviso. Al término de la vida útil del aparato, no eliminar como residuo municipal sólido mixto sino eliminarlo en un centro de recogida específico colocado en vuestra zona o entregarlo al...
  • Seite 32: Asistencia Técnica

    En cualquier caso, si la parte que necesita ser sustituida por defecto, rotura o mal funcionamiento es un accesorio y / o una parte desmontable del producto, beper se reserva el derecho de reempla- zar sólo la pieza en cuestión y no todo el producto.

Inhaltsverzeichnis