Inhaltsverzeichnis
Werbung
Verfügbare Sprachen
Verfügbare Sprachen
Quicklinks
BEDIENUNGSANWEISUNG
mit Montageanweisungen
INSTRUCTION FOR USE
and installation
D
GB
F
NL
I
E
P
VKI3505.0
Lesen Sie unbedingt die Gebrauchsanleitung
und den Montageplan vor Aufstellung,
Installation sowie Inbetriebnahme.
Please read the users an installation
instructions carefully before installation ot the
appliance and before starting to use.
Service und Kundendienst
Telefon: 0209 - 401 631
Email: kundendienst@kueppersbusch.de
240 601 2000 I51
Werbung
Kapitel
Inhaltsverzeichnis

Verwandte Anleitungen für Küppersbusch VKI3505.0


Inhaltszusammenfassung für Küppersbusch VKI3505.0
- Seite 1 BEDIENUNGSANWEISUNG mit Montageanweisungen INSTRUCTION FOR USE and installation VKI3505.0 Lesen Sie unbedingt die Gebrauchsanleitung und den Montageplan vor Aufstellung, Installation sowie Inbetriebnahme. Please read the users an installation instructions carefully before installation ot the appliance and before starting to use.
-
Seite 2: Inhaltsverzeichnis
Allgemeines Inhalt 1 Allgemeines 1 Allgemeines 1.1 Küppersbusch-Kundendienst 1.1 Küppersbusch-Kundendienst ........2 Zentrale Kundendienst- / Ersatzteilanforderung 1.2 Garantiebedingungen ..........3 Deutschland: 1.3 Hier fi nden Sie............3 Küppersbusch Hausgeräte GmbH 1.4 Bestimmungsgemäße Verwendung ......3 Küppersbuschstraße 16 2 Sicherheitshinweise und Warnungen 45883 Gelsenkirchen 2.1 Für Anschluss und Funktion ........4 2.2 Für das Kochfeld allgemein ........4 Telefon: 0209-401631... -
Seite 3: Garantiebedingungen
Allgemeines 1.2 Garantiebedingungen 4. In Fällen, in denen die Nachbesserung fehlschlägt oder von uns abgelehnt wird, liefern wir innerhalb der oben Zusätzlich zu seinen Gewährleistungsansprüchen aus genannten Garantiezeit auf Wunsch des Endabneh- seinem Kaufvertrag mit dem Händler leisten wir dem mers kostenfrei gleichwertigen Ersatz. -
Seite 4: Sicherheitshinweise Und Warnungen
Sicherheitshinweise und Warnungen 2 Sicherheitshinweise und Warnungen • Die Glaskeramik-Fläche ist sehr widerstands- fähig. Vermeiden Sie dennoch, dass harte Ge- 2.1 Für Anschluss und Funktion genstände auf die Glaskeramik-Fläche fallen. • Die Geräte werden nach den einschlägigen Punktförmige Schlagbelastungen können zum Sicherheitsbestimmungen gebaut. -
Seite 5: Für Personen
Sicherheitshinweise und Warnungen • Niemals verschlossene Konservendosen und schreiten, sonst besteht Vergiftungsgefahr. Verbundschichtverpackungen auf Kochzonen • Beim Kochen wird durch den Wrasen zusätz- erhitzen. Durch Energiezufuhr könnten diese lich Feuchtigkeit in die Raumluft abgegeben zerplatzen! • Im Umluftbetrieb wird die Feuchtigkeit aus •... -
Seite 6: Symbol- Und Hinweiserklärung
Sicherheitshinweise und Warnungen 2.4 Symbol- und Hinweiserklärung Zusätzlich werden an einigen Stellen die folgenden Gefah- rensymbole verwendet: Das Gerät wurde nach aktuellem Stand der Technik gefer- tigt. Dennoch gehen von Maschinen Risiken aus, die sich konstruktiv nicht vermeiden lassen. WARNUNG VOR ELEKTRISCHER Um dem Bediener ausreichende Sicherheit zu gewähr- ENERGIE! leisten, werden zusätzlich Sicherheitshinweise gegeben,... -
Seite 7: Gerätebeschreibung
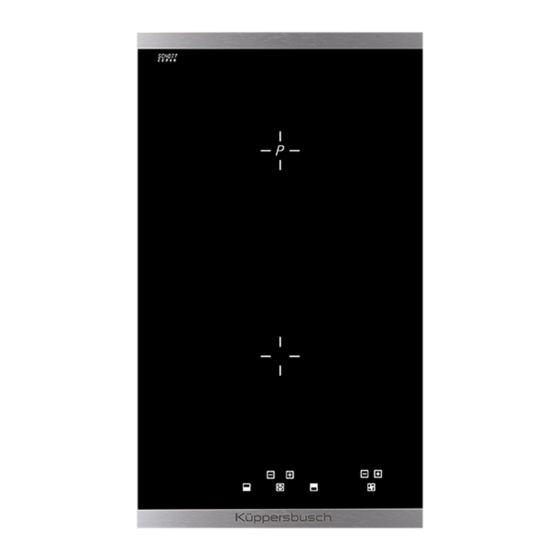
Gerätebeschreibung 3 Gerätebeschreibung Das Dekor kann von den Abbildungen abweichen. Ein-/Aus-Taste 1. Induktionskochzone vorne Mit dieser Taste wird das gesamte Kochfeld ein- und aus- 2. Induktionskochzone hinten geschaltet. Die Taste ist sozusagen der Hauptschalter. 3. Glaskeramik-Kochfeld Kochzonenauswahl-Taste; z.B. vorne 4. Touch-Control Bedienfeld Durch Betätigung einer der zur Verfügung stehenden 5. -
Seite 8: Bedienung
Bedienung 4 Bedienung 4.3 Betriebsdauerbegrenzung Das Induktionskochfeld besitzt eine automatische Be- 4.1 Das Kochfeld triebsdauerbegrenzung. Die Kochfl äche ist mit einem Induktionskochfeld ausgestat- Die kontinuierliche Nutzungsdauer jeder Kochzone ist tet. Eine Induktionsspule unterhalb der Glaskeramik-Koch- abhängig von der gewählten Kochstufe (siehe Tabelle). fl... -
Seite 9: Geschirr Für Induktionskochfeld
Bedienung 4.6 Geschirr für Induktionskochfeld 4.7 Energiespartipps Das für die Induktionskochfl äche benutzte Kochgefäß Nachfolgend fi nden Sie einige wichtige Hinweise, um ener- muss aus Metall sein, magnetische Eigenschaften haben giesparend und effi zient mit Ihrem neuen Induktionskoch- und eine ausreichende Bodenfl äche besitzen. feld und dem Kochgeschirr umzugehen. -
Seite 10: Tastenbetätigung
Bedienung 4.10 Tastenbetätigung Die hier beschriebene Steuerung erwartet nach der Betä- tigung einer (Auswahl-) Taste anschließend die Betätigung einer nachfolgenden Taste. Die Betätigung der nachfolgenden Taste muss grund- sätzlich innerhalb von 10 Sekunden begonnen werden, ansonsten erlischt die Auswahl. Die Plus-/ Minus-Tasten können einzeln angetippt werden oder permanent gedrückt gehalten werden. -
Seite 11: Powerstufe (Kochzonen Mit P)
Bedienung 4.14 Powerstufe (Kochzonen mit P) Die Powerstufe stellt den Induktionskochzonen zusätzliche Leistung zur Verfügung. Eine große Menge Wasser kann schnell zum Kochen gebracht werden. Die Powerstufe arbeitet für 5 Minuten, anschließend wird automatisch auf Kochstufe 9 zurückgeschaltet. 1. Das Kochfeld einschalten. 2. -
Seite 12: Abschaltautomatik (Timer)
Bedienung 4.16 Abschaltautomatik (Timer) Durch die Abschaltautomatik wird jede eingeschaltete Kochzone nach einer einstellbaren Zeit automatisch ab- geschaltet. Es können Kochzeiten von 01 bis 99 Minuten eingestellt werden. 1. Das Kochfeld einschalten. Eine oder mehrere Kochzo- nen einschalten und gewünschte Kochstufen wählen. 2. -
Seite 13: Kochfeld Mit Lüftersteuerung: Lüfter Verwenden
Bedienung 4.18 Kochfeld mit Lüftersteuerung: Lüfter verwen- Auf dem Touch Control Bedienfeld befi nden sich rechts die Tasten für den Lüfter. Vor Inbetriebnahme des Lüfters Glas-Abdeckung vollstän- dig abnehmen. Bei Modellen mit off ener Abdeckung ist ein Abneh men nicht erforderlich. Wichtig: Abdeckung nicht auf dem Induktionskochfeld ablegen! Verbrennungsgefahr! -
Seite 14: Reinigung Und Pfl Ege
Reinigung und Pfl ege 5 Reinigung und Pfl ege Farbige Veränderungen des Kochfeldes haben keinen Einfl uss auf die Funktion und Stabilität der Glaskeramik. • Vor dem Reinigen das Kochfeld ausschalten und ab- Es handelt sich dabei nicht um eine Beschädigung des kühlen lassen. -
Seite 15: Was Tun Bei Problemen
Was tun bei Problemen? 6 Was tun bei Problemen? Es wird ein Fehlercode (ERxx oder Ex) angezeigt? Es liegt ein technischer Defekt vor. Bitte den Kundendienst Unqualifi zierte Eingriff e und Reparaturen am Gerät sind rufen. gefährlich, weil Stromschlag- und Kurzschlussgefahr besteht. -
Seite 16: Montageanleitung
Montageanleitung 7 Montageanleitung 7.3 Einbau Wichtige Hinweise 7.1 Sicherheitshinweise für den Küchenmöbel- monteur • Übermäßige Hitzeentwicklung von unten z.B. von ei- nem Backofen ohne Querstromlüfter ist zu vermeiden. • Furniere, Kleber bzw. Kunststoff beläge der angren- • Wenn bei Einbauherden der Pyrolysebetrieb stattfi ndet, zenden Möbel müssen temperaturbeständig sein (min. -
Seite 17: Aufsatz Solo
Montageanleitung Aufsatz solo Aufsatz mit VKI 3505 + Zub. 1130 Wichtig: Durch schiefe Aufl age oder Verspannen besteht beim Einbau des Glaskeramik- Kochfeldes Bruchgefahr! 1 Mindestabstand zu benachbarten Wänden 2 Ausfräsmaß 3 Kochfeldaussenmaß 4 Einbauhöhe 17 von 128... -
Seite 18: 7-Poliger Stecker Anschluss Lüfter
Montageanleitung 7.4 7-poliger Stecker Anschluss Lüfter 7.5 Einbau Kochmulden Lüfter Für den Lüfteranschluss verbinden Sie die beiden 7-poli- • Das Produkt darf nur von einem zugelassenen Fach- gen Stecker. mann unter Beachtung der örtlich geltenden Vorschrif- ten angeschlossen werden, gleiches gilt für die Ab- Steckersicherung am 7 poligen Stecker (Lüfter) des Koch- luftanschlüsse. -
Seite 19: Elektrischer Anschluss
Außerbetriebhame, Entsorgung 7.6 Elektrischer Anschluss 7.7 Technische Daten Abmessungen Kochfeld WARNUNG VOR ELEKTRISCHER Höhe/ Breite/ Tiefe ..mm 55x298x518 ENERGIE! Kochzonen ES BESTEHT LEBENSGEFAHR! vorne ....Ø cm / kW 16/ 1,4 In der Nähe dieses Symbols sind span- hinten ....Ø cm / kW 1,4 (2,0)* nungsführende Teile angebracht. -
Seite 20: General
General Content 1 General 1.1 For your information... 1 General Please read this manual carefully before using your appli- 1.1 For your information..........20 ance. It contains important safety advice; it explains how to 1.2 Intended use ............20 use and look after your appliance so that it will provide you 2 Safety Instructions and Warnings with many years of reliable service. -
Seite 21: Safety Instructions And Warnings
Safety Instructions and Warnings 2 Safety Instructions and Warnings might break it. 2.1 For connection and operation • There is a risk of electric shocks if the glass ceramic hob develops fractures, cracks, tears • The appliances are constructed in accordance or damage of any other kind. -
Seite 22: For Persons
Safety Instructions and Warnings • If food boils over onto the sensor keys, we • Always make sure that the indoor climate is advise you to activate the OFF key. normal and comfortable (45 - 60 % humidity). • Hot pans and pots should not cover resp. be •... -
Seite 23: Explanation For Symbols And Indications
Safety Instructions and Warnings 2.4 Explanation for symbols and indications The following danger symbols are used at some points: The appliance was produced according to state of the art technology. Machines nevertheless give rise to risks which WARNING OF ELECTRICAL ENERGY cannot be constructively avoided. -
Seite 24: Appliance Description
Appliance description 3 Appliance description The decorative design may deviate from the illustrations. ON/OFF key 1. Front induction cooking zone This key is used to switch the entire hob on and off . It is, 2. Rear induction cooking zone as it were, the main switch. -
Seite 25: Operation
Operation 4 Operation 4.3 Operation time limit The induction hob has an automatic time limit function. 4.1 The hob The duration of continuous use of each cooking zone de- The hob is equipped with an induction cooking mode. An pends on the cooking level selected (see chart). induction coil underneath the glass ceramic hob generates an electromagnetic alternating fi... -
Seite 26: Cookware For Induction Hobs
Operation 4.6 Cookware for induction hobs 4.7 How to cut power consumption Cookware for induction cooking zones must be made of The following are a few useful hints to help you cut your metal and have magnetic properties. The base must be consumption of energy and use your new induction hob suffi... -
Seite 27: Operating The Keys
Operation 4.10 Operating the keys The controls described here expect the pressing of a (selection) key to be followed by the pressing of a subse- quent key. The next key will need to be pressed within 10 seconds, otherwise the selection will be deleted. The Plus/ Minus keys can be touched individually or be permanently pressed. -
Seite 28: Power Boost Setting (Cooking Zones Marked With "P")
Operation 4.14 Power boost setting (cooking zones mar- ked with "p") The power boost setting makes additional power available for induction cooking zones. A large quantity of water can be brought to the boil very quickly. The power boost setting operates for 5 minutes, after which the power level is auto- matically reduced to power setting 9. -
Seite 29: Automatic Switch-Off (Timer)
Operation 4.16 Automatic switch-off (timer) The automatic switch-off device is used to automatically switch off any cooking zone after an adjustable period of time. Cooking times ranging from 01 to 99 minutes can be set. 1. Switch on the hob. Switch on one or more cooking zones and select the required power settings. -
Seite 30: Hob With Fan Control: Using The Fan
Operation 4.18 Hob with fan control: Using the fan The keys for the ventilator are on the right side of the panel. wRemove the glass cover before initial operation of the fan. The cover does not need to be removed from models with an open cover. -
Seite 31: Cleaning And Care
Cleaning and care 5 Cleaning and care Shiny spots result when the base of the cookware rubs on the surface of the hob, particularly when cookware • Switch the hob off and let it cool down before you clean with an aluminium base or unsuitable cleaning agents are used. -
Seite 32: What To Do If Trouble Occurs
What to do if trouble occurs? 6 What to do if trouble occurs? The pot sign appears? Interference with and repairs to the appliance by unquali- A cooking zone has been switched on and the hob is ex- fi ed persons are dangerous as they can result in an elec- pecting a suitable pot or pan to be placed on the cooking tric shock or a short circuit. -
Seite 33: Instructions For Assembly
Instructions for assembly 7 Instructions for assembly 7.3 Installation Important information 7.1 Safety instructions for kitchen unit fi tters • Avoid excessive thermal development from below e.g. • Veneers, adhesives and plastic surfaces of surrounding from a baking oven without a cross fl ow cooling device. furniture must be temperature resistant (at least 75°C). -
Seite 34: Aufsatz Solo
Instructions for assembly Aufsatz solo Aufsatz mit VKI 3505 + Zub. 1130 Important: There is a risk of breakage if the hob is canted or sub- jected to stress during installation! 1 Minimum clearance to adjacent walls 2 Cut-out dimension 3 Outer dimensions of the hob 4 Installation height 34 of 128... -
Seite 35: 7-Pole Fan Plug Connector
Instructions for assembly 7.4 7-pole fan plug connector 7.5 Hob fan installation Connect the two 7-pole plus for the fan connection. • The product may only be connected by a qualifi ed fi tter according to applicable local regulations. The same Open the plug retainer on the 7-pole plug (fan) of the hob applies for the extraction air connections. -
Seite 36: Electrical Connection
Instructions for assembly 7.6 Electrical connection Mains cable available in the factory • The hob has been fi tted with a temperature-resistant connection cable in the factory. WARNING OF ELECTRICAL ENERGY! • Connection to the mains is carried out in accordance RISK OF FATAL INJURY! with the circuit diagram, unless the connection cable is Live components have been installed near... -
Seite 37: Decommissioning And Disposal Of The Appliance
Decommissioning and disposal of the appliance 8 Decommissioning and disposal of the ap- 8.2 Disposing of the packaging pliance Please ensure the environmentally-friendly disposal of the packaging that came with your appliance. Recycling the 8.1 Switching the appliance off completely packaging material saves on resources and cuts down on The appliance is to be put out of operation when its useful waste. -
Seite 38: En Général
En général Table des matières 1 En général 1.1 Ce que vous trouverez ici... 1 En général Lisez soigneusement les informations portées dans ce 1.1 Ce que vous trouverez ici........38 manuel avant de mettre votre table de cuisson en service. 1.2 Utilisation conforme à... -
Seite 39: Consignes De Sécurité Et Avertissements
Consignes de sécurité et avertissements 2 Consignes de sécurité et avertissements • La surface en vitrocéramique est très résistan- te. Évitez toutefois d’y faire tomber des objets 2.1 Pour le raccordement et le fonctionnement durs. Les impacts en forme de point peuvent •... -
Seite 40: Pour Les Personnes
Consignes de sécurité et avertissements • Maintenir les touches sensitives propres, car • Les vapeurs de cuisson dégagent de l'humi- des salissures sur l’appareil pourraient être dité supplémentaire dans l'air ambiant. détectées comme effl eurement d’un doigt. Ne • En mode « Recyclage d'air », cette humidité jamais poser d'objets (tels que casseroles, des vapeurs de cuisson n'est que très peu torchons, etc.) sur les touches sensitives ! -
Seite 41: Explication Des Symboles Et Des Consignes
Consignes de sécurité et avertissements 2.4 Explication des symboles et des consignes En outre, les symboles de danger suivants marquent cer- tains passages de texte : L'appareil a été fabriqué selon l'état actuel de la technique. Cependant, les machines recèlent toujours des risques qu'il n'est pas possible d'exclure en matière de constructi- ATTENTION - ÉNERGIE ÉLECTRIQUE ! DANGER DE MORT ! -
Seite 42: Description De L'appareil
Description de l’appareil 3 Description de l’appareil Le décor peut être diff érent de celui illustré. Touche de sélection zone de cuisson ; p. ex. avant 1. Zone de cuisson à induction avant 2. Zone de cuisson à induction arrière L’appui sur l’une des touches de sélection zones de cuis- son, vous permet de sélectionner une zone de cuisson à... -
Seite 43: Utilisation
Utilisation 4 Utilisation 4.3 Limitation de la durée de fonctionnement La table de cuisson à induction possède une limitation 4.1 La table de cuisson automatique de la durée de fonctionnement. La table de cuisson est composée de zones de cuisson à La durée de fonctionnement en continu de chacune des induction. -
Seite 44: Vaisselle Pour Table De Cuisson À Induction
Utilisation 4.6 Vaisselle pour table de cuisson à induction 4.7 Conseils pour économiser de l’énergie Le récipient utilisé avec la table à induction doit être en Vous trouvez, ci-après, quelques conseils importants métal, avoir des propriétés magnétiques et posséder un concernant l’utilisation économique et effi... -
Seite 45: Utilisation Des Touches
Utilisation 4.10 Utilisation des touches Dans la commande décrite ici, l’appui d’une touche de sélection doit être suivi par l’appui d’une autre touche. L’appui de la touche suivante doit toujours avoir lieu sous 10 secondes, dans le cas contraire, la sélection s’eff ace. Les touches Plus/Moins peuvent être effl... -
Seite 46: Position Power (Zones De Cuisson Avec «P».)
Utilisation 4.14 Position Power (zones de cuisson avec «P».) La position Power fournit une puissance supplémentaire aux zones de cuisson à induction. Une grande quantité d’eau peut très rapidement être portée à ébullition. L'intensité Power travaille pendant 5 minutes, ensuite la puissance est automatiquement ramenée sur la position de cuisson 9. -
Seite 47: Arrêt Automatique (Minuterie)
Utilisation 4.16 Arrêt automatique (minuterie) L’arrêt automatique permet d’arrêter automatiquement chaque zone de cuisson en fonctionnement après une durée de cuis- son réglable. Vous pouvez régler des temps de cuisson entre 01 à 99 minutes. 1. Mettre en marche la table de cuisson. Mettre en marche une ou plusieurs zones de cuisson et sélectionner la(les) position(s) de cuisson souhaitée(s). -
Seite 48: Table De Cuisson Avec Commande De Ventilateur: Utiliser Le Ventilateur
Utilisation 4.18 Table de cuisson avec commande de ventilateur: Utiliser le ventilateur Sur le bandeau de commande Touch Control, à droite, se trouvent les touches pour le ventilateur. Retirer entièrement le couvercle en verre avant la mise en service du ventilateur. Le retrait n'est pas nécessaire pour les modèles avec couvercle ouvert en alumi- nium. -
Seite 49: Nettoyage Et Entretien
Nettoyage et entretien 5 Nettoyage et entretien la plaque vitrocéramique. Il ne s’agit pas d’une altération du matériau mais de restes calcinés qui n’ont pas été • Avant le nettoyage, éteignez la table de cuisson et enlevés. laissez-la refroidir. Des zones brillantes se produisent par le frottement du •... -
Seite 50: Que Faire En Cas De Problèmes
Que faire en cas de problèmes ? 6 Que faire en cas de problèmes ? Le symbole de casserole s’affi che. Les interventions ou réparations non qualifi ées sont Une zone de cuisson a été mise en marche et elle attend dangereuses ;... -
Seite 51: Instructions De Montage
Instructions de montage 7 Instructions de montage 7.3 Montage Consignes importantes 7.1 Consignes de sécurité pour l’installateur des meubles de cuisine • Éviter toute production de chaleur excessive sous la table de cuisson, provenant par exemple d'un four sans • Les placages, colles ou revêtements plastiques des ventilation tangentielle. -
Seite 52: Aufsatz Solo
Instructions de montage Aufsatz solo Aufsatz mit VKI 3505 + Zub. 1130 Important : Veillez à poser la table de cuisson en vitrocérame par- faitement à plat ; une légère inclinaison ou un appui non uniforme risque de la vriller et de la fendre. 1 Espacement minimal par rapport aux meubles avoisi- nants 2 Dimension du fraisage... -
Seite 53: Connecteur 7 Pôles Raccordement Ventilateur
Instructions de montage 7.4 Connecteur 7 pôles Raccordement ventila- 7.5 Ventilateur de table de cuisson teur • Le produit doit être raccordé uniquement par un pro- fessionnel dans le respect des prescriptions locales en Relier les deux connecteurs 7 pôles pour raccorder le vigueur, ce qui vaut également pour les raccordements ventilateur. -
Seite 54: Raccordement Électrique
Instructions de montage 7.6 Raccordement électrique Appareil livré avec cordon d’alimentation • La table de cuisson est équipée en usine d'un cordon électrique thermorésistant. ATTENTION - ÉNERGIE ÉLECTRIQUE ! • Le raccordement au réseau se fait d’après le schéma DANGER DE MORT ! électrique, seul le cordon de raccordement est déjà... -
Seite 55: Mise Hors Service, Élimination
Mise hors service, élimination 8 Mise hors service, élimination 8.2 Élimination de l’emballage Éliminez le plus écologiquement possible l'emballage de 8.1 Mise hors service transport. Le recyclage des matériaux d'emballage per- La mise hors service de l'appareil survient lorsque l'appa- met d'économiser des matières premières et de réduire le reil n'est plus utilisé. -
Seite 56: Algemeen 1.1 Hier Vindt U
Algemeen Inhoud 1 Algemeen 1.1 Hier vindt u... 1 Algemeen Lees eerst zorgvuldig de informatie in dit boekje door 1.1 Hier vindt u.............56 vooraleer u uw kookplaat in gebruik neemt. Hier vindt u 1.2 Reglementair gebruik ..........56 belangrijke richtlijnen voor uw veiligheid, het gebruik, het 2 Veiligheidsaanwijzingen en schoonmaken en het onderhoud van het toestel, zodat u waarschuwingen... -
Seite 57: Veiligheidsaanwijzingen En Waarschuwingen
Veiligheidsaanwijzingen en waarschuwingen 2 Veiligheidsaanwijzingen en • De keramische plaat is zeer stevig. Zorg er waarschuwingen niettemin voor dat er geen harde voorwerpen op de keramische plaat vallen. Puntvormige 2.1 Voor aansluiting en werking slagbelastingen kunnen de kookplaat doen • De apparaten worden volgens de geldende breken. -
Seite 58: Voor Personen
Veiligheidsaanwijzingen en waarschuwingen undverpakkingen op kookzones verwarmen. • Tijdens het koken wordt door de damp extra Door de energietoevoer kunnen deze ui- vocht aan de kamerlucht afgegeven. teenspatten! • In circulatiebedrijf wordt het vocht uit de damp • De sensoren schoonhouden omdat verontrei- maar voor een klein deel verwijderd. -
Seite 59: Symbool- En Instructieverklaring
Veiligheidsaanwijzingen en waarschuwingen 2.4 Symbool- en instructieverklaring Bovendien worden op sommige plekken de volgende gevaarsymbolen gebruikt: Het apparaat werd volgens de huidige stand van de techniek geproduceerd. Desondanks kunnen machines risico's opleveren, die constructief niet te vermijden zijn. WAARSCHUWING VOOR ELEKTRI- Om voldoende veiligheid voor de bediener te waarborgen, SCHE ENERGIE! worden extra veiligheidsinstructies gegeven in de vorm... -
Seite 60: Beschrijving Van Het Toestel
Beschrijving van het toestel 3 Beschrijving van het toestel Het decor kan van de afbeeldingen afwijken. Kookzonekeuzetoets, bijv. voor 1. Inductiekookzone voor Door op een van de beschikbare kookzonekeuzetoetsen 2. Inductiekookzone achter te drukken wordt een kookzone geselecteerd, waarvoor vervolgens met de plus-toets of min-toets een kookstand 3. -
Seite 61: Bediening
Bediening 4 Bediening 4.3 Gebruiksduurbeperking De inductiekookplaat bezit een automatische gebruiksdu- 4.1 De kookplaat urbeperking. De kookplaat is met een inductiekookveld uitgerust. Een De ononderbroken gebruiksduur voor elke kookzone is inductiespoel onder de keramische kookplaat wekt een afhankelijk van de gekozen kookstand (zie tabel). elektromagnetisch wisselveld op, dat de vitrokeramiek doordringt en in de bodem van de pan een warmtevor- De voorwaarde is dat tijdens de gebruiksduur de instellin-... -
Seite 62: Servies Voor Inductiekookplaat
Bediening 4.6 Servies voor inductiekookplaat 4.7 Tips om energie te besparen De pannen die voor de inductiekookplaat worden gebru- Hier vindt u enkele belangrijke aanwijzingen om zuinig en ikt, moeten van metaal zijn, magnetische eigenschappen effi ciënt met uw nieuwe inductiekookplaat en uw kookgerei bezitten en een voldoende grote bodem hebben. -
Seite 63: Bediening Van De Toetsen
Bediening 4.10 Bediening van de toetsen De hier beschreven besturing verwacht na het bedienen van een (keuze-) toets daarna de bediening van een volgende toets. De volgende toets moet principieel binnen 10 seconden worden bediend, anders wordt de keuze geannuleerd. De plus-/min-toetsen kunnen apart worden aangeraakt of ingedrukt gehouden worden. -
Seite 64: Powerstand (Kookzones Met "P")
Bediening 4.14 Powerstand (kookzones met "P") De powerstand stelt extra vermogen voor de inductiekookzo- nes ter beschikking. Een grote hoeveelheid water kan snel aan de kook worden gebracht. De powerstand werkt gedurende 5 minuten, vervolgens wordt automatisch naar kookstand 9 terug- geschakeld. -
Seite 65: Automatische Uitschakeling (Timer)
Bediening 4.16 Automatische uitschakeling (timer) Door de automatische uitschakeling wordt elke inge- schakelde kookzone na een instelbare tijd automatisch uitgeschakeld. Er kunnen kooktijden van 01 tot 99 minuten worden ingesteld. 1. De kookplaat inschakelen. Een of meer kookzones inschakelen en gewenste kookstanden kiezen. 2. -
Seite 66: Kookplaat Met Ventilatoraansturing: Ventilator Gebruiken
Bediening 4.18 Kookplaat met ventilatoraansturing: Ventilator gebruiken Op het Touch Control bedieningspaneel bevinden zich rechts de toetsen voor de ventilator. Voor de ingebruikname van de ventilator dient het glazen deksel weggehaald te worden. Bij modellen met een open deksel is weghalen ervan niet vereist. Belangrijk: Leg het deksel niet op de inductiekookplaat! Gevaar voor verbranding! -
Seite 67: Reiniging En Onderhoud
Reiniging en onderhoud 5 Reiniging en onderhoud invloed op de werking en de stevigheid van de vitrokera- miek. Het gaat hierbij niet om een beschadiging van de • Vóór het reinigen de kookplaat uitschakelen en laten kookplaat, maar om niet verwijderde en daarom ingebran- afkoelen. -
Seite 68: Wat Te Doen Bij Problemen
Wat te doen bij problemen? 6 Wat te doen bij problemen? Er wordt een foutcode (ERxx of Ex) getoond? Er is een technisch defect. A.u.b. contact opnemen met de Ongekwalifi ceerde ingrepen en reparaties aan het appa- service. raat zijn gevaarlijk omdat er gevaar voor stroomstoten en kortsluiting bestaat. -
Seite 69: Montagehandleiding
Montagehandleiding 7 Montagehandleiding 7.3 Montage Belangrijke opmerkingen 7.1 Veiligheidsinstructies voor de keuken- meubelmonteur • Overmatige warmteontwikkeling langs onder, bijv. door een oven zonder dwarsstroomventilator, moet worden • Het fi neer, de lijm of de kunststofbekleding van de aan- vermeden. grenzende meubels moeten temperatuurbestendig zijn •... -
Seite 70: Aufsatz Solo
Montagehandleiding Aufsatz solo Aufsatz mit VKI 3505 + Zub. 1130 Belangrijk: Als de keramische kookplaat scheef zit of spant, be- staat er verhoogd breukgevaar bij de montage! 1 Minimumafstand tot naburige wanden 2 Uitfreesmaat 3 Buitenmaat kookplaat 4 Inbouwhoogte 70 van 128... -
Seite 71: 7-Polige Stekker Aansluiting Ventilator
Montagehandleiding 7.4 7-polige stekker aansluiting ventilator 7.5 Montage kookplaatventilator Voor de ventilatoraansluiting dient u beide 7-polige • Het product mag alleen door een erkende vakman met stekkers met elkaar te verbinden.Stekkerborging op de inachtneming van de plaatselijk geldende voorschriften 7-polige stekker (ventilator) van de kookplaat openen en worden aangesloten;... -
Seite 72: Elektrische Aansluiting
Montagehandleiding 7.6 Elektrische aansluiting Aansluitkabel standaard aanwezig • De kookplaat is bij levering met een temperatuurbes- tendige aansluitkabel uitgerust. WAARSCHUWING VOOR ELEKTRI- • De aansluiting op het net wordt volgens het aansluit- SCHE ENERGIE! schema uitgevoerd, tenzij de aansluitkabel al met een ER BESTAAT LEVENSGEVAAR! stekker is uitgerust. -
Seite 73: Buitenbedrijfstelling, Afvoer
Buitenbedrijfstelling, afvoer 8 Buitenbedrijfstelling, afvoer 8.2 Verwijderen van de verpakking Verwijder de transportverpakking op een zo milieubewust 8.1 Buitenbedrijfstelling mogelijke manier. De recyclage van het verpakkingsmate- Als het apparaat ooit is uitgediend, vindt de buitenbedri- riaal bespaart grondstoff en en vermindert de afvalberg. jfstelling plaats. -
Seite 74: Generalmente 1.1 Qui Trovate
Generalmente Contenuto 1 Generalmente 1.1 Qui trovate... 1 Generalmente Siete pregati di leggere attentamente le informazioni 1.1 Qui trovate.............74 contenute nel presente manuale prima di mettere in 1.2 Utilizzo conforme alla destinazione d’uso .....74 funzione l’apparecchio. In questo manuale sono contenute 2 Indicazioni in materia di sicurezza e avvertenze importanti indicazioni relative la vostra sicurezza, l'uso, 2.1 Per il collegamento e il funzionamento ....75... -
Seite 75: Indicazioni In Materia Di Sicurezza E Avvertenze
Indicazioni in materia di sicurezza e avvertenze 2 Indicazioni in materia di sicurezza e avver- • La superfi cie in vetroceramica è molto resis- tenze tente agli urti. Evitare però che oggetti solidi e duri cadano sulla superfi cie di cottura, perché 2.1 Per il collegamento e il funzionamento potrebbero provocarne la rottura se appuntiti. -
Seite 76: Per Le Persone
Indicazioni in materia di sicurezza e avvertenze • Assicurarsi che i tasti a sensore siano sempre • Occorre pertanto provvedere sempre a un puliti, perché l'apparecchio potrebbe interpre- suffi ciente apporto di aria fresca, per es. tare le macchie di sporco come un contatto lasciando una fi... -
Seite 77: Spiegazione Dei Simboli E Delle Avvertenze
Indicazioni in materia di sicurezza e avvertenze 2.4 Spiegazione dei simboli e delle avvertenze In più ci si trovano anche i seguenti simboli di pericolo: L'apparecchio è stato costruito secondo lo stato attuale della tecnica. Le macchine comportano tuttavia dei rischi ATTENZIONE! ENERGIA ELETTRICA! che non sono evitabili sotto il profi... -
Seite 78: Descrizione Dell'apparecchio
Descrizione dell'apparecchio 3 Descrizione dell'apparecchio La decorazione del piano può diff erire dalle illustrazioni. Tasto per la selezione della zona di cottura; p.e. ante- riore 1. Zona di cottura ad induzione anteriore Attivando uno dei tasti di selezione disponibili si seleziona 2. -
Seite 79: Comandi
I comandi 4 I comandi 4.3 Limitazione della durata d'esercizio Il piano di cottura ad induzione ha un dispositivo automati- 4.1 Il piano di cottura co che limita la durata d'esercizio. Il piano di cottura è dotato di un campo di cottura ad indu- La durata di funzionamento di ogni singola zona di cottura zione. -
Seite 80: Pentole Da Utilizzare Per La Cottura Ad Induzione
I comandi 4.6 Pentole da utilizzare per la cottura ad 4.7 Consigli per il risparmio d'energia induzione In seguito vi diamo alcuni consigli su come adoperare il nuovo piano di cottura ad induzione in modo effi cace ed I recipienti utilizzati per la superfi cie di cottura ad induzione economico. -
Seite 81: Comando A Tasti
I comandi 4.10 Comando a tasti Per attivare il comando qui descritto si deve prima preme- re un tasto di selezione e quindi subito dopo un altro. Il secondo tasto deve essere premuto entro 10 secondi, perché altrimenti si disattiva la selezione desiderata. I tasti Più... -
Seite 82: Funzione Power (Zona Di Cottura Con "P")
I comandi 4.14 Funzione Power (zona di cottura con "P") La funzione Power mette a disposizione delle zone di cottura ad induzione delle potenze supplementari. Si può, per esempio, far bollire velocemente una grande quantità d'acqua. La funzione Power è attiva per 5 minuti, trascorsi i quali il livello di potenza si abbassa automaticamente a 9. -
Seite 83: Spegnimento Automatico (Timer)
I comandi 4.16 Spegnimento automatico (timer) Lo spegnimento automatico disattiva ogni zona di cottura accesa al termine di un periodo di tempo predeterminato. Possono essere regolati tempi di cottura tra 01 e 99 minuti. 1. Accendere il piano di cottura. Accendere una o più zone di cottura e selezionare il livello di potenza desi- derato. -
Seite 84: Piano Di Cottura Con Comando Del Ventilatore Usare La Cappa Aspirante
I comandi 4.18 Piano di cottura con comando del ventilatore Usare la cappa aspirante I tasti per il ventilatore si trovano a destra. Prima di usare il pi- ano di cottura togliere completamente la copertura. Non biso- gna rimuoverla nei modelli con copertura in acciaio aperta. Importante! Non mettere la copertura sul piano cottura a induzione! Pericolo di ustionarsi! -
Seite 85: Pulizia E Manutenzione
Pulizia e manutenzione 5 Pulizia e manutenzione I cambiamenti cromatici non infl uiscono sul funziona- mento e la stabilità della vetroceramica. Non si tratta, • Lasciare raff reddare la superfi cie di cottura prima di infatti, di modifi che del materiale del piano di cottura, ma di procedere alla pulizia. -
Seite 86: Che Fare In Caso Di Problemi
Che fare in caso di problemi? 6 Che fare in caso di problemi? È visualizzato il simbolo ? È stata accesa una zona di cottura, ma non vi è stata an- Modifi che e riparazioni all'apparecchio non a regola d’arte cora appoggiata una pentola (riconoscimento pentola). -
Seite 87: Istruzioni Di Montaggio
Istruzioni di montaggio 7 Istruzioni di montaggio 7.3 Incasso Avvertenze importanti 7.1 Indicazioni di sicurezza per il montaggio dei mobili da cucina • Evitare un eccessivo surriscaldamento inferiore, causato per esempio da forni sprovvisti di ventilatore a • Impiallacciature, collanti o rivestimenti plastici sui mobili corrente trasversale. -
Seite 88: Aufsatz Solo
Istruzioni di montaggio Aufsatz solo Aufsatz mit VKI 3505 + Zub. 1130 Importante! Se il supporto dovesse essere inclinato o sotto tensione, il piano di cottura in vetroceramica si potrebbe rompere durante il montaggio. 1 Distanza minima dalle pareti confi nanti (40mm) 2 Misure d’incasso 3 Misure esterne del piano di cottura 4 Altezza d’incasso... -
Seite 89: Connettore A 7 Poli Per L'allacciamento Al Ventilatore
Istruzioni di montaggio 7.4 Connettore a 7 poli per l'allacciamento al 7.5 Incasso della cappa aspirante del piano di ventilatore cottura Per il collegamento al ventilatore abbinare i due connettori • L'allacciamento alle rete elettrica e il collegamento a 7 poli. degli allacciamento per l'aria di scarica del prodotto può... -
Seite 90: Collegamento Elettrico
Istruzioni di montaggio 7.6 Collegamento elettrico Collegamento da parte della fabbrica • Il piano di cottura è dotato in sede di fabbricazione di un cavo di linea resistente al calore. ATTENZIONE! ENERGIA ELETTRICA! • Il collegamento va eff ettuato in conformità allo schema PERICOLO DI MORTE! di collegamento, tranne il cavo è... -
Seite 91: Messa Fuori Servizio, Smaltimento
Messa fuori servizio, smaltimento 8 Messa fuori servizio, smaltimento 8.2 Smaltimento dell'imballo Smaltire gli imballi per il trasporto nel rispetto dell'ambi- 8.1 Mettere fuori servizio ente. La rimessa dell’imballo nel circolo di produzione Quando l'apparecchio un giorno cessa il suo servizio gior- consente di risparmiare le materie prime e di naliero, avviene la sua messa fuori servizio. -
Seite 92: En General
En general 1 En general Índice 1.1 Aquí encontrará usted... 1 En general Lea por favor cuidadosamente las informaciones de este 1.1 Aquí encontrará usted..........92 manual antes de poner en funcionamiento su encimera. 1.2 Uso previsto ............92 Usted encontrará aquí indicaciones importantes para su 2 Indicaciones de seguridad y advertencias seguridad, el empleo, el cuidado y el mantenimiento de su 2.1 Conexión y funcionamiento ........93... -
Seite 93: Indicaciones De Seguridad Y Advertencias
Indicaciones de seguridad y advertencias 2 Indicaciones de seguridad y advertencias tente. No obstante hay que evitar que caigan objetos sólidos sobre la misma. Cargas por 2.1 Conexión y funcionamiento impacto puntual pueden producir la rotura del • Los aparatos hay que montarlos siguiendo las campo de cocción. -
Seite 94: Para Personas
Indicaciones de seguridad y advertencias el aparato podría interpretar la suciedad como contrario existe riesgo de intoxicación. el contacto de un dedo. ¡No depositar nunca • Al cocinar, debido al vapor el aire del recinto objetos (ollas, paños de cocina, etc.) sobre se carga más de humedad. -
Seite 95: Explicación De Los Símbolos Y De Las Indicaciones
Indicaciones de seguridad y advertencias 2.4 Explicación de los símbolos y de las Además, en algunos lugares se emplean los siguientes indicaciones símbolos de peligro: El aparato ha sido fabricado conforme al nivel de desarrollo actual de la técnica. Aún así, de las máquinas ¡ADVERTENCIA DE ENERGÍA ELÉCTRI- se derivan ciertos riesgos que no es posible evitar con medidas constructivas. -
Seite 96: Descripción Del Aparato
Descripción del aparato 3 Descripción del aparato La decoración puede diferir de la representada en las Tecla de selección de zonas de cocción; p.ej delante fi guras. 1. Zona de cocción por inducción delante Pulsando una de las teclas de selección de zonas de cocción disponibles se selecciona una zona de cocción, 2. -
Seite 97: Manejo
Manejo 4 Manejo 4.3 Limitación de la duración del funcionamiento La encimera de vitrocerámica dispone de una limitación 4.1 Encimera de cocción automática de la duración del funcionamiento. La encimera de cocción está equipada con una campo de El tiempo de funcionamiento continuo de cada una de las cocción por inducción. -
Seite 98: Batería De Cocina Para La Encimera Por Inducción
Manejo 4.6 Batería de cocina para la encimera por induc- 4.7 Consejos para el ahorro de energía ción A continuación encontrará usted algunas indicaciones para trabajar de forma económica y efi ciente con su nueva El recipiente de cocción utilizado para la superfi cie de coc- encimera por inducción y la batería de cocina. -
Seite 99: Accionamiento De Tecla
Manejo 4.10 Accionamiento de tecla El control aquí descrito espera, después de accionar una tecla (de selección), seguidamente el accionamiento de la tecla siguiente. El accionamiento de la tecla siguiente tiene que llevarse a cabo por principio dentro de un plazo de 10 segundos, ya que en caso contrario se anula la selección. -
Seite 100: Nivel «Power» (Zonas De Cocción Con «P»)
Manejo 4.14 Nivel «power» (zonas de cocción con «P») El nivel «power» pone potencia adicional a disposición de las zonas de cocción por inducción. Así es posible poner en ebullición rápidamente una gran cantidad de agua. El nivel «power» funci- ona durante 5 minutos, después se cambia automáticamente al nivel 9. -
Seite 101: Automatismo De Desconexión (Temporizador)
Manejo 4.16 Automatismo de desconexión (temporizador) Por medio del automatismo de desconexión es posible des conectar automáticamente después de un tiempo determinado todas las zonas de cocción que estuvieran conectadas. Es posible ajustar tiempos de cocción de entre 01 y 99 minutos. 1. -
Seite 102: Encimera Con Control De Ventilador: Uso Del Ventilador
Manejo 4.18 Encimera con control de ventilador: Uso del ventilador En el panel de mandos Touch Control se encuentran a la derecha las teclas para el ventilador. Antes de la puesta en marcha del ventilador debe retirarse la cubier- ta completamente. En modelos con cubierta abierta no es necesario retirarla. -
Seite 103: Limpieza Y Conservación
Limpieza y conservación 5 Limpieza y conservación de la encimera no infl uyen en la funcio- Cambios de color nalidad ni en la estabilidad de la vitrocerámica. No se trata • Antes de proceder a la limpieza hay que desconectar la de daños del material, sino de restos de comida requema- encimera y dejar que se enfríe. -
Seite 104: Qué Hacer En Caso De Problemas
Qué hacer en caso de problemas 6 Qué hacer en caso de problemas ¿Aparece el símbolo de olla ? Se ha conectado una zona de cocción y la encimera espe- Manipulaciones y reparaciones en el aparato por parte de ra la colocación de una olla adecuada (reconocimiento de personas no cualifi... -
Seite 105: Instrucciones De Montaje
Instrucciones de montaje 7 Instrucciones de montaje 7.3 Montaje Indicaciones importantes 7.1 Indicaciones de seguridad para el montador • Se debe evitar un exceso de generación de calor de muebles de cocina desde abajo, como el causado p.ej. por un horno sin •... -
Seite 106: Aufsatz Solo
Instrucciones de montaje Aufsatz solo Aufsatz mit VKI 3505 + Zub. 1130 Importante: ¡Debido a una posición inclinada o a tensiones indebi- das existe peligro de ruptura al montar la encimera de cocción de vitrocerámica! 1 Distancia mínima a las paredes vecinas 2 Medida de fresado 3 Medida exterior de la encimera 4 Altura de montaje... -
Seite 107: Conector De 7 Polos Conexión Ventilador
Instrucciones de montaje 7.4 Conector de 7 polos conexión ventilador 7.5 Montaje del ventilador de encimera • El producto tiene que ser conectado obligatoriamente Para la conexión del ventilador una los dos conectores de por un profesional autorizado observando las normas 7 polos. -
Seite 108: Conexión Eléctrica
Instrucciones de montaje 7.6 Conexión eléctrica El cable de conexión viene de fábrica • La encimera de cocción está equipada de fábrica con una línea de conexión resistente a la temperatura. ¡ADVERTENCIA DE ENERGÍA ELÉCTRI- • La conexión a la red se realiza en conformidad con el esquema de conexión, a no ser que la línea de co- ¡EXISTE PELIGRO DE MUERTE! nexión esté... -
Seite 109: Puesta Fuera De Servicio, Eliminación
Puesta fuera de servicio, eliminación 8 Puesta fuera de servicio, eliminación 8.3 Eliminación de los aparatos antiguos El símbolo en el producto o en su embalaje indica que 8.1 Puesta fuera de servicio este producto no se puede tratar como desperdicios nor- La puesta fuera de servicio tiene lugar una vez concluido males del hogar. -
Seite 110: Índice 1 Geralmente 110 1.1 Aqui Você Encontra
Geralmente Índice 1 Geralmente 1 Geralmente 1.1 Aqui você encontra... 1.1 Aqui você encontra..........110 Leia cuidadosamente as informações contidas nesta 1.2 Utilização conforme as determinações ....110 brochura antes de colocar o aparelho em funcionamento. Aqui encontra indicações importantes referentes à sua 2 Indicações de segurança e avisos segurança, ao uso, à... -
Seite 111: Indicações De Segurança E Avisos
Indicações de segurança e avisos 2 Indicações de segurança e avisos cozinhar. 2.1 Ligação e funcionamento • Se houver ruturas, rachaduras, fi ssuras ou outras danifi cações na placa vitrocerâmica há • Os aparelhos são construídos de acordo com perigo de choque elétrico. Desligue imediata- as normas de segurança pertinentes. -
Seite 112: Pessoas
Indicações de segurança e avisos aparelho como contacto de dedos. Nunca co- • Ao cozinhar, devido aos vapores é adicionada loque objetos (panelas, panos da louça, etc.) mais humidade ao ar ambiente. sobre as teclas de sensor! • No funcionamento com recirculação, a humi- •... -
Seite 113: Explicação De Símbolos E Indicações
Indicações de segurança e avisos 2.4 Explicação de símbolos e indicações Adicionalmente, em determinadas partes são usados os seguintes símbolos de perigo: O aparelho foi fabricado segundo o estado atual da técnica. No entanto, as máquinas implicam riscos que não podem ser evitados com a construção. -
Seite 114: Descrição Do Aparelho
Descrição do aparelho 3 Descrição do aparelho A aparência pode divergir das ilustrações. Tecla seletora da zona de cozinhar; p. ex. à frente 1. Zona de cozinhar de indução frontal 2. Zona de cozinhar de indução traseira Ao acionar uma das teclas seletoras das zonas de cozin- har disponíveis é... -
Seite 115: Utilização
Utilização 4 Utilização 4.3 Limitação do tempo de funcionamento A placa de cozinhar de indução possui um sistema au- 4.1 A placa de cozinhar tomático de limitação do tempo de funcionamento. A superfície de cozinhar está equipada com uma placa de O tempo de utilização contínuo de cada zona de cozinhar cozinhar de indução. -
Seite 116: Louça Para Placa De Cozinhar De Indução
Utilização 4.6 Louça para placa de cozinhar de indução 4.7 Dicas para poupar energia As panelas usadas sobre a placa de cozinhar de indução Em seguida encontra algumas indicações importantes têm de ser de metal, ter propriedades magnéticas e uma para usar efi... -
Seite 117: Acionamento De Teclas
Utilização 4.10 Acionamento de teclas Após o acionamento de uma tecla (de seleção), o coman- do aqui descrito espera a seguir o acionamento de uma tecla seguinte. O acionamento da tecla seguinte tem que ser sempre iniciado dentro de 10 segundos; caso contrário, a seleção é... -
Seite 118: Nível Power (Zonas De Cozinhar Com "P")
Utilização 4.14 Nível Power (zonas de cozinhar com "P") O nível Power coloca à disposição das zonas de cozinhar de indução uma função adicional. Uma quantidade grande de água pode ser levada a ferver rapidamente. O nível Power trabalha durante 5 minutos e a seguir reduz-se automatica- mente para o nível de cozimento 9. -
Seite 119: Sistema Automático De Desconexão (Temporizador)
Utilização 4.16 Sistema automático de desconexão (temporizador) Através do sistema automático de desconexão, cada zona de cozinhar ligada é desconectada automaticamente após um determinado período de tempo ajustável. Pode-se ajustar tempos de cozinhar de 01 até 99 minutos. 1. Ligue a placa de cozinhar. Ligue uma ou várias zonas de cozinhar e selecione os níveis de cozimento dese- jados. -
Seite 120: Placa De Cozinhar Com Comando Do Ventilador: Usar O Ventilador
Utilização 4.18 Placa de cozinhar com comando do ventilador: Usar o ventilador No painel de controlo com Touch Control, no lado direito en- contram-se as teclas para o comando do ventilador. Retire a cobertura por completo antes de colocar o ventilador em funcionamento. -
Seite 121: Manutenção E Limpeza
Manutenção e limpeza 5 Manutenção e limpeza mas sim de resíduos que não foram removidos e, por isso, fi cam queimados. • Desligue e deixe a placa de cozinhar arrefecer antes Partes brilhantes são provocadas por fricção dos fundos de a limpar. das panelas, especialmente quando se usa panelas com •... -
Seite 122: Caso Surjam Problemas
Caso surjam problemas 6 Caso surjam problemas É indicado um código de erro (ERxx ou Ex)? Há um defeito técnico. Por favor chame a Assistência As operações e reparações efetuadas no aparelho por Técnica. pessoas não qualifi cadas são perigosas, uma vez que existe perigo de choque elétrico e curto-circuito. -
Seite 123: Instruções De Montagem
Instruções de montagem 7 Instruções de montagem 7.3 Instalação Indicações importantes 7.1 Indicações de segurança para o instalador de • Evite formação excessiva de calor na parte inferior, móveis de cozinha causada p. ex. por um forno sem ventilador de circu- •... - Seite 124 Instruções de montagem Aufsatz solo Aufsatz mit VKI 3505 + Zub. 1130 Importante! Se, ao ser instalada, a placa vitrocerâmica não fi car bem ajustada ou fi car sob tensão, há perigo de rutura da mesma! 1 Distância mínima até às paredes adjacentes 2 Medida de fresagem 3 Medida exterior da placa de cozinhar 4 Altura da montagem...
-
Seite 125: Conector De 7 Polos Para A Ligação Do Ventilador
Instruções de montagem 7.4 Conector de 7 polos para a ligação do ventilador 7.5 Instalação do ventilador da placa de cozinhar Conecte os dois conectores de 7 polos para efetuar a • O produto só pode ser conectado por um técnico ligação do ventilador. -
Seite 126: Ligação Elétrica
Instruções de montagem 7.6 Ligação elétrica Cabo de ligação de fábrica existente • A placa de cozinhar está equipada por parte de fábrica com um condutor resistente a temperaturas elevadas. AVISO DE ENERGIA ELÉTRICA! • A ligação à rede é efetuada segundo o esquema de EXISTE PERIGO DE VIDA! ligação, exceto se o condutor já... -
Seite 127: Colocação Fora De Serviço, Eliminação
Colocação fora de serviço, eliminação 8 Colocação fora de serviço, eliminação 8.2 Eliminação da embalagem Elimine a embalagem de transporte do modo mais ecoló- 8.1 Colocação fora de serviço gico possível. O retorno dos materiais de embalagem ao Quando o aparelho, um dia, deixar de trabalhar, é neces- ciclo de materiais economiza matéria-prima e reduz o lixo. - Seite 128 K06-180169/01...