OXO GOOD GRIPS Bedienungsanleitung
Vorschau ausblenden
Andere Handbücher für GOOD GRIPS:
- Handbuch (19 Seiten) ,
- Bedienungsanleitung (18 Seiten) ,
- Bedienungsanleitung (13 Seiten)
Werbung
Quicklinks
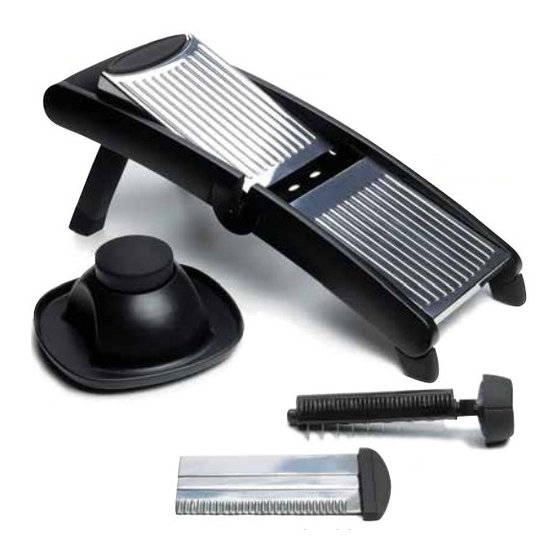
Mandoline Slicer
Trancheuse Mandoline, Cortadora Mandoline, Gemüsehobel
OXO's user-friendly Mandoline is the perfect tool for creating culinary sensations quickly and easily.
Please familiarize yourself with its variety of blades and cutting options, perfect for slicing your favorite
fruits and vegetables. For safe operation, always use the Food Holder.
La Mandoline conviviale d'OXO constitue l'outil idéal pour créer facilement et vite des merveilles
culinaires. Familiarisez-vous avec son assortiment de lames et ses diverses options de coupe, parfaits
pour couper vos fruits et légumes préférés. À titre sécuritaire, utilisez toujours le poussoir.
La cortadora Mandoline de OXO, fácil de usar, es el instrumento ideal para crear sensaciones culinarias de
forma rápida y cómoda. Le invitamos a que se familiarice con las distintas hojas y opciones de corte,
perfectas para cortar sus frutas y verduras favoritas. Para mayor seguridad, utilice siempre el recipiente
para alimentos.
OXOs gebrauchsfreundlicher Gemüsehobel ist das perfekte Hilfsmittel für die schnelle und einfache
Kreation kulinarischer Sensationen. Bitte machen Sie sich mit den verschiedenen Klingen und
Schneidmöglichkeiten vertraut. Perfekt zum Schneiden von Obst und Gemüse. Für eine sichere
Bedienung immer den Gemüsehalter verwenden.
Werbung

Verwandte Anleitungen für OXO GOOD GRIPS


Inhaltszusammenfassung für OXO GOOD GRIPS
- Seite 1 À titre sécuritaire, utilisez toujours le poussoir. La cortadora Mandoline de OXO, fácil de usar, es el instrumento ideal para crear sensaciones culinarias de forma rápida y cómoda. Le invitamos a que se familiarice con las distintas hojas y opciones de corte, perfectas para cortar sus frutas y verduras favoritas.
- Seite 2 CAUTION! Mandoline Slicer blades are very sharp. Handle OXO GOOD GRIPS them with care when using the Mandoline and when cleaning the components. Always use the Food Holder to prevent injury. Do not leave the Mandoline or any components within reach of children.
- Seite 3 Thickness Measurements MANDOLINE COMPONENTS ÉLÉMENTS DE LA MANDOLINE COMPONENTES DE LA CORTADORA MANDOLINE BESTANDTEILE DES GEMÜSEHOBELS Top Runway Mesures d'épaisseur Couloir supérieur Medidas de espesor Handle Superficie de corte superior Dickemessungen Poignée Obere Gleitfläche Mango Griff Bottom Runway Couloir inférieur Superficie de corte inferior Untere Gleitfläche Legs...
- Seite 4 MANDOLINE COMPONENTS SLICING BLADE This Blade features a straight side for straight slices and a wavy side for crinkle cuts and waffle cuts. A soft grip area lets you safely remove and insert this blade. JULIENNE & THICKNESS This rotating Cylinder has two sets of julienne blades. The row of blades set close together makes 1/8”...
- Seite 5 TO REMOVE & CLEAN THE JULIENNE & THICKNESS CYLINDER 1- Remove the Slicing Blade as shown above. 2- Use one hand to press on the OXO logo on the Top Runway to flip up the Runway. 3- Use the other hand to lift the Julienne &...
- Seite 6 5- Fold the Legs beneath the body. 6- Snap the Food Holder on to the tabs on the TO ATTACH THE FOOD HOLDER underside of the Mandoline body. 7- Store your OXO GOOD GRIPS Mandoline Slicer in its box.
- Seite 7 INSTRUCTIONS FOR SLICING 1- Insert the Slicing Blade into the slot in the side of the STRAIGHT SLICES Mandoline body so that the straight side is visible. 2- Press in and turn the Julienne & Thickness Cylinder knob so that the julienne blades are not visible. 3- Continue to press and turn the Cylinder knob to adjust the desired slice thickness.
- Seite 8 1- Insert the Slicing Blade into the slot in the side of the WAFFLE CUTS Mandoline body so that the wavy side is visible. 2- Press in and turn the Julienne & Thickness Cylinder knob until you reach the Waffle Cut setting. 3- Place the fruit or vegetable crosswise or lengthwise into the Food Holder.
- Seite 9 ÉLÉMENTS DE LA MANDOLINE LAME À TRANCHER Cette lame est munie d'un bord droit pour les tranches rectilignes et d'un bord ondulé pour les tranches collerettes et les coupes gaufrées. Une prise souple vous permet de retirer et d'introduire la lame en toute sécurité. CYLINDRE JULIENNE &...
-
Seite 10: Démontage Et Nettoyage
3- Lavez à la main et séchez immédiatement. POUR ENLEVER & NETTOYER LE CYLINDRE JULIENNE & ÉPAISSEUR 1- Servez-vous d'une main pour appuyer sur le OXO logo situé sur le couloir supérieur afin de le soulever. 2- De l'autre main, soulevez le cylindre par son bouton souple pour le retirer de la Mandoline. - Seite 11 5- Repliez les pieds sous le corps. POUR FIXER LE POUSSOIR 6- Encastrez le poussoir sur les pattes situées sous le corps de la Mandoline. 7- Rangez votre trancheuse Mandoline OXO GOOD GRIPS dans sa boîte.
- Seite 12 INSTRUCTIONS POUR TRANCHER 1- Introduisez la lame à trancher dans la fente située sur le côté TRANCHES DROITES du corps de la Mandoline, de sorte que le côté droit soit visible. 2- Appuyez sur le bouton du cylindre Julienne et épaisseur et tournez-le de sorte que les lames julienne ne soient pas visibles.
- Seite 13 1- Introduisez la lame à trancher dans la fente située sur le côté du TRANCHES GAUFRÉES corps de la Mandoline, de sorte que le côté ondulé soit visible. 2- Appuyez sur le bouton du cylindre Julienne et épaisseur et tournez-le jusqu'à ce que vous soyez sur le réglage de coupe gaufrée.
- Seite 14 COMPONENTES DE LA CORTADORA MANDOLINE HOJA DE CORTE EN TIRAS Esta hoja cuenta con un lado recto, para obtener tiras derechas, y con un lado ondulado, con el que obtendrá tiras rizadas y onduladas. La suave superficie de agarre le permite retirar e introducir las hojas sin riesgo. JULIANA Y CILINDRO Este cilindro que gira cuenta con dos juegos de hojas para juliana.
-
Seite 15: Desmontaje Y Limpieza
2- Extraiga la superficie superior pulsando sobre el logotipo de OXO, tal y como se muestra en la figura anterior. 3- Extraiga la superficie inferior empujando la superficie de corte hacia arriba, desde la parte inferior de la Mandoline. - Seite 16 - Con la otra mano, extraiga la superficie de corte superior presionando sobre el logotipo de OXO. CÓMO PLEGAR LAS PATAS - Introduzca el extremo superior del cilindro en el orificio situado en el lateral del cuerpo de la Mandoline.
- Seite 17 INSTRUCCIONES PARA CORTAR 1- Introduzca la hoja de corte en la ranura situada en el lateral del TIRAS RECTAS cuerpo de la Mandoline, de modo que se vea el lado recto. 2- Presione y haga girar el botón para el corte en juliana y el Cilindro de grosor de modo que las hojas para la juliana queden ocultas 3- Continúe presionando y girando el botón del cilindro hasta ajustarlo al grosor deseado.
- Seite 18 1- Introduzca la hoja de corte en la ranura situada en el lateral del CORTES ONDULADOS cuerpo de la Mandoline, de modo que se vea el lado ondulado. 2- Presione y gire el botón para la hoja de corte en juliana y el cilindro de grosor hasta que alcance la posición de corte ondulado.
- Seite 19 BESTANDTEILE DES GEMÜSEHOBELS SCHNEIDKLINGE Diese Klinge hat eine glatte Seite für glatte Scheiben und eine gewellte Seite für wellige und gittrige Scheiben. Diese Klinge kann mit Hilfe eines weichen Griffs sicher eingesetzt und herausgenommen werden. JULIENNE- UND DICKE- Dieser drehbare Zylinder hat zwei Sätze Julienne-Klingen. Mit den eng beieinander befindlichen Klingen werden 3 mm dünne quadratische EINSTELLZYLINDER Julienne-Stifte hergestellt.
- Seite 20 2- Die Klinge aus dem Hobel herausziehen. 3- Von Hand waschen und sofort abtrocknen. DEN JULIENNE- UND DICKE-EINSTELLZYLINDER ENTFERNEN UND REINIGEN 1- Mit einer Hand auf das OXO-Firmenzeichen auf der oberen Gleitfläche drücken, um die Gleitfläche hochzuklappen. 2- Mit der anderen Hand den Julienne- und Dicke- Einstellzylinder an seinem weichen Griff aus dem Gemüsehobel entfernen.
- Seite 21 Griff festhalten und in den Schlitz auf der Seite des Hobelkörpers schieben, bis sie einrastet. 5- Die Füße unter den Hobel klappen. ANBRINGEN DES GEMÜSEHALTERS 6- Den Gemüsehalter an der Unterseite des Hobelkörpers einhängen. 7- Den OXO GOOD GRIPS Gemüsehobel in seiner Schachtel aufbewahren.
- Seite 22 SCHNEIDANLEITUNGEN GLATTE SCHEIBEN 1- Die Schneidklinge in den Schlitz auf der Seite des Hobels stecken, so dass die gerade Seite sichtbar ist. 2- Den Julienne- und Dicke-Einstellzylinder eindrücken und drehen, so dass die Stiftklingen nicht sichtbar sind. 3- Den Zylinderknopf weiter eindrücken und drehen, um die gewünschte Scheibendicke einzustellen.
- Seite 23 1- Die Schneidklinge in den Schlitz auf der Seite des Hobels GITTRIGE SCHEIBEN stecken, so dass die wellige Seite sichtbar ist. 2- Den Julienne- und Dicke-Einstellzylinder drücken und drehen, bis die Gitterschneideinstellung erreicht ist. 3- Das Obst oder Gemüse quer oder längs in den Gemüsehalter legen. 4- Zum Schneiden mit der Handfläche auf die weiche Oberseite des Gemüsehalters drücken.
- Seite 24 - SERIES OXO introduces the GOOD GRIPS i-Series , a collection of tools that take the OXO design philosophy to a new performance level. OXO présente la i-Series GOOD GRIPS , une collection d'outils propulsant la philosophie de la conception OXO vers un nouveau niveau de performance.