Seite 1
Manual / Bedienungsanleitung / Mode d´emploi tarm 2.5 Please spend a few minutes to read this manual fully before operating this laser! Bitte lesen Sie diese Bedienungsanleitung sorgfältig vor Inbetriebnahme dieses Showlasersystems! Avant d’utiliser cet appareil pour la première fois nous vous recommandons de lire cette notice d’utilisation!
Seite 2
Manual: tarm 2.5 Legal notice: Thank you for purchasing this Laserworld product. Due to continual product developments and technical improvements, Laserworld (Switzer- land) AG reserves the right to make modifications to its products. This manual and its content have been made with due care but Laserworld (Switzerland) AG cannot however, take any responsibility for any errors, omissions or any resulting damages forthwith.
Manual: tarm 2.5 Content: Product and package contents Preliminary warning notices Initial operations, safety instructions Working on the device Service notes Warnings and other notices on the device Device connections General operation Operation modes FB4 version Final statement Technical data sheet...
Manual: tarm 2.5 1. Product and package contents Please check if all listed parts are included and undamaged. Included in delivery: 1 x laser projector 1 x key (for key switch) 1x interlock connector 1 x manual 1 x power cable 2.
Manual: tarm 2.5 with large appliances (especially fog ma- heads). Heat of spotlights could overheat chines) on the same mains! laser in a little while and leads to a degra- dation of performance. 12. Ensure sufficient ventilation and do not place the device on any warm or heat ra- diating surface.
Laser class 4 Model type Production Caution of year radiation if cover Output power is removed Power supply & consumption Use in enclosed spaces only! 7. Device connections tarm 2.5 Emission LED Laser aperture Beam block page 6 / 29...
Seite 7
LAN / ShowNET Fuse DMX in Power in DMX out Interlock out ILDA out ILDA in Loop for safety cord Device connections tarm 2.5 FB4 color display Menu button Ethernet Key switch Power button RJ45 for Interlock Power fuse Power in...
Manual: tarm 2.5 8. General Operation Power Connect the power cord to the device and to the mains. Make sure that your device is pro- vided with the correct voltage. Wrong voltage could lead to irreparable damages. Please find the correct voltage data in the synoptical table at the end of this manual. Make sure that the device is not directed to people or inflammable objects during installation.
Manual: tarm 2.5 Turn device off To turn off the device, use the power button („OFF“), turn the key to ‚OFF‘ and disconnect the power cable from the mains. 9. Operation Modes (Firmware version: 20190520x - Admin tool: v1.33) This laser system can be operated in many different operation modes. It is possible to...
Seite 10
Manual: tarm 2.5 The software can be downloaded for free on: https://www.showeditor.com After downloading and installing the software, open the .exe file on the computer and use the software to operate the show laser system. Details on installation and use of the software please find on the aforementioned web- site.
Seite 11
Manual: tarm 2.5 Select the *.ild files to be uploaded from the computer (left side) to the integrated SD card memory (right side). Click on the button with the two arrows to the right to upload the *.ild files to the integ- rated SD card.
Seite 12
Manual: tarm 2.5 Stand-Alone Mode / Automatic Mode / Playback Mode Dip switch setting switch On (1) / Off (0) In stand-alone mode the ILDA files on the integrated SD card are triggered automatically. This setting is especially suitable for demo purposes or for fixed laser installations.
Seite 13
Manual: tarm 2.5 Master-Slave-Mode: Sound-to-Light MASTER unit: switch On (1) / Off (0) SLAVE units: switch On (1) / Off (0) To have the same effects show on all connected units, it is required to have the same pattern sets on all SD cards inside the units.
Seite 14
Manual: tarm 2.5 Click on ‚Store Data‘ to save the changes. Click on ‚OK‘ twice and wait until another win- dow opens that asks to restart the ILDA interface. To do so, switch the laser system off and on again.
Seite 15
Manual: tarm 2.5 (1) DJ Mode To get laser output, DMX channel 1 needs to have a value greater than 0 (recommended 64 to 192) Channel Mode Value Function 1 Intensity Laser off 1 - 255 Increase intensity (full intensity = 255) 2 Pattern selection Blackout (000.ild must not exist)
Seite 16
Manual: tarm 2.5 Channel Mode Value Function 12 Color effects 0 - 127 Smooth color fade effect to the re-color effect extended Value of channel 11 must be >15! 128 - 192 Blocking color effect to the re-color effect Value of channel 11 must be >15!
Manual: tarm 2.5 (2) Professional Mode Channel Mode Value Function 1 Intensity Prof. Laser off 1 - 255 Increase intensity (full intensity = 255) 2 Pattern selection Prof. Blackout (000.ild must not exist) 1 - 255 Display patterns from SD card: 1 = 001.ild...
Seite 18
Manual: tarm 2.5 Channel Mode Value Function 17 Strobe Prof. 0 - 15 None 16 - 255 Increasing strobe effect 18 Scan speed Prof. 0 - 15 Default 16 - 255 Increasing scan speed (from 5 kpps to 40 kpps) 19 Safety zone size Prof.
Seite 19
Manual: tarm 2.5 Network Operation Important: Only ShowNET interfaces and potentially an ArtNet controller must be used in the same net- work. Avoid using other network devices in the same network. Avoiding connectivity issues, Troubleshooting: - Make sure that no firewall is blocking the network traffic between the computer and the show laser device.
Seite 20
Manual: tarm 2.5 AutoIP switch On (1) / Off (0) In this mode, the IP address is negotiated automatically without the need for a DHCP server. A Windows computer with enabled AutoIP is necessary to use this feature. In Win- dows 7, 8 and 10, AutoIP is enabled by default.
Seite 21
Manual: tarm 2.5 Dip switch setting switch On (1) 0000 -> IP sender: 192.168.2.70 sends to 192.168.2.50 sender: 0 / Off 0001 -> IP sender: 192.168.2.71 sends to 192.168.2.51 receiver: 1 0010 -> IP sender: 192.168.2.72 sends to 192.168.2.52 0011 -> IP sender: 192.168.2.73 sends to 192.168.2.53 0100 ->...
Seite 22
Manual: tarm 2.5 10. Operation Instruction - FB4 version The following operation instructions only apply, if the Diode Series laser has been purchased with built-in Pangolin FB4. With built-in Pangolin FB4 interface, the Diode Series laser can be controlled over LAN (network cable) or ILDA cable.
Manual: tarm 2.5 Final statement Laserworld products are tested and product packaging is inspected before leaving our warehouse. Users must to follow the local safety regulations and warnings within this manual and adhere to any regulations within its place of use. Damages through inappropriate use will void any liability or warranty of our products.
Seite 24
Manual: tarm 2.5 Inhaltverzeichnis: Lieferumfang & Hinweise Einleitende Warnhinweise Schritte zur Inbetriebnahme, Sicherheitshinweise Sicherheitshinweise für Arbeiten am Gerät Pflege- und Wartungshinweise Warnhinweise und Spezifikationen am Gerät Geräteanschlüsse & Bedienelemente Bedienung Betriebsmodi FB4-Version Abschließende Erklärung Technische Daten Laserleistungsdaten page 24 / 29...
Manual: tarm 2.5 1. Lieferumfang & Hinweise Bitte prüfen Sie, ob Sie die Lieferung vollständig erhalten haben und die Ware unbeschädigt ist. Im Lieferumfang enthalten sind: 1 x Laserprojektor 1 x Schlüssel für den Schlüsselschalter 1 x Interlock 1 x Kaltgerätekabel zur Stromversorgung 1 x Bedienungsanleitung 2.
Manual: tarm 2.5 seil sollte mindestens dem 10-fachen 12. Sorgen Sie immer für eine ausreichende Belüftung und stellen Sie das Gerät auf Gewicht des Geräts standhalten können. Im Übrigen beachten Sie die Unfallverhü- keine warmen oder wärmeabstrahlen- tungsvorschriften der Berufsgenossen- den Untergründe.
Manual: tarm 2.5 Immer für ausreichende Belüftung • Lüfter und Kühlkörper (Kühlrippen usw.) sorgen. müssen frei von Staubansammlungen Keine Scheinwerfer (insbesondere und Ablagerungen sein, da sonst die Ge- kopfbewegte) auf das Gerät richten. fahr des Überhitzens droht und jegliche Bei jeder Neuinstallation nach ca. 30 Gewährleistung erlischt.
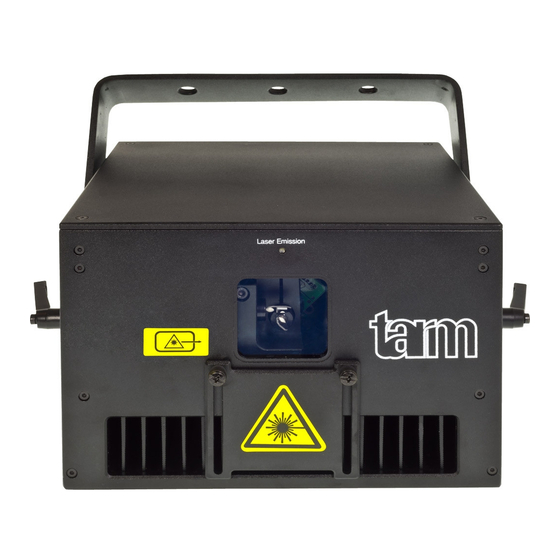
Manual: tarm 2.5 8. Bedienung Stromversorgung Das Stromkabel mit dem Gerät und der Stromversorgung verbinden. Es muss darauf ge- achtet werden, dass das Gerät mit der richtigen Spannung versorgt wird, da die falsche Spannung zu irreparablen Schäden am Gerät führen kann. Die Spannungsdaten finden sich in der Übersichtstabelle am Ende dieser Bedienungsanleitung.
Manual: tarm 2.5 Gerät ausschalten Um das Gerät vollständig auszuschalten, „OFF“ am An- / Ausschalter drücken, den Schlüssel auf „OFF“ drehen und von der Stromversorgung trennen. 9. Betriebsmodi (Firmware: 20190520x - Admin tool: v1.33) Dieses Lasersystem verfügt über viele verschiedene Betriebsarten: Es ist möglich, den Laser direkt mit dem Computer und einer Lasershow-Software zu steuern.
Seite 32
Manual: tarm 2.5 Verwenden Sie ein Ethernet-Kabel (RJ45-Standard), um den LAN-Anschluss des Show- lasers mit dem Computer zu verbinden. Mit Netzwerk-Switches können mehrere Laser gleichzeitig verbunden und angesteuert werden. Die Software kann kostenlos hier heruntergelanden werden: https://www.showeditor.com Nach dem Herunterladen und der Installation der Software öffnen Sie die dazugehörige .exe-Datei auf Ihrem Computer, um den Showlaser mit der Software zu steuern.
Seite 33
Manual: tarm 2.5 Um *.ild-Dateien größer als 6 MB hochzuladen, verwenden Sie bitte einen externen Kar- tenleser. Andernfalls kann der Import zu Problemen führen. Wählen Sie die *.ild-Dateien aus, die vom Computer (linke Seite) in den integrierten SD- Kartenspeicher (rechte Seite) hochgeladen werden sollen.
Manual: tarm 2.5 Automatikmodus DIP-Schalter Einstellung Schalter An (1) / Aus (0) 0 Im Automatikmodus werden die *.ild-Dateien auf der integrierten SD-Karte automatisch abgespielt. Dieser Modus eignet sich besonders für feste Installationen. Der Automatik-Modus bietet eine weitere Einstellung: Standardmäßig werden alle auf der SD-Karte befindlichen ILDA-Dateien nacheinander abgespielt.
Manual: tarm 2.5 Master-Slave im Musikmodus MASTER-Projektor: Schalter An (1) / Aus (0) 0 SLAVE-Projektoren Schalter An (1) / Aus (0) 0 Damit auf allen Projektoren dieselben Effekte dargestellt werden, müssen auf allen in- tegrierten SD-Karten dieselben *.ild-Dateien in derselben Reihenfolge gespeichert sein.
Seite 36
Manual: tarm 2.5 Klicken Sie auf ‚Store Data‘ , um die Änderungen zu speichern. Klicken sie zwei Mal auf ‚OK‘ und warten Sie, bis sich ein weiteres Fenster öffnet, das Sie dazu auffordert, das ILDA- Interface neu zu starten. Schalten Sie dazu den Laser aus und wieder an.
Seite 37
Manual: tarm 2.5 (1) DJ Modus Um eine Laserausgabe zu erhalten, stellen Sie für DMX-Kanal 1 einen Wert größer als 0 ein (z.B. ein Wert zwischen 128 und 159 für den Automatikmodus). Kanal Modus Wert Funktion 1 Helligkeit Laser aus 1 - 255 Helligkeit erhöhen (volle Helligkeit = 255)
Seite 38
Manual: tarm 2.5 Kanal Modus Wert Funktion 12 Erweiterte Farb- 0 - 127 Hinzufügen eines Farbverlaufs effekte Der Wert von Kanal 11 muss >15 sein! 128 - 192 Hinzufügen von Farbblöcken Der Wert von Kanal 11 muss >15 sein! 193 - 255 Automatische Änderung von Farbverläufen...
Seite 39
Manual: tarm 2.5 (2) Professional Modus 1 Helligkeit Prof. Laser aus 1 - 255 Helligkeit erhöhen (volle Helligkeit = 255) 2 Musterauswahl Prof. Blackout (000.ild darf nicht existieren) 1 - 255 Gespeicherte Muster darstellen: 1 = 001.ild 2 = 002.ild ...
Seite 40
Manual: tarm 2.5 17 Strobo Prof. 0 - 15 Kein Strobo-Effekt 16 - 255 Ansteigender Strobo-Effekt 18 Scangeschwindigkeit Prof. 0 - 15 Standard 16 - 255 Ansteigende Scangeschwindigkeit (von 5 kpps bis 40 kpps) 19 Größe der Safety Prof. 0 - 63 Größe der horizontalen Safety Zone...
Seite 41
Manual: tarm 2.5 Netzwerkbetrieb Wichtig: Es dürfen sich nur ShowNET-Interfaces und der ArtNet-Controller im selben Netzwerk befin- den. Vermeiden Sie den Einsatz von anderen Geräten im selben Netzwerk. Vermeidung von Verbindungsproblemen, Troubleshooting: - Stellen Sie sicher, dass keine Firewall den Netzwerkverkehr zwischen dem Computer und dem Showlaser blockiert.
Seite 42
Manual: tarm 2.5 AutoIP switch On (1) / Off (0) Bei diesem Modus wird die IP-Adresse automatisch und ohne den Einsatz eines DHCP- Servers vergeben. Ein Windows-PC mit aktiviertem AutoIP ist nötig, um dieses Feature verwenden zu können. In Windows 7, 8 und 10 ist AutoIP standardmäßig aktiviert. In Windows XP muss diese Option manuell eingestellt werden.
Seite 43
Manual: tarm 2.5 DIP-Schalter-Einstellungen Schalter An (1) / 0000 -> IP sender: 192.168.2.70 sendet an 192.168.2.50 Sender: 0 Aus (0) 0001 -> IP sender: 192.168.2.71 sendet an 192.168.2.51 Empfänger: 1 0010 -> IP sender: 192.168.2.72 sendet an 192.168.2.52 0011 -> IP sender: 192.168.2.73 sendet an 192.168.2.53 0100 ->...
Seite 44
Manual: tarm 2.5 10. Version FB4 - mit Pangolin FB4 In der FB4-Version kann der Showlaser durch ein eingebautes FB4-Interface per LAN- (Netzwerkkabel) oder ILDA-Kabel angesteuert werden. Es ist möglich entweder das LAN- Kabel direkt von der PC ( Laptop / Tablet ) zum Interface verbinden, oder ein bestehendes Netzwerk nutzen.
Manual: tarm 2.5 Abschließende Erklärung Sowohl Produkt als auch Verpackung sind beim Verlassen der Fabrikation einwandfrei. Der Benutzer des Geräts muss die lokalen Sicherheitsbestimmungen und die Warnhinweise in der Betriebsanleitung beachten. Schäden, die durch unsachgemäße Handhabung entstehen, unterliegen nicht dem Einflussbereich der Herstellers und des Händlers. Somit wird keine Haf- tung bzw.
Seite 46
Manual: tarm 2.5 Table des matières: Contenu et informations Avertissements d’usage et précautions avant d’utiliser cet appareil Démarches pour la mise en service, mesures de précaution Instructions de sécurité pour le travail avec l’appareil Soin et entretien Description de l’appareil et mesures de sécurité...
Manual: tarm 2.5 1. Contenu et informations Nous vous prions de vérifier si vous avez reçu l’intégralité de la marchandise et si la marchan- dise est intacte. Sont compris dans le volume de livraison: 1 x Projecteur laser 1 x Mode d‘emploi 1 x Câble d‘alimentation...
Manual: tarm 2.5 selon les normes et règlementations de tion contre les accidents de travail mis sécurité des pays respectifs. au point par les associations de préven- tion des accidents du travail ou des règ- 4. Veuillez toujours respecter impérati- lements semblables pour la prévention...
Manual: tarm 2.5 5. Soin et entretien vaudrait mieux trouver une place plus fraiche ou mieux ventilée. maintenez l’appareil au sec et abrité • La durée de vie du système laser peut être de l’humidité, de la pluie et des écla- extrêmement raccourcie par l’humidité...
Manual: tarm 2.5 8. Fonctionnement général Alimentation électrique Connectez le câble d‘alimentation avec l‘appareil et l‘alimentation électrique. Il est pri- mordial d‘alimenter l‘appareil avec la bonne tension d‘alimentation car une mauvaise ten- sion d‘alimentation pourra provoquer des dégâts irréparables au projecteur. Les tensions d‘alimentations sont listées en fin de mode d‘emploi dans le tableau récapitulatif.
Manual: tarm 2.5 Extinction de l’appareil Pour éteindre l’appareil, veuillez actionner l’interrupteur en face arrière, tourner l’interrupteur à clé sur « OFF » et déconnecter le câble d’alimentation. 9. Modes d’opérations / de fonctionnement (La version firmware : 20190520x - Admin tool : v1.33) Ce projecteur laser offre plusieurs modes de fonctionnement.
Seite 54
Manual: tarm 2.5 Utilisez un câble Ethernet standard (norme RJ45) pour connecter le port LAN du pro- jecteur laser à votre ordinateur. Les switchs / HUB réseaux peuvent être utilisés pour con- necter plusieurs projecteurs à la fois à votre ordinateur de contrôle.
Seite 55
Manual: tarm 2.5 IMPORTANT: Les fichiers laser personnalisés doivent être stockés au format * .ild et doi- vent être nommés avec un numéro allant de «000.ild» à «255.ild». Chaque nombre repré- sente une valeur DMX sur le fader respectif. Pour télécharger des fichiers * .ild supérieurs à 6 Mo, utilisez un lecteur de carte externe.
Seite 56
Manual: tarm 2.5 Mode autonome / Mode automatique / Mode de lecture Réglage DIP Switch switch On (1) / Off (0) En mode autonome, les fichiers ILDA sur la carte SD intégrée sont déclenchés automati- quement. Ce mode de fonctionnement est particulièrement adapté à la démonstration ou aux installations laser fixes.
Seite 57
Manual: tarm 2.5 Maitre-esclave en mode musical Réglage de l’appareil Maitre : switch On (1) / Off (0) Réglage des appareils esclaves : switch On (1) / Off (0) Pour que les mêmes effets apparaissent sur toutes les unités connectées, il est nécessaire d’avoir les mêmes motifs définis sur toutes les cartes SD à...
Seite 58
Manual: tarm 2.5 Cliquez sur «Store Data» pour enregistrer les modifications. Cliquez deux fois sur «OK» et attendez qu’une autre fenêtre demandant de redémarrer l’interface ShowNet s’ouvre. Pour ce faire, éteignez puis rallumez le système laser. Voir les détails sur le mode DMX ci-dessous pour plus d‘informations :...
Seite 59
Manual: tarm 2.5 (1) Mode DJ Pour obtenir une sortie laser, le canal DMX 1 doit avoir une valeur supérieure à 0 (recom- mandé : 64 à 192). Canal Mode Valeur Fonction / descriptif 1 Intensité Laser éteint 1 - 255 Intensité...
Seite 60
Manual: tarm 2.5 Canal Mode Valeur Fonction / descriptif 12 Effets de couleur 0 - 127 Effet de fondu de couleur lisse jusqu’à effet de étendus recoloriage. La valeur du canal 1 doit être >15 ! 128 - 192 Blocage de l‘effet de couleur à l‘effet de re- coloriage.
Seite 61
Manual: tarm 2.5 (2) Mode Professionnel Canal Mode Valeur Fonction / descriptif 1 Intensité Prof. Laser éteint 1 - 255 Intensité croissante (pleine puissance = 255) 2 Sélection des motifs Prof. Blackout (fichier 000.ild ne doit pas exister) 1 - 255 Affichage des animations ILDA de la carte SD : 1 = 001.ild...
Seite 62
Manual: tarm 2.5 Canal Mode Valeur Fonction / descriptif 17 Strobe Prof. 0 - 15 Aucun effet de strobe 16 - 255 Effet strob (vitesse croissante) 18 Vitesse de scan Prof. 0 - 15 Valeur par défaut 16 - 255 Vitesse de scan croissante (de 5kpps à...
Seite 63
Manual: tarm 2.5 Contrôle via réseau Important : Seules les interfaces ShowNET et potentiellement un contrôleur ArtNet doivent être utilisées sur le même réseau. Évitez d’utiliser d’autres périphériques réseau sur le même réseau. Eviter les problèmes de connectivité, Troubleshooting : - Assurez-vous qu‘aucun pare-feu ne bloque le trafic réseau entre l‘ordinateur et l’interface...
Seite 64
Manual: tarm 2.5 Mode AutoIP Réglage DIP Switch switch On (1) / Off (0) Dans ce mode, l‘adresse IP est négociée automatiquement sans avoir besoin d‘un serveur DHCP. Un ordinateur Windows avec AutoIP activé est nécessaire pour utiliser cette fonc- tionnalité.
Seite 65
Manual: tarm 2.5 Configuration émetteur-récepteur pour Streaming ILDA via réseau local, utilisati- on en mode « range extender » L’émetteur (ShowNet en mode émetteur) utilise une plage d‘adresses IP comprise ent- re 192.168.2.70 et 192.168.2.85 et transmet le signal à un récepteur (ShowNet en mode récepteur) dont les adresses sont comprises entre 192.168.2.50 et 192.168.2.65.
Manual: tarm 2.5 10. Version FB4 - avec Pangolin FB4 Les instructions d’opérations suivantes ne s’appliquent uniquement si votre projecteur laser a été acheté avec une interface de gestion Pangolin FB4 intégrée d’office dans le projecteur. Avec cette carte de gestion interne Pangolin FB4, le projecteur laser peut être contrôlé...
Manual: tarm 2.5 Explication finale Ce produit, de même que son emballage, sont en parfait état lors de l’envoi. Celui qui utilise cet appareil laser doit respecter les règlements de sécurités locales ainsi que les avertissements expliqués dans notre mode d’emploi. Les dommages qui sont provoqués par une utilisation non convenable ne peuvent pas être prévus ni par le fabricant ni par le marchand.
Seite 68
Manual: tarm 2.5 Technical data / Technische Daten / caractéristiques techniques Laser sources: Diode (red / green / blue) Laserquellen: Diode (rot / grün / blau) Sources laser: diode (rouge / vert / bleu) Laser class: Laserklasse: Classe laser Scanner: Galvo System, 45 kpps@8°...