Inhaltsverzeichnis
Werbung
Verfügbare Sprachen
Verfügbare Sprachen
Quicklinks
Werbung
Inhaltsverzeichnis

Verwandte Anleitungen für Blumfeldt 10029657


Inhaltszusammenfassung für Blumfeldt 10029657
- Seite 1 ZIERBRUNNEN BEDIENUNGSANLEITUNG 10029657...
-
Seite 2: Inhaltsverzeichnis
Technische Daten Sicherheitshinweise Teile Zusammenbau Aufbau der Pumpe Hinweise zur Entsorgung Konformitätserklärung User Manual Mode d‘emploi Istruzioni per l'uso Technische Daten Artikelnummer 10029657 Pumpenleistung 12W Max. Betriebstauchtiefe 1,5m Max. Förderhöhe 1,5m Durchflussmenge 800l/h Maße / Gewicht Ø56cm x 103cm / 12,5kg... -
Seite 3: Sicherheitshinweise
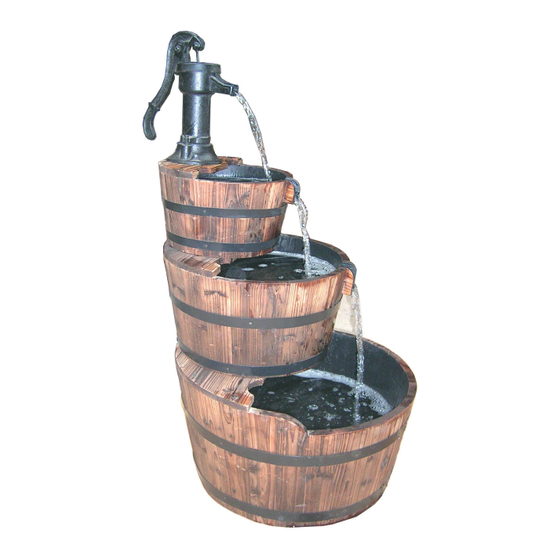
Sehr geehrter Kunde, zunächst möchten wir Ihnen zum Erwerb Ihres Gerätes gratulieren. Bitte lesen Sie die folgenden Aufbau- und Anwendungshinweise sorgfältig durch und befolgen Sie diese um möglichen technischen Schäden vorzubeugen. Sicherheitshinweise • Dieser Zierbrunnen ist für den Einsatz in Gebäuden und im Freien geeignet. Lassen Sie den Netzad- apter dennoch auf keinen Fall Feuchtigkeit oder Regen ausgesetzt. - Seite 4 Kleines Fass Handpumpe Schlauch Flügelmuttern Holzschrauben M3.5x20 Elektrische Pumpe...
-
Seite 5: Zusammenbau
Zusammenbau Setzen Sie das mittelgroße Fass (B) auf das größte Fass (A) wie in der Abbil- Schritt 1: dung zu erkennen. Fixieren Sie die Verbindung mit den Flügelmuttern (F). Setzen Sie nun das kleine Fass (C) auf das mittlere Fass und fixieren Sie diese Schritt 2: Verbindung auch mit Flügelmuttern (F). - Seite 6 Stecken Sie den Schlauch (E) von unten in die Handpumpe (D) und schrauben Schritt 3: Sie sie dort mit der Gewindeseite fest. Achten Sie darauf, das Gewinde nicht zu überdrehen. Montieren Sie die Handpumpe oben auf dem kleinen Fass und schrauben Sie sie mit den 3 Holzschrauben (G) am Fass fest (nutzen Sie die vorgebohrten Löcher zur Orientierung).
-
Seite 7: Aufbau Der Pumpe
Aufbau der Pumpe Große Modelle Laufrad Laufrad- Abdeckung Hintere Abdeckung Kleine Modelle Spezielle Hinweise zur Pumpe Hinweis: Stellen Sie sicher, dass das Netzkabel tiefer verläuft, als die Steckdose ange- bracht ist. Dadurch wird verhindert, dass Wasser am Kabel entlang in die Steckdose fließt. •... -
Seite 8: Hinweise Zur Entsorgung
Hinweise zur Pumpenfunktion Ein verstopfte oder verschmutzte Ansaugoberfl äche verringert die Leistung erheblich. Wenn die Pum- pe auf einer schmutzigen Oberfl äche verwendet wird, heben Sie sie leicht an, um die Menge an Schmutz zu reduzieren, die den Einlass berührt. Wenn ein langsamerer Durchfl uss erwünscht ist, stellen Sie das am Durchfl ussregelhebel an der Seite der Pumpe ein. -
Seite 9: Important Safety Instructions
Dear Customer, Congratulations on purchasing this product. Please read and follow these instructions, in order to avoid damaging the item. We do not cover any damages that may arise from improper use of the item or the disregard of the safety instructions. Important Safety Instructions •... - Seite 10 Small barrel Handle pump Pipe Nuts Wood screws M3.5x20 Electric pump...
- Seite 11 Assembly Put the medium sized bowl (B) onto the large barrel (A) as depicted below. Step 1: Then, secure the connection with nuts (F) on the threaded rods. Put the small barrel (C) onto the medium sized barrel (B) and secure the con- Step 2: nection with another two nuts (F) over the threaded rods.
- Seite 12 Put the pipe (E) into the bottom of the pump and use the thread to lock it in Step 3: place. Mount the handle pump (D) to the top, using the three wood screws (G). Use the pre-drilled holes for orientation. Put the electric pump (H) into the large barrel (A), leading the mains cord out of the barrel to a nearby outlet.
- Seite 13 Construction of the Pump Larger Models Impeller Impeller Cover Back Cover Smaller Models Sepcials Instructions on the Pump Note: Ensure that the electrical cord loops below the electrical outlet to form a “Drip Loop” This will prevent water from running down the cord into the electrical outlet. •...
-
Seite 14: Technical Data
Continue to unplug the electrical cord and then plug it back in until water begins to fl ow. Technical Data Article no. 10029657 Pump power 12 W Max. immersion depth 1.5 m H Max 1.5 m... -
Seite 15: Consignes De Sécurité
Chère cliente, cher client, Toutes nos félicitations pour l’acquisition de ce nouvel appareil. Veuillez lire attentivement et suivre les instructions de montage et d’utilisation afin d’éviter d’éventuels dommages techniques. Consignes de sécurité • Cette fontaine est prévue pour une utilisation en intérieur comme en extérieur. Cependant, veiller à ne pas exposer l’adaptateur secteur à... - Seite 16 Petite bassine Pompe manuelle Tuyau Écrous papillon Vis à bois M 3,5 x 20 Pompe électrique...
- Seite 17 Montage Placer la bassine de taille moyenne (B) sur la grande bassine (A) comme Étape 1: l’indique l’illustration ci-dessous. Fixer le raccordement à l’aide d’écrous papil- lons (F) Placer la petite bassine (C) sur la bassine de taille moyenne (B) et fixer le rac- Étape 2: cordement à...
- Seite 18 Insérer le côté fileté du tuyau (E) dans la partie du bas de la pompe manuelle Étape 3: (D) et le visser. Veiller à ne pas forcer le filetage. Monter la pompe manuelle en haut de la petite bassine et la fixer à l’aide des trois vis à...
-
Seite 19: Montage De La Pompe
Montage de la pompe Grands modèles Turbine Cache de la turbine Cache arrière Petits modèles Consignes particulières pour la pompe Remarque : assurez-vous que le câble d’alimentation soit situé plus bas que la prise. Cela évitera à l’eau de s’écouler le long du câble vers la prise. •... -
Seite 20: Données Techniques
Retirez la prise plusieurs fois et rebranchez-la jusqu‘à ce que l‘eau commence à couler. Données techniques Numéro d‘article 10029657 Puissance de la pompe 12 W Profondeur de fonctionnement max 1.5 m Hauteur de refoulement max. -
Seite 21: Avvertenze Di Sicurezza
Gentile Cliente, La ringraziamo per aver acquistato il nostro prodotto. La preghiamo di leggere attentamente le seguenti istruzioni d’installazione e di utilizzo del prodotto e di seguirle per evitare eventuali danni tecnici. Avvertenze di sicurezza • Questa fontana può essere installata all’interno e all’esterno. Non esporre tuttavia in nessun caso l’adattatore di rete a umidità... - Seite 22 Barile piccolo Pompa a mano Tubo Dadi ad alette Viti per legno M3.5x20 Pompa elettrica...
- Seite 23 Montaggio Fissare il barile medio (B) sul barile grande (A) utilizzando i dadi ad alette (F), Fase 1: come mostrato nella figura. Fase 2: Fissare il barile piccolo (C) su quello medio utilizzando i dadi ad alette (F).
- Seite 24 Infilare il tubo (E) sotto la pompa a mano (D) e avvitarlo alla filettatura. Pres- Fase 3: tare attenzione a non spanare la filettatura. Montare la pompa a mano sul barile piccolo avvitandola saldamente con l’aiuto delle 3 viti per legno (G) (orientarsi con i fori già presenti). Installare la pompa elettrica (H) nel barile grande (A), e far uscire il cavo di rete verso l’esterno.
-
Seite 25: Montaggio Della Pompa
Montaggio della pompa Modello grande Girante Coperchio girante Coperchio posteriore Modello piccolo Note speciali sulla pompa Nota: assicurarsi che il cavo di alimentazione sia sistemato più in basso rispetto alla presa. In questo modo si im- pedisce che l´acqua finisca nella presa lungo il cavo. •... -
Seite 26: Dati Tecnici
Staccare più volte la spina e inserirla di nuovo fi no a quando l´acqua inizia a scorrere. Dati tecnici Numéro d‘article 10029657 Potenza della pompa 12 W Max. profondità di funzionamento 1.5 m Max. - Seite 28 MANUFACTURER CHAL-TEC GMBH WALLSTRASSE 16 10179 BERLIN...