Herunterladen Inhalt Inhalt Diese Seite drucken

Cabletech URZ0336 Bedienungsanleitung

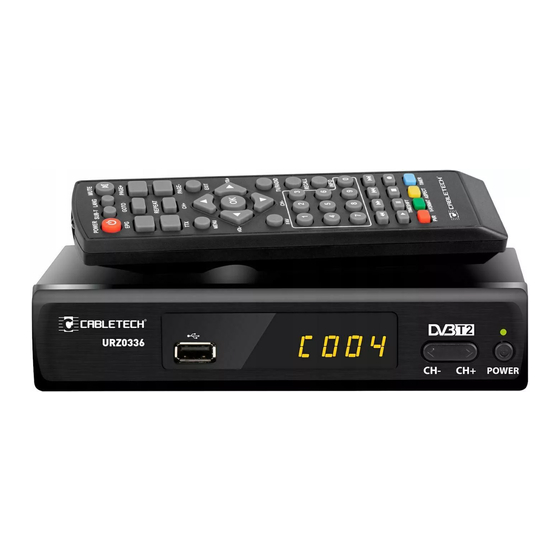
Dvb-t2 hd tuner for ground-based television

Werbung

Verfügbare Sprachen

Verfügbare Sprachen

DVB-T2 HD tuner
for ground-based television
URZ0336
Bedienungsanleitung
User's manual
Instrukcja obsługi
Manual de utilizare

Werbung

Inhaltsverzeichnis
loading

Inhaltszusammenfassung für Cabletech URZ0336

  • Seite 1 DVB-T2 HD tuner for ground-based television URZ0336 Bedienungsanleitung User's manual Instrukcja obsługi Manual de utilizare...
  • Seite 3: Sicherheitsanleitungen

    Bedienungsanleitung SICHERHEITSANLEITUNGEN Lesen Sie diese Bedienungsanleitung vor Inbetriebnahme sorgfältig durch, und bewahren diese auf zum späteren Nachschlagen. Der Hersteller übernimmt keine Haftung für Schäden, verursacht durch unsachgemäße Bedienung und Benutzung des Gerätes. Das Blitzsymbol mit Pfeilspitze im gleichseitigen Dreieck soll den Benutzer auf das Vorhandensein von nicht isolierter, gefährlicher Spannung, innerhalb des Produktgehäuses aufmerksam machen, die so stark sein kann, dass die Gefahr eines Stromschlags besteht.
  • Seite 4 Bedienungsanleitung • Das Gerät nicht zerlegen, ändern oder versuchen dieses zu reparieren. Bei Beschädigung, wenden Sie sich an einen autorisierten Kundendienst für Überprüfung / Reparatur. • Das Gerät kann von Kindern benutzt werden, die älter als 8 Jahre alt sind und von Personen mit eingeschränkten physischen, sensorischen oder geistigen Fähigkeiten oder Mangel an Erfahrung und Wissen, wenn sie von einer Person beaufsichtigt und geleitet werden, die für ihre Sicherheit zuständig ist, in einer vorsichtigen Art und Weise...
  • Seite 5: Produktbeschreibung

    Bedienungsanleitung PRODUKTBESCHREIBUNG Frontpaneel URZ0336 POWER 1. USB Steckplatz 4. Nächster Sender 2. Display 5. Netztaste 3. Vorheriger Sender 6. IR Sensor Rückseite 100-240V 50/60HZ ETHERNET HDMI 1. Antenneneingang 4. HDMI Ausgang 2. Schleifenausgang 5. Koaxial Ausgang 3. LAN Anschluss 6. SCART Ausgang...
  • Seite 6 Bedienungsanleitung FERNBEDIENUNG 1. Netztaste 2. Taste SUB-T: Untertiteloptionen 3. Taste LANG: Auswählen der Audiosprache oder Audio- Modus 4. Taste MUTE: Ton aus/Ton Wiederherstellen 5. Taste EPG: Elektronischen Programmführer anzeigen 6. Taste GOTO: Zu einem bestimmten Zeitpunkt in Film gehen 7. Taste PAGE + : Nächstes Menü 8.
  • Seite 7: Batterien Einlegen

    Bedienungsanleitung BATTERIEN EINLEGEN 1. Batteriefachdeckel entfernen. 2. Zwei “AAA” Batterien einlegen. Achten Sie auf die korrekte Polarität. 3. Schließen Sie den Batteriefachdeckel bis er einrastet. Hinweise: • Verwenden Sie nicht neue und alte Batterien zusammen. • Entfernen Sie die Batterien, wenn die Fernbedienung für einen längeren Zeitraum nicht verwendet wird.
  • Seite 8 Bedienungsanleitung drücken, der Sender wird mit einem Symbol markiert. Der gewählte Sender wird beim Programmwechsel übersprungen. Zum abzubrechen, drücken Sie erneut die grüne Taste. » Sperren [Lock]: Sender auswählen und Gelbe Taste an der Fernbedienung drücken; Passwort eingeben und mit der OK-Taste bestätigen. Der Sender wird mit einem Symbol markiert. Der Sender wird zum betrachten gesperrt. Der Sender wurde für die Anzeige gesperrt.
  • Seite 9 Bedienungsanleitung SENDERSUCHE [CHANNEL SEARCH] Automatische Suche [Auto Search]: Wählen Sie diese Funktion um die automatische Sendersuche zu beginnen und die verfügbaren TV-Sender zu speichern. Hinweis: Alle zuvor gespeicherten Sender und Einstellungen werden gelöscht. Manuelle Suche [Manual Search]: Mit dieser Funktion können Sie manuell nach Fernsehsendern suchen, ohne zuvor gespeicherte Sender und Einstellungen zu löschen.
  • Seite 10 Bedienungsanleitung Digital Audio: auswählen des digitalen Ausgangstyp (Aus/ PCM/ RAW HDMI Ein/ RAW HDMI AUS). SYSTEM Kindersicherung [Parental Guidance]: Sperren von bestimmten Sendern Um die Funktion zu aktivieren geben Sie das Passwort 000000, 888888 oder Ihr eigenes ein. Stellen Sie anschließend die Altersfreigabe ein und bestätigen mit der Taste OK. Wenn die Alterseinstufung eines Programms gleich oder höher als das voreingestellte Alter ist, wird das Programm gesperrt.
  • Seite 11: Usb-Aufnahme

    Bedienungsanleitung Verwerfen [Discard] - Vollbild-Anzeige Filmeinstellung [Movie Configure]: » Untertitel [Subtitle Specific]: Einstellen der Untertitel-Schriftgröße » Untertitel Hintergrund [Subtitle BG]: Einstellen der Farbe des Untertitel-Hintergrundes » Untertitel Schriftfarbe [Subtitle Font Color]: Einstellen der Farbe der Untertitel-Schrift Videorekorder einstellen [PVR Configure]: » Aufnahmegerät [Record device]: Information über das angeschlossene Gerät » Format: Angeschlossener USB Speicher wird formatiert Netzwerk-Anwendungen: Das Gerät unterstützt die folgenden Anwendungen: Wetter, RSS, IPTV und YouTube. USB AUFNAHME Hinweis: Diese Funktion ist nur verfügbar, wenn ein USB Speichergerät an den Receiver angeschlossen ist.
  • Seite 12: Fehlerbehebung

    Bedienungsanleitung ZEITVERSETZTE AUFNAHME [TIMESHIFT] Diese Funktion ermöglicht eine ununterbrochene Aufnahme des ausgewählten Senders im Hintergrund. Stellen Sie sicher, dass das Flash-Laufwerk an den USB-Anschluss des Geräts angeschlossen ist! • Aktivieren Sie die Senderaufzeichnung (PVR) und drücken die Taste TIMESHIFT auf der Fernbedienung; Zeitversetzte Aufnahme wird aktiviert (Statusleiste wird am unteren Bildschirmrand angezeigt). •...
  • Seite 13 Bedienungsanleitung Fernbedienung funktioniert Das Gerät ist ausgeschaltet Gerät einschalten nicht Die Fernbedienung ist nicht Fernbedienung auf das am Gerät ausgerichtet Gerät richten in einem Abstand nicht größer als 8 Meter vom Fernbedienungs- Sensor und innerhalb von 30° horizontal und 30° vertikal von der Vorderseite des Gerätes Es gibt Hindernisse zwischen...
  • Seite 14: Technische Daten

    Bedienungsanleitung TECHNISCHE DATEN CPU: Mstar3Z173 Interner Speicher: 64 Mb RAM: 1 GB DDR3 Antennenanschluss: IEC-Buchse Schleifen-Ausgang: IEC-Stecker Eingangsfrequenz: (VHF) 170~230 MHz (UHF) 470~862 MHz Demodulation: QPSK, 16QAM, 64QAM, 256QAM Bandbreite: 7 MHz, 8 MHz Decoder: MPEG-1, MPEG-2, MPEG-4, H.264, H.265, AAC, HE-AAC, AC-3, DD+ Anschlüsse: USB 2.0 HDMI SCART...
  • Seite 15 Bedienungsanleitung Deutsch Korrekte Entsorgung dieses Produkts (Elektromüll) (Anzuwenden in den Ländern der Europäischen Union und anderen europäischen Ländern mit einem separaten Sammelsystem) Die Kennzeichnung auf dem Produkt bzw. auf der dazugehörigen Literatur gibt an, dass es nach seiner Lebensdauer nicht zusammen mit dam normalen Haushaltsmüll entsorgt werden darf.
  • Seite 16: Safety Instructions

    Owner’s manual SAFETY INSTRUCTIONS Read the instruction manual carefully before first use and keep it for future reference. Producer is not responsible for damages caused by inappropriate handling and use of the device. The lightning flash with arrowhead symbol, whithin an equilateral triangle is indicated to alert the user the presence of uninsulated, dangerous voltage, within the product enclosure that may be of sufficient magnitude to constitute risk of electric shock to persons. The exclamation point within an equilateral triangle is intended to alert the user the presence of important operation and maintenance (servicing) instructions in the literature accompanying the appliance.
  • Seite 17 Owner’s manual if they are supervised and guided by a person who is responsible for their safety in a cautious manner, and all the safety precautions are understood and followed. Children should not play with this device. Children should not perform cleaning and servicing of the device unsupervised.
  • Seite 18: Product Description

    Owner’s manual PRODUCT DESCRIPTION Front panel URZ0336 POWER 1. USB port 4. Next channel 2. Display 5. Power button 3. Previous channel 6. IR sensor Back panel 100-240V 50/60HZ ETHERNET HDMI 1. Antenna input 4. HDMI output 2. Loop output 5. Coaxial output 3.
  • Seite 19: Remote Control

    Owner’s manual REMOTE CONTROL 1. Power button 2. SUB-T button: Subtitle options 3. LANG button: Select audio language or audio mode 4. MUTE button: Mute/unmute 5. EPG button: Display Electronic Program Guide 6. GOTO button: Go to a specific time in the movie 7. PAGE + button: Go to next menu 8.
  • Seite 20: Installation Of Batteries

    Owner’s manual INSTALLATION OF BATTERIES 1. Open the battery compartment. 2. Insert 2x AAA batteries with correct polarization (+/-). 3. Close the battery compartment. Notes: • Do not mix the batteries. • Remove the batteries if the remote control is not going to be used for an extended period of time. •...
  • Seite 21: Channel Search

    Owner’s manual » Delete: Select a channel and press the blue button on the remote control; a warning message will appear. Press the OK button to delete the channel. » Favorite: Select a channel and press the FAV button on the remote control. Select a category for the channel (Movie, News, Sport or Music) and press the OK button to confirm. Press the EXIT button to return to the channel list. A star appeared next to the selected channel and it is now marked as favorite channel and automatically added to the favorite list (a list is available after pressing the FAV button on the remote control in normal...
  • Seite 22 Owner’s manual Country: Select your country. Antenna Power: Set this function at On position in case of active antenna; set this function at Off position in case of passive antenna. TIME Time Offset: Set the GMT time zones automatically or manually. Country Region: Select your country if [Time Offset] is set to [Auto]. Time Zone: Select your region time zone if [Time Offset] is set to [Manual]. Sleep: Select time period after which the unit will automatically switch to standby mode. Power On/Off: »...
  • Seite 23: Usb-Recording

    Owner’s manual Information: Display information about the model and software version. Software Update: » OAD: It is not suggested to update the software by OAD as software is not being broadcast through DVB-T transmitters. Update the software by the USB only. » USB Upgrade: Update software by USB (only when USB drive with upgrade file is connected). • Do not turn off the device or unplug the flash drive when the update has not finished, as this may damage the device! • Do not use software which has been modified or is dedicated to other models, as this may damage the device. Network Setting: Set link type and IP setting.
  • Seite 24 Owner’s manual 2. Schedule a recording (EPG) » Press the EPG button to open full listings. » Select the TV channel using direction buttons. » Select the TV program you want to record. » Press the OK button to confirm. A window will appear. There is no need to set options such as channel, start or end time as they were uploaded from the EPG. To schedule a recording, select [RECORD] in [Mode] option.
  • Seite 25: Troubleshooting

    Owner’s manual TROUBLESHOOTING Problem Possible reason Possible solution LED indicator is not on Power adapter is Check the connection of disconnected power adapter No signal Antenna is disconnected Check antenna connection Antenna is damaged/ improperly set No signal is transmitted No image or sound Improper mode has been Choose proper mode on...
  • Seite 26: Specification

    Owner’s manual SPECIFICATION CPU: Mstar3Z173 Internal memory: 64 Mb RAM: 1 GB DDR3 Antenna connector: IEC-Female Loop output: IEC-Male Input frequency range: (VHF) 170~230 MHz (UHF) 470~862 MHz Demodulation: QPSK, 16QAM, 64QAM, 256QAM Bandwidth: 7 MHz, 8 MHz Decoding: MPEG-1, MPEG-2, MPEG-4, H.264, H.265, AAC, HE-AAC, AC-3, DD+ I/O: USB 2.0 HDMI...
  • Seite 27 Owner’s manual English Correct Disposal of This Product (Waste Electrical & Electronic Equipment) (Applicable in the European Union and other European countries with separate collection systems) This marking shown on the product or Its literature, indicates that It should not be disposed with other household wastes at the end of its working life.
  • Seite 28 Instrukcja obsługi KWESTIE BEZPIECZEŃSTWA Przed użyciem należy dokładnie zapoznać się z treścią instrukcji obsługi oraz zachować ją w celu późniejszego wykorzystania. Producent nie ponosi odpowiedzialności za nieprawidłowe użycie produktu. Symbol błyskawicy zakończonej strzałką w obrębie trójkąta równobocznego ma na celu ostrzegać użytkownika o obecności nieizolowanego “niebezpiecznego napięcia” urządzenia, o wartości, która może stwarzać ryzyko porażenia prądem elektrycznym osób. Symbol wykrzyknika w obrębie trójkąta równobocznego wskazuje obecność w dołączonej literaturze ważnych instrukcji dotyczących obsługi i konserwacji (serwisowania) tego urządzenia. • Przed podłączeniem urządzenia, należy sprawdzić zgodność napięcia prądu gniazda sieciowego i urządzenia.
  • Seite 29 Instrukcja obsługi tak aby związane z tym zagrożenia były zrozumiałe. Należy poinstruować dzieci, aby nie traktowały urządzenia jako zabawki. Dzieci nie powinny wykonywać czyszczenia i konserwacji sprzętu bez nadzoru. • Przewód zasilający nieodłączalny może być wymieniany wyłącznie w autoryzowanym punkcie serwisowym. • Należy ZAWSZE odłączyć urządzenie od źródła zasilania przed czyszczeniem. • Urządzenie należy czyścić jedynie za pomocą miękkiej, lekko wilgotnej ściereczki. Nie należy używać środków chemicznych lub detergentów do czyszczenia tego urządzenia.
  • Seite 30: Opis Produktu

    Instrukcja obsługi OPIS PRODUKTU Panel przedni URZ0336 POWER 1. Port USB 4. Następny kanał 2. Wyświetlacz 5. Przycisk zasilania 3. Poprzedni kanał 6. Czujnik podczerwieni Panel tylny 100-240V 50/60HZ ETHERNET HDMI 1. Wejście anteny 4. Wyjście HDMI 2. Wyjście loop 5. Wyjście coaxial 3. Port LAN 6. Wyjście SCART...
  • Seite 31: Pilot Zdalnego Sterowania

    Instrukcja obsługi PILOT ZDALNEGO STEROWANIA 1. Przycisk zasilania 2. Przycisk SUB-T: opcje napisów 3. Przycisk LANG: wybierz język audio lub tryb audio 4. Przycisk MUTE: wyłącz/włącz dźwięk 5. Przycisk EPG: wyświetla Elektroniczny Przewodnik po Programach (EPG) 6. Przycisk GOTO (Idź do): umożliwia przejście do wybranego czasu w filmie 7. Przycisk PAGE + : przejdź do następnego menu 8. Przycisk TTX: wyświetl teletekst 9.
  • Seite 32: Instalacja Baterii

    Instrukcja obsługi INSTALACJA BATERII 1. Należy otworzyć gniazdo baterii. 2. Następnie umieścić 2x baterie AAA zgodnie z zaznaczoną polaryzacją. 3. Zamknąć pokrywę baterii. Uwagi: • Nie należy umieszczać w pilocie różnych typów baterii jednocześnie. • Jeśli pilot nie będzie używany przez dłuższy czas, należy przechowywać go bez baterii w środku. • Pilot należy chronić przed bezpośrednim nasłonecznieniem oraz źródłami ciepła. • Pilot należy skierować w kierunku jednostki głównej. Powinien on znajdować się w odległości nie większej niż 8 metrów od urządzenia oraz pod kątem 30°.
  • Seite 33 Instrukcja obsługi przycisk na pilocie. Kanał zostanie oznaczony ikoną pominięcia. Wybrany kanał zostanie pominięty podczas zmieniania kanałów. » Blokada: Należy wybrać kanał, który ma zostać zablokowany, następnie nacisnąć żółty przycisk na pilocie. Wpisać hasło i zatwierdzić naciskając przycisk OK. Ikona kłódki pojawi się obok wybranego kanału. Kanał został zablokowany. Aby móc obejrzeć program na tym kanale, wymagane jest wpisanie hasła. » Skasuj: Należy wybrać kanał, który ma zostać usunięty, następnie nacisnąć niebieski przycisk na pilocie; pojawi się okno z prośbą o potwierdzenie usunięcia kanału. Należy nacisnąć przycisk OK, aby usunąć.
  • Seite 34: Szukanie Kanałów

    Instrukcja obsługi SZUKANIE KANAŁÓW Automatyczne strojenie: Wybór tej funkcji spowoduje rozpoczęcie automatycznego wyszukiwania i zapisywania dostępnych kanałów TV. Uwaga: Wszystkie wcześniej wyszukane i zapisane kanały zostaną usunięte. Strojenie ręczne: Funkcja umożliwia ręczne wyszukiwanie kanałów TV (poprzednio wyszukane i zapisane kanały nie zostaną usunięte). Należy użyć przycisków kierunkowych, aby wybrać częstotliwość żądanego kanału. Należy nacisnąć przycisk OK, aby rozpocząć wyszukiwanie kanału. Kiedy kanał zostanie znaleziony, zostanie dodany do listy kanałów. Jeśli kanały nie zostaną wyszukane, urządzenie automatycznie opuści menu. Kraje: Wybór kraju. Zasilanie anteny: Należy włączyć tę funkcję w przypadku posiadania anteny aktywnej; wyłączyć w przypadku posiadania anteny pasywnej.
  • Seite 35 Instrukcja obsługi OPCJE Język OSD: Ustawienie języka menu. Język napisów: Wybór języka napisów. Język audio: Wybór języka audio podczas oglądania programów telewizyjnych. Cyfrowy dźwięk: Wybór sygnału wyjściowego (PCM/ RAW HDMI wł./ RAW HDMI wył./ Wyłączony). SYSTEM Blokada rodzicielska: Funkcja umożliwiająca zablokowanie wyświetlania wybranego kanału. Należy wpisać domyślne hasło 000000, 888888 lub własne, aby przejść do funkcji. Ustawić klasyfikację wiekową i potwierdzić naciskając przycisk OK. Kiedy klasyfikacja wiekowa programu jest równa lub wyższa niż ustawiony wiek, program zostanie zablokowany. Aby móc obejrzeć program, wymagane jest wpisanie hasła. Aby wyłączyć tę funkcję należy ustawić klasyfikację wiekową na [Wyłączony]. Ustaw hasło: Najpierw należy wpisać stare hasło, następnie dwukrotnie wpisać nowe i zatwierdzić przyciskiem OK.
  • Seite 36 Instrukcja obsługi Multimedia: Należy wybrać tę funkcję jeśli nośnik USB podłączony jest do urządzenia Należy nacisnąć przycisk OK, aby wyświetlić menu, w którym możliwe jest wybranie typu pliku do odtworzenia (Muzyka/Zdjęcia/Filmy/PVR). Konfiguracja zdjęć: » Szybkość prezentacji: Ustawienie czasu wyświetlania zdjęcia » Typ prezentacji: Wybór efektu podczas wyświetlania slajdów » Proporcje obrazu: Ustawienie proporcji obrazu (proporcje oryginalne lub tryb pełnoekranowy) Konfiguracja napisów: » Wielkość napisów: Wybór rozmiaru czcionki napisów » Tło napisów: Wybór koloru tła napisów » Kolor napisów: Wybór koloru czcionki napisów PVR Konfiguracja: » Urządzenie nagrywające: Informacje o podłączonym urządzeniu » Formatowanie: Przeprowadź formatowanie podłączonego urządzenia Aplikacje sieciowe: Urządzenie obsługuje aplikacje takie jak: Pogoda, RSS, IPTV oraz YouTube.
  • Seite 37 Instrukcja obsługi 3. Timer » Nacisnąć przycisk TIMER na pilocie zdalnego sterowania. » Nacisnąć czerwony przycisk na pilocie, aby dodać nowe wydarzenie do harmonogramu. » Ustawić wszystkie opcje i potwierdzić naciskając przycisk OK. Uwagi: » Kompatybilność urządzenia ze wszystkimi nośnikami USB nie jest zagwarantowana. » Wczytanie danych z nośnika USB, który posiada dużą ilość danych, może zająć więcej czasu. » Należy upewnić się, że format plików znajdujących się na podłączonym nośniku jest obsługiwany przez tuner. TIMESHIFT Ta funkcja zapewnia ciągłe nagrywanie wybranego kanału w tle. Należy upewnić się, że nośnik USB jest podłączony do portu USB urządzenia! Należy włączyć funkcję nagrywania (PVR) i nacisnąć przycisk TIMESHIFT na pilocie; » Timeshift zostanie włączony (na dole ekranu zostanie wyświetlony pasek stanu z odliczaniem).
  • Seite 38: Rozwiązywanie Problemów

    Instrukcja obsługi ROZWIĄZYWANIE PROBLEMÓW Problem Możliwa przyczyna Możliwe rozwiązanie Wskaźnik LED nie świeci się Zasilacz jest odłączony Należy sprawdzić podłączenie zasilacza Brak sygnału Antena jest odłączona Należy sprawdzić podłączenie anteny Antena jest uszkodzona / nieprawidłowo ustawiona Brak nadawanego sygnału Brak obrazu lub dźwięku Nie został wybrany odpowiedni tryb Należy wybrać odpowiedni tryb na telewizorze na telewizorze Informacja, że kanał jest Kanał jest zakodowany / Należy wybrać inny kanał zakodowany / niedostępny niedostępny Pilot nie działa Urządzenie jest wyłączone Należy włączyć urządzenie Pilot nie jest skierowany w Pilot należy skierować w stronę urządzenia kierunku jednostki głównej.
  • Seite 39 Instrukcja obsługi SPECYFIKACJA CPU: Mstar3Z173 Pamięć wewnętrzna: 64 Mb RAM: 1 GB DDR3 Konektor ANT: IEC-żeński Wyjście LOOP: IEC-męskie Zakres częstotliwości: (VHF) 170~230 MHz (UHF) 470~862 MHz Demodulacja: QPSK, 16QAM, 64QAM, 256QAM Szerokość pasma: 7 MHz, 8 MHz Dekodowanie: MPEG-1, MPEG-2, MPEG-4, H.264, H.265, AAC, HE-AAC, AC-3, DD+ Wejścia/wyjścia: USB 2.0 HDMI SCART COAXIAL RJ45 2 x IEC konektor (ANT IN, Loop)
  • Seite 40 Instrukcja obsługi Poland Prawidłowe usuwanie produktu (zużyty sprzęt elektryczny i elektroniczny) Oznaczenie umieszczone na produkcie lub w odnoszących się do niego tekstach wskazuje, że po upływie okresu użytkowania nie należy usuwać z innymi odpadami pochodzącymi z gospodarstw domowych. Aby uniknąć szkodliwego wpływu na środowisko naturalne i zdrowie ludzi wskutek niekontrolowanego usuwania odpadów, prosimy o oddzielenie produktu od innego typu odpadów oraz odpowiedzialny recykling w celu promowania ponownego użycia zasobów materialnych jako stałej praktyki. W celu uzyskania informacji na temat miejsca i sposobu bezpiecznego dla środowiska recyklingu tego produktu użytkownicy w gospodarstwach domowych powinni skontaktować się z punktem sprzedaży detalicznej, w którym dokonali zakupu produktu, lub z organem władz lokalnych. Użytkownicy w firmach powinni skontaktować się ze...
  • Seite 41 Manual de utilizare ASPECTE PRIVIND SIGURANȚĂ Înainte de utilizare, citiți cu atenție instrucțiunile de utilizare și păstrați-le pentru utilizare ulterioară. Producătorul nu este răspunzător pentru utilizarea incorectă a produsului. Triunghiul continand simbolul fulgerului indica cazurile in care sanatatea dumneavoastra este in pericol (datorita electrocutarii, de exemplu). Acest simbol avertizeaza in privinta existentei unor tensiuni periculoase in interiorul aparatului, suficient de puternice pentru a provoca electrocutarea.
  • Seite 42 Manual de utilizare sau instructaj privind utilizarea echipamentelor într-un mod sigur, astfel încât riscurile asociate cu aceasta să fie înțelese. Copii trebuie instructați ca să nu a trateze dispozitivul ca o jucărie. Copiii nu trebuie să efectueze curățarea și întreținerea echipamentului fără supraveghere. • Cablul de alimentare detașabil poate fi înlocuit numai în centru de service autorizat. • TOTDEAUNA trebuie să deconectați dispozitivul de la sursa de alimentare înainte de curățare. • Dispozitivul trebuie curățat cu o cârpă moale, umedă. Nu utilizați substanțe chimice sau detergenți pentru a curăța dispozitivul.
  • Seite 43: Descrierea Produsului

    Manual de utilizare DESCRIEREA PRODUSULUI Panoul frontal URZ0336 POWER 1. Portul USB 4. Canalul următor 2. Ecran 5. Butonul de alimentare 3. Canalul anterior 6. Senzor IR Panoul spate 100-240V 50/60HZ ETHERNET HDMI 1. Intrare antenă 4. Ieșire HDMI 2. Ieșire loop 5. Ieșire coaxială 3. Port LAN 6.
  • Seite 44 Manual de utilizare TELECOMANDĂ DE CONTROL LA DISTANȚĂ 1. Butonul de alimentare 2. Butonul SUB-T: Opțiuni subtitrare 3. Butonul LANG: Selectați limba sau mod audio 4. Butonul MUTE: Porniți/opriți sunetul 5. Butonul EPG: Afișează Ghidul electronic de programe (EPG) 6. Butonul GOTO (Merge la): Pentru a trece la momentul ales al filmului 7. Butonul PAGE + : Mergeți la meniul următor 8. Butonul TTX: Pentru a vizualiza teletext 9. Butonul REPEAT: Porniți/opriți modul de repetare 10.
  • Seite 45 Manual de utilizare INSTALAREA BATERIEI 1. Deschideți compartimentul pentru baterii. 2. Introduceți două baterii AAA în conformitate cu polaritatea marcată (+/-). 3. Închideți capacul bateriei. Atenție: • Nu introduceți în telecomandă diferite tipuri de baterii în același timp. • Dacă telecomanda nu este utilizată pentru o lungă perioadă de timp, depozitați-o fără baterii introduse. • Telecomanda trebuie să fie ferită de lumina directă a soarelui și de surse de căldură. • Telecomanda trebuie să fie îndreptată spre unitatea principală. Trebuie să se afle la distanță de nu mai mult de 8 metri de dispozitiv, și la un unghi de 30 °de dispozitiv.
  • Seite 46 Manual de utilizare telecomandă; introduceți parola și confirmați cu butonul OK. Canalul va fi marcat cu icoana de blocare. Canalul selectat va fi blocat pentru selectare. Accesul la canalul blocat este permis doar după introducerea parolei (000000 sau 888888). Pentru a anula, apăsați butonul galben din nou. » Ștergere: Selectați programul pe care doriți să îl ștergeți. Va apărea un mesaj de avertizare. Apăsați butonul OK pentru a șterge canalul. » Preferate: Selectați un canal și apăsați butonul FAV de pe telecomandă. Selectați o categorie pentru canal (Film, Știri, Sport sau Muzică) și apăsați butonul OK pentru a confirma. Apăsați butonul EXIT pentru a reveni la lista de canale. O stea va apărea lângă...
  • Seite 47 Manual de utilizare Căutare manuală: Această funcție activează căutarea manuală a canalelor TV fără a șterge canalele salvate anterior și setările. Utilizați butoanele direcționale pentru a selecta frecvența canalului dorit. Apăsați butonul OK pentru a începe căutarea. Când canalul va fi găsit, va fi agăugat la lista canalelor. Daca canalele nu pot fi găsite în timpul căutării, dispozitivul va ieși automat. Țara: Selectați țara. Alimentarea antenei: Activați această funcție dacă aveți o antenă activă, dezactivați această funcție dacă aveți o antenă pasivă. ORĂ Schimbarea orei: Reglare automată sau manuală a fusului orar GMT. Regiune: Această funcție vă permite să selectați regiunea, atunci când opțiunea [Schimbarea orei] este setată pe [Auto]. Fus orar: Această funcție vă permite să selectați un fus orar, atunci când opțiunea [Schimbarea orei] este setată pe [Manual]. Sleep: Setați un timp după care dispozitivul va intra automat în modul stand-by. Alimentare on/off: » Pornire: Activați funcția de pornire/oprire funcției de pornire automată după o perioadă de timp prestabilită. » Ora poririi: Setați ora pornirii automate. » Oprire: Activați/dezactivați funcția de oprire automată după o perioadă de timp prestabilită. » Ora opririi: Setați ora opririi automate. OPȚIUNI Limbă OSD: Setați limba meniului. Limbă subtitrare: Selectați limba de subtitrare. Limbă audio: Selectați limba audio la vizionarea programelor TV. Sunet digital: Selectați semnalul de ieșire (Oprit/ PCM/ RAW HDMI pornit/ RAW HDMI oprit).
  • Seite 48 Manual de utilizare SISTEM Control parental: Această funcție permite să blocați afișarea canalului selectat. Pentru a utiliza această funcție, introduceți parola implicită, 000000, 888888, sau parola dumneavoastră proprie. După aceea setați categoria de vârstă și confirmați apăsând butonul OK. Când rata vârstei este mai mare sau egală cu cea presetată, canalul este blocat. Pentru vizionare trebuie furnizață o parolă pentru deblocarea canalului. Pentru a dezactiva funcția control parental, setați [Age rating] pe [Off]. Setarea parolei: Mai întâi introduceți parola veche, apoi introduceți cea nouă de două ori și confirmați apăsând butonul OK. Revenirea la setările din fabrică: Funcția permite să resetați dispozitivul și să reveniți setările din fabrică.
  • Seite 49 Manual de utilizare Setări PVR: » Dispozitiv de înregistrare: Informații despre dispozitivul conectat » Formatare: Funcția care începe formatarea dispozitivului conectat Aplicații de rețea: Dispozitivul acceptă următoarele aplicații: Vremea, RSS, IPTV și YouTube. ÎNREGISTRAREA USB Notă: Această funcție este disponibilă doar când USB-ul este conectat la receptor. 1. Înregistrare instantanee Pentru a începe să înregistrați un program TV care este în curs de difuzare, mergeți la canalul dorit și apăsați butonul (un punct din colțul din stânga sus pâlpâie). Apăsați butonul pentru a opri înregistrarea. 2. Programarea unei înregistrări (EPG) » Apăsați butonul EPG pentru a deschide lista completă. » Selectați canalul TV. » Selectați programul TV pe care doriți să îl înregistrați. » Apăsați butonul OK pentru a confirma. Va apărea o fereastră. Nu este necesar să setați opțiunile cum ar fi canalul, ora de începere sau de sfârșit când au fost înărcate de pe EPG. Pentru a programa o înregistrare, selectați [RECORD] în opțiunea [Mode]. 3. Temporizator » Apăsați butonul TIMER de pe telecomandă. »...
  • Seite 50 Manual de utilizare » Pentru a controla redarea imaginilor video înregistrate, utilizați butoanele REV/FWD/ Redare/Pauză de pe telecomandă. » Pentru a elimina afișarea barei de stare de pe ecran fără a opri Timeshift, apăsați butonul EXIT [ieșire] de pe telecomandă. Pentru a dezactiva Timeshift, apăsați butonul telecomandă. DEPANARE Problemă Motiv posibil Soluție posibilă Indicatorul LED nu este Adaptorul de alimentare Verificați conexiunea pornit este deconectat...
  • Seite 51 Manual de utilizare Când dispozitivul este mutat Conexiunea antenei din noul Verificați conexiunea ante- în altă cameră, nu este loc poate fi diferită (puterea nei sau conectați amplifica- semnal semnalului mai scăzută, torul la antenă rezultând o recepție mai slabă a canalului sau niciun semnal) OAD caută software-ul Deconectați antena, așteptați până când căuta- rea este finalizată, intrați în meniu, mergeți la [System], [Software] și opriți actualiza- rea OAD...
  • Seite 52 Manual de utilizare SPECIFICATII CPU: Mstar3Z173 Memoria interna: 64 Mb RAM: 1 GB DDR3 Conectori: IEC-mama x1 Iesire bucla: IEC-tata x1 Frecventa de intrare: (VHF) 170~230 MHz (UHF) 470~862 MHz Demodulare: QPSK, 16QAM, 64QAM, 256QAM Lățime bandă: 7 MHz, 8 MHz Decodare: MPEG-1, MPEG-2, MPEG-4, H.264, H.265, AAC, HE-AAC, AC-3, DD+ Porturi intrare/iesire: USB 2.0 HDMI...
  • Seite 53 Manual de utilizare Romania Reciclarea corecta a acestui produs (reziduuri provenind din aparatura electrica si electronica) Marcajale de pe acest produs sau mentionate in instructiunile sale de folosire indica faptul ca produsul nu trebuie aruncat impreuna cu alte reziduuri din gospod arie atunci cand nu mai este in stare de functionare.

Inhaltsverzeichnis