Omnimount MWFS Benutzerhandbuch
Multi-configuration wall furniture system
Quicklinks
MWFS
MULTI-CONFIGURATION WALL FURNITURE SYSTEM
EN
Instruction Manual
ES
Manual De Instrucciones
FR
Manuel D'instructions
DE
Benutzerhandbuch
NL
Instructiehandleiding
IT
Manuale Di Istruzioni
PL
Instrukcja Obsáugi
CZ
Návod K Obsluze
HU
Kezelési Kézikönyv
GK
PT
Manual De Instruções
DA
Brugervejledning
FI
Asennusopas
SV
Monteringsanvisning
RO
Manual Cu Instruc iuni
BL
ET
Juhend
LV
Lietošanas Pam c ba
LT
Naudojimo Instrukcija
SL
Navodila
SK
Návod Na Obsluhu
RU
TR
Talimat Kilavuzu
NO
Bruksanvisning
CN
说明手册
JP
取扱説明書
AR
EN
Images may differ from actual product
ES
El producto real puede variar respecto a la
imagen mostrada.
FR
Le produit réel peut différer de l'illustration.
DE
Abbildung weicht möglicherweise von
tatsächlichem Produkt ab.
NL
De afbeelding kan verschillend zijn van het
eigenlijke product.
IT
L'immagine può non corrispondere al prodotto
effettivo.
PL
Rzeczywisty produkt mo e si ró niü od
przedstawionego na ilustracji.
CZ
Obrázek se m že od skuteþného produktu lišit.
HU
A kép eltérhet a tényleges termékt l.
GK
.
PT
As imagens poderão divergir do produto real
DA
Billederne kan variere fra det faktiske produkt
UL10021
ULN #
PN #
MWFS = L27-UL10021-CON-062408vD
FI
Kuvat voivat erota itse tuotteesta
SV
Bilder kan skilja sig från befintlig produkt
RO
Este posibil ca imaginile s difere fa
BL
ET
Pildid võivad tegelikust tootest erineda
LV
Att li var atš irties no pašreiz j izstr d juma
LT
Paveiksl liai gali skirtis nuo tikrojo produkto
SL
Slike se lahko razlikujejo od dejanskega izdelka
SK
Obrázky sa môžu od skutoþného produktu odlišova .
RU
,
.
TR
Resimler, gerçek ürünle farklÕlÕk gösterebilir
NO
Bildene kan variere i forhold til det faktiske produktet
AR
CN
示
JP
画像は実際の製品とは異なる場合があります。
de produsul real
,

Verwandte Anleitungen für Omnimount MWFS


Inhaltszusammenfassung für Omnimount MWFS
- Seite 1 UL10021 ULN # MWFS PN # MWFS = L27-UL10021-CON-062408vD MULTI-CONFIGURATION WALL FURNITURE SYSTEM Instruction Manual Manual De Instrucciones Manuel D’instructions Benutzerhandbuch Instructiehandleiding Manuale Di Istruzioni Instrukcja Obsáugi Návod K Obsluze Kezelési Kézikönyv Manual De Instruções Brugervejledning Asennusopas Monteringsanvisning Manual Cu Instruc iuni Juhend Lietošanas Pam c ba...
- Seite 2 équipements. ƒ Ce produit ne doit pas être utilisé pour un usage autre que ceux spécifiés par OmniMount. ƒ Ce produit peut contenir des pièces mobiles. Veuillez l'utiliser avec prudence.
- Seite 3 Installeer of monteer het product niet als het product of de bevestigingsmiddelen beschadigd zijn of ontbreken. Als u vervangingsonderdelen nodig heeft, kunt u contact opnemen met de OmniMount-klantendienst op het nummer 800.668.6848 of via e-mail op info@omnimount.com. Internationale klanten dienen contact op te nemen met een plaatselijke leverancier.
- Seite 4 Nie instalowaü, ani nie przeprowadzaü monta u, je li produkt lub urz dzenie jest uszkodzone lub go brakuje. Je li potrzebne s cz ci zapasowe, nale y skontaktowaü si z dziaáem obsáugi klienta firmy OmniMount pod numerem telefonu 800-668-6848 lub adresem e-mail info@omnimount.com. Klienci w ró nych krajach powinni skontaktowaü si z lokalnym dystrybutorem w celu uzyskania pomocy.
- Seite 5 OmniMount kundservice på 800.668.6848 eller info@omnimount.com. ƒ Installera eller montera inte produkten om den är skadad eller delar saknas. Om reservdelar krävs kontakta OmniMount kundservice på 800.668.6848 eller Info@omnimount.com. Internationella kunder måste kontaka en lokal distributör för assistans. ƒ...
- Seite 6 Ikke begynn å installere eller montere hvis produktet eller noen av delene er skadet eller mangler. Hvis du har behov for reservedeler, må du ta kontakt med OmniMounts kundetjeneste på 800 668 6848 eller info@omnimount.com. Internasjonale kunder må kontakte en lokal distributør for å...
- Seite 7 Neveiciet uzst d šanu vai mon žu, ja izstr d jums vai aparat ra ir boj ta vai to tr kst. Ja nepieciešamas rezerves deta as, sazinieties ar OmniMount klientu apkalpošanas dienestu pa t lruni 800 668 6848 vai s tiet e-pasta zi ojumu uz info@omnimount.com.
- Seite 8 ZRANENIE ALEBO SMR . PRED ZAýIATKOM INŠTALÁCIE SI PREýÍTAJTE NASLEDUJÚCE VAROVANIA. ƒ V prípade, že pokynom nerozumiete, máte nejaké pripomienky alebo otázky, kontaktujte kvalifikovaného technika. Zákazníci so sídlom v Severnej Amerike môžu kontaktova oddelenie služieb zákazníkom spoloþnosti OmniMount na þísle 800.668.6848 alebo na e-mailovej adrese info@omnimount.com. ƒ...
- Seite 9 WEIGHT CAPACITY ! CAUTION! MAXIMUM WEIGHT CAPACITY POUNDS (LBS) KILOGRAMS (KG) MÁXIMA CAPACIDAD DE PESO LIBRAS (LB) KILOGRAMOS (KG) CAPACITE DE CHARGE MAXIMALE LIVRES (LB) KILOGRAMMERS (KG) PER SHELF 40 (LBS) 18 (KG) USE WITH PRODUCTS LARGER THAN THE MAXIMUM WEIGHT AND SIZE MAY RESULT IN INSTABILITY CAUSING POSSIBLE INJURY.
- Seite 10 Tools Not included Tools Needed No se incluye Herramientas necesarias Non inclus Outils requis Nicht im Lieferumfang enthalten Benötigte Werkzeuge Niet inbegrepen Benodigde gereedschappen Non incluso Strumenti necessari Nie nale y do zestawu Potrzebne narz dzia Není souþástí Pot ebné nástroje Nem tartalmazza Szükséges eszközök Não incluído...
- Seite 11 OPTIONS There are three configurations possible in this install. See following pages. Options Opciones Options Optionen Opties Opzioni Opcje Možnosti Beállítások Opções Valg Vaihtoehdot Alternativ Op iuni Võimalused Iesp jas Parinktys Možnosti Možnosti Seçenekler Alternativer オプション...
- Seite 12 Contents P-B B UL10021vAX Pouch # Part # Description Masonry Anchor Lag Screws Hex Screw M6 x 18mm Small wood screw Pegs Allen Wrench 4mm Acrylic Washer Metal Washer Acrylic Shelf Spacer...
- Seite 13 Option A Contents Pouch # Part # Description Large Frame Top Cap Top Cover Small Glass Shelf Large Glass Shelf Bottom Cover Small Frame Trim...
- Seite 14 Option B Contents Pouch # Part # Description Large Frame Top Cap Top Cover Small Glass Shelf Large Glass Shelf Bottom Cover Small Frame Trim...
- Seite 15 Option C Contents Pouch # Part # Description Large Frame Top Cap Top Cover Small Glass Shelf Large Glass Shelf Bottom Cover Small Frame Trim...
- Seite 16 Option A FIGURE A-1 Assemble entire wall assemble as shown in Figure A-1. Once these brackets are assembled they will serve as a template to mark the locations for lag screws. Each bracket is secured with two M6 Hex Screws (Part P-C). Install screws sukite varžtus Coloque los tornillos...
- Seite 17 Option B FIGURE B-1 Assemble entire wall assemble as shown in Figure B-1. Once these brackets are assembled they will serve as a template to mark the locations for lag screws. Each bracket is secured with two M6 Hex Screws (Part P-C). Install screws sukite varžtus Coloque los tornillos...
- Seite 18 Option C FIGURE C-1 Assemble entire wall assemble as shown in Figure C-1. Once these brackets are assembled they will serve as a template to mark the locations for lag screws. Each bracket is secured with two M6 Hex Screws (Part P-C). Install screws sukite varžtus Coloque los tornillos...
-
Seite 19: Installation Options
INSTALLATION OPTIONS Options Možnosti Op iuni Opciones Beállítások Seçenekler Options Võimalused Alternativer Optionen Opções Iesp jas Opties Valg Parinktys Opzioni Vaihtoehdot Možnosti オプション Opcje Alternativ Možnosti OPTION S-1 Single stud installation Instalación en panel simple Installation sur un seul poteau Montage an Einzelbalken Installatie op enkele drager Installazione su montante singolo... -
Seite 20: Wood Stud Installation
Wood Stud Installation STUD Find stud and mark edge and center locations. Ubique el panel y marque las ubicaciones de los bordes y el centro. Repérez l'emplacement d'une poutre, puis marquez l'emplacement des bords et du centre de cette poutre. Suchen Sie den Balken und markieren Sie Ränder und Mitte. - Seite 21 Wood Stud Installation STUD STUD STUD Use wall plate to mark mounting location Use la placa de pared para marcar el lugar donde se realizará la instalación Utilisez la plaque murale pour marquer l'emplacement de montage Verwenden Sie die Wandplatte, um die Montagestelle zu markieren Gebruik de wandplaat om de montageplaats af te tekenen Utilizzare la piastra a muro per segnare la posizione di montaggio U yj páyty ciennej do oznaczenia miejsca monta u...
- Seite 22 Wood Stud Installation STUD Wood Pilot Pilot Hole Size Pilot Drill Depth 1/8” inch 2 inch 4 mm 50 mm Drill pilot hole Wood Stud Wall Installation Realice el agujero piloto Instalación en pared con paneles de madera Percez le trou de guidage Installation murale sur poteau de cloison en bois Bohren Sie die Vorbohrung Montage an Holzbalken an der Wand...
- Seite 23 Masonry Installation Masonry Pilot Pilot Hole Size Pilot Drill Length 5/16 inch 2 1/2 inch 8 mm 60 mm For masonry installation use the wall bracket, as seen in the wood stud install, to mark the correct mounting location. Level the wall bracket on the solid concrete and mark mounting locations.
- Seite 24 Masonry Installation Install wall anchors after drilling pilot hole by gently tapping in with hammer. Make sure that wall anchors are securely situated in wall and are undamaged. Never under any circumstance install wall anchors into mortar. Wall anchors are meant for solid concrete only. Hammer Solid Concrete Concreto sólido...
- Seite 25 Single Stud Installation Dual Stud Installation Drill pilot holes Gaur de ghidare a burghiului Realice el agujero piloto Percez le trou de guidage Puurige esialgne auk Bohren Sie die Vorbohrung Izveidojiet priekšurbumu Boor een montagegat Išgr žkite bandom j skyl Trapanare il foro pilota Navrtajte zaþetno luknjo Wywierü...
- Seite 26 Single Stud Installation Dual Stud Installation X 12 Using the steps for single or double stud installation, install the lag screws. Remember that 4 lag screws are requires for each wall bracket for double stud installation, and 2 lag screws for each wall bracket in single stud installation.
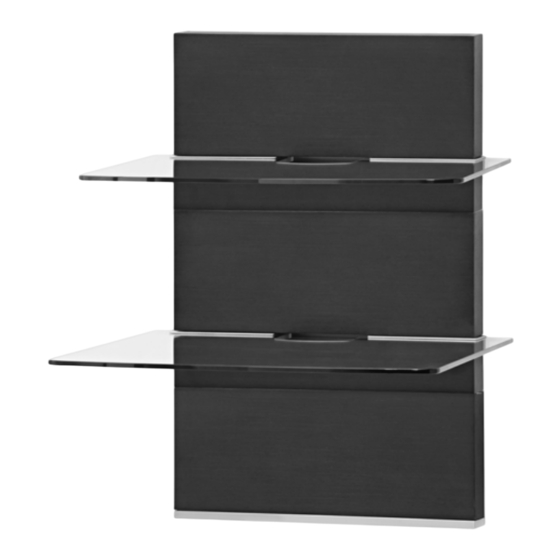
- Seite 27 Do not install product without plastic spacer. The convex side of the plastic bushing needs to be on the top side of glass. The large glass shelf is marked with an Omnimount logo as up. The smaller shelf can be installed in either configuration.
- Seite 28 Installer hyller 安装框架 棚を取り付けます。 Install glass shelves, with the larger shelf on the bottom (Part 5). The Omnimount logo should face up on the larger shelf. The smaller shelf does not have a logo and can be installed in any orientation.
- Seite 29 Install screws Coloque los tornillos Installez les vis Drehen Sie die Schrauben ein Installeer de schroeven Installare le viti Zaáó ruby Nainstalujte šrouby Helyezze be a csavarokat. Montar parafusos Isæt skruerne Asenna ruuvit Montera skruvar Monta i úuruburile Paigaldage kruvid Ievietojiet skr ves sukite varžtus Pritrdite vijake...
-
Seite 30: Cable Management
Cable Management Kabelio tvarkymas Cable Management Držalo za kable Sistema de organización de cables Gestão de cabos Kabelstyring Kryty káblov Gestion des câbles Kaapelien hallinta Kabelführung Kabelhantering Kablo ødaresi Kabelgoten Gestionarea cablurilor Kabelorganisering Passacavi Pokrywa na przewody Kaablite korraldamine Kryty kabel ケーブル管理... - Seite 31 Attach Covers There are three covers labeled part 3. These parts are interchangeable. The cover that is installed on the top wall bracket uses the finished end cap. Ataúa i capacele Attach covers Coloque las cubiertas Fixez les caches Kinnitage kaaned Befestigen Sie die Abdeckungen Piestipriniet p rsegus Bevestig de bedekkingen...
- Seite 32 Attach Covers Attach covers Coloque las cubiertas Fixez les caches Befestigen Sie die Abdeckungen Bevestig de bedekkingen Montare i coperchi Zamontuj pokrywy P ipevn te kryty Tegye fel a burkolatokat. Prender as coberturas Sæt dækplader på Kiinnitä suojukset Sätt fast höljen Ataúa i capacele Kinnitage kaaned Piestipriniet p rsegus...
- Seite 33 OmniMount will not be liable for any damages arising out of the use of, or inability to use, OmniMount products. OmniMount bears no responsibility for incidental or consequential damages. This includes, but is not limited to, any labor charges for the repair of OmniMount products performed by anyone other than OmniMount.
- Seite 34 GARANTIE. AVVERTENZA PER GLI UTENTI RESIDENTI AL DI FUORI DEGLI STATI UNITI: LA GARANZIA PER I PRODOTTI OMNIMOUNT È VALIDA SOLO PER I PRODOTTI ACQUISTATI NEGLI STATI UNITI. PER ACQUISTI AL DI FUORI DEGLI STATI UNITI, CONTATTARE IL DISTRIBUTORE PER IL VOSTRO PAESE PER RICHIEDERE INFORMAZIONI RELATIVE ALLA GARANZIA DISPONIBILE NEL VOSTRO PAESE.
- Seite 35 KONTAKTA DISTRIBUTÖREN I DITT LAND FÖR SPECIFIK GARANTIINFORMATION. NOTIFICARE PENTRU CLIEN II DIN AFARA STATELOR UNITE: GARAN IA PRODUSULUI OMNIMOUNT SE APLIC NUMAI LA PRODUSELE ACHIZI IONATE ÎN STATELE UNITE. PENTRU ACHIZI IILE ÎN AFARA STATELOR UNITE, CONTACTA I DISTRIBUITORII DE AR PENTRU INFORMA II DESPRE GARAN IE SPECIFICE RII RESPECTIVE.
- Seite 36 OmniMount 製品をご購入いただきまし て、 あり がと う ございます (JP) Japanese (AR) Arabic OmniMount Systems, Inc. 8201 South 48th Street Phoenix, AZ 85044-5355 1-800-MOUNT-IT (1-800-668-6848) www.omnimount.com All trademarks are the property of their respective companies. OmniMount is a registered trademark of OmniMount Systems, Inc. © 2006...