Herunterladen Inhalt Inhalt Diese Seite drucken

Werbung

Verfügbare Sprachen
  • DE

Verfügbare Sprachen

  • DEUTSCH, seite 1
Le Vide
Vakuumierer
Vacuum Sealer
Máquina de envasado al vacío
Appareil de mise sous vide
Macchina per sottovuoto
10033153

Werbung

Inhaltsverzeichnis
loading

Inhaltszusammenfassung für Klarstein Le Vide

  • Seite 1 Le Vide Vakuumierer Vacuum Sealer Máquina de envasado al vacío Appareil de mise sous vide Macchina per sottovuoto 10033153...
  • Seite 3: Inhaltsverzeichnis

    Sehr geehrter Kunde, wir gratulieren Ihnen zum Erwerb Ihres Gerätes. Lesen Sie die folgenden Hinweise sorgfältig durch und befolgen Sie diese, um möglichen Schäden vorzubeugen. Für Schäden, die durch Missachtung der Hinweise und unsachgemäßen Gebrauch entstehen, übernehmen wir keine Haftung. Scannen Sie den folgenden QR-Code, um Zugriff auf die aktuellste Bedienungsanleitung und weitere Informationen rund um das Produkt zu erhalten:...
  • Seite 4: Sicherheitshinweise

    SICHERHEITSHINWEISE • Versichern Sie sich dass das Gerät ausgeschaltet ist, bevor Sie den Stecker einstecken. Ziehen Sie den Stecker wenn Sie das Gerät nicht mehr benutzen oder bevor Sie es reinigen. • Achten Sie darauf, dass Kinder nicht mit dem Gerät spielen und bewahren Sie es außerhalb der Reichweite von Kindern auf.
  • Seite 5: Hinweise Zum Vakuumieren

    HINWEISE ZUM VAKUUMIEREN Vakuumverpackung verlängert die Haltbarkeit von Nahrungsmitteln, indem die Luft aus verschweißten Behältern nahezu vollständig entfernt und das Eindringen von Luft verhindert wird, wodurch sich der Oxidationsvorgang verlangsamt. Vakuumverpackung erhält den Geschmack und die Gesamtqualität. Darüber hinaus wird das Wachstum aerober Mikroorganismen, die unter Umständen zu im Folgenden aufgeführten Problemen führen können, verhindert: Schimmel –...
  • Seite 6: Geräteübersicht

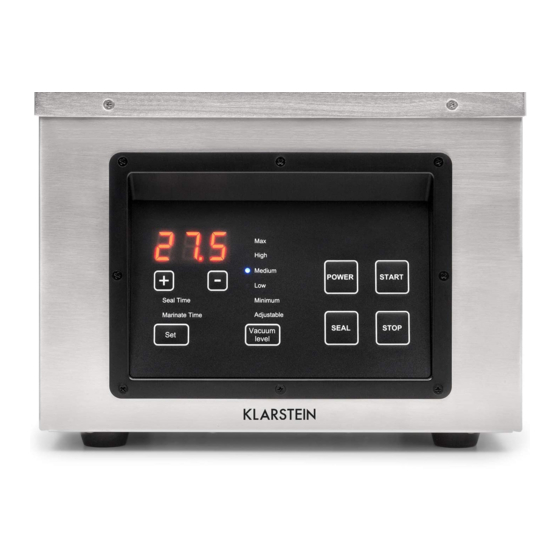
    GERÄTEÜBERSICHT Abdeckung Bedienfeld BEDIENFELD UND TASTENFUNKTIONEN...
  • Seite 7: Led-Anzeige

    An-/Aus-Schalter (Strom) Wenn das Gerät an den Strom angeschlossen ist, zeigt die LED-Anzeige (G) OFF. Drücken Sie den An-/Aus-Schalter und die LED-Anzeige (G) zeigt die voreingestellte Verschweißzeit (oder Marinierzeit) sowie die voreingestellte Vakuumstufe an. Das Gerät ist nun betriebsbereit. Drücken Sie den An-/ Aus-Schalter, um das Gerät auf den Standby-Modus zurückzustellen.
  • Seite 8: Vorbereitung

    VORBEREITUNG Gebrauchsanweisung für das Vakuumverpacken • Verpacken Sie nur frische Nahrungsmittel. Verpacken Sie keine alten oder verdorbenen Produkte. Eine bereits schlechte Qualität ist durch das Vakuumverpacken nicht zu verbessern. • Frische Nahrungsmittel (Fleisch, Gemüse, Käse usw.) sollten nach dem Vakuumverpacken bei 1˚ C oder darunter gekühlt oder eingefroren werden. •...
  • Seite 9: Bedienung

    BEDIENUNG Inbetriebnahme • Lesen Sie vor der Verwendung das Benutzerhandbuch sorgfältig durch. • Schließen Sie den Netzstecker an eine geerdete Steckdose an. • Öffnen Sie die Abdeckung, drücken Sie den An-/Aus-Schalter und das Gerät ist betriebsbereit. In der LED-Anzeige erscheint die zuletzt verwendete Betriebsart. Jetzt kann das Gerät zum Vakuumverpacken verwendet werden.
  • Seite 10 Arbeitsvorgang (Vakuumverschweißen) • Schließen Sie die Abdeckung und drücken Sie die Starttaste. Nun ist der Beutel bereit zum Vakuumverschweißen. • Die Pumpe beginnt zu arbeiten. Die Leuchtanzeige des gewählten Vakuumgrads beginnt zu blinken (wenn der Vakuumgrad den eingestellten Grad erreicht, hört die Leuchtanzeige auf zu blinken). Die Zahl in der LED-Anzeige zählt von 0 bis zum eingestellten Vakuumgrad hoch (wenn 5 und 19 erreicht sind, ertönt ein Signalton).
  • Seite 11 Stellen Sie den Vakuumgrad ein Drücken Sie Vakuumstufe und wählen Sie den Vakuumgrad. Es stehen 6 Möglichkeiten zur Auswahl: Max (29,3 inHg), Hoch (29,0 inHg), Mittel (27,5 inHg), Niedrig (26,0 inHg), Minimum (23,5 inHg) und Einstellbar. Der Vakuumgrad wird durch die entsprechende Leuchtanzeige angezeigt. Wenn Sie die Option Einstellbar wählen, drücken Sie die Tasten “+”...
  • Seite 12: Lagerung Von Vakuumierten Lebensmitteln

    Arbeitsvorgang (Vakuummarinieren) • Schließen Sie die Abdeckung und das Gerät schaltet auf den Marinierbetrieb. Ein Arbeitsgang dauert 9 Minuten; die maximale Anzahl von Arbeitsgängen beträgt 1 1 (99 Minuten). Der Vorgang umfasst: Vakuum herstellen - Vakuum aufrechterhalten - Freigabe. Vakuum herstellen und Freigabe dauern 1 Minute.
  • Seite 13 Trockene Nahrungsmittel wie Nudeln, Getreide und Mehl bleiben von Anfang bis Ende frisch. Vakuumverpackung verhindert auch den Befall trockener Nahrungsmittel durch Käfer oder andere Insekten. Verpacken Sie Nahrungsmittel stets so frisch wie möglich. Beachten Sie jedoch bitte, dass sich nicht alle Nahrungsmittel zum Verpacken eignen. Vakuumverpacken Sie niemals Knoblauch oder Pilze.
  • Seite 14: Fehlerbehebung

    Reinigung und Pflege • Ziehen Sie den Netzstecker vor der Reinigung aus der Steckdose. • Reinigen Sie das Gerät regelmäßig mit einem feuchten Tuch und milder Seife, um Krümel, Staub und Rückstände zu entfernen. FEHLERBEHEBUNG Unter den richtigen Bedingungen liefert Ihnen der Vakuumierer beste Vakuumleistung. In einigen Fällen kann es zu Problemen kommen.
  • Seite 15: Fehlermeldungen

    Der Vakuumbeutel hält das Vakuum nach dem Verschweißen nicht • Scharfkantige oder spitze Produkte können den Beuteln kleine Löcher zufügen. Schützen Sie scharfe Kanten mit Küchentüchern und vakuumieren Sie mit einem neuen Beutel. • Einige Früchte oder Gemüsesorten können Gase freigeben, wenn sie vor dem Verpacken nicht korrekt blanchiert oder eingefroren wurden.
  • Seite 16: Hinweise Zur Entsorgung

    Code Mögliche Ursache Lösungsansatz Überprüfen Sie, ob die Abdeckung geschlossen ist; Wenn das Gerät in den Überprüfen Sie, ob der Verschweißbetrieb schaltet, Mikro-Schalter korrekt sitzt schließt der Mikro-Schalter nicht. und funktioniert (GAS1 Verbindungsdraht, Mikro-Schalter, 10P Datenkabel usw.) HINWEISE ZUR ENTSORGUNG Befindet sich die linke Abbildung (durchgestrichene Mülltonne auf Rädern) auf dem Produkt, gilt die Europäische Richtlinie 2012/19/EU.
  • Seite 17 Dear Customer, Congratulations on purchasing this equipment. Please read this manual carefully and take care of the following hints to avoid damages. Any failure caused by ignoring the items and cautions mentioned in the instruction manual is not covered by our warranty and any liability. Scan the QR code to get access to the latest user mannual and other information about the product CONTENT...
  • Seite 18: Safety Instructions

    SAFETY INSTRUCTIONS • Before plugging cord into wall outlet, or disconnecting, make sure the control is OFF, and unplug from outlet when not in use or before cleaning • This appliance is not a toy, when used by or near children close attention is necessary, and store this appliance to a safe place, out of the reach of children.
  • Seite 19: Notes On Vacuuming

    NOTES ON VACUUMING Vacuum packaging extends the life of foods by removing most of the air from sealed containers and prevents fresh air escaping into the sealed containers, thereby reducing oxidation. Vacuum packaging helps preserve flavor and overall quality. It also helps inhibit the growth of aerobic microorganisms, which can lead to the problems noted below under certain conditions: Mold –...
  • Seite 20: Product Overview

    PRODUCT OVERVIEW Vacuum lid Control panel CONTROL PANEL AND KEY FUNCTIONS...
  • Seite 21 Power Button (Power) When the machine is connected to the power, the LED display (G) will show OFF. Press the Power button and the LED display (G) will show the preset sealing time (or marinating time) and then the preset vacuum degree. The machine is now ready to work.
  • Seite 22: Preparation

    PREPARATION Getting Started with Vacuum Packaging • Package only fresh foods. Do not package old or rancid foods. An already bad product does not improve with vacuum packaging. • Fresh foods (Meats, vegetables, cheeses, etc.) should be refrigerated at 34˚F or below or frozen after vacuum packaging.
  • Seite 23: Operation

    OPERATION Startup • Read the user manual carefully before use. • Plug into grounded power socket. • Open the lid, press the Power button and the machine is ready to work. The LED display will show the most recently used working mode. Now the machine can be used for vacuum packing.
  • Seite 24 Working Process (Vacuum-Seal) • Close the lid and press the Start button. The bag is now ready for Vacuum-Seal. • The pump will start to work. The indicator light of the preset vacuum degree will start to flash (when the vacuum degree reaches the preset degree, the indicator light will stop flashing).
  • Seite 25 Set Vacuum Degree Press Vacuum Level and select the vacuum degree needed. There are 6 options: Max (29.3 inHg), High (29.0 inHg), Medium (27.5 inHg), Low (26.0 inHg), Minimum (23.5 inHg) and Adjustable. The relevant indicator light will be on according to the selected vacuum degree. If you select the Adjustable option, press the “+”...
  • Seite 26: Storage Of Vacuum-Packed Foodstuffs

    Working Process (Vacuum-Marinate) • Close the vacuum lid and the machine will start to run and enter Vacuum- Marinate mode. One cycle takes 9 minutes; the maximum number of cycles is 1 1 (99 minutes). The process is as follows: vacuum—keep vacuum—release.
  • Seite 27 Dry foods like pasta, cereals and flour will stay fresh from start to finish. Vacuum packaging also prevents weevils and other insects from infesting dry goods. Package only the freshest foods possible. However, please keep in mind that not all foods benefit from vacuum packaging.
  • Seite 28: Troubleshooting

    Cleaning and Care • Unplug before cleaning. • Regularly clean the appliance with a damp cloth and mild soap to remove crumbs, dust and debris. TROUBLESHOOTING Under the proper circumstances, your vacuum sealer will give you top-notch vacuum performance. In some instances, problems may arise. Please consult the troubleshooting menu before calling customer support.
  • Seite 29: Error Codes

    Vacuum pouch loses vacuum after being sealed • Sharp items can puncture small holes in pouches. To prevent this, cover sharp edges with paper towel and vacuum in a new pouch. • Some fruits and vegetables can release gases (out-gassing) if not properly blanched or frozen before packaging.
  • Seite 30: Hints On Disposal

    Code Possible Cause Suggested Solution Check if the vacuum lid is closed; When the machine enters Seal Check if the micro-switch is mode, the micro-switch does not correctly fitted and functioning close. (GAS1 connecting wire, micro- switch, 10P data cable, etc.) HINTS ON DISPOSAL According to the European waste regulation 2012/19/EU this symbol on the product or on its packaging indicates that this...
  • Seite 31 Estimado cliente: Le felicitamos por la adquisición de este producto. Lea atentamente el siguiente manual y siga cuidadosamente las instrucciones de uso con el fin de evitar posibles daños. La empresa no se responsabiliza de los daños ocasionados por un uso indebido del producto o por haber desatendido las indicaciones de seguridad.
  • Seite 32: Indicaciones De Seguridad

    INDICACIONES DE SEGURIDAD • Asegúrese de que el aparato está apagado antes de conectar el enchufe a la toma de corriente. Cuando no utilice el aparato y antes de su limpieza, desconecte el enchufe de la toma de corriente. • Asegúrese de que los niños no juegan con el aparato y manténgalo fuera de su alcance.
  • Seite 33: Instrucciones Para El Envasado Al Vacío

    INSTRUCCIONES PARA EL ENVASADO AL VACÍO El envasado al vacío prolonga el tiempo de conservación de los alimentos, ya que elimina casi por completo el aire de los envases sellados y evita la entrada de aire, lo que ralentiza el proceso de oxidación. El envasado al vacío conserva el sabor y la calidad en general.
  • Seite 34: Vista General Del Aparato

    VISTA GENERAL DEL APARATO Tapa Panel de control PANEL DEL CONTROL Y FUNCIONES DE LAS TECLAS...
  • Seite 35 Interruptor de encendido/apagado (corriente) Cuando el aparato está conectado a la red eléctrica, la pantalla LED (G) muestra OFF. Presione el interruptor de encendido/apagado y la pantalla LED (G) mostrará el tiempo de soldadura preestablecido (o tiempo de marinado) y el nivel de vacío preestablecido. El aparato está listo para funcionar.
  • Seite 36: Preparación

    PREPARACIÓN Instrucciones para el envasado al vacío • Empaque sólo alimentos frescos. No empaque productos viejos o descompuestos. Una calidad que ya es deficiente no puede ser mejorada por el envasado al vacío. • Los alimentos frescos (carne, vegetales, queso, etc.) deben ser refrigerados o congelados después de envasarlos al vacío a 1 C o menos.
  • Seite 37: Funcionamiento

    FUNCIONAMIENTO Puesta en marcha • Lea atentamente el manual del usuario antes de utilizarlo. • Conecte la clavija de alimentación a un enchufe conectado a tierra. • Abra la tapa, pulse el interruptor de encendido/apagado y el dispositivo estará listo para funcionar. La pantalla LED muestra el último modo de funcionamiento utilizado.
  • Seite 38 Proceso de trabajo (selladura al vacío) • Cierre la tapa y pulse el botón de inicio. Ahora la bolsa está lista para ser sellada al vacío. • La bomba empieza a funcionar. La luz indicadora del nivel de vacío seleccionado empieza a parpadear (la luz indicadora deja de parpadear cuando el nivel de vacío alcanza el nivel ajustado).
  • Seite 39 Seleccione el nivel de vacío Presione el nivel de vacío y seleccione el nivel de vacío. Hay 6 posibilidades para elegir: Max (29.3 inHg), Alto (29.0 inHg), Medio (27.5 inHg), Bajo (26.0 inHg), Mínimo (23.5 inHg) y Ajustable. El nivel de vacío se indica con la luz indicadora correspondiente.
  • Seite 40: Almacenamiento De Productos Alimenticios Envasados Al Vacío

    Proceso de trabajo (Marinado al vacío) • Cierre la tapa y la unidad cambiará al modo de marinado. Una operación de trabajo dura 9 minutos; el número máximo de operaciones es 1 1 (99 minutos). El proceso incluye: Crear vacío - Mantener el vacío - Soltar.
  • Seite 41 Los alimentos secos como la pasta, el grano y la harina permanecen frescos desde el inicio hasta el final. El envasado al vacío también evita la infestación de escarabajos y otros insectos en los alimentos secos. Siempre envase los alimentos lo más fresco posible, pero tenga en cuenta que no todos los alimentos son adecuados para el envasado.
  • Seite 42: Solución De Problemas

    Limpieza y cuidado • Desenchufe el cable de alimentación antes de limpiarlo. • Limpie la máquina regularmente con un paño húmedo y jabón suave para eliminar migas, polvo y residuos. SOLUCIÓN DE PROBLEMAS En las condiciones adecuadas, la máquina de envasado al vacío le ofrece el mejor rendimiento de vacío.
  • Seite 43: Mensajes De Error

    La bolsa de vacío no sostiene el vacío después del sellado • Los productos con bordes afilados o puntiagudos pueden añadir pequeños agujeros a las bolsas. Proteja los bordes afilados con toallas de cocina y inténtelo con una bolsa nueva. •...
  • Seite 44: Retirada Del Aparato

    Código Posible causa Solución de problema Compruebe si la tapa está cerrada; Cuando la unidad cambia al modo Compruebe si los presostatos E 02 de sellado, el microinterruptor no siguen funcionando (compruebe la se cierra. línea de conexión, el presostato, el cable de datos 10P, etc.).
  • Seite 45: Fiche Technique

    Cher client, Toutes nos félicitations pour l’acquisition de ce nouvel appareil. Veuillez lire attentivement les instructions suivantes de branchement et d’utilisation afin d’éviter d’éventuels dommages. Le fabricant ne saurait être tenu pour responsable des dommages dus au non-respect des consignes de sécurité et à la mauvaise utilisation de l’appareil.
  • Seite 46: Consignes De Sécurité

    CONSIGNES DE SÉCURITÉ • S’assurer que l’appareil est éteint avant de brancher la fiche. Débrancher l’appareil après utilisation ou avant de le nettoyer. • Veiller à ce que les enfants ne jouent pas avec l’appareil et tenir celui-ci hors de leur portée.
  • Seite 47: Remarques Sur La Mise Sous Vide

    REMARQUES SUR LA MISE SOUS VIDE L‘emballage sous vide prolonge la durée de conservation des produits alimentaires en éliminant presque complètement l‘air des récipients scellés et en empêchant la pénétration d‘air, ralentissant ainsi le processus d‘oxydation. L‘emballage sous vide préserve le goût et la qualité globale. En outre, la croissance de microorganismes aérobies, qui peut éventuellement conduire à...
  • Seite 48: Aperçu De L'appareil

    APERÇU DE L‘APPAREIL Couvercle Panneau de commande PANNEAU DE COMMANDE ET FONCTIONS DES TOUCHES...
  • Seite 49 Bouton de marche/arrêt (alimentation) Lorsque l‘appareil est branché, l‘indicateur LED (G) indique OFF. Appuyez sur l‘interrupteur marche / arrêt et l‘indicateur LED (G) affiche le temps de soudure préréglé (ou le temps de marinade) ainsi que le niveau de vide prédéfini. L‘appareil est maintenant prêt à fonctionner. Appuyez sur l‘interrupteur marche / arrêt pour remettre l‘appareil en mode veille.
  • Seite 50: Préparation

    PRÉPARATION Indications pour l‘emballage sous vide • N‘emballez que des aliments frais. Ne pas emballer des produits anciens ou gâtés. Une qualité déjà médiocre ne peut pas être améliorée par l‘emballage sous vide. • Les aliments frais (viande, légumes, fromage, etc.) doivent être réfrigérés ou congelés après conditionnement sous vide à...
  • Seite 51: Utilisation

    UTILISATION Mise en marche • Lisez attentivement le manuel avant d‘utiliser l‘appareil. • Connectez la fiche d’alimentation à une prise de courant mise à la terre. • Ouvrez le capot, appuyez sur l‘interrupteur marche / arrêt, l‘appareil est prêt à être utilisé.
  • Seite 52 Processus (soudure sous vide) • Fermez le capot et appuyez sur le bouton de démarrage. Le sachet est maintenant prêt pour le scellement sous vide. • La pompe commence à fonctionner. Le voyant du niveau de vide sélectionné commence à clignoter (lorsque le niveau de vide atteint le niveau défini, le voyant cesse de clignoter).
  • Seite 53 Réglez le degré de vide Appuyez sur le niveau de vide et sélectionnez le degré de vide. 6 choix sont possibles : Max (29,3 inHg), High (29,0 inHg), Medium (27,5 inHg), Low (26,0 inHg), Minimum (23,5 inHg) et Réglable. Le degré de vide est indiqué...
  • Seite 54: Conservation D'aliments Sous Vide

    9 minutes ; le nombre maximum d‘opérations est de 1 1 (99 minutes). Le processus comprend les étapes suivantes : établissement du vide - maintien du vide - relâchement du vide. Créer le vide et le relâcher prend 1 minute. Maintenir le vide dure environ 8 minutes.
  • Seite 55 Les légumes doivent être blanchis avant d’être emballés pour tuer toute enzyme susceptible de détériorer le vide créé par aspiration. Durées de conservation Durée type de...
  • Seite 56: Résolution Des Problèmes

    • Le temps d‘aspiration ou de scellement est insuffisant. Augmentez le temps d‘aspiration et de scellement et essayez à nouveau. • Pour faire le vide et sceller correctement, l‘ouverture du sachet doit se trouver à l‘intérieur de la chambre à vide.
  • Seite 57: Codes Erreurs

    Le sachet sous vide ne retient pas le vide après scellement • Les objets pointus peuvent percer de petits trous dans les sacs. Pour éviter cela, couvrez les bords tranchants avec une serviette en papier et faites le vide dans un nouveau sachet.
  • Seite 58: Conseils Pour Le Recyclage

    Code Cause possible Solution Vérifiez que le capot est bien fermé ; Lorsque l'appareil passe en mode Vérifiez que le micro-interrupteur scellement, le micro-interrupteur ne est bien en place et fonctionne se ferme pas. correctement (GAS1 Câble de connexion, micro-interrupteur, câble de données 10P, etc..) CONSEILS POUR LE RECYCLAGE Le pictogramme ci-contre apposé...
  • Seite 59: Dati Tecnici

    Gentile cliente, La ringraziamo per aver acquistato il dispositivo. La preghiamo di leggere attentamente le seguenti istruzioni per l’uso e di seguirle per evitare possibili danni tecnici. Non ci assumiamo alcuna responsabilità per danni scaturiti da una mancata osservazione delle avvertenze di sicurezza e da un uso improprio del dispositivo.
  • Seite 60: Avvertenze Di Sicurezza

    AVVERTENZE DI SICUREZZA • Assicurarsi che il dispositivo sia spento prima di inserire la spina nella presa. Staccare la spina in caso di inutilizzo e prima di ogni operazione di pulizia. • Prestare attenzione che i bambini non giochino con il dispositivo e conservarlo fuori dalla loro portata.
  • Seite 61 AVVERTENZE PER METTERE SOTTOVUOTO Le confezioni sottovuoto prolungano la vita degli alimenti: rimuovendo la maggior parte dell’aria da contenitori sigillati e impedendo all’aria di entrare nuovamente si riduce l’ossidazione. Il confezionamento sottovuoto favorisce il mantenimento della qualità e del sapore. Inoltre, impedisce la crescita di microorganismi aerobici, che in alcune condizioni possono causare i seguenti problemi: Muffa –...
  • Seite 62: Descrizione Del Dispositivo

    DESCRIZIONE DEL DISPOSITIVO Copertura Panello di controllo PANNELLO DI CONTROLLO E TASTI FUNZIONE...
  • Seite 63 Interruttore On/Off (corrente) Quando il dispositivo è collegato alla corrente, l’indicazione LED (G) mostra OFF. Premere l’interruttore e l’indicazione LED (G) mostra il tempo di saldatura predefinito (o tempo di marinatura) e il livello di sottovuoto. Il dispositivo è pronto all’uso. Premere l’interruttore per rimettere il dispositivo in standby.
  • Seite 64 PREPARAZIONE Istruzioni per il confezionamento sottovuoto • Confezionare solo alimenti freschi. Non confezionare prodotti vecchi o andati a male. Una cattiva qualità non viene migliorata dal confezionamento sottovuoto. • Gli alimenti freschi (carne, verdura, formaggio, ecc.) devono essere conservati a temperature di massimo 1 °C o surgelati dopo il confezionamento sottovuoto.
  • Seite 65 UTILIZZO Messa in funzione • Leggere attentamente il manuale prima dell’utilizzo. • Collegare la spina a una presa elettrica con messa a terra. • Aprire la copertura, premere l’interruttore On/Off e il dispositivo è pronto all’uso. L’indicazione LED mostra la funzione utilizzata più di recente. Ora è possibile utilizzare il dispositivo per il confezionamento sottovuoto.
  • Seite 66 Procedimento (chiusura sottovuoto) • Chiudere la copertura e premere Start. Il sacchetto è pronto per essere chiuso sottovuoto. • La pompa comincia a lavorare. L’indicazione luminosa del livello di sottovuoto selezionato comincia a lampeggiare (quando si raggiunge il livello impostato, l’indicazione smette di lampeggiare. La cifra nell’indicazione LED conta da 0 fino al livello di sottovuoto impostato (raggiunti 5 e 19 viene emesso un segnale acustico).
  • Seite 67 Selezionare un livello di sottovuoto Premere il livello di sottovuoto e selezionarne uno. Sono disponibili 6 opzioni: Max (29,3 inHg), Alto (29,0 inHg), Medio (27,5 inHg), Basso (26,0 inHg), Minimo (23,5 inHg) e Impostabile. Il livello di sottovuoto viene indicato dalla relativa indicazione luminosa.
  • Seite 68 Procedimento (marinatura sottovuoto) • Chiudere la copertura e il dispositivo passa in modalità di marinatura. Un processo dura 9 minuti; il numero massimo di processi è 1 1 (99 minuti). Il processo comprende: creazione del sottovuoto – Mantenimento del sottovuoto – Rilascio. La creazione e il rilascio del sottovuoto richiedono 1 minuto.
  • Seite 69 Alimenti secchi come pasta, cereali e farina restano freschi dall’inizio alla fine. Il confezionamento sottovuoto impedisce anche che gli alimenti secchi vengano intaccati da insetti. Confezionate sempre i vostri alimenti quando sono il più freschi possibile. Tenere presente che non tutti gli alimenti sono adatti a questo tipo di confezionamento. Non confezionare mai sottovuoto funghi o aglio.
  • Seite 70: Correzione Degli Errori

    Pulizia e manutenzione • Staccare la spina prima della pulizia. • Pulire regolarmente il dispositivo con un panno umido e un sapone delicato, in modo da rimuovere briciole, polvere e residui. CORREZIONE DEGLI ERRORI Tra le condizioni adeguate, la macchina offre la migliore potenza per la realizzazione di sottovuoto.
  • Seite 71: Avvisi Di Errore

    Il sacchetto non rimane sottovuoto • Prodotti taglienti o appuntiti possono formare piccoli buchi nel sacchetto. Coprire i bordi taglienti con tovaglioli e mettere sottovuoto con un nuovo sacchetto. • Alcuni tipi di frutta e verdura possono rilasciare gas se non vengono sbollentati o se erano surgelati prima del confezionamento sottovuoto.
  • Seite 72: Smaltimento

    Codice Possibile causa Soluzioni Controllare che la copertura sia chiusa; Quando il dispositivo passa in Controllare che il micro modalità di saldatura, il micro interruttore sia posizionato e interruttore non si chiude. funzioni correttamente (cavo di collegamento GAS1, micro interruttore, dato cavo 10P, ecc.) SMALTIMENTO Se sul prodotto è...

Inhaltsverzeichnis