Herunterladen Inhalt Inhalt Diese Seite drucken

Werbung

Verfügbare Sprachen

Verfügbare Sprachen

Divido wall thermostatic mixer
EN
INSTRUCTION GUIDE
Divido termosztátos fali csap
HU
ÖSSZESZERELÉSI ÚTMUTATÓ
Divido Wandthermostatmischer
DE
AUFBAUANLEITUNG
Mitigeur thermostatique mural Divido
FR
Guide d'instruction
ACS0193

Werbung

Inhaltsverzeichnis
loading

Inhaltszusammenfassung für Wellis Divido

  • Seite 1 Divido wall thermostatic mixer INSTRUCTION GUIDE Divido termosztátos fali csap ÖSSZESZERELÉSI ÚTMUTATÓ Divido Wandthermostatmischer AUFBAUANLEITUNG Mitigeur thermostatique mural Divido Guide d’instruction ACS0193...
  • Seite 2 Feature of Divido wall thermostatic mixer Small size. Easy-installation in solid and cavity wall. The Pre-embedded part (E-box) and control valve are installed separately, so that it can avoid any damage on the chrome surface. The Pre-embedded part (E-box) and control valve can be purchased separately. It is special good for project of contractor.
  • Seite 3: Preparation Before Installation

    Preparation before installation The control valve can be installed only after the E-box has been installed. For the installation of the E-box, please refer to the installation guide of E-box. Water pressure: 0.05 Mpa- 1.0 Mpa Best performance at: 0.05 Mpa-1.0 Mpa Temperature: 5°...
  • Seite 4 As shown in the photo, put the sealing ring first, then the plastic gasket. Fix the plastic gasket with Allen head screw. Please adjust the plastic gasket in the right position before tightening the screw. Install the chrome plate as shown above. Make sure that don’t miss the sealing ring.
  • Seite 5: Switch Function

    Switch function Switch function image: Temperature adjustment function: When the temperature of water under 38°C , adjustment was shown in pic 1; When the temperature of water above 38°C, press the button and then to adjust the temperature of water (shown in pic 2). Maintenance Clean with water and dry it with soft cloth.
  • Seite 6 A Divido termosztátos fali csap jellemzői Kis méret. Tömör és üreges falra egyaránt könnyen szerelhető. Az Előre beágyazott elem (E-box) és a szabályzószelep külön szerelendő, elkerülve ezzel a krómfelület sérülését. Az Előre beágyazott elem (E-box) és a szabályzószelep külön-külön is kapható. Ez vállalkozói projektek számára különösen előnyös.
  • Seite 7: Összeszerelési Útmutató

    Szerelés előtti előkészületek A szabályzószelepet csak az E-box után lehet beszerelni. Az E-box szereléséhez, kérjük, nézze át az E-box szerelési útmutatóját. Víznyomás: 0.05 Mpa- 1.0 Mpa Legjobb teljesítmény: 0.05 Mpa-1.0 Mpa Hőmérséklet: 5° C-90° C Összeszerelési útmutató Zárja el a vízvezetéket. Szerelje ki a zárólemezt az E-box-ból, majd helyezze a termosztátos szabályzószelepet az E-box-ba a...
  • Seite 8: Használati Útmutató

    Az ábra szerint először helyezze be a zárógyűrűt, azután a műanyag tömítést. Rögzítse a műanyag tömítést az imbuszkulccsal. Kérjük, állítsa a tömítést a helyes pozícióba mielőtt meghúzná a csavart. Helyezze fel a krómlapot a képen látható módon. Ügyeljen rá, hogy ne hagyja ki a zárógyűrűt.
  • Seite 9 A kapcsolók funkciói A kapcsolók funkciói a képen: Hőmérsékletszabályzó funkció: Ha a vízhőmérséklet 38°C alatt van, az első kép szerint állítsa be a hőfokot; Ha a vízhőmérséklet 38°C feletti, nyomja meg a gombot, majd tekerje el a hőmérséklet szabályzásához (második kép). Karbantartás Vízzel tisztítsa meg, majd puha ruhával törölje szárazra.
  • Seite 10: Packliste Für Steuerventil Mit Zwei-Funkti- Onen

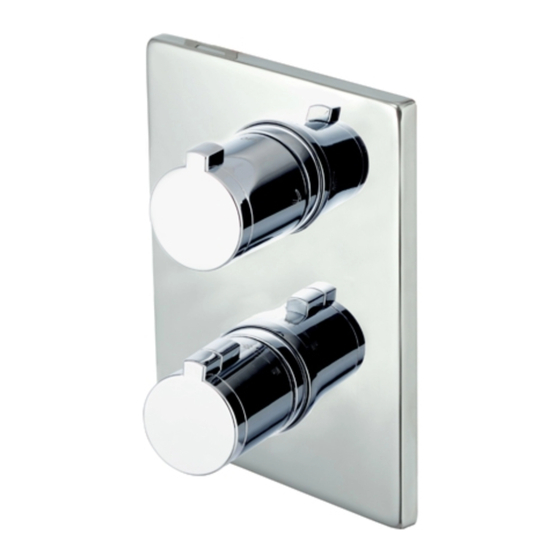
    Funktion der Divido Wandthermostatmischer Kleine Größe. Einfache Installation in Massiv- und Hohlwand. Das eingebettete Teil (E-Box) und das Steuerventil werden separat installiert, um Schäden an der Chromoberfläche zu vermeiden. Der eingebettete Teil (E-Box) und das Steuerventil können separat erworben werden.
  • Seite 11: Vorbereitung Vor Der Installation

    Vorbereitung vor der Installation Das Steuerventil kann erst installiert werden, nachdem die E-Box installiert wurde. Informationen zur Installation der E-Box finden Sie in der Installationsanleitung der E-Box. Wasserdruck: 0,05 Mpa- 1,0 Mpa Beste Leistung bei: 0,05 Mpa-1,0 Mpa Temperatur: 5° C-90° C Installationsanleitung Stoppen Sie die Wasserversorgung.
  • Seite 12 Wie auf dem Foto dargestellt, setzen Sie zuerst den Dichtungsring und dann die Plastikdichtung ein. Befestigen Sie die Kunststoffdichtung mit Inbusschraube. Stellen Sie die Kunststoffdichtung vor dem Anziehen der Schraube in die richtige Position ein. Installieren Sie die Chromplatte wie oben gezeigt.
  • Seite 13: Wartung

    Schalterfunktion Schaltfunktion Bild: Temperaturanpassungsfunktion: Wenn die Wassertemperatur unter 38°C liegt, wird die Einstellung in Bild 1 dargestellt. Wenn die Wassertemperatur 38°C übersteigt, drücken Sie die Taste und dann, um die Wassertemperatur einzustellen (siehe Abbildung 2). Wartung Mit Wasser reinigen und mit einem weichen Tuch abtrocknen.
  • Seite 14 Caractéristiques de Mitigeur thermostatique mural Divido Petite taille. Installation facile dans les murs pleins et creux. La partie pré-intégrée (E-box) et la vanne de régulation sont installées séparément, de manière à éviter tout dommage sur la surface chromée. La pièce pré-intégrée (E-box) et la vanne de régulation peuvent être achetées séparément.
  • Seite 15: Préparation Avant L'installation

    Préparation avant l'installation: 1 La valve de contrôle ne peut être installée qu'après l'installation de l'E-box. Pour l'installation de l'E-box, merci de vous référer au guide d'installation de l'E-box. 2 Pression d'eau: 0,05 MPa - 1,0 MPa Meilleure performance à: 0.05 MPa-1.0 MPa Température: 5 °...
  • Seite 16 Comme indiqué sur la photo, placez d'abord la bague d'étanchéité, puis le joint en plastique. Fixez le joint en plastique avec la vis à tête hexagonale. Veuillez ajuster le joint en plastique dans la bonne position avant de serrer la vis. Installez la plaque chromée comme indiqué...
  • Seite 17: Entretien

    Fonction de commutation Changer l'image de la fonction: Fonction de réglage de la température: Lorsque la température de l’eau était inférieure à 38 ° C, le réglage a été indiqué à la photo 1; Lorsque la température de l'eau dépasse 38 ° C, appuyez sur le bouton, puis sur pour régler la température de l'eau (voir illustration 2).

Inhaltsverzeichnis