Herunterladen Inhalt Inhalt Diese Seite drucken
Reloop RMP1700RX Bedienungsanleitung

Reloop RMP1700RX Bedienungsanleitung

Professional dj usb/mp3/cd media player & recorder
Quelle: reloop.com
Inhaltsverzeichnis

Werbung

Verfügbare Sprachen

Verfügbare Sprachen

Deutsch .............................................................................02-11
English ...............................................................................12-21
Español ..............................................................................22-31
Français .............................................................................32-41
Technical Data .................................................................42-43
REV. 1.2
Bedienungsanleitung
ACHTUNG!
Lesen Sie sich vor der ersten Inbetriebnahme zur eigenen Sicher-
heit diese Bedienungsanleitung sorgfältig durch! Alle Personen,
die mit der Aufstellung, Inbetriebnahme, Bedienung, Wartung und
Instandhaltung dieses Gerätes zu tun haben, müssen entspre-
chend qualifiziert sein und diese Betriebsanleitung genau be-
achten. Dieses Produkt erfüllt die Anforderungen der geltenden
europäischen und nationalen Richtlinien, die Konformität wurde
nachgewiesen, die entsprechenden Erklärungen und Unterlagen
sind beim Hersteller hinterlegt.
Instruction Manual
CAUTION!
For your own safety, please read this operation manual carefully
before initial operation! All persons involved in the installation, set-
ting-up, operation, maintenance and service of this device must be
appropriately qualified and observe this operation manual in de-
tail. This product complies with the requirements of the applicable
European and national regulations. Conformity has been proven.
The respective statements and documents are deposited at the
manufacturer.
Mode d'emploi
ATTENTION!
Pour votre propre sécurité, veuillez lire attentivement ce mode
d'emploi avant la première utilisation ! Toutes les personnes
chargées de l'installation, de la mise en service, de l'utilisation,
de l'entretien et la maintenance de cet appareil doivent possé-
der les qualifications nécessaires et respecter les instructions
de ce mode d'emploi. Ce produit est conforme aux directives
européennes et nationales, la conformité a été certifiée et les
déclarations et documents sont en possession du fabricant.
Manual de instrucciones
¡ATENCIÓN!
En aras de su propia seguridad, ¡lea detenidamente este manual
de instrucciones antes de la primera puesta en marcha! Todas
las personas relacionadas con el montaje, la puesta en marcha,
la operación, el mantenimiento y la reparación de este equipo
deben estar correctamente cualificadas y haber leído con aten-
ción este manual de instrucciones. Este producto cumple con los
requisitos de las directivas europeas y nacionales, se ha com-
probado la conformidad y las declaraciones y los documentos
correspondientes están en posesión del fabricante.
WARNUNG!
Um Feuer oder einen elektrischen Schock zu vermeiden, setzen
Sie dieses Gerät nicht Wasser oder Flüssigkeiten aus! Öffnen Sie
niemals das Gehäuse!
WARNING!
To prevent fire or avoid an electric shock do not expose the
device to water or fluids!
Never open the housing!
ATTENTION !
Afin d'éviter un incendie ou une décharge électrique, veillez à te-
nir cet appareil à l'écart des liquides et de l'humidité ! N´ouvrez
jamais le boîtier !
¡ADVERTENCIA!
Para evitar incendios o descargas eléctricas, ¡no sumerja este
equipo en agua u otras sustancias líquidas! ¡Nunca abra la
carcasa!
Für weiteren Gebrauch aufbewahren!
Keep information for further reference!
Gardez ces instructions pour des utilisations ultérieurs!
¡Conservar para su uso posterior!
www.reloop.com
Reloop Trademark
Global Distribution GmbH
Schuckertstr. 28
48153 Muenster / Germany
© 2017
1

Werbung

Inhaltsverzeichnis
loading

Inhaltszusammenfassung für Reloop RMP1700RX

  • Seite 1 ¡Nunca abra la carcasa! Für weiteren Gebrauch aufbewahren! Keep information for further reference! Gardez ces instructions pour des utilisations ultérieurs! ¡Conservar para su uso posterior! www.reloop.com Reloop Trademark Global Distribution GmbH Schuckertstr. 28 48153 Muenster / Germany © 2017 REV. 1.2...
  • Seite 2: Inhaltsverzeichnis

    Vor Inbetriebnahme bitten wir Sie, alle Anweisungen sorgfältig zu studieren und zu befolgen. Nehmen Sie den Reloop RMP-1700RX aus der Verpackung. Bitte überprüfen Sie vor der ersten Inbetriebnahme, ob kein offensichtlicher Transport- schaden vorliegt. Sollten Sie Schäden am Stromkabel oder am Gehäuse entdecken, nehmen Sie das Gerät nicht in Betrieb und setzen Sie sich bitte...
  • Seite 3: Sicherheitshinweise

    SICHERHEITSHINWEISE ACHTUNG! Seien Sie besonders vorsichtig beim Umgang mit der Netzspannung 240 V. Bei dieser Spannung können Sie einen lebensgefährli- chen elektrischen Schlag erhalten! Bei Schäden, die durch Nichtbeachtung dieser Bedienungsanleitung verursacht werden, erlischt jeder Ge- währleistungsanspruch. Bei Sach- oder Personenschäden, die durch unsachgemäße Handhabung oder Nichtbeachtung der Sicherheitshinweise verursacht werden, übernimmt der Hersteller keine Haftung.
  • Seite 4: Aufbau

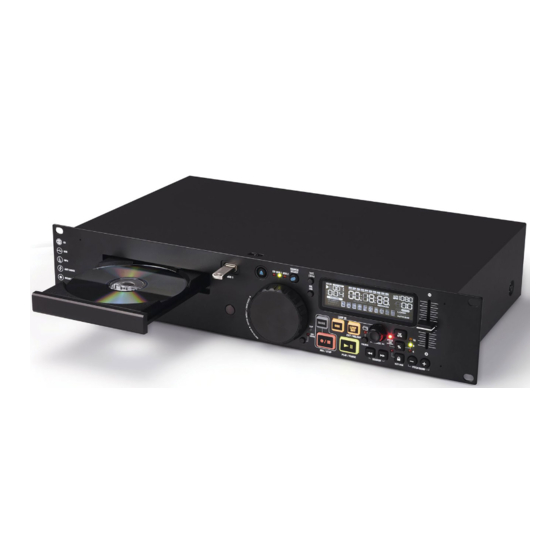
    1. AUFBAU 1.1 BEDIENELEMENTE UND ANSCHLÜSSE VORDERSEITE 1..EIN/AUS-Schalter 14..Loop Out/Exit/Reloop-Taste 2..CD-Schubfach 15..Play/Pause-Taste 3..USB1-Anschluss 16..Track Select-Encoder 4..Open/Close-Taste 17..TAP/BPM-Taste 5..Medienauswahl-Taste 18..Folder-Taste 6..Remote Control-Sensor 19.
  • Seite 5: Display

    Wenn ein Loop programmiert wurde und im Speicher liegt, so leuchtet im Display die Anzeige „Loop“ auf. Reloop-Anzeige Der zuletzt programmierte Loop kann mit der Reloop-Taste -14- wieder abgerufen und aktiviert werden. Dass der Loop aktiv ist, bestätigt das Display mit dem blinkenden Reloop-Symbol.
  • Seite 6: Geräteinstallation

    2. GERÄTEINSTALLATION • Verbinden Sie die Ausgangsbuchsen (Cinch) -29- mit den Line In Buchsen Ihres Mischpultes oder die XLR-Ausgangsstecker -28- mit Ihrer PA-Anlage. • Schließen Sie das Netzkabel -26- an Ihre Steckdose an. • Verbinden Sie eine beliebige Aufnahmequelle an die Eingansbuchsen (Cinch) -30-, um das Signal aufnehmen zu können. 3.
  • Seite 7: Geschwindigkeits-Feinregelung

    Sie ein weiteres Mal die Loop-Out-Taste -14/41- betätigen; der Player geht nahtlos in den Wiedergabe-Modus über. Mit Hilfe der Reloop-Taste -14/42- können Sie Ihren programmierten Loop aktivieren bzw. zum Loop springen. Um den nahtlosen Loop zu beenden, betätigen Sie die Loop-Out-Taste -14/41-.
  • Seite 8: Geräteeinstellungen (Submenü)

    4. GERÄTEEINSTELLUNGEN (SUBMENÜ) Durch langes Drücken der Time-Taste -8- gelangen Sie in die Geräteeinstellungen. Die Navigation erfolgt über den Track Select-Encoder -16-. Durch Drücken des Track Select-Encoders gelangen Sie in das jeweilige Untermenü. 1. Playlist Info Sofern der Database Builder (siehe Kapitel „Database Builder“ im Anhang) für das verwendete USB-Medium ausgeführt wurde, können in diesem Menü...
  • Seite 9: Anhang

    5. ANHANG 5.1 Database Builder Software Im Reloop Support-Forum (www.reloop.com/forum) können Sie im Download Center in der Kategorie „Software updates“ das Programm „Reloop Database Builder“ herunterladen. Dieses Programm analysiert den USB-Datenträger und legt spezielle Index-Dateien an, damit der Medien-Play- er schneller und einfacher auf Musikdateien zugreifen kann. Zudem hat man die Möglichkeit, nach bestimmten Kriterien wie Titel oder Interpret interaktiv zu suchen (siehe auch Kapitel „Geräteeinstellungen“, Punkt 2, „Playlist“).
  • Seite 10 2. Verwendung des Reloop Database Builders Um den Database Builder zu verwenden und Ihr USB-Speichermedium zu analysieren, gehen Sie wie folgt vor: Starten Sie das installierte Programm. Im ersten Schritt wählen Sie das gewünschte USB-Speichermedium und klicken anschließend auf die Schaltfläche „Build“.
  • Seite 11: Tipps Zur Fehlerbehebung

    Dateisystem formatiert. Bitte formatieren Sie das Medium entsprechend. Die externe USB-Festplatte benötigt Die unterstützten Dateisysteme finden Sie im mehr Strom als der Reloop Medien-Player Kapitel „Technische Daten“. Sind Sie unsicher, so hergibt. verwenden Sie den Database Builder (Kapitel „Database Builder Software“), um das Medium Es befinden sich keine kompatiblen MP3- korrekt zu formatieren.
  • Seite 12 Before operating this equipment we ask you to carefully study and observe all instructions. Please remove the Reloop RMP-1700RX from its packaging. Check before initial operation to make sure that the device has not been visibly da- maged during transport. If you detect any damage to the power cable or the casing, do not operate the device. Contact your specialised dealer.
  • Seite 13: Safety Instructions

    SAFETY INSTRUCTIONS CAUTION! Please exercise particular caution when handling the power voltage. This voltage rating may lead to a critical electrical shock! Any damage caused by the non-observance of this operation manual excludes any warranty claims. The manufacturer is not liable for any damage to pro- perty or for personal injury caused by improper handling or non-observance of the safety instructions.
  • Seite 14 1. LAYOUT 1.1 CONTROL ELEMENTS AND CONNECTIONS (PLAYER) FRONT PANEL 1..ON/OFF Button 14..Loop Out/Exit/Reloop Button 2..CD Tray 15..Play/Pause Button 3..USB 1 Port 16..Track Select Encoder 4..Open/Close Button 17.
  • Seite 15 If a loop has been set and stored it will be shown as “Loop” on the display. Reloop Display The last stored loop can be called up and activated via the Reloop Button -14-. This will be confi rmed via the blinking Reloop symbol. J) Auto Cue Display By pressing and holding the Single/Continue Button -9- for one second, the auto cue mode can be de-/activated.
  • Seite 16 2. SETUP • Connect the Outputs (RCA) -29- to the line input of your mixing console or connect the XLR Output -28- to your PA. • Connect the mains cable -26- to your power outlet. • Connect any rec source to the RCA Input -30- to be able to record the signal. 3.
  • Seite 17 The selected sequence will be repeated until the Loop-Out Button -14/41- will be pressed again; the player then returns seamlessly to playback mode. By means of the Reloop Button -14/42- you can activate the stored loop or jump to the loop respectively. In order to stop the seamless loop press the Loop-Out Button -14/41.
  • Seite 18 4. DEVICE SETTINGS (SUBMENU) By pressing the Time Button -8- for a longer period you will enter the device settings. The navigation can be carried out via the Track Select Encoder -16-. By pressing the Track Select Encoder you will enter the respective submenu. 1.
  • Seite 19 5.1 Database Builder Software In the Reloop support forum (www.reloop.com/forum) you can download the Reloop Database Builder from the Download Center in the category “Software Updates”. This software is capable of analyzing USB data carriers, creating special index files, allowing fast and easy access to music files.
  • Seite 20 2. Using the Reloop Database Builder In order to use the Reloop Database Builder and analyze your USB storage device proceed as follows: Start the installed program. As first step select the desired USB storage device and then click the “Build” button.
  • Seite 21: Possible Cause

    Please format the device correspondingly. The suppor- The external USB hard disk requires more ted file systems can be found in the chapter „Technical power than the Reloop media player is specifications“. If you are not sure use the Database able to provide.
  • Seite 22 DJs. Antes de la puesta en marcha, lea detenidamente las instrucciones y asegúrese de cumplirlas. Retire el equipo Reloop RMP-1700RX de la caja. Antes de la primera puesta en marcha, compruebe si el equipo presenta daños visibles produci- dos por el transporte. Si descubre daños en el cable de alimentación o en la carcasa, no ponga en marcha el equipo y contacte con su distribui-...
  • Seite 23: Indicaciones De Seguridad

    INDICACIONES DE SEGURIDAD ¡ATENCIÓN! Tenga extremo cuidado al manejar tensiones de red 240 V. ¡Con esta tensión puede producirse una descarga eléctrica mortal! Los daños ocasionados por el incumplimiento de este manual de instrucciones anulan el derecho a la garantía. El fabricante no se hace res- ponsable de los daños materiales o personales provocados por el manejo incorrecto del equipo o por el incumplimiento de las indicaciones de seguridad.
  • Seite 24: Estructura

    1. ESTRUCTURA 1.1 ELEMENTOS DE CONTROL Y CONEXIONES PARTE DELANTERA 1..Interruptor ON/OFF 14..Tecla Loop Out/Exit/Reloop 2..Compartimento CD 15..Tecla Play/Pause 3..Conexión USB1 16..Track Select-Encoder 4..Tecla Open/Close 17..Tecla TAP/BPM 5.
  • Seite 25: Pantalla

    Si se ha programado un Loop y está en el memora, entonces se enciende en la pantalla la visualización „Loop“. Pantalla Reloop El último Loop programado puede volver a accederse y activarse con la tecla Reloop -14-. Que el Loop está activo, lo confi rma la pantalla con el símbolo de Reloop parpadeando.
  • Seite 26: Instalación Del Dispositivo

    INSTALACIÓN DEL DISPOSITIVO • Conecte la clavija de salida (Cinch) -29- con la clavija Line In de su mesa de mezclas o del conector de salida XLR -28- con su equipo PA. • Conecte el cable de red -26- a su enchufe. •...
  • Seite 27: Regulación Precisa De La Velocidad

    Loop-Out -14/41-; el reproductor pasa al modo de reproducción hacia una transición fluida. Con ayuda de la tecla Reloop -14/42- puede activar su Loop programado o para saltar al Loop. Para terminar el Loop de forma fluida, accione la tecla Loop-Out -14/41-.
  • Seite 28: Ajustes De Dispositivo (Submenú)

    AJUSTES DE DISPOSITIVO (SUBMENÚ) Con una pulsación larga de la tecla -8- se llega a los ajustes del dispositivo. La navegación se realiza a través del die Clip-LED -25 Al presionar el Track Select-Encoder se llega al submenú correspondiente. 1. Playlist Info: Siempre que se ejecuta el Database Builder (consulte el capítulo „Database Builder“...
  • Seite 29: Anexo

    En el foro Reloop Support (www.reloop.com/forum) puede descargar en el Download Center en la categoría „Software updates“ descargue el pro- grama „Reloop Database Builder“. Este programa analiza el soporte de datos USB y coloca un archivo Index especial para que se pueda acceder de una forma más rápida y fácil a los datos de música.
  • Seite 30 2. Uso de Reloop Database Builders Para usar el Database Builder y analizar su medio de memoria USB, proceda de la siguiente forma: Inicie el programa instalado. En el primer paso seleccione el medio deseado de memoria USB y haga clic en la superficie „Build“.
  • Seite 31: Consejos Para La Solución De Errores

    Software“) para formar correctamente el medio. La placa USB fija necesita más corriente Use para su disco duro un adaptador de red ade- como el reproductor de medios Reloop. cuado. No se encuentran archivos MP3 compa- Copie archivos MP3 compatibles (consulte el capítu- tible en el medio USB.
  • Seite 32 Jockey. Avant la mise en service, nous vous prions de lire attentivement ce mode d’emploi et de respecter les instructions pendant l’utilisation. Retirez le Reloop RMP-1700RX de son emballage. Avant la première mise en service, vérifiez le bon état de l’appareil. Si le boîtier ou le câble sont...
  • Seite 33: Consignes De Sécurité

    CONSIGNES DE SÉCURITÉ ATTENTION ! Soyez particulièrement vigilant lors des branchements avec la tension secteur. Une décharge électrique à cette tension peut être mortelle ! La garantie exclu tous les dégâts dus au non-respect des instructions de ce mode d’emploi. Le fabricant décline toute responsabilité pour les dégâts matériels et personnels dus à...
  • Seite 34: Installation

    1. INSTALLATION 1.1 ÉLÉMENTS DE COMMANDE & CONNECTIQUE (LECTEUR) FACE AVANT 1..Touche Open/Close 14..Touche Loop Out/Exit/Reloop 2..Tiroir du CD 15..Touche Play/Pause 3..Port USB1 16..Track Select-Encoder 4..Touche Open/Close 17.
  • Seite 35: Affichage

    Le témoin „Loop“ indique qu‘une boucle est programmée et disponible en mémoire. Témoin Reloop La boucle mémorisée peut être activée et lue avec la touche Reloop -14-. L‘affi chage indique que la boucle est active par le clignotement du témoin Reloop.
  • Seite 36: Installation De L'équipement

    2. INSTALLATION DE L‘ÉQUIPEMENT • Raccorder les prises de sortie (coaxiales) -29- aux prises Line In de votre console de mixage ou la fiche de sortie XLR -28- avec votre sono. • Brancher le cordon secteur -26- sur une prise de courant. •...
  • Seite 37: Réglage Fin De La Vitesse

    Loop-Out, que vous pouvez décaler avec précision en tournant la Jog Wheel -7-. Pour quitter le réglage fin, appuyer sur la touche Loop-Out -14/41-. Après la définition du point Loop-Out, appuyer une fois de plus sur la touche Reloop -14- pour passer en mode d‘édition de la boucle. Vous pouvez à...
  • Seite 38: Réglages De L'appareil (Rubrique)

    4. RÉGLAGES DE L‘APPAREIL (RUBRIQUE) Enfoncer la touche Time -8- pendant quelques secondes pour accéder aux réglages de l‘appareil. La navigation s‘effectue avec le Track Select- Encoder -16-. Appuyer sur le Track Select Encoder pour accéder au sous-menu respectif. 1. Playlist Info : Étant donné...
  • Seite 39: Annexe

    5.1 Logiciel Database Builder Dans le forum d‘assistance Reloop (www.reloop.com/forum), vous pouvez télécharger le programme „Reloop Database Builder“ dans la rubrique „Software updates“. Ce programme analyse le support de données USB et créé des fichiers d‘indexation spéciaux afin que le lecteur de support puisse accéder plus rapidement et aisément aux fichiers audio.
  • Seite 40 2. Utilisation du Reloop Database Builder Procéder comme suit pour pouvoir utiliser le logiciel Database Builder et analyser votre support de données USB : Lancer le programme installé. À la première étape, sélectionner le support de données USB désiré et cliquer ensuite sur le bouton „Build“.
  • Seite 41: Conseils De Dépannage

    Ronflement. Mauvaise connexions des câbles. ,Contrôlez toutes les fiches audio. Reloop vous souhaite beaucoup de plaisir avec votre double lecteur de CD! Reloop - Solution for DJs Global Distribution GmbH, Schuckertstraße 28, 48153 Muenster, Germany, Fax +49.251.6099368,...
  • Seite 42: Technical Specification

    5.3 TECHNICAL SPECIFICATION...
  • Seite 44 Reloop Distribution Global Distribution GmbH Schuckertstr. 28 48153 Münster / Germany Fax ++49/251/6099368 Technische Änderungen vorbehalten. Alle Abbildungen ähnlich. Keine Haftung für Druckfehler. Subject to alterations. Illustrations similar to original product. Misprints excepted. Reservado el derecho para realizar modificaciones técnicas.

Inhaltsverzeichnis