Herunterladen Inhalt Inhalt Diese Seite drucken

Werbung

Verfügbare Sprachen
  • DE

Verfügbare Sprachen

  • DEUTSCH, seite 1
Luftbefeuchter
10028741
10028742

Werbung

Inhaltsverzeichnis
loading

Inhaltszusammenfassung für Klarstein 10028741

  • Seite 1 Luftbefeuchter 10028741 10028742...
  • Seite 2: Inhaltsverzeichnis

    Konformitätserklärung ..........9 Technische Daten Artikelnummer 10028741 10028742 Stromversorgung 220-240 V...
  • Seite 3: Geräteübersicht

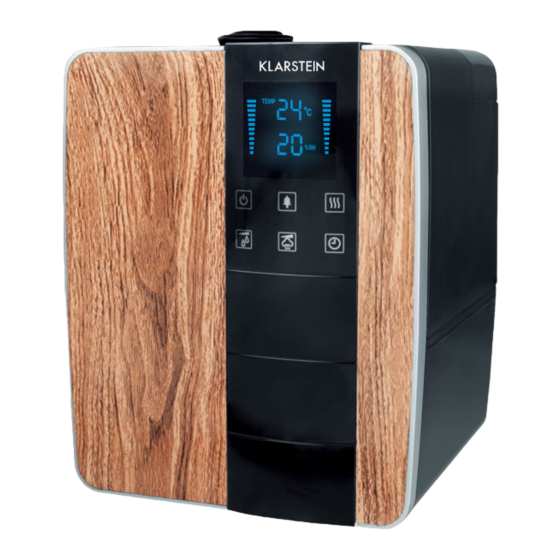
    • Schaben Sie nicht absichtlich am Ultraschallwandler. • Reinigen Sie den Wandler nicht mit scharfen Reinigungsmitteln und chemischen Lösungen. • Lassen Sie kein Wasser in die Gerätebasis spritzen, damit die Komponenten nicht beschädigt werden. • Seien Sie bei der Verwendung dieses Geräts vorsichtig, da heißer Wasserdampf austritt. •...
  • Seite 4 20 Display (7) und Fernbedienung (19) 1 Ein/Aus-Schalter 18 Gehäuse 2 Einstellen der relativen Luftfeuchtigkeit 19 Fernbedienung 3 Einstellung der Nebelintensität 20 Anzeige für: 4 Ionisierer Ein/Aus 21 eingestellte Raumfeuchtigkeit 5 Zeitschaltuhr Ein/Aus 22 Raumbefeuchter ein/aus 6 Wassererwärmung Ein/Aus 23 Ionisierer-Modus 7 Display 24 Wassertank leer 8 Deckel des oberen Ventils...
  • Seite 5: Vor Dem Ersten Gebrauch

    Vor dem ersten Gebrauch • Lassen Sie das Gerät sich für eine halbe Stunde an die Raumtemperatur anpassen. • Es wird empfohlen, das Gerät bei einer Temperatur von 20 °C und einer relativen Luftfeuchtigkeit von unter 80 % zu betreiben. •...
  • Seite 6: Bedienung

    Bedienung Bedienung: 1. Schließen Sie den Netzstecker an. 2. Schalten Sie das Gerät ein. Die Hintergrundbeleuchtung der LED geht an. Das Gerät beginnt zu funktionieren. 3. Berühren Sie das Symbol MAX-MIN, um die Dunstmenge einzustellen. Auf der Fernbedienung drücken Sie einfach die Taste für die Dunstmenge 4.
  • Seite 7: Reinigung Und Wartung

    Reinigung und Wartung Wasserwechsel: 1. Schalten Sie das Gerät aus und ziehen Sie den Netzstecker. 2. Nehmen Sie den Wassertank aus dem Gerät. 3. Öffnen Sie die Abdeckung des Wassertanks. 4. Befüllen Sie den Wassertank mit frischem Wasser. 5. Schließen Sie den Deckel und setzen Sie den Wassertank wieder vorsichtig auf das Gerät. 6.
  • Seite 8: Fehlerbehebung

    Reinigung des Filters Methode A: 1. Reinigen Sie und aktivieren Sie die Keramikkugeln nach dem Durchlauf von 1000 Liter Wasser. 2. Entfernen Sie das Filtersystem von der Tankabdeckung. 3. Legen Sie das Filtersystem für 10 Minuten in Essig ein. 4. Nehmen Sie den Filter heraus. Schütteln Sie den Essig etwas ab. 5.
  • Seite 9: Hinweise Zur Entsorgung

    Der Wassertank ist verkalkt. Den Ultraschallwandler reinigen. Zu wenig Nebel Schmutziges oder lang stehendes Den Wassertank reinigen. Frisches Wasser. Wasser nachfüllen. Resonanz im Wassertank bei Wasser nachfüllen. geringer Befüllung Merkwürdige Geräusche Das Gerät steht auf einer unebe- Stellen Sie das Gerät auf eine nen Oberfläche.
  • Seite 10: Technical Data

    Dear Customer, Congratulations on purchasing this Klarstein equipment. Please read this manual carefully and take care of the following hints on installation and use to avoid techni- cal damages. Any failure caused by ignoring the mentioned items and cautions mentioned in the operation and installation instructions are not covered by our warranty and any liability.
  • Seite 11: Appliance And Panel

    • Never touch water in the Water Basin & components in the water when the unit is in working. • Never switch on when there is no water in the water basin. • Never scrape transducer cpl at will. • Never clean transducer cpl with detergents, or chemical solutions. •...
  • Seite 12 20 Display (7) and remote control (19) 1 On/off touch button 18 Body 2 Setting the relative humidity in the room 19 Remote control 3 Setting the the mist release intensity 20 Display (7) 4 Ionization on/off 21 Room humidity/preset humidity indication 5 Timer setting 22 Humidifier on/off icon 6 Water heating on/off...
  • Seite 13: Before First Use

    Before first use • During first operation, put unit under the room temperature for half of an hour be- fore running. • It is recommended to use the unit under the temperature of 20 °C relative humidi- ty less than 80% RH. •...
  • Seite 14: Operation

    Operation Usage: 1. Plug in the socket. 2. Switch on the machine; the background light of LED will be on. The machine begins to work. 3. Touch the symbol “MAX-MIN”, you may adjust the mist volume. On the remote control, just press the button of 4.
  • Seite 15: Cleaning And Care

    Cleaning and Care Changing the water:: 1. Turn the device off and disconnect the power cord. 2. Take the water tank out of the unit. 3. Open the water tank cover. 4. Fill the tank with clear water. 5. Close the cover, and put the tank onto the base unit carefully. 6.
  • Seite 16: Trouble Shooting

    3. Put the filter system into white vinegar for about 10 minutes. 4. Take the filter system away from the white vinegar; shake for several times, clean it with clear water. 5. Make it dry. Pack it into a polybag. Keep it in a cool and shady place. Method B: 1.
  • Seite 17: Disposal Considerations

    Mist fog gathers around the There are apertures between the Dip the nozzle into water for a nozzle. nozzle and water tank. while and then fix it to the socket on the water tank. Disposal Considerations According to the European waste regulation 2002/96/EC this symbol on the product or on its packaging indicates that this product may not be treated as household waste.
  • Seite 18: Dati Tecnici

    Dichiarazione di conformità ........25 Dati tecnici Numero articolo 10028741 10028742 Alimentazione 220-240 V...
  • Seite 19: Descrizione Del Prodotto

    • Non toccare l’ a cqua e i componenti all’interno del serbatoio quando il dispositivo è in funzione. • Non mettere in funzione il dispositivo con il serbatoio vuoto. • Non graffiare il trasduttore a ultrasuoni. • Non pulire il trasduttore con detergenti aggressivi e soluzioni chimiche. •...
  • Seite 20 20 Display (7) e telecomando (19) 1 Accensione/spegnimento 18 Alloggiamento 2 Impostare l’umidità relativa 19 Telecomando 3 Impostare l’intensità della nebbia 20 Spia per: 4 Accensione/spegnimento della modalità 21 Umidità della stanza impostata ionizzazione 22 Accensione/spegnimento 5 Accensione/spegnimento del timer 23 Modalità...
  • Seite 21: Prima Del Primo Utilizzo

    Prima del primo utilizzo • Prima dell’utilizzo, lasciare che il dispositi- vo si adatti alla temperatura ambiente per mezz’ o ra. • Si consiglia di azionare il dispositivo ad una temperatura di 20°C e ad una umidità relativa inferiore all’80%. •...
  • Seite 22: Messa In Funzione

    Messa in funzione Utilizzo: 1. Inserire la spina nella presa. 2. Accendere il dispositivo. La retroilluminazione del LED si accende. Il dispositivo ora è in funzione. 3. Toccare il simbolo MAX-MIN per regolare la quantità di vapore. Sul telecomando premere il tasto 4.
  • Seite 23: Pulizia E Manutenzione

    Pulizia e manutenzione Cambiare l’acqua: 1. Spegnere il dispositivo e staccare la spina. 2. Rimuovere il serbatoio dal dispositivo. 3. Togliere il tappo del serbatoio. 4. Riempire il serbatoio con acqua pulita. 5. Chiudere il coperchio e reinserire con cautela il serbatoio nel dispositivo. 6.
  • Seite 24: Risoluzione Dei Problemi

    2. Estrarre il sistema del filtro dal tappo del serbatoio. 3. Immergere per 10 minuti il sistema del filtro nell’ a ceto. 4. Rimuovere il filtro. Agitare un po’ l’ a ceto. 5. Lavare il filtro con acqua pulita. 6. Riporre la cartuccia del filtro in un sacchetto di plastica e conservarla in un luogo fresco e lontano dai raggi del sole.
  • Seite 25: Smaltimento

    Quantità insufficiente di acqua nel Aggiungere acqua. serbatoio. Rumori insoliti. Il dispositivo non è collocato su Collocare il dispositivo su una una superficie piana. superficie stabile e piana. Immergere l’ugello in acqua per La nebbia si accumula intorno C’ è uno spazio libero tra l’ugello e un po’...
  • Seite 26: Données Techniques

    Déclaration de conformité ......... 33 Données techniques Numéro d’article 10028741 10028742 Alimentation électrique 220-240 V...
  • Seite 27: Aperçu D'appareil

    • Ne pas utiliser l’ a ppareil lorsque le réservoir d’ e au est vide. • Ne pas frotter le transducteur à ultra-son. • Ne pas nettoyer le transducteur à ultra-son avec des détergents agressifs ou des produits chimiques. • Veiller à ne pas mouiller l’intérieur de l’ a ppareil pour ne pas endommager ses composants. •...
  • Seite 28 20 Écran (7) et télécommande (19) 1 Interrupteur marche/arrêt 18 Boîtier 2 Ajuster l´humidité relative 19 Télécommande 3 Ajuster l‘intensité de la brume 20 Affichage pour: 4 Activer/désactiver l‘ionisateur 21 L’humidité préréglée 5 Activer/désactiver le minuteur 22 Activer/désactiver la déshumidification ambiante 6 Activer/désactiver le chauffage de l‘eau 23 Mode ionisateur...
  • Seite 29: Avant La Première Utilisation

    Avant la première utilisation • Laisser l’ a ppareil s’ a dapter à la température de la pièce pendant une heure et demie. • Il est conseillé de régler la température sur 20 °C et le taux d’humidité à moins de 80 %. •...
  • Seite 30: Utilisation

    Utilisation Utilisation : 1. Installer l’ a ppareil sur une surface plane. 2. Remplir le réservoir d’ e au puis le fermer avec son couvercle. 3. Insérer le réservoir d’ e au dans l’ a ppareil. 4. Brancher l’ a ppareil. 5.
  • Seite 31: Nettoyage Et Entretien

    Nettoyage et entretien Changer l’eau : 1. Éteindre et débrancher l’ a ppareil. 2. Retirer le réservoir de l’ a ppareil. 3. Retirer le couvercle du réservoir d’ e au. 4. Remplir le réservoir d’ e au avec de l’ e au claire. 5.
  • Seite 32: Résolution Des Problèmes

    3. Laisser le système de filtration tremper dans du vinaigre pendant 10 minutes. 4. Retirer le système de filtration et le secouer un peu. 5. Rincer à l’ e au claire. 6. Le placer dans un sac en plastique et le laisser dans un endroit frais et à l’ o mbre pour qu’il sèche. Méthode B : 1.
  • Seite 33: Informations Sur Le Recyclage

    Plonger le pulvérisateur pendant Il y a un espace entre le pulvéri- De la brume s’ é chappe du bas de un moment dans de l’ e au et le sateur et l’ o uverture du réservoir l’ a ppareil. fixer de nouveau à...
  • Seite 34: Datos Técnicos

    Declaración de conformidad ........41 Datos técnicos Número de artículo 10028741 10028742 Suministro eléctrico 220-240 V...
  • Seite 35: Descripción Del Aparato

    • No encienda el aparato si el depósito está vacío. • No rasque el transductor intencionadamente. • No limpie el transductor con productos de limpieza abrasivos. • No deje que el agua se filtre al interior del aparato para evitar daños en sus componentes. •...
  • Seite 36 20 Display (7) y mando a distancia (19) 1 Interruptor on/off 18 Carcasa 2 Ajuste de la humedad relativa 19 Mando a distancia 3 Ajuste de la intesidad del chorro de vapor 20 Indicadores para: 4 Ionizador on/off 21 Humedad seleccionada 5 Temporizador on/off 22 Humidificador on/off 6 Calentamiento del chorro de vapor on/off...
  • Seite 37: Antes Del Primer Uso

    Antes del primer uso • Deje que el aparato se adapte a la tempera- tura ambiente durante al menos media hora. • Se recomienda poner en marcha el aparato a una temperatura ambiente de 20 °C y con una humedad relativa inferior al 80 %. •...
  • Seite 38: Uso

    Utilización: 1. Enchufe el aparato. 2. Encienda el aparato. La lámpara LED de fondo se encenderá. El aparato comienza a funcionar. 3. Ajuste el volumen de vapor con el botón MAX-MIN de la unidad o pulsando en el mando a distancia. 4.
  • Seite 39: Limpieza Y Mantenimiento

    Limpieza y mantenimiento Cambio de agua: 1. Apague el aparato y desenchúfelo. 2. Retire el depósito de agua del aparato. 3. Abra la tapa del depósito. 4. Llene el depósito con agua limpia. 5. Coloque la tapa y vuelva a encajar el depósito en el aparato. 6.
  • Seite 40: Detección Y Resolución De Problemas

    3. Deje en remojo con vinagre el sistema de filtrado durante 10 minutos. 4. Retire el filtro de su carcasa y vierta un poco más de vinagre. 5. Enjuague el filtro con agua limpia. 6. Seque el filtro, colóquelo dentro de una bolsa de plástico y guárdelo en un lugar fresco y seco. Método B 1.
  • Seite 41: Indicaciones Para La Retirada Del Aparato

    Sumerja la boquilla en agua un El vapor se concentra alrededor de Hay un hueco entre la boquilla y el momento y fíjela en el hueco del la boquilla depósito. depósito de agua. Indicaciones para la retirada del aparato Si el aparato lleva adherida la ilustración de la izquierda (el contenedor de basura tachado) entonces rige la normativa europea, directiva 2002/96/CE.

Diese Anleitung auch für:

10028742

Inhaltsverzeichnis