Herunterladen Inhalt Inhalt Diese Seite drucken
Petsafe PIF-300-21 Betriebsanleitung
Vorschau ausblenden Andere Handbücher für PIF-300-21:
Inhaltsverzeichnis

Werbung

Verfügbare Sprachen
  • DE

Verfügbare Sprachen

  • DEUTSCH, seite 120
Operating and Training Guide
Manuel d'utilisation et de dressage
Handleiding en Africhtingsgids
Manual de adiestramiento y funcionamiento
Guida all'uso e all'addestramento
Betriebsanleitung und Trainingsanleitung
PIF-300-21
Wireless Pet Containment System™
Système anti-fugue sans fi l
Draadloos omheiningssystem
voor huisdieren
Limitador de zona sin cable
Sistema antifuga senza fi li
Drahtloses Tierrückhaltesystem
Please read this entire guide before beginning
Veuillez lire ce manuel en entier avant de commencer
Gelieve deze gids volledig door te lezen voordat u begint
Por favor, lea detenidamente este manual antes de empezar
Si prega di leggere attentamente la guida al uso prima di utilizzare il collare
Bitte lesen Sie die gesamte Betriebsanleitung vor dem Train

Werbung

Inhaltsverzeichnis
loading

Inhaltszusammenfassung für Petsafe PIF-300-21

  • Seite 1 Operating and Training Guide Manuel d’utilisation et de dressage Handleiding en Africhtingsgids Manual de adiestramiento y funcionamiento Guida all’uso e all’addestramento Betriebsanleitung und Trainingsanleitung PIF-300-21 Wireless Pet Containment System™ Système anti-fugue sans fi l Draadloos omheiningssystem voor huisdieren Limitador de zona sin cable Sistema antifuga senza fi li Drahtloses Tierrückhaltesystem...
  • Seite 2: Important Safety Information

    Therefore, if you have reason to believe that your pet may pose a danger to others or harm himself if he is not kept from crossing the boundaries, you should NOT rely solely upon the PetSafe Wireless Pet Containment System to confi ne your pet.
  • Seite 3 • Do not place anything on the top of the Transmitter or cover any ventilation holes. This may overheat the Transmitter and cause early transmit failure. • Do not place Transmitter in a closet or any other confi ned, unventilated area. www.petsafe.net...
  • Seite 4: Inhaltsverzeichnis

    To get the most protection out of your warranty, please register your product within 30 days at www. petsafe.net. By registering and keeping your receipt, you will enjoy the product’s full warranty and should you ever need to call the Customer Care Centre, we will be able to help you faster. Most importantly, PetSafe will never give or sell your valuable information to anyone.
  • Seite 5: Components

    Boundary Flags - 50 Long Contact Points Test Light Receiver Battery Operating and ® Collar with Short (PetSafe RFA-67D-1 1) Training Guide Contact Points Other Items You May Need • Pliers • Scissors • Lighter • Drill & mounting hardware •...
  • Seite 6: How The System Works

    How the System Works The PetSafe ® Wireless Pet Containment System™ has been proven safe, comfortable, and effective for all pets over 3.6 kg (8 lb). The system works by transmitting a radio signal up to 27.5 m (90 ft) in all directions.
  • Seite 7: Operating Guide

    To maximize your Pet Area, make (3ft) sure the Boundary Switch is on “High” and the Boundary Control Wall Mount Dial is set to “8” (1C). Plug Power Adapter into Power Jack and standard outlet. Turn the Transmitter on. Tabletop www.petsafe.net...
  • Seite 8: Prepare The Receiver Collar

    (RFA-67D-11) can be found at many retailers. Contact the Customer ® Care Centre or visit our web site at www.petsafe.net to locate a retailer near you. To Set the Static Stimulation Level Read all the steps below before attempting to set the Static Stimulation Level.
  • Seite 9: Battery Contact Verifi Cation

    If your pet enters the Boundary Zone or continues anywhere beyond the Pet Area, this feature limits the Static Stimulation duration to 30 seconds. In the unlikely event that your pet leaves the Pet Area, he will not receive a Static Stimulation upon return to the Pet Area. www.petsafe.net...
  • Seite 10: Adjust The Pet Area To Desired Size

    Dial is set to “8”. Plug Power Adapter into Power Jack and standard outlet. Two-Person Method Hold the Receiver Collar at your pet’s neck height (3C) with the Petsafe logo facing away from the Transmitter. Walk to the edge of the desired Pet Area. Facing away from the Transmitter, hold the Receiver Collar at the edge of the desired Pet Area (3D).
  • Seite 11: Transmitter Range Chart

    0.6 m to 1 m (2 ft to 3 ft) of the Boundary Flags. 1. Using the Test Light, with the Static Stimulation Level set at 2 or greater, hold the Receiver Collar at your pet’s neck height with the PetSafe ® logo facing away from the Transmitter.
  • Seite 12: Fit The Receiver Collar

    1. Make sure that the battery is not installed in the Receiver Collar. 2. Start with your pet standing comfortably (5A). 3. To make it easier to hear the warning beep, place the Receiver Collar on your pet with the PetSafe ®...
  • Seite 13: Training Guide

    Important: Proper training of your pet is essential to the success of the PetSafe ® Wireless Pet Containment System™. Read this section completely before beginning to train your pet. Remember that the PetSafe ® Wireless Pet Containment System™ is not a solid barrier.
  • Seite 14: Day 1 - Boundary Awareness

    4. Repeat this process at the same Boundary Flag until your pet resists going into the Boundary Zone. 5. Aim to master 3 to 4 Boundary Flags per session. Make this FUN! Praise if your pet quickly retreats or resists going into the Boundary Zone. www.petsafe.net...
  • Seite 15: Days 2 Thru 4 - Continue Boundary Awareness

    2 through 4. • Put a separate non-metallic collar on your pet’s neck ABOVE the Receiver Collar and attach a lead. Be sure the extra collar does not put pressure on the Contact Points. • Have tiny pieces of treats available. www.petsafe.net...
  • Seite 16: Days 9 Thru 14 - Supervision Off The Lead

    3. Preoccupy yourself with another task in the garden while watching your pet. 4. Should your pet escape, take the Receiver Collar off or turn the system off at the Fence Transmitter and lead him back into the Pet Area. www.petsafe.net...
  • Seite 17: Days 15 Thru 30 - Pet Monitoring

    DC source, use an inverter rated for 50 watts or more. Accessories To purchase additional accessories for your PetSafe ® Wireless Pet Containment System™, visit our website at www.petsafe.net to locate a retailer near you and for a listing of Customer Care Centre telephone numbers in your area. www.petsafe.net...
  • Seite 18: Frequently Asked Questions

    Wireless System. You must purchase an additional Wireless System? Receiver Collar for each pet. Contact the Customer Care Centre or visit our website at www.petsafe.net to locate a retailer near you. Will the Wireless System keep • No. The Wireless System is only effective on pets who wear other pets out of my garden? the Receiver Collar.
  • Seite 19 • Fixed large metal objects such as metal sheds can affect the signal by reducing the maximum range of the system at the location of the object. As a result, your pet may receive a Static Stimulation. www.petsafe.net...
  • Seite 20: Troubleshooting

    • Ensure the entire house is within the Pet Area. The Transmitter may need to be moved to adjust the Pet Area to include the entire house. • If relocating the Transmitter, remove the Receiver Collar from your pet before turning the Transmitter off. www.petsafe.net...
  • Seite 21 Collar within 1.5 m to 3 m (5 ft to 10 ft) of the Transmitter, turn the Boundary Control Dial to “8” and reset the Boundary Zone, making sure to turn the dial down slowly. www.petsafe.net...
  • Seite 22: Re-Synchronize The System

    Customer Care Centre. For a listing of Customer Care Centre telephone numbers, visit our website at www.petsafe.net. Separate collection of spent batteries is required in many regions; check the regulations in your area before discarding spent batteries.
  • Seite 23: Important Recycling Advice

    EU R&TTE regulations, could void the user’s authority to operate the equipment, and will void the warranty. Hereby, Radio Systems Corporation, declares that this PIF-300-21 Wireless Pet Containment System™ is in compliance with the essential requirements and other relevant provisions of Directive 1999/5/EC.
  • Seite 24: Consignes De Sécurité Importantes

    • En cas de rougeur ou de plaie, arrêtez d’utiliser le collier jusqu’à la guérison. • Si l’irritation persiste après 48 heures, consultez un vétérinaire. • Pour des informations supplémentaires sur les escarres et les nécroses cutanées, veuillez consulter notre site interne. www.petsafe.net...
  • Seite 25 • Ne rien poser sur le transmetteur et ne pas couvrir les aérations. Ceci pourrait provoquer une surchauffe du transmetteur et causer une défaillance prématurée de celui-ci. • Ne pas placer le transmetteur dans un placard ou dans d’autres endroits confi nés et non aérés. www.petsafe.net...
  • Seite 26 Pour bénéfi cier pleinement de votre garantie, veuillez enregistrer votre article dans les 30 jours sur le site www.petsafe.net. Grâce à cet enregistrement et en conservant le reçu, votre produit sera totalement couvert par notre garantie et si vous deviez contacter notre centre de service clientèle, nous pourrions vous aider plus rapidement.
  • Seite 27: Contenu De L'emballage

    Contenu de l’emballage Adaptateur Emetteur secteur Fanions Points de contact longs de délimitation (50) Lampe témoin Pile Collier récepteur (PetSafe ® RFA-67D-1 1) Manuel d’utilisation avec points et de dressage de contact courts Autres éléments nécessaires • Pince • Ciseaux •...
  • Seite 28: Fonctionnement

    Ce voyant signale également lorsque la pile est plate. Points de contact: administrent une stimulation statique inoffensive lorsque l’animal pénètre dans la limite de la zone. Prise d’alimentation: point de raccord entre l’adaptateur secteur et l’émetteur. L’émetteur est alimenté par une prise standard. www.petsafe.net...
  • Seite 29: Manuel D'utilisation

    Montage mural réduire la taille et la confi guration de la zone réservée à votre animal domestique (1B). Sur une table www.petsafe.net...
  • Seite 30: Préparation Du Collier Récepteur

    Remarque: n’insérez jamais la pile lorsque votre animal porte le collier récepteur. Ce processus devrait être réalisé à une distance d’1,5 m de l’émetteur. Le collier récepteur fonctionne à l’aide d’une pile jetable PetSafe ® (RFA-67D-11). Cette pile spécifi que garantit une plus grande facilité de remplacement de la pile et une meilleure étanchéité.
  • Seite 31: Vérifi Cation Du Contact De La Pile

    Si jamais votre animal entre dans les limites du périmètre ou continu au delà de la zone autorisée, cette fonction limite la stimulation électrostatique à 30 secondes Dans le cas improbable où votre animal quitte la zone autorisée, il ne recevra pas de stimulation électrostatique à son retour dans la zone autorisée. www.petsafe.net...
  • Seite 32: Ajustement De La Zone Réservée À L'animal Domestique Aux Dimensions Souhaitées

    Remarque : si la clé multifonctions ne clignote pas, rechargez la pile et testez à nouveau. Si la clé multifonctions ne clignote toujours pas, veuillez contacter le Service clientèle ou visitez notre site internet www.petsafe.net. Pour agrandir la zone autorisée, assurez-vous que le sélecteur de limite de périmètre est positionné...
  • Seite 33: Tableau De Portée De L'émetteur

    26 m à 27,5 m Notez ci-dessous vos réglages Réglage défi nitif Position défi nitive de Niveau d’intensité du commutateur de la molette de réglage de la stimulation délimitation des limites (1-8) statique (1-6) (HIGH ou LOW) Domicile Camping Vacances Autre www.petsafe.net...
  • Seite 34: Positionnement Des Fanions De Délimitation

    1. Tout en utilisant la clé multifonctions avec le niveau de stimulation électrostatique réglé sur le niveau 2 au minimum, tenez le collier-récepteur à hauteur du cou de votre animal avec le logo PetSafe ® dirigé dans la direction opposée au transmetteur.
  • Seite 35 Pour renfi ler le collier La boucle empêche que le collier ne se desserre du Boucle coulissante cou de l’animal. Les crans doivent être dirigés vers le haut. Si le collier Rayures n’est pas enfi lé comme il se doit, il se desserrera. www.petsafe.net...
  • Seite 36: Manuel De Dressage

    Jour 1: Prise de conscience des fanions de délimitation Pour cette première journée de dressage, organisez trois séances de 10 à 15 minutes chacune. Objectif: Apprendre à l’animal que les fanions de délimitation et le signal sonore d’avertissement émis par le www.petsafe.net...
  • Seite 37: Jours 2 À 4: Suite De La Prise De Conscience Des Fanions De Délimitation

    Félicitez votre chien s’il refuse vigoureusement d’aller dans la zone de limite du périmètre. PHASE 2 Jours 2 à 4: Suite de la prise de conscience des fanions de délimitation Organisez trois séances de dressage par jour, de 10 à 15 minutes chacune. www.petsafe.net...
  • Seite 38: Jours 5 À 8: Phase De Distraction

    • Tenez également le jouet favori de votre animal à portée de main. • Créez des distractions susceptibles d’attirer l’animal dans la limite de la zone, par exemple: - Demandez à l’un des membres de la famille de quitter la zone réservée à l’animal. www.petsafe.net...
  • Seite 39: Jours 9 À 14: Supervision Sans Laisse

    3. Attelez-vous à une autre tâche dans le jardin, tout en surveillant votre animal. 4. Si l’animal tente de quitter la zone qui lui est réservée, ôtez le collier récepteur et éteignez le système et l’émetteur, puis ramenez l’animal dans la zone qui lui est réservée. www.petsafe.net...
  • Seite 40: Jours 15 À 30 - Surveillance De L'animal

    Afi n de vous procurer des accessoires supplémentaires pour votre Système anti-fugue sans fi l Wireless Pet Containment System™, contactez le Service clientèle ou consultez notre site web pour connaître l’adresse du revendeur le plus proche de chez vous. Pour obtenir une liste des centres de service clientèle de votre région, consultez www.petsafe.net. www.petsafe.net...
  • Seite 41: Foire Aux Questions

    Pour ce faire, contactez notre service clientèle ou visitez notre site Web à l’adresse www.petsafe. net afi n de connaître le distributeur le plus proche. Le système sans fi l tiendra-t-il •...
  • Seite 42 • Vérifi ez une fois par chaque semaine que le collier récepteur est bien ajusté au cou de votre animal. • Le voyant lumineux du récepteur vous indique l’état de la pile et clignote toutes les 4 à 5 secondes lorsque celle-ci doit être remplacée. www.petsafe.net...
  • Seite 43: Résolution Des Problèmes

    • Vérifi ez que l’émetteur est réglé conformément aux instructions et installez une nouvelle pile à une distance maximale de 1,5 m à 3 m de l’émetteur. • Resynchronisation du système (page 46). www.petsafe.net...
  • Seite 44 à proximité de la limite de la zone ou lorsque des bruits électroniques environnants interfèrent avec le signal. Si cette situation perdure, envisagez de repositionner l’émetteur et de redéfi nir la zone réservée à l’animal. • Resynchronisation du système (page 46). www.petsafe.net...
  • Seite 45 éloignez le transmetteur du système de clôture In-Ground. • Ajustez la zone autorisée de telle façon que le collier- récepteur s’active jusqu’à environ 1,5 m au delà des limites réduites du périmètre lorsque l’on se déplace vers la clôture In-Ground. www.petsafe.net...
  • Seite 46: Resynchronisation Du Système

    équivalente obtenue en vous adressant au Service clientèle. Pour obtenir une liste des numéros de téléphone du centre de service clientèle, consultez notre site Web, www.petsafe.net. La collecte sélective des piles usagées est exigée dans de nombreux pays ; renseignez-vous sur les réglementations locales en vigueur avant d’éliminer les piles usagées.
  • Seite 47: Conformité

    R&TTE, peut annuler la capacité de l’acheteur à utiliser le dispositif et annule la garantie. Radio Systems Corporation déclare par la présente que ce PIF-300-21 Système anti-fugue sans fi l Wireless Pet Containment System™ est conforme aux exigences essentielles et autres dispositions pertinentes de la directive 1999/5/EC.
  • Seite 48: Belangrijke Veiligheidsinformatie

    – Als uitslag of een zweer worden aangetroffen, stop dan het gebruik van de halsband tot de huid geheeld is. – Als deze conditie langer dan 48 uur aanhoudt, bezoek dan uw dierenarts. – Voor aanvullende informatie over decubitus en druknecrose bezoekt u onze website. www.petsafe.net...
  • Seite 49 1, enkel piepen. • Plaats niets bovenop de zender en bedek de ventilatiegaten niet. Hierdoor zou de zender oververhit kunnen raken en voortijdig defect kunnen raken. • Plaats de zender niet in een kast of andere afgesloten, niet-geventileerde ruimte. www.petsafe.net...
  • Seite 50 Om volop van uw garantie te kunnen genieten, verzoeken wij u uw product binnen 30 dagen te registreren via www.petsafe.net. Als u uw product registreert en uw aankoopbon bewaart, heeft u volledige garantie op het product, en mocht u ooit een keer genoodzaakt zijn de klantenservice te bellen, dan zijn wij in staat u sneller te helpen.
  • Seite 51: Onderdelen

    Onderdelen Adapter Zender Lange contactpunten Grensvlaggetjes - 50 Testlampje Halsbandontvanger Batterij ® met korte (PetSafe RFA-67D-1 1) Handleiding contactpunten Wat u nog nodig hebt • Tang • Schaar • Aansteker • Boor & montagegereedschap • Meetlint • Niet-metalen halsband en leiband...
  • Seite 52: Hoe Werkt Het Systeem

    Grensschakelaar: Om de grootte van het huisdieren te regelen. Verklikkerlampje voor de stroom: Brandt als de zender aan staat. Grenscontroleknop: Om de afstand tussen de zender en het grensgebied te regelen. Opmerking: Door aan deze knop te draaien, wijzigt u het niveau van de statische Stimulans niet. www.petsafe.net...
  • Seite 53: Handleiding

    (1B). Om het huisdieren zo groot mogelijk te maken zet u de grensschakelaar op “High” en de grenscontroleknop op “8” (1C). Steek de adapter in Tegen het standaard stopcontact en zet de de wand zender aan. Op een tafel www.petsafe.net...
  • Seite 54: De Ontvangerhalsband Klaarmaken

    Bij heel wat detailhandelaars vindt u een PetSafe batterij (RFA-67D-11). Neem contact op met het ® Klantenservice of surf naar onze website: www.petsafe.net voor adressen in uw buurt. Statische Stimulans instellen Lees eerst alle onderstaande stappen door voordat u het statische Stimulans aan gaat passen.
  • Seite 55: Verifi Catie Batterijcontact

    Stimulans tot 30 seconden beperkt wordt. Mocht het gebeuren dat uw huisdier de vrije ruimte verlaat (wat onwaarschijnlijk is), dan krijgt hij geen statische Stimulans op het moment dat hij terugkeert naar de vrije ruimte. www.petsafe.net...
  • Seite 56: Geef Het Huisdieren De Gewenste Omvang

    Opmerking: Als het testlampje niet knippert, installeert u een nieuwe batterij en herhaalt de test. Neem als het testlampje nog steeds niet knippert contact op met de Klantenservice of bezoek onze website op www.petsafe.net. Om de vrije ruimte voor uw huisdier zo groot mogelijk te maken, zet u de grensschakelaar op “High”...
  • Seite 57: Tabel Van Het Zenderbereik

    26 m tot 27,5 m 12 m tot 13,5 m 26 m tot 27,5 m Noteer uw instellingen Instelling van de Stand van de Niveau van de grensschakelaar grenscontroleknop statische Stimulans (HIGH of LOW) (1-8) (1-6) Thuis Camping Vakantie Andere www.petsafe.net...
  • Seite 58: Breng De Grensvlaggetjes Aan

    1. Met het testlampje en het correctieniveau op stand 2 of hoger houdt u de ontvangerhalsband op de hoogte van de nek van uw huisdier met het PetSafe ® -logo afgekeerd van de zender. 2. Loop naar het grensgebied totdat de ontvangerhalsband piept en het testlampje knippert (4A).
  • Seite 59 8. Plaats de batterij in de ontvangerhalsband. De halsband opnieuw bevestigen Schuifgesp Door de schuifgesp gaat de halsband niet te los zitten rond de nek van uw huisdier. Randen De randen moeten omhoog gericht zijn; de halsband raakt los als hij niet goed is bevestigd. www.petsafe.net...
  • Seite 60: Trainingshandleiding

    • Zelfs als u denkt dat uw hond goed reageert op de training, dient u de hele trainingsprocedure af te werken. Herhaling is belangrijk! FASE 1 Dag 1 – Uw hond bewust maken van de aanwezigheid van de grensvlaggetjes Houd drie sessies op dag 1. Elke sessie duurt 10 tot 15 minuten. www.petsafe.net...
  • Seite 61 4. Herhaal dit proces bij dezelfde grensvlag totdat uw huisdier tegenwerkt bij het binnengaan van het grensgebied. 5. Probeer per sessie 3 tot 4 grensvlaggen te behandelen. Zorg dat dit LEUK is! Prijs uw huisdier als hij snel teruggaat of niet het grensgebied in wil gaan. www.petsafe.net...
  • Seite 62: Dag 2 Tot En Met Dag 4 - Uw Hond Verder Bewust Maken Van De Aanwezigheid Van De Grensvlaggetjes

    • Zet het statische stimulansniveau op de ontvangerhalsband op niveau 2 of hoger, afhankelijk van de reactie dat uw huisdier vertoonde van dag 2 tot 4. • Breng BOVEN de ontvangerhalsband een niet-metalen halsband aan en maak er een leiband aan vast. www.petsafe.net...
  • Seite 63: Dag 9 Tot En Met Dag 14 - Toezicht Zonder Leiband

    Tijdens deze stap mag u uw hond niet alleen laten. Doel: Uw hond zonder leiband vrij laten rondlopen in het huisdieren. Voorbereiding: Programmeer het niveau van de statische Stimulans op de ontvangerhalsband op basis van de grootte en het temperament van uw hond. www.petsafe.net...
  • Seite 64: Dag 15 Tot En Met Dag 30 - Uw Huisdier Controleren

    Opmerking: U kunt het dier ook het gebied uit dragen. Een verplaatsbaar draadloos systeem Uw Draadloos omheiningssystem voor huisdieren Wireless Pet Containment System™ van PetSafe ® volledig draagbaar. Volg opnieuw de procedure voor het opstellen (stap 1 tot en met stap 4) als u het huisdieren voor uw hond wilt verplaatsen.
  • Seite 65: Accessoires

    U moet dan wel voor elk dier een aparte met het draadloos systeem? ontvangerhalsband kopen. Via het Klantenservice of onze website www.petsafe.net komt u te weten waar u die kunt kopen. Houdt het draadloos systeem • Neen. Het draadloos systeem werkt alleen bij honden die andere honden van de ontvangerhalsband dragen.
  • Seite 66 • Neen. Neem contact op met het Klantenservice of ga naar Bestaat er een kleinere onze website www.petsafe.net voor bijkomende ideeën ontvangerhalsband of of oplossingen. een andere compatibele ontvangerhalsband die ik kan gebruiken voor het draadloos systeem? • Neem contact op met het Klantenservice of ga naar onze Als ik een vraag heb over website www.petsafe.net.
  • Seite 67 Waarom heeft mijn • De “beep only”-modus kan worden gebruikt om uw hond ontvangerhalsband een te laten wennen aan de grenslijn of voor goed afgerichte “beep only”-modus? honden die geen statische Stimulans meer nodig hebben. www.petsafe.net...
  • Seite 68: Problemen Oplossen

    Het veld kan worden beïnvloed door “elektronisch lawaai” in de omgeving, waardoor het tot 5% kan schommelen. • De plaats waar de ontvangerhalsband wordt geactiveerd, is afhankelijk van de snelheid en de oriëntering ervan wanneer uw hond het grensgebied betreedt. www.petsafe.net...
  • Seite 69 • Pas de vrije ruimte voor het huisdier aan zodat de ontvangerhalsband op een afstand van ten minste 1,5 m voorbij de verlaagde grensinstelling activeert als u naar het omheiningssysteem met draad toeloopt. www.petsafe.net...
  • Seite 70: Synchroniseer Het Systeem Opnieuw

    Voor een lijst van telefoonnummers van de klantendienst bezoekt u onze website: www.petsafe.net. Gescheiden inzameling van gebruikte batterijen is in veel landen verplicht; controleer de plaatselijke voorschriften voor afvoer van gebruikte batterijen.
  • Seite 71: Conformiteit

    Hierbij verklaart Radio Systems Corporation dat deze PIF-300-21 Draadloos omheiningssystem voor voldoet aan de essentiële vereisten en andere relevante bepalingen van Richtlijn 1999/5/EC.
  • Seite 72: Información De Seguridad Importante

    – Si se observa una herida o una úlcera, deje de usar el collar hasta que se haya curado la piel. – Si la condición persiste durante más de 48 horas vaya a ver al veterinario. – Para obtener información adicional sobre las úlceras por presión y la necrosis por presión, por favor visite nuestro sitio web. www.petsafe.net...
  • Seite 73 • No ponga ningún objeto sobre el transmisor ni cubra los orifi cios de ventilación, ya que esto podría sobrecalentar el transmisor y ocasionar un fallo de transmisión prematuro. • No ponga el transmisor en un armario ni en ningún otro lugar cerrado y exento de ventilación. www.petsafe.net...
  • Seite 74 Para obtener la mayor protección de su garantía, por favor registre su producto dentro de los 30 días posteriores a la compra en www.petsafe.net. Con el registro y conservando su recibo de compra, disfrutará de la garantía total del producto y, si tuviera necesidad de contactar con el Centro de Atención al cliente, podremos ayudarle con mayor rapidez.
  • Seite 75: Componentes

    Puntos de contacto largos Banderas de límites - 50 Luz de prueba Receptor Pila Manual de adiestramiento Collar con puntos (PetSafe ® RFA-67D-1 1) y funcionamiento de contacto cortos Otros artículos que puede necesitar • Alicates • Tijeras • Encendedor •...
  • Seite 76: Cómo Funciona El Sistema

    Luz de alimentación: Indica que el transmisor está encendido. Selector de control de límites: Ajusta la distancia desde el transmisor a la límite de la zona. Nota: El ajuste del selector no cambia el nivel de estimulación estática en el collar receptor. www.petsafe.net...
  • Seite 77: Manual De Funcionamiento

    “High” y que el Montaje de pared selector de control de límites está en “8” (1C). Conecte el adaptador de corriente a la toma de alimentación y a la salida estándar. Encienda el Encima de la mesa transmisor. www.petsafe.net...
  • Seite 78: Prepare El Collar Receptor

    Los repuestos de pilas PetSafe ® (RFA-67D-11) pueden encontrarse en muchas tiendas. Póngase en contacto con el Centro de Asistencia al Cliente o visite nuestra página Web en www.petsafe.net para localizar la tienda más cercana. Para ajustar el nivel de estimulación estática...
  • Seite 79: Verifi Cación Del Contacto De La Pila

    Si su mascota entra en la límite de la zona o sobrepasa la zona autorizada, esta función limita la duración de la corrección por electricidad estática a 30 segundos. En el improbable caso de que su mascota salga de la zona autorizada, no recibirá una corrección por electricidad estática al regresar a la zona autorizada. www.petsafe.net...
  • Seite 80: Ajuste La Zona Del Perro Al Tamaño Deseado

    Nota: si la luz de prueba no se enciende, instale una pila nueva y vuelva a realizar la comprobación. Si aun así no se enciende, póngase en contacto con el Centro de atención al cliente o visite nuestro sitio web www.petsafe.net. Para maximizar el tamaño de la zona autorizada, asegúrese de que el conmutador de límites esté...
  • Seite 81: Gráfi Ca De Alcance Del Transmisor

    26 m a 27,5 m Registre sus ajustes Ajuste del conmutador Posición de selector de Nivel de Estimulación de límites fi nal control de límites fi nal estática del receptor (HIGH o LOW) (1-8) (1-6) Casa Camping Vacaciones Otros www.petsafe.net...
  • Seite 82: Coloque Las Banderas De Límites

    1. Utilizando la luz de prueba, y con la corrección por electricidad estática en el nivel 2 o en un nivel superior, sujete el collar receptor a la altura del cuello de su mascota con el logotipo de PetSafe ® orientado en dirección opuesta al transmisor.
  • Seite 83 8. Coloque la pila en el collar receptor. Para volver a pasar el collar Broche deslizante La hebilla evita que el collar se afl oje alrededor del cuello del perro. Caballetes Los pliegues deben estar hacia arriba; el collar resbalará si no se ensarta correctamente. www.petsafe.net...
  • Seite 84: Guía De Adiestramiento

    • Aunque crea que su perro responde bien al aprendizaje, complete todo el proceso de adiestramiento. ¡Es muy importante el refuerzo! FASE 1 Día 1 – Aprendizaje de las banderas de límites Realice tres sesiones de adiestramiento el primer día, cada una que dure de 10 a 15 minutos. www.petsafe.net...
  • Seite 85: Días 2 A 4 - Continuación Del Aprendizaje De Las Banderas De Límites

    ¡Procure que esta actividad sea DIVERTIDA! Elogie a su mascota si retrocede rápidamente o se resiste a entrar en la límite de la zona. FASE 2 Día 2 a 4 - Continuación del aprendizaje de las banderas de límites www.petsafe.net...
  • Seite 86: Días 5 A 8 - Fase De Distracción

    • Tenga a mano el juguete preferido del perro. • Cree distracciones para tentar al perro a entrar en la límite de la zona, como por ejemplo: - Hacer que un miembro de la familia cruce desde dentro de la zona hacia fuera. www.petsafe.net...
  • Seite 87: Días 9 A 14 - Supervisión Sin Correa

    3. Ocúpese en alguna otra tarea en el terreno mientras presta atención al perro. 4. Si el perro se escapa, quítele el collar receptor o desconecte el sistema en el transmisor de valla y conduzca al perro de vuelta hacia la zona. www.petsafe.net...
  • Seite 88: Días 15 A 30 - Supervisión De La Mascota

    Nota: Si se instala en un vehículo o construcción metálica, el espacio máximo de la zona del animal doméstico puede reducirse. Asegúrese de extraer la pila del collar receptor antes de apagar el transmisor. Si quiere conectar el transmisor a un coche u otra fuente de CC, utilice un invertidor de 50 vatios o superior. www.petsafe.net...
  • Seite 89: Accesorios

    System™ póngase en contacto con el Centro de atención al cliente o visite nuestro sitio web para encontrar una tienda minorista próxima a usted. Para obtener un listado de los números de teléfono de los centros de atención al cliente de su zona visite nuestro sitio web en www.petsafe.net. Preguntas más frecuentes ¿Qué...
  • Seite 90 ¿Si tengo alguna pregunta • Llame al Centro de Asistencia al Cliente o visite nuestra acerca de mi sistema página Web www.petsafe.net. inalámbrico o necesito cambiar algunas piezas, dónde puedo obtener respuestas o servicio? ¿Puedo utilizar el sistema • No es recomendable utilizar ningún dispositivo de inalámbrico en un animal...
  • Seite 91: Solución De Problemas

    • Compruebe que el transmisor está instalado de acuerdo con las normas e instale una nueva pila a menos de 1,5 m a 3 m del transmisor. • Resincronización del sistema (página 94). www.petsafe.net...
  • Seite 92 “ruido electrónico” del entorno interfi ere con la señal. Si sigue produciéndose este fenómeno, considere la posibilidad de resituar el transmisor y reajustar la zona del perro. • Resincronización del sistema (página 94). www.petsafe.net...
  • Seite 93 • Ajuste la zona autorizada de forma que el collar receptor su propiedad. se active a al menos 1,5 m más allá del nivel reducido de límites al caminar hacia el sistema de contención subterráneo. www.petsafe.net...
  • Seite 94: Resincronización Del Sistema

    Centros de atención al cliente visite nuestro sitio web en www.petsafe.net. En muchas regiones del mundo, las pilas gastadas deben recogerse por separado. Compruebe las normas vigentes en su país antes de deshacerse de las pilas gastadas. Consulte la página 78 para ver instrucciones sobre cómo retirar la pila del producto y desecharla por separado.
  • Seite 95: Conformidad

    Radio Systems Corporation pueden infringir la normativa R&TTE de la UE, podrían anular la autoridad del usuario para usar el equipo y anularán la garantía. Por el presente documento, Radio Systems Corporation, declara que su sistema PIF-300-21 Limitador de zona sin cable Wireless Pet Containment System™ cumple con los requisitos esenciales y con las demás provisiones relevantes de la normativa 1999/5/EC.
  • Seite 96: Importanti Informazioni Per La Sicurezza

    – Se si rilevano arrossamenti o escoriazioni, interrompere l’uso del collare fi nché la cute non è guarita. – Se il problema si protrae oltre le 48 ore, rivolgersi a un veterinario. – Per ulteriori informazioni su piaghe e necrosi da pressione, si prega di visitare il nostro sito web. www.petsafe.net...
  • Seite 97 • Non appoggiare nulla sopra il trasmettitore né coprire le aperture di ventilazione per non surriscaldarlo causandone il guasto prematuro. • Non posizionare il trasmettitore in un armadio, uno sgabuzzino o altra area confi nata e priva di ventilazione. www.petsafe.net...
  • Seite 98 Per usufruire della copertura integrale della nostra garanzia, è necessario registrare il prodotto entro 30 giorni sul sito www.petsafe.net. Registrando il prodotto e conservando lo scontrino, potrete usufruire della garanzia completa sul prodotto e, nel caso doveste rivolgervi al centro di assistenza alla clientela, saremo in grado di aiutarvi più...
  • Seite 99: Componenti

    Punti di contatto lunghi di delimitazione - 50 Luce di prova Collare ricevitore Batteria Guida all’uso e ® con punti di contatto corti (PetSafe RFA-67D-1 1) all’addestramento Altri strumenti necessari • Pinze • Forbici • Accendino • Trapano e minuteria per il montaggio •...
  • Seite 100: Funzionamento Del Sistema

    Indicatore di accensione: Indica quando il trasmettitore è acceso. Selettore di regolazione zona di delimitazione: Regola la distanza dal trasmettitore alla zona di delimitazione. N.B.: La regolazione del selettore non modifi ca il livello di stimolazione statica sul collare ricevitore. www.petsafe.net...
  • Seite 101: Guida All'uso

    Limite sia posizionato su “High” e che il Selettore di regolazione limite sia impostato Montaggio a parete su “8” (1C). Inserire l’Adattatore di corrente nella presa “jack” e nella presa standard. Accendete il trasmettitore. Su ripiano www.petsafe.net...
  • Seite 102: Preparazione Del Collare Ricevitore

    La batteria di ricambio PetSafe ® (RFA-67D-11) è reperibile presso numerosi rivenditori. Contattate il Centro di Assistenza Clienti oppure visitate il nostro sito web www.petsafe.net per l’indirizzo del rivenditore più vicino. Come impostare il livello di stimolazione statica Prima di impostare il livello di stimolazione statica, leggere tutti i passaggi seguenti.
  • Seite 103: Verifi Ca Dei Contatti Della Batteria

    Se l’animale entra nella zona delimitata o prosegue il suo cammino oltre l’area riservatagli, questa funzionalità limita la stimolazione statica impartita a 30 secondi. Nell’improbabile eventualità che l’animale abbandoni l’area delimitata, questi non riceverà la stimolazione statica al suo ritorno nell’area riservatagli. www.petsafe.net...
  • Seite 104: Regolazione Delle Dimensioni Dell'area Di Movimento

    Nota: se la chiave multiuso non lampeggia, sostituire la batteria con una nuova e riprovare. Se la luce di prova ancora non lampeggia, contattare il Centro di Assistenza Clienti o visitare il nostro sito web: www.petsafe.net. Per estendere al massimo l’area delimitata, verifi care che l’interruttore sia impostato su “High” (Alto) e il quadrante di controllo zona di delimitazione sia regolato su “8”.
  • Seite 105: Grafi Co Area Di Copertura Del Trasmettitore

    26 m a 27,5 m 12 m a 13,5 m 26 m a 27,5 m Registrate le vostre impostazioni Impostazione fi nale Posizione fi nale Livello stimolazione Interruttore limite selettore regolazione statica ricevitore (1-6) (HIGH o LOW) limite (1-8) Casa Campeggio Vacanza Altro www.petsafe.net...
  • Seite 106: Posizionamento Delle Bandierine Di Zona Di Delimitazione

    1. Utilizzando la spia della chiave di prova con il livello di stimolazione statica impostato su un valore pari o superiore a 2, afferrare il collare ricevitore all’altezza del collo dell’animale con il logo PetSafe ® rivolto in direzione opposta a quella del trasmettitore.
  • Seite 107 8. Introdurre la batteria nel collare ricevitore. To Re-Thread the Collar Fibbia a scorrimento La fi bbia laterale impedisce al callare di allentarsi. Rilievi Gli attacchi devono essere rivolti verso l’alto. Il collare scivolerà se non è regolato correttamente. www.petsafe.net...
  • Seite 108: Guida All'addestramento

    • Anche se ritenete che il vostro animale stia rispondendo bene all’addestramento, portatelo completamente a termine. Il rafforzamento è un aspetto importante! www.petsafe.net...
  • Seite 109: Giorno 1 - Consapevolezza Delle Bandierine Di Zona Di Delimitazione

    5. Puntare alla padronanza di 3 a 4 bandierine per sessione. Fare in modo che sia DIVERTENTE! Lodare l’animale se si ritira subito o se oppone resistenza a varcare il perimetro della zona delimitata. www.petsafe.net...
  • Seite 110: Giorni Da 2 A 4 - Rafforzamento Della Consapevolezza Delle Bandierine Di Zona Di Delimitazione

    • Impostare il livello di stimolazione statica del collare ricevitore sul livello 2 o un nivel più alto in base alla reazione del cane dal giorno 2 al giorno 4. • Fate indossare al vostro animale un collare non metallico separato SOPRA il collare ricevitore ed agganciate un guinzaglio. www.petsafe.net...
  • Seite 111: Giorni Da 9 A 14 - Supervisione Senza Guinzaglio

    Durante questa fase non lasciate mai il vostro cane da solo. Obiettivo: Lasciate correre liberamente il vostro cane nell’area di movimento. Impostazione: Regolate il collare ricevitore sull’impostazione permanente appropriata per il vostro animale, in base www.petsafe.net...
  • Seite 112: Giorni Da 15 A 30 - Monitoraggio Dell'animale

    N.B.: Se l’impostazione viene eseguita dall’interno di una struttura metallica o di un veicolo, le dimensioni massime dell’area di movimento possono subire una riduzione. Assicuratevi di rimuovere la batteria www.petsafe.net...
  • Seite 113: Accessori

    Per acquistare ulteriori accessori per il Sistema antifuga senza fi li Wireless Pet Containment System™, contattare il Centro di assistenza clienti o visitare il nostro sito per trovare il rivenditore più vicino. Per un elenco dei Centri di assistenza della propria zona, visitare www.petsafe.net. Domande più frequenti Quanto tempo deve avere •...
  • Seite 114 Esiste un collare ricevitore • No. Contattate il Centro Assistenza Clienti oppure visitate il più piccolo o un altro collare nostro sito web www.petsafe.net per ulteriori idee ricevitore compatibile o soluzioni. utilizzabile con il Radiotrasmettitore? A chi posso rivolgermi per •...
  • Seite 115: Ricerca Guasti

    “Istruzioni relative alla chiave multiuso” ed utilizzatela per defi nire la zona di delimitazione. • Controllate che il trasmettitore sia impostato secondo le direzioni ed inserite una nuova batteria nel raggio di 1,5 m a 3 m dal trasmettitore. • Risincronizzare il sistema (pagina 118). www.petsafe.net...
  • Seite 116 “rumore elettronico” circostante interferisce con il segnale. Se questo continua a verifi carsi, riposizionate il trasmettitore reimpostando l’Area Riservata. • Risincronizzare il sistema (pagina 118). www.petsafe.net...
  • Seite 117 • Regolare l’ampiezza dell’area autorizzata affi nché il collare ricevitore sia attivo per almeno 1,5 m oltre l’impostazione ridotta dell’area delimitata in direzione della recinzione interrata. www.petsafe.net...
  • Seite 118: Risincronizzare Il Sistema

    Centri di assistenza clienti della propria zona, visitare il sito web www.petsafe.net. In molti paesi è obbligatorio raccogliere separatamente le batterie esaurite; controllare le norme in vigore nella propria zona prima di smaltire le batterie esaurite. Per le istruzioni su come rimuovere la batteria dal prodotto per smaltirla separatamente, vedere a pagina 102.
  • Seite 119: Conformità

    R&TTE, possono annullare il diritto dell’utilizzatore a usare l’apparecchiatura e rendere nulla la garanzia. Con il presente documento Radio Systems Corporation, dichiara che questo sistema PIF-300-21 Sistema antifuga senza fi li Wireless Pet Containment System™ è conforme ai requisiti essenziali e relative disposizioni della Direttiva 1999/5/CE.
  • Seite 120: Wichtige Sicherheitsinformation

    – Wird Hautausschlag oder eine Wundstelle vorgefunden, das Empfängerhalsband nicht verwenden, bis die Haut geheilt ist. – Wenn der Zustand länger als 48 Stunden lang anhält, Ihren Tierarzt zu Rate ziehen. – Für weitere Informationen über Druckgeschwüre und Drucknekrose besuchen Sie bitte unsere Website. www.petsafe.net...
  • Seite 121 • Platzieren Sie keine Gegenstände auf dem Sender und verdecken Sie die Belüftungsöffnungen nicht. Dadurch kann eine Überhitzung des Senders erfolgen und zu Übertragungsfehlern führen. • Stellen Sie den Sender nicht in einen Schrank oder einen anderen unbelüfteten Bereich. www.petsafe.net...
  • Seite 122 Um den größten Schutz für Ihre Garantie zu erhalten, registrieren Sie bitte Ihr Produkt innerhalb von 30 Tagen auf www.petsafe.net. Wenn Sie eine Registrierung vornehmen und die Quittung behalten, profi tieren Sie von der vollständigen Garantieleistung; und sollten Sie sich jemals an den Kundenservicezentum wenden müssen, werden wir in der Lage sein, Ihnen schneller zu helfen.
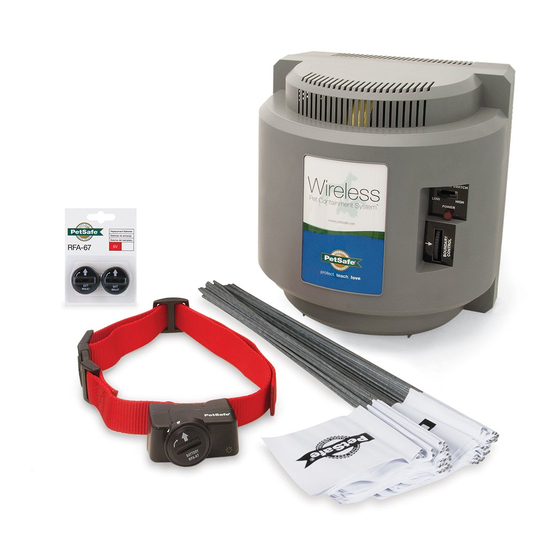
  • Seite 123: Bestandteile

    Bestandteile Stromkabel Sender 50 Markierungsfähnchen Lange Kontaktstifte Testlicht Batterie Empfängerhalsband Betriebs- und ® (PetSafe RFA-67D-1 1) mit kurzen Kontaktstiften Trainingsleitfaden Andere Dinge, die Sie eventuell benötigen • Zange • Schere • Feuerzeug • Bohrer und Handwerkszeug • Maßband • Nicht metallisches Halsband und Leine...
  • Seite 124: Wie Das System Funktioniert

    Grenzschalter: je nach gewünschter Größe des Aufenthaltsbereichs anpassen. Stromanzeige: zeigt an, ob der Sender angeschaltet ist. Begrenzungsbereichneinstellung: dient zur Einstellung der Entfernung vom Sender zur Begrenzungsbereich. Anmerkung: Drehen an der Einstellung ändert nicht die Intensität des statischen Stromreizes am Empfängerhalsband. www.petsafe.net...
  • Seite 125: Empfängerhalsband

    Um den Aufenthaltsbereich so groß wie möglich zu machen, sollten Sie den Grenzschalter auf „High“ stellen (größtmöglicher Bereich) und die Begrenzungsbereichneinstellung auf „8“ drehen (1C). Stecken Sie das Stromkabel in die Stromanschlussbuchse und in eine normale Steckdose. Stellen Sie den Sender ein. www.petsafe.net...
  • Seite 126: Das Empfängerhalsband Vorbereiten

    Eine Ersatzbatterie von PetSafe ® (RFA-67D-11) fi nden Sie bei vielen Einzelhändlern. Nehmen Sie mit dem Kundenservicezentrum Kontakt auf oder besuchen Sie unsere Webseite unter www.petsafe.net, um einen Händler in Ihrer Nähe zu fi nden. Einstellen der Intensität des statischen Stromreizes...
  • Seite 127: Überprüfung Der Batteriekontakte

    Aufenthaltsbereich des Haustieres befi ndet, wird durch diese Funktion die Dauer der statischen Korrektur auf 30 Sekunden begrenzt. In dem unwahrscheinlichen Fall, dass Ihr Haustier den erlaubten Aufenthaltsbereich des Haustieres verlässt, erhält es keine Statische Stimulation, wenn es wieder in den erlaubten Aufenthaltsbereich zurückkehrt. www.petsafe.net...
  • Seite 128: Aufenthaltsbereich Auf Gewünschte Größe Einstellen

    Hinweis: Wenn die Testleuchte nicht blinkt, setzen Sie eine neue Batterie ein und führen den Test erneut durch. Wenn die Testleuchte immer noch nicht aufl euchtet, wenden Sie sich an das Kundendienstzentrum oder besuchen Sie unsere WebPage unter www.petsafe.net. Stellen Sie zur Maximierung des erlaubten Aufenthaltsbereich des Haustieres sicher, dass der Begrenzungsschalter auf “high”...
  • Seite 129: Senderabstandstabelle

    26 m bis 27,5 m 12 m bis 13,5 m 26 m bis 27,5 m Notieren Sie Ihre Einstellungen Endgültige Einstellung Endgültige Einstellung Einstellung Grenzschalter (HIGH Begrenzungsbereich statischer Stromreiz oder LOW) (1–8) (Intensität 1–6) Zu Hause Campingplatz Urlaub Andere www.petsafe.net...
  • Seite 130: Markierungsfähnchen Aufstellen

    1.Halten Sie das Empfängerhalsband unter Verwendung der Testleuchte und der statischen Korrekturstufe auf 2 oder höher in die Höhe des Halses Ihres Haustiers, dabei soll das Logo von PetSafe ® vom Sender weg zeigen. 2. Gehen Sie in Richtung des Begrenzungsbereichs bis das Empfängerhalsband einen Piepton ausgibt und die Testleuchte aufblinkt (4A).
  • Seite 131: Das Halsband Einfädeln

    8. Setzen Sie die Batterie in das Empfängerhalsband. Das Halsband einfädeln Gleitschnalle Die Gleitschnalle verhindert, dass das Halsband sich am Hals des Hundes lockert. Zahnung Die Zahnung muss nach oben weisen. Das Halsband rutscht, wenn es nicht richtig eingefädelt ist. www.petsafe.net...
  • Seite 132: Trainingsleitfaden

    Sie das Empfängerhalsband und tragen Sie Ihren Hund oder setzen Sie ihn ins Auto, um ihn aus dem Aufenthaltsbereich zu bringen. • Auch wenn Sie glauben, Ihr Hund spräche gut auf das Training an, sollten Sie das gesamte Training abschließen. Wiederholung ist wichtig! www.petsafe.net...
  • Seite 133: Tag 1 - Markierungsfähnchen Kennen Lernen

    4. Wiederholen Sie diesen Vorgang an dem selben Begrenzungsfähnchen, bis sich Ihr Haustier weigert, den Begrenzungsbereich zu betreten. 5. Als Ziel sollten in jeder Sitzung 3 bis 4 Begrenzungsfähnchen gelernt werden. Machen Sie es mit SPASS! Loben Sie Ihr Haustier, wenn es schnell zurückgeht oder sich weigert, den Begrenzungsbereich zu betreten. www.petsafe.net...
  • Seite 134: Tag 2 Bis 4 - Markierungsfähnchen Kennen Lernen (Fortsetzung)

    • Programmieren Sie das Stimulationniveau auf dem Empfaengerhalsband auf Stufe 2 oder hoeher, abhaengig davon, wie Ihr Hund zwischen dem 2.und 4.Tag darauf reagiert. • Legen Sie ein zusätzliches nicht metallisches Halsband um den Hals Ihres Hundes und zwar OBERHALB des Empfängerhalsbands. Befestigen Sie eine Leine daran. www.petsafe.net...
  • Seite 135: Tag 9 Bis 14 - Beaufsichtigung Ohne Leine

    Größe und dem Temperament Ihres Hundes. Schritte: 1. Begeben Sie sich mit Ihrem Hund in den Aufenthaltsbereich. Der Hund trägt das Empfängerhalsband. 2. Laufen Sie im Garten herum und spielen Sie mit Ihrem Hund. Bleiben Sie dabei im Aufenthaltsbereich. www.petsafe.net...
  • Seite 136: Tage 15 Bis 30 - Haustierüberwachung

    Sie den Kundendienst oder besuchen Sie unsere Website auf www.petsafe.net, um einen Einzelhandel in Ihrer Gegend zu fi nden. Für eine Liste der Kundendienstzentren in Ihrer Nähe besuchen Sie bitte www.petsafe.net.
  • Seite 137: Häufi G Gestellte Fragen

    Nehmen Sie bitte mit dem Kundenservicezentrum Kontakt auf oder besuchen Sie unsere Webseite unter www. petsafe.net, um einen Händler in Ihrer Nähe zu fi nden. Hindert das drahtlose • Nein. Das drahtlose Funkzaunsystem funktioniert nur bei Funkzaunsystem andere Tiere Tieren, die ein Empfängerhalsband tragen.
  • Seite 138 • Nehmen Sie bitte mit dem Kundenservicezentrum Kontakt drahtlosen Funkzaunsystem auf oder besuchen Sie unsere Webseite habe oder Ersatzteile unter www.petsafe.net. benötige, wo erhalte ich dann Antworten oder Hilfe? Kann ich das drahtlose • Wir raten davon ab, bei aggressiven Hunden elektronische Funkzaunsystem bei einem Trainingsgeräte zu verwenden.
  • Seite 139: Problembewältigung

    Begrenzungsbereich verläuft. • Überprüfen Sie, dass der Sender entsprechend den Anweisungen eingestellt ist und setzen Sie innerhalb von 1,5 m bis 3 m Abstand zum Sender eine neue Batterie ein. • Synchronisieren Sie das System erneut (Seite 142). www.petsafe.net...
  • Seite 140 Begrenzungsbereich ändert, oder wenn „elektronischer Lärm“ aus der Umgebung das Signal stört. Wenn das dauerhaft der Fall ist, sollten Sie sich überlegen, den Sender zu versetzen und den Aufenthaltsbereich für den Hund neu einzustellen. • Synchronisieren Sie das System erneut (Seite 142). www.petsafe.net...
  • Seite 141 Sender weiter vom unsichtbaren Zaunsystem entfernt auf. nicht aktiviert. • Passen Sie den erlaubten Aufenthaltsbereich des Haustieres so an, dass das Empfängerhalsband mindestens 1,5 m außerhalb der verringerten Begrenzungseinstellung aktiviert wird, wenn Sie in Richtung des unsichtbaren Zauns gehen www.petsafe.net...
  • Seite 142: Synchronisieren Sie Das System Erneut

    Das Gerät wird mit einer 6-Volt-Lithium-Batterie mit 240 mAH-Kapazität betrieben. Ersetzen Sie diese nur mit einer gleichwertigen Batterie, die Sie über den Kundendienst bekommen. Für eine Liste der Telefonnummern des Kundendienstes besuchen Sie bitte unsere Website auf www.petsafe.net. In vielen Regionen ist die separate Sammlung von verbrauchten Batterien erforderlich; prüfen Sie die Bestimmungen in Ihrer Gegend, bevor Sie verbrauchte Batterien wegwerfen.
  • Seite 143: Konformität

    Systems Corporation genehmigt wurden, könnten die EU R&TTE-Richtlinien verletzen, die Autorisierung des Benutzers die Ausrüstung zu betreiben annullieren und die Garantie ungültig machen. Die Radio Systems Corporation erklärt hiermit, dass dieser PIF-300-21 Drahtloses Tierrückhaltesystem Wireless Pet Containment System™ konform mit den wesentlichen Anforderungen und anderen relevanten Vorkehrungen der Richtlinie 1999/5/EG.
  • Seite 144: Mounting Template

    Radio Systems Corporation 10427 PetSafe Way Knoxville, TN 37932 (865)-777-5404 www.petsafe.net 400-651-19/1 ©2012 Radio Systems Corporation Covered by US Patent 6,879,300; 6,921,089; 7,142,167; D515,027. Protégé par des brevets américains 6,879,300; 6,921,089; 7,142,167; D515,027. Gedekt door VS octrooien 6,879,300; 6,921,089; 7,142,167; D515,027.

Inhaltsverzeichnis