Herunterladen Inhalt Inhalt Diese Seite drucken
XTZ EDGE SA-1 Bedienungsanleitung

XTZ EDGE SA-1 Bedienungsanleitung

Edge-serie plate amplifier

Werbung

Verfügbare Sprachen

Verfügbare Sprachen

EDGE
series Subwoofers
&
SA-1 plate amplifier
MANUAL
Bedienungsanleitung
1

Werbung

Kapitel

Inhaltsverzeichnis
loading

Inhaltszusammenfassung für XTZ EDGE SA-1

  • Seite 1 EDGE series Subwoofers & SA-1 plate amplifier MANUAL Bedienungsanleitung...
  • Seite 2: Inhaltsverzeichnis

    XTZ Group AB Our concept: • Extensive development for advanced products. Gamla Nissastigen 17 • Cost-effective manufacturing & sales strategy. • Meticulous quality controls. 31441 Torup / Sweden • Reduction of intermediaries. Phone: +46(0)345-20049 Website: www.xtz.se / www.xtzsound.eu Mail: info@xtzsound.eu...
  • Seite 3: Important Safety Instructions

    DANGER! No user serviceable parts inside. Service is to be 11. Only attachments/accessories specified performed only by XTZ. manufacturer. The lightning flash with arrowhead symbol within an equilateral triangle is intended to alert the user to the presence of uninsulated “dangerous voltage” within the product’s enclosure that may be of sufficient magnitude to constitute a risk of electrical shock to persons.
  • Seite 4: Introduction

    Introduction We would like to thank you for buying the SA-1 amplifier. The electrical design of the amplifier offers the ultimate in sound reproduction. In order to utilize your new device in the best possible way, please read this manual carefully before using it for the first time. It often takes some effort and patience to make a HiFi system sound its best.
  • Seite 5: Placing The Unit

    Use short as possible signal cables of high quality to minimize resistance and impedance. Trademarks ICEpower is a registered trademark of ICEpower a/s XTZ is a trademark of XTZ Group AB Cleaning the Switch off all components of your system when cleaning any of the components. Clean surfaces with a soft dry cloth only.
  • Seite 6: Connection & Controls

    Connections & controls English...
  • Seite 7 ADVA NCED CO NTR OLS (PA RAME TRIC E QUAL IZER) - PEQ Frequen cy Ta rge t fre quency fo r filter effect. - PEQ Gain Co ntrol l i ng the l evel of cut or bo ost (-9 to + 9 dB ). - PEQ On/ Off Select b etwe e n A cti ve(On) or B yp ass(Off) mod e.
  • Seite 8 LINE IN LFE & Unbalanced RCA inputs for left and right channel. Choose the left one when using LFE signal. The left and right inputs are a sum, providing bass for both channels. L & R XLR BALANCED This is a balanced version of the LFE signal XLR BALANCED This works as a pass through for the XLR balanced signal, this makes it possible to connect several subs with one signal from the source.
  • Seite 9 Low Pass The low pass filter cuts away high frequencies at a certain point and over, the frequency point is set by the crossover variable. We recommend that when using LFE signal to turn the low pass filter off, as most receivers are handling filters internally.
  • Seite 10: Led Indicators

    Turn the Amplifier off with the main power switch, and let it rest for 10 min before you turn it back on. If the same issue occurs again, please contact XTZ personnel.
  • Seite 12: Sound Adjustments

    Sound Adjustments (EQ, Port Tuning, PEQ) This control allows you to adjust characteristics of the subwoofer to match the room and speakers in your system. EQ “equalization” aims to get as even frequency response as possible in your sound system. The subwoofer has a switch marked with “EQ”, this allows you to choose between three different EQ “Characteristics”...
  • Seite 13 The picture below shows the effects of the different EQ settings. (These curves illustrates the frequency response of a anechoic room, have in mind that the frequency response will change depending of the room and placement of the subwoofer and listing position. E.g. A setup in a regular room with the EQ 2 could have a total frequency response that extends much lower than represented in the graph below due to room gain.
  • Seite 14 Port Tuning As a part of XTZ room tuning concept, our subwoofers are often supplied with two ports and foam plugs. By using the supplied foam plugs in the bass reflex ports, you can alter the lower boundary frequency of the subwoofer. This makes it possible to alter the sound characteristics of the subwoofer.
  • Seite 15 To use this function in the best way, we recommend using a measuring equipment like the “XTZ Room Analyzer II Pro” to see how the listening area is performing. Start by Real Time Analysis (RTA) measuring (at ear height) a couple of different places in your listening spot, to see if a certain frequency range have a repeating pattern e.g.
  • Seite 16: Installation

    Installation Cables - RCA When installing your new subwoofer using unbalanced RCA connections, you should use high quality shielded coaxial cables. Poor quality cables may pickup interference and result in hum or noise. Keep the unbalanced length of cable as short as possible and route all input signal cables away from power cables to reduce the potential of induced noise.
  • Seite 17: General Guidelines

    General guidelines In most rooms, the optimum location for your subwoofer is in the closest solid front corner or somewhere along the front wall in line with your front speaker. This location typically offers optimal energy coupling with the room, front-speakers and the deepest low frequency extension, with the best high impact bass.
  • Seite 18: Connections (Noise Issues)

    Connections All connections for the subwoofer are located on the rear of the unit. Whether you choose the LFE (Low Frequency Effects) coaxial, Left & Right coaxial or XLR-input, the subwoofer is auto selecting the one input where there is signal. Multiple subwoofers When connecting multiple subwoofers, it is recommended to use the XLR pass through to the next subwoofer.
  • Seite 19: Default Subwoofer Settings

    Default subwoofer settings Home Cinema In this case, the bass management is performed by the AV Receiver or another external device. We recommend the following subwoofer settings (please use any of the Line In inputs or the XLR Balanced input.) System Crossover 170 Hz...
  • Seite 20: Calibration

    Calibration Introduction For optimal performance, you should calibrate your system to ensure proper level matching between all speakers and the proper setting of all controls (including crossover frequency, phase, and any channel delays your receiver/processor may offer). This procedure will vary depending on system configuration and the information below is provided as a basic guide to assist you.
  • Seite 21 Low subwoofer gain/trim settings (on your receiver/processor) effect the operation of the “AUTO ON/ OFF” signal sensing circuit. If your receiver/processor gain is set to a low values (e.g. attenuating the signal -6dB or more) this reduces the signal available to properly “turn on” the subwoofer when using the “AUTO ON/OFF”...
  • Seite 22 Do not hesitate to contact us at info@xtz.se for questions about settings. We are happy to assist you in optimizing your system!
  • Seite 23: Installation And Placement Tips

    Practice of sound / Installation and placement tips The following points contains common information on loudspeaker placement and installation. These are general rules, so there are exceptions. How do i achieve No matter how good the equipment is, in the wrong listening environment it will inevitably sound bad. There are some basic rules concerning a proper loudspeaker installation: the best sound? Reflections...
  • Seite 24 Speaker To achieve the best results the front speakers should be placed symmetrically in front of the listener. The distance between the front speakers should be about 80% of the distance to the listener. In other words, the Placement recommended angle between the front speakers is 45°. Finally Please remember that good sound is a matter of taste, so you have to experiment to obtain your favorite one.
  • Seite 25: Protection Circuitry

    Turn the Amplifier off with the main power switch, and let it rest for 10 min before you turn it back on. If the same issue occurs again, please contact XTZ personnel.
  • Seite 26: Technical Specifications

    Technical Specifications SA-1 Amplification type ICEpower - triple loop feedback CLASS D ® Power 1 x 700 W (1% THD, 4 Ω) Damping Factor >1500 (8 Ω, 20 - 500 Hz) Dynamic range 117 dB S/N, (A-weighted at 300 W, 4 Ω) Standby Power Consumption 0.17 W Idle Power Consumption...
  • Seite 28: Troubleshooting And Service

    Troubleshooting and service If you should experience a problem with the operation of your subwoofer, please check all of the following before seeking service. Following is a simple troubleshooting guide to assist you. NOTE 1. Verify unit is plugged in and that the power outlet used supplies the proper AC voltage & current. 2.
  • Seite 29 10. If the unit exhibits a drastic change in output sound, after you check the items above you may wish to perform the steps below to assist in troubleshooting by verifying the proper operation of both amplifier module and driver; Turn on your audio equipment, except for the subwoofer’s main power switch, which should remain “OFF”...
  • Seite 30 Equalizer Bassreflexrohre Einstellungen Parametrischer Equalizer XTZ Philosophie Unser grundlegendes Ziel ist die natürliche und harmonische Ton-Wiedergabe mit optimalem Verhältnis aus Preis, Leistung und Qualität. So können Sie Ihre Lieblingsmusik oder Ihren Lieblingsfilm voller Freude genießen und genau so erleben,wie es vom Produzenten angedacht war.
  • Seite 31: Wichtige Hinweise

    • Verwenden Sie keine chemischen Lösungen zur Reinigung der Geräte. Benutzen Sie ein sauberes, trockenes Tuch. • XTZ kann für Schäden, die aus Nichtbeachtung der folgenden Punkte resultieren, nicht haftbar gemacht werden. • Bei starken Temperaturschwankungen kann es zu Kon- dens-niederschlag (Wassertropfen) im Inneren der Lautspre- •...
  • Seite 32: Einführung

    Einführung Herzlichen Glückwunsch zum Erwerb eines XTZ-Produkts. Dieses Produkt ist äußerst leistungsfähig und wird Ihnen ein über viele Jahre andauerndes Hörvergnügen bereiten sofern es ordentlich eingestellt und be- handelt wird. Wir empfehlen daher eindringlich, diese Bedienungsanleitung zu lesen und den angegebenen Instruktionen zu folgen um maximale Leistungsfähigkeit zu erzielen.
  • Seite 33 • ICEpower ist eine eingetragene Marke der ICEpower a/s • XTZ ist eine Marke der XTZ Group AB Reinigung des Schalten Sie alle Komponenten Ihres Systems aus, wenn Sie eine der Komponenten reinigen. Reinigen Sie die Oberflächen nur mit einem weichen Tuch und gegebenenfalls Glasreiniger.
  • Seite 34: Anschlüsse & Einstellungen

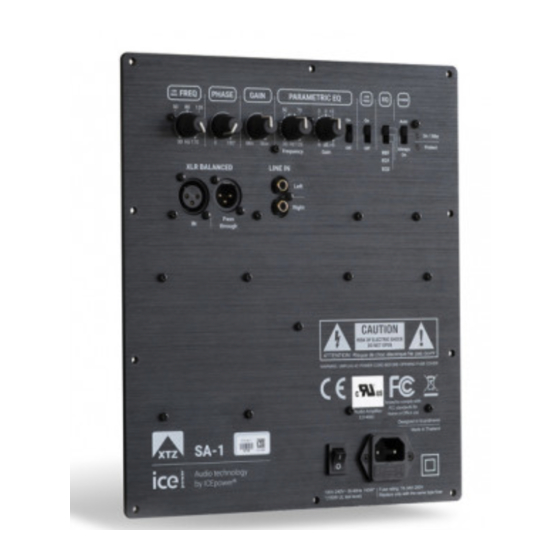
    Anschlüsse und Einstellungen Deutsch...
  • Seite 35: Stromanschluss

    For t ges chrit te ne Einste llu n g smög lichkei te n ( Para me tris c he r Equ a lizer) - PEQ Frequency Wäh le n S ie die ge wünsc hte Freq uenz aus - PEQ Gain Stellen S ie die ge wünsc ht e Pegelän derun g (-9 dB bis +9 dB) ein - PEQ On/ Off Schal ten S ie de n Parametrisc hen Equ alizer ei n oder aus...
  • Seite 36 LINE IN Cinch-Eingang für den linken und rechten Kanal. Die Signale beider Kanäle werden intern summiert. Sofern Ihr AV-Receiver nur einen Subwoofer-Ausgang verfügt, verbinden Sie diesen mit dem linken Cinch-Eingang. L & R XLR BALANCED Symmetrischer XLR-Eingang für den linken und rechten Kanal. XLR BALANCED Dieser Anschluss dient zum Durchschleifen für das symmetrische XLR-Signal, welches am XLR-Eingang anliegt, wodurch es möglich ist, mehrere Subwoofer mit einem Signal von der Quelle zu versorgen.
  • Seite 37 Low Pass Dieser Schalter aktiviert bzw. deaktiviert den Drehregler „Low Pass FREQ“. Wir empfehlen, bei Verwendung eines AV-Receivers den Schalter in die Stellung „Off“ zu stellen. Dieser Schalter erlaubt es Ihnen, zwischen drei verschiedenen Equalizer-Einstellungen zu wählen. Weitere Informationen zu den Equalizern finden Sie im weiteren Verlauf des Handbuchs. PARAMETRIC EQ In der Position "On"...
  • Seite 38 Power Wenn der Schalter in die Position „Auto“ geschaltet ist, schaltet sich der Subwoofer automatisch ein, wenn ein Audiosignal anliegt. Wenn für ca. 13 Minuten kein Signal anliegt, schaltet das Gerät in den Standby-Modus. AUTO/Always ON Wenn der Schalter in die Position „Always On“ geschaltet wird, bleibt der Subwoofer dauerhaft an und schaltet sich nicht in den Standby-Modus.
  • Seite 40: Klanganpassungsmöglichkeiten

    Klanganpassungsmöglichkeiten Equalizer Die drei vorhandenen Equalizer des Subwoofers ermöglichen es Ihnen, den Subwoofer auf Ihren Raum und Ihre persönlichen Anforderungen anzupassen. Mit Hilfe des auf der Rückseite angebrachten Schalters “EQ“ kann eine der drei im Folgenden beschriebenen Einstellungen gewählt werden. - REF Ermöglicht den maximalen Tiefgang.
  • Seite 41 Das Bild unten zeigt schematisch die Auswirkungen der verschiedenen EQ-Einstellungen. Diese Kurven zeigen den Frequenzgang in einem schalltoten Raum. Bitte berücksichtigen Sie, dass sich der Frequenzgang je nach Raum und Platzierung des Subwoofers ändert.
  • Seite 42: Bassreflexrohre Einstellungen

    Bassreflexrohre Durch die Verwendung der mitgelieferten Stopfen für die Bassreflexrohre können Sie die untere Grenzfrequenz und die Klangeigenschaften des Subwoofers ändern. Die folgende Grafik zeigt den Einfluss der vier möglichen Einstellungen Einstellungen. Generell wird bei einem oder zwei offenen Bassreflexrohen die Effizienz des Subwoofers erhöht, wodurch ein höherer Schalldruck erreicht werden kann.
  • Seite 43: Parametrischer Equalizer

    Stärke der Anhebung bzw. Absenkung mit Hilfe des „GAIN“- Drehreglers. Sie können diese Funktion nutzen, um Raummoden auszugleichen oder Basslöcher aufzufüllen. Um diese Funktion optimal nutzen zu können, empfehlen wir die Verwendung eines Akustik-Messsystems wie den "XTZ Room Analyzer II Pro". On / Off In der Position "On"...
  • Seite 44: Installation

    Sie haben die optimale Position erreicht, wenn der Klang am Hörplatz am besten ist. Falls Sie über ein akustisches Messsystem (wie z.B. den XTZ Room Analyzer II Pro) verfügen, können Sie die optimale Platzierung durch Messen der verschiedenen Positionen ermitteln.
  • Seite 45: Einstellungsempfehlung

    Einstellungsempfehlung Einstellungen Bei dieser Methode stellt der Receiver oder AVR die zentrale Schaltstelle des Systems dar und ist für das Bass-Management verantwortlich (Aufteilung des Frequenzspektrums auf Lautsprecher und Subwoofer). Heimkino-System Nutzen Sie folgende Einstellungen am Subwoofer, wenn Sie ein automatisches Einmesssystem nutzen: Frequency 170 Hz Phase...
  • Seite 46: Schutzschaltung

    Schutzschaltung Ihr neuer Subwoofer ist mit speziellen Schutzschaltungen ausgestattet, um maximale Leistung bei höchster Zuverlässigkeit zu gewährleisten. Die Schutzschaltung verhindert Überhitzung und arbeitet konstant ohne hörbar zu sein. In einigen Extremsituationen (z. B. anhaltend hohe Ausgabepegel in warmen Umgebungen) kann das Gerät vorübergehend herunterfahren. Die LED leuchtet in diesem Fall rot und zeigt das Anspringen der thermischen oder Überstromschutzschaltung an.
  • Seite 48: Technische Daten

    Technische Daten SA-1 Verstärker-Typ ICEpower - triple loop feedback CLASS D ® Leistung 1 x 700 W (1% THD, 4 Ω) Dämpfungsfaktor >1500 (8 Ω, 20 - 500 Hz) Dynamikbereich 117 dB S/N, ((A-gewichtet bei 700 W, 4 Ω) Standby Stromverbrauch 0.17 W Leerlauf Stromverbrauch 22 W...
  • Seite 49: Fehlerbehebung Und Service

    Fehlerbehebung und Service Sollten Sie ein Problem mit dem Betrieb Ihres Subwoofers haben, überprüfen Sie bitte alle folgenden Punkte, bevor Sie sich an den Kundendienst wenden. Hinweise 1. Vergewissern Sie sich, dass der Subwoofer eingesteckt ist und dass die verwendete Steckdose die richtige Wechselspannung und Stromstärke liefert.
  • Seite 50 Notes / Notizen...
  • Seite 52: Xtz Deutschland

    XTZ Group AB (Sweden) XTZ Deutschland (Germany) Gamla Nissastigen 17 Höhenstr. 7 31441 Torup / Sweden 75239 Eisingen / Deutschland Phone: +46(0)345-20049 Tel.: 07232 3225616 Mail: info@xtzsound.eu Mail: kontakt@xtz-deutschland.de SA-1 plate amplifier...

Inhaltsverzeichnis