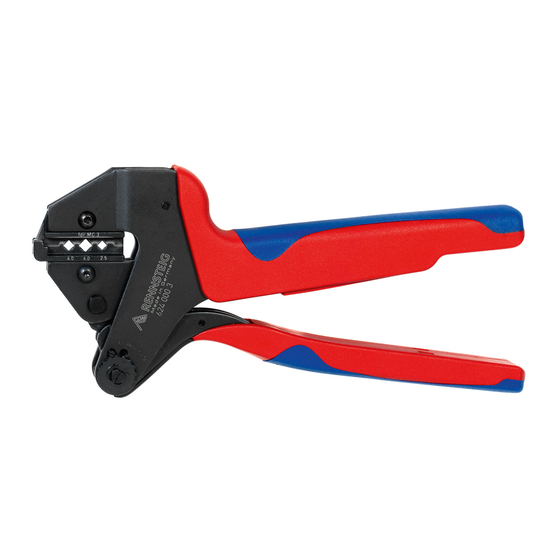
Rennsteig PEW 12 Bedienungsanleitung
Handcrimpzange
Vorschau ausblenden
Andere Handbücher für PEW 12:
- Betriebsanleitung (6 Seiten) ,
- Bedienungsanleitung (12 Seiten) ,
- Bedienungsanleitung (13 Seiten)
Installation and Removal of Dies and Positioning
Aid
Installation and Removal of Dies
Select the suitable die set.
♦
Open the tool.
♦
Loosen the die setscrew with an M4 Allen wrench.
♦
Remove the die set from the jaws, pulling it away from
♦
the tool and out of the jaws.
Insert the new die set into the jaws, tighten them up
♦
enough so you can position the top and lower dies.
Secure the dies.
Installation and Removal of the Positioning Aid
The PEW 12 Crimping System can be fitted with a positioning
aid when required.
Mounted on the side of the tool's jaws, the positioning aid can
be loosened via Allen wrench or open-end socket wrench
(positioning aid for open, non-insulated tab connectors) and
turned clockwise by the die setscrew. Reverse the sequence to
install.
Adjustment of the Jaw Spread
PEW12's crimping strength is factory set. The hand force idle travel is 130 – 180 N. The tool and die set are
designed to provide optimum crimping within this range. However, if the setting is not ideal for the connector
manufacturer's specifications (opening and torque), one of the following problems could be the reason:
a)
Wear and tear due to excessive use of the tool
b)
Worn dies
The crimping height (opening) should be regularly checked by qualified technical personnel and set as
described in the following:
CAUTION: The following steps should only be performed by qualified technicians!
(1)
Loosen the headless screw (A) with a screwdriver.
A
(2)
Turn the dial counter (B) clockwise (+) to increase the
crimping force. This also reduces the jaw spread.
(3)
Turn the dial clockwise (-) to reduce the strength of the
crimping force. This also increases the jaw spread. Do exceed
180 N.
(4)
After changing the setting, make sure the headless screw is
adequately tightened.
B
Maintenance
Before using the crimping tool, make sure it is in a clean and proper operating state. Always remove crimping
residue. Protect the joints from soiling and apply light machine oil to them regularly. Check the bolts regularly
to ensure that the lock washers and headless screw, securing the adjustment dial, are intact and tight. All
other maintenance should be performed by the manufacturer.
Adjustment of the crimping strength possible
To avoid damage, the die set must be replaced
Bedienungsanleitung
Handcrimpzange PEW 12
Allgemeines
Die Handcrimpzange ist nach dem neuesten Stand der Technik und den anerkannten sicherheitstechnischen
Regeln hergestellt. Die Zange darf nur in technisch einwandfreiem Zustand sowie sicherheits- und
gefahrenbewusst benutzt werden und ist nur für den in der Bedienungsanleitung beschriebenen Zweck zu
verwenden.
E i n e
e i g e n m ä c h t i g e
V e r ä n d e r u n g
g e m ä ß e V e r w e n d u n g d e r H a n d c r i m p z a n g e s c h l i e ß t e i n e H a f t u n g d e s
H e r s t e l l e r s f ü r d a r a u s r e s u l t i e r e n d e S c h ä d e n a u s .
Verwendungszweck
Mit der Handcrimpzange PEW 12 können unter Einsatz verschiedener Crimpmatrizen die unterschiedlichsten
Crimpkontakte verarbeitet werden.
Beschreibung
Die Handcrimpzange
PEW 12 besteht aus einer Grundzange mit Stellscheibe und Notentriegelung, einem
Crimpmatrizenpaar, zwei Befestigungsschrauben für die Matrize und bei Bedarf mit einer Positionierhilfe
(Locator). Positionierhilfen können verbinderbezogen nachträglich angebracht werden. Es ist möglich, die
Crimpkraft nachträglich zu justieren (siehe auch Punkt „Einstellen der Crimphöhe"). Der Ratschenmechanismus
der Handcrimpzange besitzt 6 Raststufen. Erst nach Überwindung der letzten Raststufe öffnet die
Handcrimpzange automatisch (Prinzip der Zwangsvollendung). Um eine Beschädigung der Crimpmatrize bzw.
des Verbinders zu vermeiden, kann bei Fehlercrimpung die Zange über die Notentriegelung vorzeitig geöffnet
werden.
Feststehende
Schrauben zur
Crimpmatrize
Matrizenbefestigung
Bewegliche
Locator
Crimpmatrize
o d e r
e i n e
n i c h t
b e s t i m m u n g s -
Notentriegelung
Stellscheibe
Schaftschraube

Verwandte Anleitungen für Rennsteig PEW 12


Inhaltszusammenfassung für Rennsteig PEW 12
- Seite 1 Installation and Removal of the Positioning Aid Verwendungszweck The PEW 12 Crimping System can be fitted with a positioning Mit der Handcrimpzange PEW 12 können unter Einsatz verschiedener Crimpmatrizen die unterschiedlichsten aid when required. Crimpkontakte verarbeitet werden. Mounted on the side of the tool’s jaws, the positioning aid can...
- Seite 2 Die Crimpkraft der Crimp- Systemzange PEW 12 ist vom Werk eingestellt. Die Handkraft im Leerhub beträgt 130 – 180 N. Die Crimpmatrize und Handzange sind so aufeinander abgestimmt, dass bei dieser Handkraft ein The PEW 12 Crimping System is comprised of the basic tool with adjustment dial and quick release, a set of optimaler...