Werbung
T0362
INSTRUCTION MANUEL • GEBRUIKSAANWIJZING • PLAN DE MONTAGE • ANLEITUNG
WARNING ! This R/C kit and the model
you will build is not a toy.
LET OP ! Deze bouwdoos van een
4900 g.
radiobestuurd vliegtuig is geen
speelgoed.
62,0 dm
2
ATTENTION ! Ce kit d'avion R/C n'est
pas un jouet.
ACHTUNG ! Dieser Bausatz von
ferngesteurte model
ist kein Spielzeug.
version: 09/10/2002 • T0362
Katana S180 - 1
Werbung
Inhaltsverzeichnis

Verwandte Anleitungen für protech Katana S 180


Inhaltszusammenfassung für protech Katana S 180
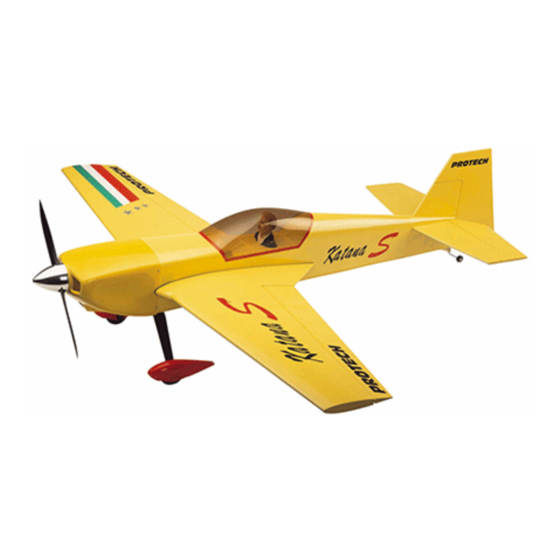
- Seite 1 T0362 INSTRUCTION MANUEL • GEBRUIKSAANWIJZING • PLAN DE MONTAGE • ANLEITUNG WARNING ! This R/C kit and the model you will build is not a toy. LET OP ! Deze bouwdoos van een 4900 g. radiobestuurd vliegtuig is geen speelgoed. 62,0 dm ATTENTION ! Ce kit d’avion R/C n’est pas un jouet.
- Seite 2 Specifications / Specificaties / Spécifications / Technische daten Length: 1636 mm Lengte: 1636 mm Longueur: 1636 mm Länge: 1636 mm Wing span: 1820 mm Spanwijdte: 1820 mm Envergure: 1820 mm Spannweite: 1820 mm Wing area: 62,0 dm Vleugelopp.: 62,0 dm Surface alaire: 62,0 dm Tragflügelinhalt: 62,0 dm...
-
Seite 3: Important Safety Notes
Important Safety Notes. Be sure to read right through the instructions covering assembly and operation of your model before you attempt to operate it for the first time. You alone are responsible for the safe operation of your radio-controlled model. Young people should only be permitted to build and fly these models under the instruction and supervision of an adult who is aware of the hazards involved in this activity. -
Seite 4: Conseils De Sécurité Importants
Conseils de sécurité importants Avant de tenter la première mise en service, la totalité des instructions de montage et d’utilisation devront être attentivement lues. Vous êtes seul responsable de la sécurité d’utilisation de votre modèle volant R/C. Il est conseillé aux adolescents de se faire assister pour la construction et pour les premiers vols par un adulte déjà familiarisé... - Seite 5 Tools & items / Gereedschap & benodigdheden / Werkzeuge und erforderliches / Outils et équipements To assamble this airplane some tools are needed. Voor het samenstellen van het vliegtuig zijn er enkele gereedschappen nodig. Zum bauen dieses Flugzeug werden einige Werkzeuge gebraucht . Certains outils sont requis pour assembler cet avion.
- Seite 6 Fixing the vertical fin / Monteren van het richtingsroer / Fixation du gouvernail de direction / Befestigung von das Seitenruder fig. 1 fig. 2 fig. 3 fig. 4 Cut out the covering of the Verwijder de folie aan de Découpez l’entoilage à l’endroit slots.
- Seite 7 Installing the horizontal stabilizer / Monteren van het horizontale staartvlak / Installation du stabilisateur / Montieren von Höhenleitwerk fig. 6 fig. 5 Trim out the covering at the pre- Snij de voorgevormde gaten uit Découpez l’entoilage aux fixed slots for the stabilizer and de romp voor het plaatsen van endroits de passage du servos, see fig.
- Seite 8 Installing the landinggear (tail) / Bevestig het achterste staartwiel / Installation de la roulette de queue / Befestigung von Heckfahrwerk fig. 10 fig. 11 fig. 9 Drill a 2mm hole into the rudder Boor een gaatje van 2mm in het Forez un trou de 2mm dans le to accept the tail wheel wire as roer om de stang van het...
- Seite 9 Installing horn and servo for the ailerons / Monteren van de roerhorn en servo voor de rolroeren / Installation du servo et guignol d’aileron / Montieren von Ruderhorn und Querruder servos fig. 13 fig. 14a fig. 14 Cut out the covering of the Verwijder de folie aan de Découpez l’entoilage à...
- Seite 10 Installing the wing / Monteren van de vleugels / Mise en place des ailes / Montieren von Flächen fig. 16 fig. 17 fig. 19 fig. 18 Make sure the tail plane and Controleer of de vleugel- en Assurez-vous que le stabilisa- NEVER USE SPRING wing are parallel.
- Seite 11 Installing the engine / Monteren van de motor / Installation du moteur / Montieren von Motor fig. 22 fig. 23 We recommend that you install Wij raden voor de meeste 2T Nous recommandons l’installa- the most 2T engines in 90° or motoren aan dat u ze in een tion des moteurs 2T à...
- Seite 12 Installing throttle servo / Monteren van de gas servo / Installation du servo de gas / Montieren von Gaz-Servo fig. 26 fig. 27 Use wire adjuster for your Gebruik een draadstang- Fixez un raccord de tringle sur engine control linkage, see fig. aansturing op de servoarm, zie le palonnier de servo, voir fig.
- Seite 13 Assembling the landinggear / Monteren van het landingsgestel / Montage du train d’atterissage / Montieren van Hauptfahrwerk fig. 30 fig. 31 fig. 32 fig. 33 fig. 34 Drill a 4mm hole in each leg of Boor een gaatje ø4mm in elke Percez un trou de 4mm dans the landinggear, see fig.
- Seite 14 Decals / Decals / Autocollants / Dekor fig. 37 fig. 38 fig. 39 fig. 40 Remove the unnecessary decal Verwijder het onnodige Nous conseillons d’utiliser un tape. stickermateriaal. film de transition pour un Use transition film to move out Gebruik transportfilm om de positionnement facile et précis the decal and stick it to the sticker van zijn rugmateriaal te...
- Seite 15 Centre of gravity / Uitwegen / Centre de gravité / Schwerpunkt Rudder deflection / Roeruitslag / Débattements / Ruderausschlägen 21 mm 20 mm 20 mm 19 mm 55 mm 55 mm Katana S180 - 15...
- Seite 16 Bestandteile zu, die abused, damaged, modified and beschadigd, aangepast en gebruikt. utilisés ou qui ont été endommagés. unsachgemäß installiert worden, used. angefaßt worden, mißbraucht worden, beschädigt worden, geändert worden und benutzt worden sind. © Copyright PROTECH 16 - Katana S180...