Herunterladen Inhalt Inhalt Diese Seite drucken

SCHOTT Instruments SLK 1 Gebrauchsanleitung

Laborkocher mit glaskeramik - heizfläche
Inhaltsverzeichnis

Werbung

Verfügbare Sprachen

Verfügbare Sprachen

Gebrauchsanleitung
Operating Instructions
Mode d'emploi
Manual de instrucciones
Typ / type / type / tipo
Laborkocher
mit Glaskeramik - Heizfläche
Laboratory hot plates
with glass - ceramic material
Plaques chauffantes
avec surface de chauffe
en vitrocéramique
Placas calefactoras
vitrocerámicas
SLK 1
SLK 2
SLK 2-T
SLK 6
Laborkocher SLK 2-T

Werbung

Inhaltsverzeichnis
loading

Inhaltszusammenfassung für SCHOTT Instruments SLK 1

  • Seite 1 Laboratory hot plates with glass - ceramic material Mode d'emploi Plaques chauffantes avec surface de chauffe en vitrocéramique Manual de instrucciones Placas calefactoras vitrocerámicas Typ / type / type / tipo SLK 1 SLK 2 SLK 2-T SLK 6 Laborkocher SLK 2-T...
  • Seite 2 Gebrauchsanleitung Seite 2 ......................... Wichtige Hinweise: Die Gebrauchsanleitung vor der ersten Inbetriebnahme der Laborkocher bitte sorgfäl- tig lesen und beachten. Aus Sicherheitsgründen darf der Laborkocher mit Glaskeramik - Heizfläche aus- schließlich nur für die in dieser Gebrauchsanleitung beschriebenen Zwecke eingesetzt werden. Alle in dieser Gebrauchsanleitung enthaltenen Angaben sind zum Zeitpunkt der Drucklegung gültige Da- ten.
  • Seite 3: Inhaltsverzeichnis

    INHALTSVERZEICHNIS SEITE Eigenschaften ..........................2 Allgemeines ..........................2 Physikalische und chemische Eigenschaften der Glaskeramik ........... 2 Technische Daten, die vier Laborkocher von SCHOTT im Überblick .......... 3 Konformitätserklärung ........................4 Warn- und Sicherheitshinweise .................... 5 Aufstellen und Inbetriebnahme ..................... 7 Allgemeines, sachgemäßer Gebrauch ..................
  • Seite 4: Eigenschaften

    DIN 12 116: Klasse 3 Die Laborkocher SLK 1 und SLK 2 mit ihren Strahlungsheizkörpern eignen sich zum schnellen Erhitzen von Flüssigkeiten. Die höchste Heizstufe << 9 >> entspricht einer Heizleistung von 1,2 kW bzw. 1,8 kW. Auf dem Laborkocher SLK 2-T können Sie zusätzlich die Temperatur der Flüssigkeit konstant halten. Ein in die Flüssigkeit eingetauchter und rückseitig am Laborkocher angeschlossener Temperaturfühler,...
  • Seite 5: Technische Daten, Die Vier Laborkocher Von Schott Im Überblick

    Technische Daten Laborkocher SLK 1 bis SLK 6 Stand 15. Januar 2001 CE - Zeichen: EMV - Verträglichkeit nach der Richtlinie 89/336/EWG des Rates; Störaussendung nach Norm EN 55 011, Störfestigkeit nach Norm EN 50 082, Teil 1 Niederspannungsrichtlinie nach der Richtlinie 73/23/EWG, zuletzt geändert durch Richtlinie 93/68/EWG des Rates...
  • Seite 6: Konformitätserklärung

    Laboratory hot plates Plaques chauffantes with avec Glaskeramik - glass - ceramic surface de chauffe Heizfläche material en vitrocéramique SLK 1 SLK 1 SLK 1 SLK 2 SLK 2 SLK 2 SLK 2-T SLK 2-T SLK 2-T SLK 6 SLK 6 SLK 6 auf die sich diese Erklärung...
  • Seite 7: Warn- Und Sicherheitshinweise

    Warn- und Sicherheitshinweise Der Laborkocher darf aus sicherheitstechnischen und funktionellen Gründen grundsätzlich nur von autori- sierten Personen geöffnet werden; so dürfen z. B. Arbeiten an der elektrischen Einrichtung nur von aus- gebildeten Fachleuten durchgeführt werden. Bei unbefugtem Eingriff in den Laborkocher sowie bei fahr- lässiger oder vorsätzlicher Beschädigung erlischt die Gewährleistung.
  • Seite 8 Sollten sich die Heizflächen durch einen Defekt der Sensorsteuerung nicht mehr abschalten lassen, sofort den Laborkocher vom Netz trennen und Netzkabel entfernen. Der Laborkocher ist für den Einsatz in trocknen Innenräumen vorgesehen. Beachten Sie bei der Wahl des Standortes folgende Sicherheitsvorschriften: Den Laborkocher nicht als Ablage und nicht als Arbeitsfläche verwenden.
  • Seite 9: Aufstellen Und Inbetriebnahme

    Aufstellen und Inbetriebnahme Achten Sie beim Auspacken, dass Sie auch die Zusatzteile aus der Verpackung nehmen. Stellen Sie den Laborkocher auf eine waagerechte, ebene und rutschfeste Standfläche. Der Aufsellung- sort darf nicht von brennbaren Materialien umgeben sein. Ein allseitiger Abstand von mindestens 0,5 m ist einzuhalten.
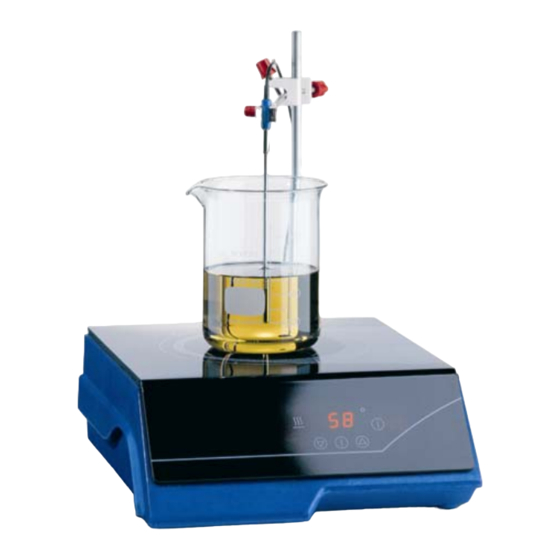
  • Seite 10: Arbeiten Mit Den Laborkochern

    Arbeiten mit den Laborkochern SLK 1 SLK 2 Sensortaste „Ein / Aus“ = Sensortasten Heizstufen: höhere Heizstufe einstellen niedrigere Heizstufe einstellen mit Anzeige Symbol für Heizung Symbol für Heizung: rechte Heizfläche = Sensortasten Rührstufen: höhere Rührstufe einstellen niedrigere Rührstufe einstellen...
  • Seite 11: Einstellen Der Heizstufen, Der Rührstufen Und Der Temperaturregelung

    Ausführliche Erläuterung zu Kapitel „Arbeiten mit den Laborkochern“. Sensortaste zum Ein- / Ausschalten der Laborkocher (Ein- / Aus- Schalter) „Ein / Aus“ Wird nach dem Einschalten eines Laborkochers innerhalb 10 Sekunden kein weiterer Sensor berührt, schaltet sich der Kocher automatisch aus. Beim Ausschalten des Laborkochers werden aus Sicherheitsgründen alle Einstellungen auf Stufe zurückgeschaltet.
  • Seite 12: Reinigung, Pflege Und Wartung

    Reinigung, Pflege und Wartung Die Glaskeramik ist weitgehend chemisch resistent, die Heizfläche bleibt stets plan, ist porenfrei und des- halb leicht zu reinigen. Die leicht verschmutzte Heizfläche reinigen Sie am besten einfach mit warmem Wasser und ein paar Tropfen Haushaltsspülmittel, wenn die Heizfläche handwarm oder kalt ist. Krusten, Kalk und Wasserränder, aber auch metallisch schillernde Flecken entfernen Sie mit einem haus- haltsüblichen Reinigungsmittel für Herde mit Glaskeramik - Kochflächen.
  • Seite 13 CONTENTS PAGE Properties ............................12 General ............................12 Physical and chemical properties ....................12 Technical data, overview of the four SCHOTT Laboratory hot plates ........13 Declaration of Conformity ......................14 Warning and safety instructions ..................15 Set-up and putting into operation ..................
  • Seite 14: Properties

    3 The SLK 1 and SLK 2 Laboratory hot plates including their radiant elements are suitable for quick heat- ing-up of liquids. The highest heating stage, i.e. << 9 >> corresponds to a heating output of 1.2 kW or 1.8 kW, respectively.
  • Seite 15: Technical Data, Overview Of The Four Schott Laboratory Hot Plates

    Translation of the legally binding German version Technical data of the SLK 1 to SLK 6 Laboratory hot plates State January 15th, 2001 CE sign: Electromagnetic compatibility according to the Council Directive 89/336/EMC; generic emission according to standard EN 50 011...
  • Seite 16: Declaration Of Conformity

    Laboratory hot plates Laborkocher Plaques chauffantes with avec glass - ceramic Glaskeramik - surface de chauffe Heizfläche material en vitrocéramique SLK 1 SLK 1 SLK 1 SLK 2 SLK 2 SLK 2 SLK 2-T SLK 2-T SLK 2-T SLK 6 SLK 6...
  • Seite 17: Warning And Safety Instructions

    Warning and safety instructions For reasons of safety technology and functional integrity the Laboratory hot plates must only be opened by authorised staff; work on the electrical system, e.g., must only be performed by trained specialists. In the case of unauthorised intervention in the Laboratory hot plates and negligent or deliberate damage the war- ranty will lapse.
  • Seite 18 If the heating zones cannot be switched off any more owing to a defect of the sensor control, the Labora- tory hot plates have to be separated from the mains immediately, and the mains cable has to be removed. The Laboratory hot plates must not be used to store objects on them, or as a working surface. The Laboratory hot plates are designed for indoor use in dry environments.
  • Seite 19: Set-Up And Putting Into Operation

    Set-up and putting into operation When unpacking the device, please make sure to unpack the accessories as well. Install the Laboratory hot plates on a flat, stable and non-slippery surface. The area under the Laboratory hot plates must be non-combustible! An allround space of at least 0,5 m must be observed. Insert a 10 mm ∅...
  • Seite 20: Working With The Laboratory Hot Plate

    Working with the Laboratory hot plates SLK 1 SLK 2 „On / Off“ sensor key = Heating stage sensor key: setting a higher heating stage setting a lower heating stage using the display Heating symbol Heating symbol: right heating zone...
  • Seite 21: Setting The Heat Stages, The Stirring Stages And The Temperature Control

    Detailed explanation of the „Working with the Laboratory hot plates“ chapter Sensor key for switching the Laboratory hot plates on/off (on/off switch) „On / Off“ If, after the Laboratory hot plate is switched on, no other sensor is touched within 10 seconds, the Laboratory hot plate will switch off automatically.
  • Seite 22: Cleaning, Care And Maintenance

    Cleaning, care, and maintenance The glass-ceramics material is largely chemically resistant, the heating zone remains plane at all times, is free of pores and therefore easy to clean. If the heating zone is slightly dirty, you should at best clean it simply using warm water and a few drops of a household washing-up liquid as long as the heating zone is lukewarm or cold.
  • Seite 23: Malfunction / Defect; Cause; Remedy

    T A B L E D E S M A T I È R E S Page Propriétés ............................22 Généralités ............................22 Propriétés physiques et chimiques de la vitrocéramique .............. 22 Données techniques, un aperçu des quatre Plaques chauffantes SCHOTT ....... 23 Déclaration de conformité...
  • Seite 24: Propriétés

    La température peut aller de ± 2 ° à ± 5 °C, en fonction du récipient, de la quantité de liquide et de la température ambiante. La combinaison des Plaques chauffantes SLK 1 avec le chauffage à rayonnement avec chauffage à membrane et avec fonction d’agitation supplémentaire, c’est le modèle SLK 6. Avec ses propriétés, deux surfaces de chauffe, l’une avec fonction supplémentaire d’agitation, réchauffent rapidement un milieu pour...
  • Seite 25: Données Techniques, Un Aperçu Des Quatre Plaques Chauffantes Schott

    Traduction de la version légale allemande Données techniques Plaques chauffantes SLK 1 à SLK 6 Etat 15 Janvier 2001 Signe CE: EMV - compatibilité électromagnétique selon la directive 89/336/CEE du Conseil; norme générique émission EN 50 011, norme générique immunité EN 50 082, partie 1 directive relative à...
  • Seite 26: Déclaration De Conformité

    Laboratory hot plates Plaques chauffantes with avec Glaskeramik - glass - ceramic surface de chauffe Heizfläche material en vitrocéramique SLK 1 SLK 1 SLK 1 SLK 2 SLK 2 SLK 2 SLK 2-T SLK 2-T SLK 2-T SLK 6 SLK 6 SLK 6 auf die sich diese Erklärung...
  • Seite 27: Avertissements Et Consignes De Sécurité

    Avertissements et consignes de sécurité Pour des raisons de sécurité et de fonctionnement, les Plaques chauffantes ne devront être ouvertes que par des personnes autorisées ; des travaux sur le dispositif électrique par exemple ne seront effectués que par des spécialistes ayant la formation nécessaire. Des manipulations non autorisées sur les Plaques chauffantes ou une détérioration préméditée ou commise par négligence entraîneront une perte de la garantie.
  • Seite 28 Si les surfaces chauffantes ne peuvent plus être mises à l’arrêt à cause d’un défaut dans la commande des détecteurs, il faut immédiatement couper les Plaques chauffantes du réseau et retirer le câble d’alimentation. Les Plaques chauffantes avec surface de chauffe en vitrocéramique sont prévues pour l’utilisation dans des locaux intérieurs secs.
  • Seite 29: Installation Et Mise En Service

    Installation et mise en service Lorsque vous sortez l’appareil de l’emballage, veillez à bien sortir les pièces auxiliaires. Mettez les Plaques chauffantes à une surface horizontale solide, antidérapante et sans entourage de matériaux combustibles. Il faut observer une distance tout autour d’au moins 0,5 m. Insérez une barre de trépied d’un diamètre de 10 mm dans la fixation au dos (logement avec filetage M8) et vissez la barre en tournant avec la main.
  • Seite 30: Travailler Avec Les Plaques Chauffantes

    Travailler avec les Plaques chauffantes SLK 1 SLK 2 Touche à contact sensitif „marche / arrêt“ = Touches à contact sensitif paliers de chauffage: régler le palier de chauffage supérieur régler le palier de chauffage inférieur avec affichage symbole pour chauffage...
  • Seite 31: Réglage Des Degrés De Chauffe, Degrés D'agitation Et Régulation De La Température

    Explications détaillées relatives au chapitre „travailler avec les Plaques chauffantes“. Touche à pour mettre en marche / à l’arrêt les Plaques chauffantes (interrupteur de marche/arrêt) contact sensitif Si après la mise en marche d’une Plaque chauffante aucune autre touche n’est touchée en „marche/arrêt“...
  • Seite 32: Nettoyage, Entretien Et Maintenance

    Nettoyage, entretien et maintenance La vitrocéramique est largement résistante aux produits chimiques, la surface de chauffe reste toujours plane, sans porosité et est donc facile à nettoyer. Vous pouvez le plus simplement nettoyer la surface de chauffe légèrement salie en utilisant de l’eau chaude et quelques gouttes de produit à vaisselle lorsque la surface est tiède ou froide Des croûtes, du calcaire et des traces d’eau ainsi que des taches brillantes comme du métal pourront être éliminées avec un détergeant que l’on trouve dans le commerce pour les gazinières avec des surfaces en...
  • Seite 33 INDICE PAGINA Características ..........................32 Generales ........................... 32 Propiedades físicas y químicas de la vitrocerámica ..............32 Datos técnicos, vista global de las cuatro Placas calefactoras vitrocerámicas de SCHOTT ..33 Declaración de conformidad ...................... 34 Indicaciones para el cuidado y la seguridad ..............
  • Seite 34: Características

    DIN 12 116: Clase 3 Las Placas calefactoras vitrocerámicas SLK 1 y SLK 2 con sus paneles radiadores son apropiados para la rápida calefacción de líquidos. El más alto nivel de calefacción << 9 >> corresponde a una potencia ca- lorífica de 1,2 kW o bien 1,8 kW.
  • Seite 35: Datos Técnicos, Vista Global De Las Cuatro Placas Calefactoras Vitrocerámicas De Schott

    Traducción de la version alémana legal Datos técnicos de las Placas calefactoras SLK 1 - SLK 6 Estado 15 enero, 2001 Signo: EMV - Compatibilidad electromagnética según la Directiva 89/336/EWG del Consejo CE Emisión de perturbaciones, según Norma EN 50 011 Resistencia a las perturbaciones, según Norma 50 082, Parte 1...
  • Seite 36: Declaración De Conformidad

    Placas calefacto- Laboratory hot plates Laborkocher with vitrocerámicas glass - ceramic Glaskeramik - Heizfläche material SLK 1 SLK 1 SLK 1 SLK 2 SLK 2 SLK 2 SLK 2-T SLK 2-T SLK 2-T SLK 6 SLK 6...
  • Seite 37: Indicaciones Para El Cuidado Y La Seguridad

    Indicaciones para los cuidados y la seguridad Por razones de seguridad técnica y funcionalidad, la Placa calefactora vitrocerámica no podrá ser abierto más que por personas autorizadas; el trabajo sobre la instalación eléctrica del equipo solo podrá ser rea- lizado por personas cualificadas que han recibido la formación técnica apropiada. En caso de manipula- ción no autorizada de la Placa calefactora vitrocerámica o negligencias voluntarias e involuntarias la ga- rantia del equipo queda anulada.
  • Seite 38 Si por un defecto del control del sensor no se puede apagar la Placa calefactora de vitrocerámica, desco- nectar la Placa calefactora vitrocerámica de la red inmediatamente y retirar el cable de la red de la Placa calefactora. La Placa calefactora ha sido ideado para el uso en espacios secos. Al elegir la ubcación, tenga presentes las siguientes prescripciones de seguridad: La Placa calefactora vitrocerámica no se utiliza como una bandeja así...
  • Seite 39: Instalación Y Puesta En Marcha

    Instalación y puesta en marcha Al desempaquetar preste atención a que las partes del suministro sean retiradas del embalaje. Coloque la Placa calefactora en una superficie horizontal, plana y antideslizante. No debe rodearse el epuipo de materiales inflamables y se recomienda une distancia minima de 0,5 m por todos las lados. Introducir el soporte con ∅...
  • Seite 40: Trabajar Con Las Placas Calefactoras Vitrocerámicas

    Trabajar con las Placas calefactoras vitrocerámicas Teclas de contacto SLK 1 SLK 2 „encendar / apagar“ = Teclas de contacto de nivel calefactores: ajustar más altos niveles calefactores ajustar más bajos niveles calefactores con display Símbolo para la calefacción símbolo para la calefacción: zona calefactora placa derecha = Teclas de contacto de nivel de agitación:...
  • Seite 41: Selección De La Potencia Calefactora, Agitación Y Regulación De Latemperatura

    Aclaración detallada del capítulo „Trabajar con las Placas calefactoras vitrocerámicas“ Tecla de contacto al encender / apagar de las placas (encender/apagar - interruptor) „encender/apagar“ Si en el plazo de 10 s, después del encendido de un Placa calefactora vitrocerámica, no se toca ningún otro sensor, la Placa calefactora vitrocerámica se apaga automáticamente.
  • Seite 42: Limpieza, Cuidado Y Mantenimiento

    Limpieza, cuidado y mantenimiento La vitrocerámica es en su mayoria resistente químicamente, la zona calefactora de la placa permanece continuamente plana, esta exenta de poros y por ello es fácil su limpieza. La suciedad ligera de la zona calefactora de la placa se limpia de la mejor forma, simplemente con agua caliente y un par de gotas de detergente del hogar.
  • Seite 43 Notes:...
  • Seite 44 Typ / type / type / tipo SLK 1 SLK 2 SLK 2-T SLK 6 Bescheinigung des Herstellers Wir bestätigen, dass das oben genannte Gerät gemäß DIN EN ISO 9001, Absatz 8.2.4 „Überwachung und Messung des Produkts“ geprüft wurde und dass die festgelegten Qualitätsanforderungen an das Produkt erfüllt werden.

Diese Anleitung auch für:

Slk 2Slk 2-tSlk 6

Inhaltsverzeichnis