Inhaltsverzeichnis
Werbung
Verfügbare Sprachen
Verfügbare Sprachen
H A Z E T- W E R K
HÖCHSTE TECHNOLOGIE IN DER WERKZEUGFERTIGUNG SEIT 1868
HIGHEST TECHNOLOGY IN TOOL MANUFACTURE SINCE 1868
TECHNOLOGIE DE POINTE DANS LA FABRICATION D'OUTILLAGE DEPUIS 1868
Bedienungsanleitung
Tragbares Video-Endoskop
User Manual
Portable video borescope
Notice d'utilisation
Vidéo-endoscope portable
4812 N-10/3AF
4812-10
1
Werbung
Inhaltsverzeichnis

Verwandte Anleitungen für Hazet 4812 N-10/3AF


Inhaltszusammenfassung für Hazet 4812 N-10/3AF
- Seite 1 H A Z E T- W E R K HÖCHSTE TECHNOLOGIE IN DER WERKZEUGFERTIGUNG SEIT 1868 4812 N-10/3AF HIGHEST TECHNOLOGY IN TOOL MANUFACTURE SINCE 1868 TECHNOLOGIE DE POINTE DANS LA FABRICATION D’OUTILLAGE DEPUIS 1868 4812-10 Bedienungsanleitung Tragbares Video-Endoskop User Manual...
-
Seite 2: Inhaltsverzeichnis
Technische Daten ...18 Hinweise zur Benutzung 19 ....20 HAZET-WERK Hermann Zerver GmbH & Co. KG } 10 04 61 • 42804 REMSCHEID ; Güldenwerther Bahnhofstraße 25 - 29 • 42857 REMSCHEID DEUTSCHLAND • GERMANY • ALLEMAGNE [ +49 (0) 21 91 / 7 92-0 \ +49 (0) 21 91 / 7 92-375 (National) -400 (International) ^ hazet.de •... - Seite 3 For Your Information 22 ....For Your Safety 23 ....Spare Parts and Disposal 26 ....Design and Function 27 ....Scope of delivery ...27 Product Features ...28 First Time Use ...29 System Mode ...30 Multifunction Key ...31 Screen ...32 System Menu ...32 Operating Guide...
-
Seite 4: Zu Ihrer Information
• Bewahren Sie deshalb diese Betriebs anleitung immer bei Ihrem HAZET Video-Endoskop auf. • Dieses Endoskop wurde für bestimmte An wendungen entwickelt. HAZET weist ausdrücklich darauf hin, dass dieses Werkzeug nicht verändert und/oder in einer Weise eingesetzt werden darf, die nicht seinem vorgesehenen Verwendungs zweck entspricht. -
Seite 5: Verantwortung Des Betreibers
Zu Ihrer Sicherheit 1. Verantwortung des Betreibers Das Video-Endoskop ist zum Zeitpunkt seiner Ent wick lung und Fertigung nach geltenden, anerkannten Regeln der Technik gebaut und gilt als betriebssicher. Es können vom Video-Endoskop jedoch Gefahren ausgehen, wenn es von nicht fachgerecht ausge- bildetem Per sonal, unsachgemäß... - Seite 6 Zu Ihrer Sicherheit Dieses Video-Endoskop darf nicht für medizinische Anwendungen benutzt werden. • Die Video-Endoskopsonde ist wasserdicht und darf kurzzeitig in Wasser, Öl und Benzin eingetaucht werden. Das Hauptgerät ist nicht wasserdicht. • Setzen Sie das Video-Endoskop nie bei Temperaturen unter 0 °C oder über +60 °C ein, nur in diesem Temperaturbereich ist die Funktion sichergestellt.
-
Seite 7: Gefahren Die Vom Gerät Ausgehen
Zu Ihrer Sicherheit 3. Gefahren die vom Gerät ausgehen Vor jeder Benutzung ist das HAZET Video-Endoskop auf seine volle Fun ktions fähigkeit zu prüfen. Ist die Fun ktions fähigkeit nach dem Ergebnis dieser Prüfung nicht gewährleistet oder werden Schäden festgestellt, darf das Video-Endoskop nicht verwendet werden. Ist die volle Funktions fähigkeit nicht gegeben und das Video-Endoskop... -
Seite 8: Zu Ihrer Sicherheit
Sondermüllbehandlung und dürfen nur von zugelasse- nen Fachbetrieben entsorgt werden! Die Verringerung von Umweltbelastungen und die Bewahrung der Umwelt, stehen im Mittelpunkt unserer Aktivitäten! Bei HAZET wird Umweltschutz groß geschrieben. Blicken Sie nicht in Lichtquellen! Sonde nicht knicken! -
Seite 9: Lieferumfang
Aufbau und Funktion Lieferumfang: 4812 N-10/3AF SD-Speicherkarte Videoendoskop 4812-10 Sonde 4812 N-2AF 4 x Batterien AA geliefert im Kunstoffkoffer... -
Seite 10: Produktmerkmale
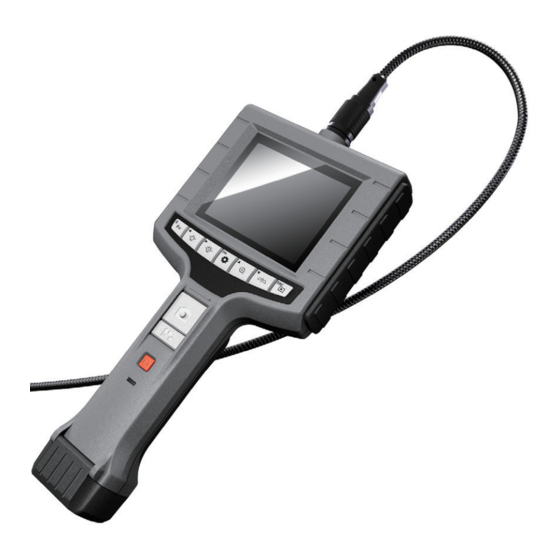
Aufbau und Funktion Produktmerkmale Geräteanschluss Bildschirm Kartensteckplatz Videoausgang * Videoausgang* (mit Schnittstelle) (ohne Schnittstelle) USB-Ausgang Funktionstaste Schnappschuss Aufnahme Stromzufuhr Blinklicht Batteriefachabdeckung * Videoausgang nicht aktiviert... -
Seite 11: Erstmalige Verwendung
Aufbau und Funktion Erstmalige Verwendung Schritt 1: Drehen Sie die Rändelschraube gegen den Uhrzeigersinn locker und öffnen Sie das Batteriefach. Schritt 2: Legen Sie die Batterie korrekt ein, setzen Sie die Batterieabdeckung wieder auf und ziehen Sie dann die Rändelschraube an. Schritt 3: Führen Sie die Sonde in den Geräteanschluss ein und ziehen Sie ihn im Uhrzeigersinn an. -
Seite 12: Systemmodus
Aufbau und Funktion Schritt 4: Heben Sie die Gummiabdeckung an und stecken Sie die SD-Speicherkarte korrekt ein. Schritt 5: Halten Sie den Schalter des Gerätes gedrückt bis die Bildschirmanzeige erscheint. Schritt 6: Nach Einschalten des Gerätes richten Sie die Sonde auf den Bereich, von dem ein Foto genommen oder eine Videoaufzeichnung erstellt werden soll. -
Seite 13: Multifunktionstaste
Aufbau und Funktion - Menü: Im Modus „Menü" kann der Benutzer Geräteeinstellungen ändern. Hinweis: Das Gerät wird vom Modus „Menü" in den Modus „Vorschau" wechseln, falls keine Handlungen vorgenom- men werden. Multifunktionstaste Taste Vorschau Durchsuchen Menü Aktivierung spezieller Datei löschen Entfällt Funktionen Helligkeit erhöhen... -
Seite 14: Bildschirm
Aufbau und Funktion Bildschirm Systemzeit 2010/09/22 12:35:45 Batterieladung Speicherkartenkapazität System-Menü Schritt 1: Drücken Sie zum Aufruf des Menüs Schritt 2: Drücken Sie die Taste oder um den gewünschten Menüpunkt zu wählen. HAUPTMENÜ Schritt 3: Drücken Sie zum Aufruf des Menüpunkts. EINSTELLUNGEN Die folgenden Anweisungen können im ALBUM... - Seite 15 Aufbau und Funktion Schritt 1: Drücken Sie oder oder oder , um das gewünschte Foto oder Video auszuwählen. Schritt 2: Drücken Sie , um die Ansicht der gewünschten Datei zu vergrößern. Schritt 3: Drücken Sie , um die Datei zu löschen. Schritt 4: Zur Bestätigung des Löschvorgangs drücken Sie oder drücken Sie...
-
Seite 16: Einstellungen
Aufbau und Funktion Status der SD-Speicherkarte Verwenden Sie diese Funktion, um den Zustand der DS-Speicherkarte anzuzeigen. -Löschen aller Dateien Löscht alle vom Gerät aufgenommene STATUS SD KARTE Dateien. 9527 -Formatieren der SD-Speicherkarte *verfügbarer Speicherplatz für Fotos. Löscht alle Dateien 3 Min. Speicherkarte. -
Seite 17: Anzeigevergrößerung Und Spiegelung
Aufbau und Funktion Anzeigevergrößerung und Spiegelung - Anzeigevergrößerung: Drücken Sie , um das Foto zweifach zu vergrößern. Nochmaliges Drücken stellt die normale Anzeigegröße wieder her. * Standardbildgröße * 2X vergrößert - Spiegelung: Drücken Sie , um ein Foto zu spiegeln. Nochmaliges Drücken stellt sie Standardanzeige wieder her. -
Seite 18: Technische Daten
Aufbau und Funktion Technische Daten Hauptsystem Geräteabmessungen 275mm x123mm x 55mm Gerätegewicht 370g (ohne Batterien) Anzeige 3,5” TFT LCD QVGA Anzeigeauflösung 320X240 Stromzufuhr AA x 4 (Alkaline oder Ni-HM) Batterielebensdauer 4 Stunden Aufzeichnungsträger SD CARD (unterstützt bis 32GB) Video-Ausgabeformat NTSC & PAL Schnittstelle AV-Ausgang Dateiformat... -
Seite 19: Hinweise Zur Benutzung
Aufbau und Funktion Hinweise zur Benutzung • Zur Vermeidung von Gefährdungen sollten Sie das Einsatzrohr nicht in brennbare Flüssigkeiten oder Gase eintauchen. • Das Einsatzrohr enthält eine Reihe von kleinen Drähten, mit denen die Optik und Elektronik der Kamera an der Endoskopspitze gesteuert wird. -
Seite 20: Aufbau Und Funktion 9
Aufbau und Funktion • Versuchen nicht, Gerät zerlegen. Dies führt zu Stromschlaggefahr und könnte das Gerät beschä- digen. • Bitte verwenden Sie nur empfohlene Bau- und Zubehörteile. Die Verwendung von ungenehmigten Bau- und Zubehörteilen kann Schäden verursachen. • Verwenden Sie dieses Produkt nicht in medizinischen Einrichtungen oder an Bord eines Flugzeugs, da das drahtlose Signal andere empfindliche Geräte in der Nähe stören könnte. - Seite 21 Notizen • Notes...
-
Seite 22: For Your Information
• HAZET will not be liable for any injuries to persons or damages to prop- erty that are due to an improper application or misuse of this borescope respectively due to the disregard of the safety instructions. -
Seite 23: Appropriate Use
For Your Safety 1. Operator’s Liability The video borescope was developed and fabricated according to the technical norms and standards that have been valid at that time and is considered to be operationally reliable. Nevertheless, the video borescope can present a danger when it is not used as intended or in an inappropriate way by non-qualified personnel. - Seite 24 For Your Safety This borescope must not be used for medical purposes. • The video borescope probe is water-proof and is suitable for short time use in water, oil and petrol. The console is not water-proof. • Never use the video borescope to temperatures outside the range of 0°C to +60°C;...
- Seite 25 • For safety reasons all modifications of the HAZET video borescope are strictly forbidden. Any modification of the Video borescope will lead to the exclusion of liability.
-
Seite 26: For Your Safety
The reduction of the pollution as well as the protection of the environ- ment are the central points of our activities. HAZET • environmental protection is of fundamental importance for us Do not look at light sources! -
Seite 27: Scope Of Delivery
Design and Function Scope of delivery: 4812 N-10/3AF SD Card Video Borescope 4812-10 Probe 4812 N-2AF 4 x Battery AA delivered in plastic case... -
Seite 28: Product Features
Design and Function Product Features Device connector Screen card socket Video out * Video out * (w/ interface) (w/o interface) USB out Function key Snap Record Power Indicator Battery cover *Video out not activated... -
Seite 29: First Time Use
Design and Function First Time Use Step 1: Turn the thumb screw loose counterclockwise, then open the battery cover. Step 2: Place battery in correctly, put the battery cover back on, and then tighten up the thumbscrew. Step 3: Insert probe into the device connector and tighten it up clockwise. -
Seite 30: System Mode
Design and Function Step 4: Raise up the rubber sheet, and insert SD memory card correctly. Step 5: Hold down the device switch until the screen displays. Step 6: After the device turns ON, aim the probe front end at an area to be snapped or recorded. -
Seite 31: Multifunction Key
Design and Function - Browse: Under „Browse“ mode, the user may view pictures and video and conduct basic file management. - Menu: Under „Menu“ mode, the user may change device set- tings. Note: Under the „Menu“ mode, the system will return to the „Preview“mode if no actions are made. -
Seite 32: Screen
Design and Function Screen System time 2010/09/22 12:35:45 Battery power Memory card capacity System menu Step 1: Press to enter the Menu mode Step 2: Press the button or , to choose the item you need. Step 3: Press to enter it. MAIN MENU Instructions which can be executed an the menu are listed as follows:... - Seite 33 Design and Functionn Step 1: Press , to choose any image or film you need. Step 2: Press to enlarge the image. Step 3: Press to delete it. Step 4: To confirm a deletion, press or press to cancel it. Total images 2010/09/22 12:35:45 Shooting time...
-
Seite 34: Sd Card Status
Design and Function SD Card Status Use this instruction to view the SD card’s status. - Delete all files Delete pictures produced by the SD CARD STATUS device. 9527 - Format SD card *available space for photo. 3 Min. Delete all files in the memory card. *available space for record. -
Seite 35: Zoom-In And Mirror
Design and Function Zoom-in and Mirror - Zoom-in: Press to enlarge the image 2 times, and press it again to the default image setting. *Default image * enlarged 2X - Mirror: Press to mirror the image and press it again to the default image setting. -
Seite 36: Specification
Design and Function Specification Main System System Dimension 275 mm x123 mm x 55 mm System Weight 370 g (w/o battery) Display 3.5" TFT LCD QVGA Display Resolution 320 X 240 Power AA x 4 (Alkaline or Ni-HM) Battery life 4hours Recording Medium SD CARD (Support to 32G) -
Seite 37: Cautions For Use 37
Design and Function Cautions for Use • To avoid danger, do not put the insert tube into any flammable liquid or gas. • The insert tube contains a series of small wires that control the optics and electronics of the camera tip. To ensure long-term reliability, do not bend the insert tube more than 180 degrees, and always bend the insert tube in as large an arc as possible during usage and storage. -
Seite 38: Design And Function 27
Design and Function • Do not try to disassemble the device. It may result in an electric shock and may damage the device. • Please use only recommended components or accessories. Unapproved accessories and components may cause damage. • Do not use this product in a medical facility or on an airplane, as the wireless signal may interfere with other critical equipment nearby. -
Seite 39: Pour Votre Information
• Pour cette raison, conservez toujours ce mode d’emploi avec votre vidéo-endoscope HAZET. • Cet endoscope a été développé exclusivement pour des applications particulières. HAZET attire l’attention sur le fait qu’une modification de l’outil et/ou une utilisation qui ne corresponde pas à sa fonction prévue sont strictement interdites. -
Seite 40: Utilisation Conforme Aux Instructions
Pour votre sécurité 1. Responsabilité du propriétaire Le vidéo-endoscope a été développé et construit selon les normes et standards techniques qui ont été en vigueur au moment de la conception. Il est considéré comme fiable. Cependant, des dangers peuvent émaner du vidéo-endoscope s’il est utilisé non confor- mément aux instructions ou de manière détournée par un personnel non spécialisé. - Seite 41 Pour votre sécurité Ce vidéo-endoscope ne peut pas être utilisé pour des applications médicales. • La sonde du vidéo-endoscope est étanche et peut être brièvement plongée dans de l'eau, de l'huile et de l'essence. L'appareil principal n'est pas étanche. • N'utilisez jamais le vidéo-endoscope en cas de températures infé- rieures à...
- Seite 42 électriques. • Pour des raisons de sécurité, toute modification du vidéo-endoscope HAZET est strictement interdite. Toute modification de l’appareil entraî- nera automatiquement l’exclusion de la responsabilité. Tenir les enfants éloignés des outils électriques. Les outils lais- sés sans surveillance peuvent être utilisés par des personnes non...
-
Seite 43: Pour Votre Sécurité
La réduction de la pollution et la préservation de l’environnement sont au cœur de nos activités ! HAZET accorde une grande importance à la protection de l’environnement. Ne regardez pas dans les sources lumineuses ! Ne pliez pas la sonde ! -
Seite 44: Fourniture
Design et fonctionnement Scope of delivery: 4812 N-10/3AF SD Card Video Borescope 4812-10 Probe 4812 N-2AF 4 x batteries AA livré dans une valise en plastique... -
Seite 45: Caractéristiques Du Produit
Design et fonctionnement Caractéristiques du produit Prise de l'appareil Emplacement Écran pour carte SD Sortie vidéo* Sortie vidéo* (avec interface) (sans interface) Sortie USB Touche de fonction Instantané Enregistrement Alimentation en courant Voyant clignotant Couvercle du compartiment à piles * Sortie vidéo non active... -
Seite 46: Première Utilisation
Design et fonctionnement Première utilisation Étape 1 : dévissez la vis moletée en la tournant dans le sens antiho- raire et ouvrez le compartiment à piles. Étape 2 : positionnez les piles correctement, replacez le couvercle de la batterie et remettez la vis moletée. Étape 3 : introduisez la sonde dans la prise de l'appareil et tour- nez-la dans le sens horaire. -
Seite 47: Modes Du Système
Design et fonctionnement Étape 4 : soulevez le cache en caoutchouc et introduisez correcte- ment la carte mémoire SD. Étape 5 : maintenez l'interrupteur de l'appareil enfoncé jusqu'à ce que l'écran s'allume. Étape 6 : une fois l'appareil allumé, dirigez la sonde vers l'endroit dont une photo ou un enregistrement vidéo doit être effec- tué. -
Seite 48: Touche Multifonction
Design et fonctionnement - Parcourir : dans le mode « Parcourir », l'utilisateur peut regarder les images ou vidéo enregistrées et effectuer des tâches élémen- taires de gestion des fichiers. - Menu : dans le mode « Menu », l'utilisateur peut modifier les para- mètres de l'appareil. -
Seite 49: Écran
Design et fonctionnement Écran Temps système 2010/09/22 12.35.45 Chargement des piles Capacité de mémoire Menu du système Étape 1 : appuyez sur pour aller au menu Étape 2 : appuyez sur la touche MENU PRINCIPAL pour sélectionner le point de menu souhaité. - Seite 50 Design et fonctionnement Étape 1 : appuyez sur pour sélectionner la photo ou vidéo souhaitée. Étape 2 : appuyez sur pour agrandir la vue du fichier souhaité. Étape 3 : appuyez sur pour effacer le fichier. Étape 4 : pour confirmer la suppression, appuyez sur ou appuyez pour annuler.
-
Seite 51: Guide-Utilisateur
Design et fonctionnement État de la carte mémoire SD Utilisez cette fonction pour afficher l'état de la carte mémoire SD. - Effacer tous les fichiers Efface tous les fichiers enregistrés par ÉTAT DE LA CARTE SD l'appareil. 9527 - Formater la carte mémoire SD *Mémoire disponible pour les photos. -
Seite 52: Sortie Usb
Design et fonctionnement Agrandissement de l'affichage et reflet - Agrandissement de l'affichage : appuyez sur pour doubler la taille de la photo. Appuyez une nouvelle fois pour rétablir la taille d'affichage normale. * Taille d'image standard * échelle agrandie 2x - Reflet : appuyez sur pour refléter une photo. -
Seite 53: Informations Techniques
Design et fonctionnement Informations techniques Système principal Dimensions de l'appareil 275mm x123mm x 55mm Poids de l'appareil 370 g (sans piles) Affichage 3,5” TFT LCD QVGA Résolution de l'écran 320X240 Alimentation en courant AA x 4 (alcaline ou Ni-HM) Durée de vie des piles 4 heures Support d'enregistrement SD CARD (prend en charge jusqu'à... -
Seite 54: Indications Concernant L'utilisation
Design et fonctionnement Indications concernant l'utilisation • Pour éviter les mises en danger, vous ne devez pas plonger le tube dans des liquides ou gaz combustibles. • Le tube contient toute une série de petits câbles qui permettent de contrôler l'optique et l'électronique de la caméra à l'extrémité de l'endoscope. -
Seite 55: Design Et Fonctionnement 44
Design et fonctionnement • N'essayez pas de démonter l'appareil. Cela engendre un risque de décharge électrique et pourrait endommager l'appareil. • Veuillez utiliser seulement des éléments et accessoires recom- mandés. L'utilisation d'éléments et accessoires non autorisés peut entraîner des dommages. •... - Seite 56 Das Werkzeug HAZET-WERK Hermann Zerver GmbH & Co. KG } 10 04 61 • 42804 REMSCHEID • GERMANY ; Güldenwerther Bahnhofstrasse 25 - 29 • 42853 REMSCHEID [ +49 (0) 21 91 / 7 92-0 \ +49 (0) 21 91 / 7 92-375 (National) -400 (International)