ESYLUX PD-C360i/12 mini DIM Bedienungsanleitung
Vorschau ausblenden
Andere Handbücher für PD-C360i/12 mini DIM:
- Bedienungsanleitung (12 Seiten) ,
- Bedienungsanleitung (6 Seiten) ,
- Bedienungsanleitung (12 Seiten)
Werbung
Quicklinks
DE
BEDIENUNGSANLEITUNG
NL
HANDLEIDING
TECHNISCHE DATEN
GB
DK
OPERATING INSTRUCTIONS
BETJENINGSVEJLEDNING
FR
NOTICE D'UTILISATION
SE
BRUKSANVISNING
MA00176500 • ALK 11/12
•
•
PD-C360i/8 mini DIM
•
•
PD-C360i/12 mini DIM
PD-C360i/8 mini DIM
PD-C360i/12 mini DIM
Technische und optische Änderungen ohne Ankündigung vorbehalten. Aktuelle Informationen zum Produkt finden Sie immer auf der ESYLUX Homepage.
www.esylux.com
DE
BEDIENUNGSANLEITUNG
Taste
Wir gratulieren Ihnen zum Kauf dieses qualitativ hochwertigen ESYLUX Produktes. Um ein einwandfreies Funktionieren
zu gewährleisten, lesen Sie bitte diese Bedienungsanleitung sorgfältig durch und bewahren Sie sie auf, um gegebenenfalls
zukünftig nachlesen zu können.
1 • SICHERHEITSHINWEISE
ACHTUNG: Arbeiten am 230 V Netz dürfen nur von autorisiertem Fachpersonal unter Berücksichtigung der
landesüblichen Installationsvorschriften/-normen ausgeführt werden. Vor der Montage des Produktes ist die
Netzspannung freizuschalten.
Das Produkt ist nur für den sachgemäßen Gebrauch (wie in der Bedienungsanleitung beschrieben)
bestimmt. Änderungen, Modifikationen oder Lackierungen dürfen nicht vorgenommen werden, da
ansonsten jeglicher Gewährleistungsanspruch entfällt. Sofort nach dem Auspacken ist das Gerät
auf Beschädigungen zu prüfen. Im Falle einer Beschädigung darf das Gerät keinesfalls in Betrieb
genommen werden.
Wenn anzunehmen ist, dass ein gefahrloser Betrieb des Gerätes nicht gewährleistet werden kann,
so ist dieses unverzüglich außer Betrieb zu nehmen und gegen unbeabsichtigten Betrieb zu sichern.
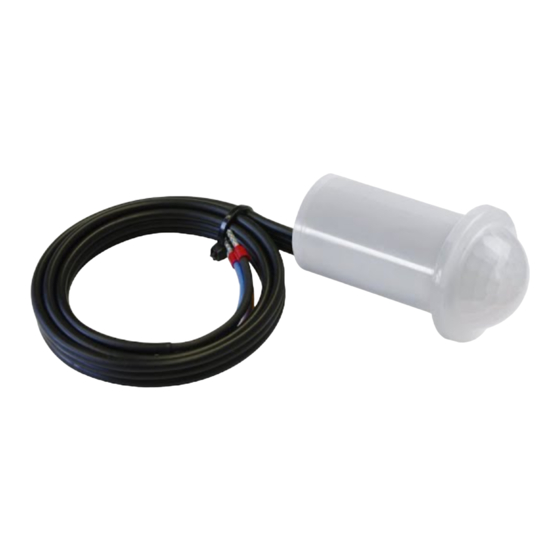
2 • BESCHREIBUNG
Die Präsenzmelder sind Passiv-Infrarot-Melder mit einer 1 - 10 V DC Schnittstelle zum Ansteuern
von dynamischen EVGs mit 1 - 10 V DC Eingang für bedarfsgerechtes Regeln auf ein konstantes
Helligkeitsniveau in Abhängigkeit von Anwesenheit und Tageslicht.
3 • INSTALLATION / MONTAGE / ANSCHLUSS
Hinweise entnehmen Sie bitte dem beiliegenden Faltblatt.
4 • INBETRIEBNAHME
• Netzspannung zuschalten
Es beginnt eine Initialisierungsphase von ca. 60 Sek.
Die rote und die blaue LED blinken dabei abwechselnd. Angeschlossene Beleuchtung ist dabei eingeschaltet.
Die Melder werden in der Einstellung Werksprogramm/fernbedienbar ausgeliefert und sind nach Ablauf
der Initialisierungsphase somit sofort betriebsbereit.
Werksprogrammübersicht:
Lichtwert = Arbeitsbereich (ca. 400 Lux)
Nachlaufzeit = 5 Min.
4.1 Funktion nach der Initialisierungsphase
Vollautomatikmodus
Liegt das Umgebungslicht über dem voreingestellten Lichtwert, dann ist die rote LED und die
angeschlossene Beleuchtung aus.
Einschalten – automatisch, wenn der Melder durch Bewegung ausgelöst wurde und das Umgebungslicht
den voreingestellten Lichtwert unterschritten hat.
Die rote LED ist als Anzeige für die Bewegungserfassung aktiv = 2 x kurzes Blitzen je erfasster Bewegung.
Ändert sich der Tageslichtwert, wird das Kunstlicht entsprechend automatisch nachgeregelt.
Ausschalten – automatisch, wenn keine Bewegungen mehr erfasst werden, dann startet die voreingestellte
Nachlaufzeit, nach Ablauf dieser Zeit schaltet die Beleuchtung aus.
Halbautomatikmodus
Funktion kann mittels Fernbedienung eingestellt werden – siehe Abschnitt 5.
Einschalten – muss zwingend manuell erfolgen per externen Taster oder per Fernbedienung.
Ausschalten – automatisch, wenn keine Bewegungen mehr erfasst werden, dann startet die voreingestellte
Nachlaufzeit, nach Ablauf dieser Zeit schaltet die Beleuchtung aus.
Hinweis zum Präsenzmelder: Steigt jedoch der Tageslichtanteil an und das Umgebungslicht übersteigt den
eingestellten Lichtwert, so schaltet der Melder die Beleuchtung automatisch 5 Min. nach Erreichen des
eingestellten Lichtwertes aus, trotz vorhandener Bewegung/Präsenz. Die Beleuchtung kann danach jederzeit
wieder manuell geschaltet werden.
Schaltverzögerung
Um plötzliche Helligkeitswechsel bei Anwesenheit durch unerwünschtes An-/Ausschalten der
Beleuchtung zu vermeiden, wird der Melder ausschließlich zeitverzögert ausgelöst.
6 • ZUSÄTZLICHE MANUELLE STEUERUNG PER TASTER
Zum Beispiel: Eine vorbeiziehende Wolke wäre in der Lage, ein unnötiges Schalten zu verursachen.
Mit kurzer Betätigung des Tasters wird die Beleuchtung eingeschaltet und automatisch bis auf den
Zeitverzögerung von „hell zu dunkel": 30 Sek. = rote LED leuchtet für diese Zeit.
voreingestellten Lichtwert gedimmt. Der Melder arbeitet dann im Vollautomatikmodus.
Zeitverzögerung von „dunkel zu hell": 5 Min. = rote LED blinkt langsam für diese Zeit.
Durch längeres Betätigen (> 2 Sek.) des Tasters kann die gewünschte Raumhelligkeit gewählt werden.
Taster solange gedrückt halten bis die gewünschte Raumhelligkeit erreicht ist. Dieser eingestellte
Raumhelligkeitswert wird angesteuert solange Personen im Raum anwesend sind.
Verlassen die Personen den Erfassungsbereich, dann startet die voreingestellte Nachlaufzeit.
5 • EINSTELLUNGEN UND FUNKTIONEN PER FERNBEDIENUNG MOBIL PDi/PLUS (EM10425530)
Nach Ablauf dieser Zeit schaltet der Melder in den eingestellten Betriebsmodus.
Wiederholte kurze Betätigung des Tasters schaltet die Beleuchtung aus. Die Beleuchtung bleibt solange
Hinweis: Für einen optimalen Empfang richten Sie die Fernbedienung bei der Programmierung auf den Melder.
ausgeschaltet wie der Melder noch eine Bewegung erfasst. Wenn keine Bewegungen mehr erfasst
Bitte beachten Sie, dass bei direkter Sonneneinstrahlung die Standardreichweite von ca. 8 m bedingt durch den
werden, dann startet die voreingestellte Nachlaufzeit. Nach Ablauf dieser Zeit schaltet der Melder in den
Infrarotanteil der Sonne stark reduziert werden kann.
eingestellten Betriebsmodus.
Taste
Kundenspezifische Einstellung
7 • ESYLUX HERSTELLERGARANTIE
Programmiermodus öffnen
ESYLUX Produkte sind nach geltenden Vorschriften geprüft und mit größter Sorgfalt hergestellt.
Blaue LED leuchtet am Melder und zeigt damit Programmiermodus „blue mode" an.
Der Garantiegeber, die ESYLUX Deutschland GmbH, Postfach 1840, D-22908 Ahrensburg
Die angeschlossene Beleuchtung schaltet ein.
(für Deutschland) bzw. der entsprechende ESYLUX Distributor in Ihrem Land (eine vollständige Übersicht
Der Melder reagiert im Programmiermodus nicht auf Bewegungen.
finden Sie unter www.esylux.com) übernimmt für die Dauer von drei Jahren ab Herstelldatum eine
Garantie auf Herstellungs-/Materialfehler der ESYLUX Geräte.
Einschalt-Lichtwert per Augentaste oder festen Lichtwert einstellen
Diese Garantie besteht unabhängig von Ihren gesetzlichen Rechten gegenüber dem Verkäufer des Geräts.
Die Garantie bezieht sich nicht auf die natürliche Abnutzung, Veränderung/Störung durch
Umwelteinflüsse oder auf Transportschäden sowie nicht auf Schäden, die infolge Nichtbeachtung der
Durch einmaliges Drücken der Taste „DIM" startet der Dimmer zyklisch und verändert
Bedienungsanleitung, der Wartungsanweisung und/oder unsachgemäßer Installation entstanden sind.
die Lichtstärke der Beleuchtung automatisch langsam zwischen max. und min. Wert.
Mitgelieferte Batterien, Leuchtmittel und Akkus sind von der Garantie ausgeschlossen.
Ist die gewünschte Raumhelligkeitswert erreicht drücken Sie bitte die Taste „Auge".
Der Lichtwert wird gespeichert als neuer Helligkeitssollwert.
Die Garantie kann nur gewährt werden, wenn das unveränderte Gerät unverzüglich nach Feststellung
des Mangels mit Rechnung/Kassenbon sowie einer kurzen schriftlichen Fehlerbeschreibung, ausreichend
frankiert und verpackt an den Garantiegeber eingesandt wird.
Fester Einschaltwert (100 Lux - Tagbetrieb)
Bei berechtigtem Garantieanspruch wird der Garantiegeber nach eigener Wahl das Gerät in
Bestätigung durch kurzes abwechselndes Blinken der blauen und roten LED am Melder.
angemessener Zeit ausbessern oder austauschen. Weitergehende Ansprüche umfasst die Garantie
nicht, insbesondere haftet der Garantiegeber nicht für aus der Fehlerhaftigkeit des Geräts entstehende
Nachlaufzeit für Kanal „Beleuchtung-C1" einstellen: 1 Min. bis 15 Min.
Schäden. Sollte der Garantieanspruch nicht gerechtfertigt sein (z.B. nach Ablauf der Garantiezeit oder
Bestätigung durch kurzes abwechselndes Blinken der blauen und roten LED am Melder.
bei Mängeln außerhalb des Garantieanspruchs), so kann der Garantiegeber versuchen, das Gerät
kostengünstig gegen Berechnung für Sie zu reparieren.
Wechsel zwischen „Vollautomatik" und „Halbautomatik"
Halbautomat = Taste drücken, blaue LED ist für ca. 3 Sek. aus.
Vollautomat = Taste drücken, blaue LED blinkt ca. 3 Sek.
0,2
8
3
0,2
12
3
GB
OPERATING INSTRUCTIONS
Kundenspezifische Einstellung
Orientierungslicht (10 % der Lichtleistung) aktivieren
Congratulations on your purchase of this high-quality ESYLUX product. To ensure proper operation, please read these user
Eine sogenannte Nachtlichtfunktion: Tageslichtanteil in einem Raum/Flur sinkt und der
instructions carefully and keep them for future reference.
am Melder eingestellte Lichtwert (Bsp.: 400 Lux) wird unterschritten, dann wird die
Beleuchtung automatisch auf ca. 10 % der max. Lichtleistung gedimmt. Bei Erkennung
1 • SAFETY INSTRUCTIONS
von Bewegungen steuert der Melder die Beleuchtung auf den voreingestellten
Lichtwert. Werden vom Präsenzmelder keine Bewegungen mehr erkannt, schaltet der
CAUTION: Work on the 230 V power system must be carried out by authorised personnel only with due regard to
Präsenzmelder nach Ablauf der eingestellten Nachlaufzeit zurück auf ca. 10 % der
the applicable installation regulations. Switch off the power supply before installing the system.
max. Lichtleistung. Ist die Raumhelligkeit größer als der eingestellte Lichtwert, schaltet
der Präsenzmelder das Orientierungslicht automatisch aus.
Use this product only as intended (as described in the user instructions). Changes or modifications to the
Bestätigung durch kurzes abwechselndes Blinken der blauen und roten LED am Melder.
product or painting it will result in loss of warranty. You should check the device for damage immediately
after unpacking it. If there is any damage, you should not install the device under any circumstances.
Orientierungslicht (10 % der Lichtleistung), jedoch mit fester Einschaltzeit 1 Min. bis 60 Min. aktivieren
If you suspect that safe operation of the device cannot be guaranteed, you should turn the device off
Die Beleuchtung wurde eingeschaltet, entweder automatisch oder durch manuelles
immediately and make sure that it cannot be operated unintentionally.
Eintasten. Werden vom Präsenzmelder keine Bewegungen mehr erkannt, schaltet
der Präsenzmelder nach Ablauf der eingestellten Nachlaufzeit zurück auf ca. 10 %
2 • DESCRIPTION
Lichtleistung. Jetzt startet die gewählte Orientierungslicht-Einschaltzeit (Bsp. 10 Min.).
Erfasst der Melder innerhalb dieser Zeit neue Bewegungen, steuert der Melder die
The presence detectors are passive infrared detectors with a 1 - 10 V DC interface for controlling
Beleuchtung wieder auf den voreingestellten Lichtwert. Werden jedoch in dieser
dynamic electronic ballasts with a 1 -10 V DC input for demand-actuated control to a constant
Zeit keine neuen Bewegungen erfasst, wird das Orientierungslicht automatisch
brightness level, depending on presence and daylight.
ausgeschaltet.
Bestätigung durch kurzes abwechselndes Blinken der blauen und roten LED am Melder.
3 • INSTALLATION / ASSEMBLY / CONNECTION
Orientierungslicht (10 % der Lichtleistung) deaktivieren
Please refer to the supplied leaflet for instructions.
Bestätigung durch kurzes abwechselndes Blinken der blauen und roten LED am Melder.
4 • START-UP
LEDs ein-/ausschalten
• Connect the power supply
LEDs ausschalten = Taste drücken, blaue LED ist für ca. 3 Sek. aus.
A warm-up phase of approx. 60 seconds is initiated during which the red and blue LEDs flash alternately.
LEDs einschalten = Taste drücken, blaue LED blinkt ca. 3 Sek.
The connected lighting is turned on.
Zurücksetzen auf Werksprogramm
The detectors are preset to "factory settings/remote control" and are therefore immediately ready for
Bestätigung durch kurzes abwechselndes Blinken der blauen und roten LED am Melder.
use after the warm-up phase.
Overview of factory settings:
Programmiermodus schließen
Light value = working area (approx. 400 lux)
Blaue LED erlischt, die Einstellungen sind nun gespeichert.
Time setting = 5 min
Melder reagiert nun automatisch entsprechend den eingestellten Werten.
4.1 Function after the warm-up phase
HINWEIS: Wird der Programmiermodus nicht per Taste geschlossen, schließt der Melder
Fully automatic mode
automatisch den Programmiermodus 10 Min. nach dem letzten Betätigen einer Taste.
If the ambient lighting level is higher than the default light value, the red LED and the connected lighting
will be switched off.
Zusätzliche Funktionen per Fernbedienung Mobil-PDi/plus
Automatic switch-on: if the detector has been triggered by movement and the ambient lighting level has
fallen below the default light value.
Prüfung der Reichweite/Erfassung durch den Testbetrieb
The red LED is enabled to indicate motion detection: two short flashes each time movement is detected.
Angeschlossene Beleuchtung schaltet ein – gut sichtbares Abschreiten/Kontrolle des
Should there be a change in the natural light value, the artificial light will be adjusted accordingly.
Erfassungsbereiches eines Melders. Verzögerungs- und lastfreie Bewegungsanzeige
Automatic switch-off: if movement is no longer detected, the lighting will be switched off once the set time
durch 2-maliges kurzes Blinken der blauen LED.
has elapsed.
HINWEIS: Verlassen des Testmodus durch erneutes Drücken der Taste „TEST" oder „RESET".
Semi-automatic mode
Function can be set using the remote control – see section 5.
Switching on must be performed manually using the external button or remote control.
Temporäres Dimmen auf den gewünschten Lichtwert (Tasterersatz)
Automatic switch-off if movement is no longer detected, the lighting will be switched off once the set time
Durch einmaliges Drücken der Taste „DIM" startet der Dimmer zyklisch und verändert
has elapsed.
die Lichtstärke der Beleuchtung automatisch langsam zwischen max. und min. Wert.Ist
die gewünschte Raumhelligkeitswert erreicht drücken Sie bitte die Taste „Auge".
Dieser Lichtwert wird ausgesteuert, solange Personen im Raum anwesend sind.
Note on presence detectors: However, should the natural lighting level increase and the ambient lighting level
Verlassen die Personen den Erfassungsbereich, kehrt der Präsenzmelder nach Ablauf
exceed the preset light value, the detector will automatically switch the lighting off 5 minutes after reaching
der Nachlaufzeit zum eingestellten Betriebsmodus zurück.
the preset light value, regardless of any movement/presence. The lighting can subsequently be switched back on
manually at any time.
Kanal „Beleuchtung-C1" manuell ein-/ausschalten (Tasterersatz)
Delay
When persons are present, in order to avoid sudden changes in brightness caused by undesired
switching on/off of the lighting, the detector will only be triggered after a time delay.
Abbrechen der Funktionen „TEST", „Licht ON/OFF"
Example: A passing cloud could potentially cause unnecessary switching.
Der Melder kehrt in den entsprechend eingestellten Betriebsmodus zurück.
Time delay from light to dark: 30 sec. = red LED lights up during this period.
Time delay from dark to light: 5 min. = red LED flashes slowly during this period.
5 • SETTINGS AND FUNCTIONS VIA MOBIL-PDi/PLUS REMOTE CONTROL (EM10425530)
NB: For optimum reception, when programming the settings, point the remote control at the detector.
Please note that if the sun shines directly on the sensor, the standard detection range of approx. 8 m
may be dramatically reduced owing to the sun's infrared rays.
Button
Customised setting
Entering programming mode
Blue LED lights up on the detector, indicating "blue mode" (programming mode).
The connected lighting turns on.
Whilst in programming mode, the detector's movement sensor is disabled.
Set switch-on light value using the eye button or a fixed light value
By pressing the "DIM" button once, the dimmer begins periodically and automatically
adjusting the light intensity of the lighting gradually between max. and min. values.
When the desired ambient brightness level has been reached, press the
"eye" button.
The light value will be stored as the new predetermined brightness value.
Preset switch-on values (100 lux - daytime operation)
Confirmed by blue and red LED on the detector flashing alternately.
Determining a time setting for channel "lighting-C1": 1 min. to 15 min.
Confirmed by blue and red LED on the detector flashing alternately.
Alternating between "fully automatic" and "semiautomatic" operation modes
Semiautomatic mode = press button, the blue LED will turn off for approx. 3 seconds.
Fully automatic mode = press button, the blue LED will flash for approx. 3 seconds.
TECHNICAL DATA
II
PD-C360i/8 mini DIM
0,2
8
3
II
PD-C360i/12 mini DIM
0,2
12
3
Technical and design features may be subject to change. You can find out more about this product on the ESYLUX homepage.
Button
Customised setting
Activating the orientation light (10 % of luminous efficiency)
So-called "night-light feature": if the natural light in a room/hallway decreases and the
lighting level falls below the light value set on the detector (e.g.: 400 lux), the lighting
is automatically dimmed to approx. 10 % of the max. luminous efficiency. When
movement is sensed, the detector turns the lighting up to the preset light value. If the
presence detector no longer detects movement, the lights will revert to approx. 10 % of
their maximum luminous efficiency once the set time has elapsed.
If the ambient brightness is greater than the preset light value, the presence detector
will automatically switch the orientation lighting off.
Confirmed by blue and red LED on the detector flashing alternately.
Activating the orientation light (10 % of luminous efficiency),
but with fixed switch-on time of 1 min. to 60 min.
Lighting has been switched on, either automatically or by manually pressing a button.
If the presence detector no longer detects movement, the lights will revert to approx.
10 % of their maximum luminous efficiency once the set time has elapsed. The selected
orientation light switch-on time (e.g. 10 min.) will now begin. If the detector senses
new movement within this period, the detector turns the lighting up to the preset light
value. If, however, no new movement is sensed within this period, the orientation light is
switched off automatically.
Confirmed by blue and red LED on the detector flashing alternately.
Deactivating the orientation light (10 % of luminous efficiency)
Confirmed by blue and red LED on the detector flashing alternately.
Switching LEDs on/off
To switch LEDs off = press button, the blue LED will turn off for approx. 3 seconds.
To switch LEDs on = press button, the blue LED will flash for approx. 3 seconds.
Reinstating factory settings
Confirmed by blue and red LED on the detector flashing alternately.
Exiting programming mode
Blue LED goes out; settings are now saved.
The detector will now operate automatically according to the preset values.
NOTE: If the programming mode is not exited by pressing the button, the detector
automatically exits the programming mode 10 minutes after the last button was pressed.
Additional functions via Mobil-PDi/plus remote control
Checking the range/detection using test mode
Connected lighting turns on – for clear inspection/pacing out of a detector's field of
detection. Real-time, load-free indication of movement given by 2 flashes of the blue LED.
NOTE: Exit test mode by pressing the "TEST" or "RESET" button.
Temporary dimming to the desired light value (replaces button)
By pressing the "DIM" button once, the dimmer begins periodically and automatically
adjusting the light intensity of the lighting gradually between max. and min. values.
When the desired ambient brightness level has been reached, press the "eye" button.
This light value will be maintained for as long as persons are present in the room.
Should these persons leave the detection range, the presence detector will revert to the
previous setting mode after the default time setting has elapsed.
Switching channel "lighting-C1" on/off manually (replaces button)
Interrupting the "TEST", "light ON/OFF" functions
The detector switches back to the corresponding set operating mode.
6 • ADDITIONAL MANUAL CONTROL BY BUTTON
By pressing the button briefly, the lighting will be switched on and automatically dimmed to the preset light
value. The detector will continue in fully automatic mode.
Press and hold the button for more than 2 seconds to select the desired ambient brightness. Hold down
the button until the desired ambient brightness is reached. This preset ambient brightness level will be
maintained for as long as persons are present in the room.
Should these persons leave the detection range, the preset time setting will start. Once this time has
elapsed, the detector will revert to the set operating mode.
Press the button again briefly to switch the lighting off. The lighting will remain switched off for as long as
the detector continues to detect movement. If movement is no longer detected, the preset time setting will
start. Once this time has elapsed, the detector will revert to the set operating mode.
7 • ESYLUX MANUFACTURER'S GUARANTEE
ESYLUX products are tested in accordance with applicable regulations and manufactured with the utmost
care. The guarantor, ESYLUX Deutschland GmbH, Postfach 1840, D-22908 Ahrensburg, Germany
(for Germany) or the relevant ESYLUX distributor in your country (visit www.esylux.com for a complete
overview) provides a guarantee against manufacturing/material defects in ESYLUX devices for a period
of three years from the date of manufacture.
This guarantee is independent of your legal rights with respect to the seller of the device.
The guarantee does not apply to natural wear and tear, changes/interference caused by environmental
factors or damage in transit, nor to damage caused as a result of failure to follow the user or maintenance
instructions and/or as a result of improper installation. Any illuminants or batteries supplied with the
device are not covered by the guarantee.
The guarantee can only be honoured if the device is sent back with the invoice/receipt, unchanged,
packed and with sufficient postage to the guarantor, along with a brief description of the fault, as soon
as a defect has been identified.
If the guarantee claim proves justified, the guarantor will, within a reasonable period, either repair the
device or replace it. The guarantee does not cover further claims; in particular, the guarantor will not be
liable for damages resulting from the device's defectiveness. If the claim is unfounded (e.g. because the
guarantee has expired or the fault is not covered by the guarantee), then the guarantor may attempt to
repair the device for you for a fee, keeping costs to a minimum.
DONNÉES TECHNIQUES
II
PD-C360i/8 mini DIM
0,2
8
3
II
PD-C360i/12 mini DIM
0,2
12
3
Des modifications techniques et esthétiques peuvent être apportées sans préavis. Pour plus d'informations sur ce produit, consultez le site Internet d'ESYLUX.
FR
NOTICE D'UTILISATION
Touche
Félicitations ! Avec ce produit ESYLUX, vous avez fait le choix de la qualité. Pour l'utiliser dans les meilleures conditions,
veuillez lire attentivement ce mode d'emploi et le conserver en vue d'une consultation future.
1 • CONSIGNES DE SÉCURITÉ
ATTENTION : seules des personnes autorisées et qualifiées pour effectuer une installation conforme aux normes et
prescriptions en vigueur peuvent intervenir sur le réseau 230 V. Coupez le courant avant d'installer le produit.
Ce produit ne doit être utilisé que dans les conditions prévues par le présent mode d'emploi.
Toute modification du produit (ajout, peinture, etc.) entraîne l'annulation de la garantie. Une fois que
vous avez déballé l'appareil, vérifiez qu'il ne présente aucun défaut. En cas d'anomalie, ne le mettez
pas en marche.
Si vous n'êtes pas certain que l'appareil peut être utilisé en toute sécurité, éteignez-le immédiatement
et prenez vos dispositions pour empêcher toute utilisation involontaire.
2 • DESCRIPTION
Les détecteurs de présence sont des détecteurs à infrarouge passifs dotés d'une interface 1 - 10 V DC.
Cette dernière commande des ballasts électroniques dynamiques avec entrée 1 - 10 V DC servant à
maintenir un niveau de luminosité constant selon la luminosité naturelle et la présence de personnes.
3 • INSTALLATION / MONTAGE / RACCORDEMENT
Vous trouverez les informations utiles dans le dépliant fourni.
4 • MISE EN SERVICE
• Mettez le dispositif sous tension
Une phase d'initialisation de 60 s environ s'amorce, durant laquelle les LED bleu et rouge clignotent
en alternance. L'éclairage raccordé est allumé.
Au terme de la phase d'initialisation, les détecteurs sont prêts à l'emploi car ils sont réglés, à la livraison,
sur préréglages d'usine/télécommande.
Liste des préréglages d'usine :
Luminosité = espace de travail (400 lux env.)
Durée d'activation = 5 minutes
4.1 Après la phase d'initialisation
Mode automatique
Si la luminosité ambiante est supérieure à la valeur limite définie, la LED rouge et l'éclairage raccordé
restent éteints.
Activation automatique lorsque le détecteur perçoit un mouvement et mesure une luminosité ambiante
inférieure à la valeur limite définie.
La LED rouge indique les mouvements détectés : 2 clignotements courts par mouvement perçu.
L'éclairage s'ajuste automatiquement lorsque la lumière du jour varie.
Désactivation automatique : si le détecteur ne perçoit plus de mouvements, il laisse s'écouler la durée
d'allumage programmée, puis désactive l'éclairage.
Mode semi-automatique
Cette fonction peut être activée à l'aide d'une télécommande – cf. paragraphe 5.
Activation – manuelle uniquement : effectuée au moyen d'une télécommande ou d'un interrupteur externe.
Désactivation – automatique : si le détecteur ne perçoit plus de mouvements, il laisse s'écouler la durée
d'allumage programmée, puis désactive l'éclairage.
Remarque à propos du détecteur de présence : si la luminosité ambiante augmente et dépasse la valeur limite
définie, le détecteur éteint l'éclairage raccordé au terme d'un délai de 5 minutes, même s'il perçoit encore une
présence ou des mouvements. L'éclairage peut, à tout moment, être rallumé manuellement.
Temporisation
Pour éviter les changements de luminosité trop soudains dus à une activation/désactivation indésirable
de l'éclairage en cas de détection de présence, le détecteur s'active exclusivement sur la base d'une
temporisation.
Par exemple : un passage nuageux pourrait, par exemple, activer inutilement le détecteur.
Temporisation « clair à sombre » : la LED rouge s'allume pendant 30 s.
6 • COMMANDE MANUELLE SUPPLEMENTAIRE PAR POUSSOIR
Temporisation « sombre à clair » : la LED rouge clignote lentement pendant 5 min.
En appuyant brièvement sur l'interrupteur, vous allumez l'éclairage, qui se règle automatiquement
sur la luminosité prédéfinie. Le détecteur fonctionne alors en mode automatique.
Un appui long (> 2 s) permet de choisir une luminosité ambiante différente. Pour ce faire, maintenez
5 • RÉGLAGES ET FONCTIONS DISPONIBLES VIA LA TÉLÉCOMMANDE MOBIL-PDi/PLUS (EM10425530)
le poussoir enfoncé jusqu'à ce que la luminosité ambiante atteigne le niveau souhaité. Cette luminosité
ambiante est conservée tant que des personnes se trouvent dans la pièce.
Remarque : pour une transmission optimale lors de la programmation, orientez la télécommande vers le détecteur.
Si les personnes quittent la zone de détection, le détecteur laisse s'écouler la durée d'allumage
Attention : en cas d'ensoleillement direct du dispositif, la portée standard (8 m) peut être fortement diminuée en
programmée. Une fois cette durée écoulée, il passe en mode automatique.
raison du rayonnement infrarouge du soleil.
Un nouvel appui court entraîne l'extinction de l'éclairage, qui reste éteint tant que le détecteur perçoit
des mouvements. Si le détecteur ne perçoit plus de mouvements, il laisse s'écouler la durée d'allumage
programmée. Une fois cette durée écoulée, il passe en mode automatique.
Touche
Programmation
7 • ESYLUX – GARANTIE DU CONSTRUCTEUR
Ouvrir le mode de programmation
La LED bleue du détecteur s'allume, indiquant le mode de programmation « blue mode ».
Les produits ESYLUX sont fabriqués avec le plus grand soin et testés selon les normes en vigueur.
L'éclairage raccordé s'allume. En mode de programmation, le détecteur ne s'active
Le garant, ESYLUX Deutschland GmbH, Case postale 1840, D-22908 Ahrensburg (pour l'Allemagne)
pas lorsqu'il perçoit un mouvement.
ou le distributeur de la marque dans votre pays (vous trouverez toutes les informations nécessaires à ce
sujet sur le site www.esylux.com) garantit les appareils ESYLUX contre les défauts de fabrication et de
Régler la luminosité à l'allumage au moyen de la touche « Œil » ou en entrant une valeur
matériaux pour une durée de 3 ans à partir de la date d'achat.
Cette garantie est indépendante de vos droits légaux vis-à-vis du vendeur de l'appareil.
Appuyez brièvement sur la touche « DIM » : le variateur effectue des boucles,
L'usure naturelle, les modifications de l'appareil dues à son milieu d'installation et les dommages
faisant varier lentement la luminosité entre les valeurs maximale et minimale.
résultant de son transport n'entrent pas dans le cadre de la garantie. De même, ne sont pas couverts
Lorsque la luminosité ambiante souhaitée est atteinte, appuyez sur la touche « Œil ».
les défauts dus au non-respect des instructions de montage et d'entretien et/ou à une installation
La luminosité est enregistrée et conservée en tant que valeur limite.
inappropriée. Sont également exclues de la garantie les batteries, sources lumineuses et piles fournies
avec l'appareil.
Valeur limite prédéfinie (100 lux - mode jour)
La procédure de garantie ne pourra être enclenchée que sur présentation d'un appareil non modifié
Confirmation par un bref clignotement de la LED bleue et rouge du détecteur.
après constatation du défaut, ainsi que d'un ticket de caisse valable, accompagnés d'une courte
description de l'anomalie constatée et expédié au garant dans un emballage approprié et suffisamment
affranchi.
Régler la durée d'allumage pour le canal « Éclairage C1 » : 1 à 15 min
Si le recours en garantie s'avère justifié, le garant peut décider soit de réparer, soit de remplacer
Confirmation par un bref clignotement de la LED bleue et rouge du détecteur.
l'appareil dans les meilleurs délais. La garantie ne comprend aucun autre recours. Le garant n'est
notamment pas responsable de tout dommage causé par un défaut de l'appareil. Si le recours de
Basculer mode « Automatique/semi-automatique »
garantie s'avère injustifié (par exemple, si la garantie a expiré ou si le défaut constaté n'est pas couvert
Appui sur la touche en mode semi-automatique : la LED bleue s'éteint pendant 3 s.
par celle-ci), le garant tentera de réparer l'appareil au meilleur coût.
Appui sur la touche en mode automatique : la LED bleue clignote pendant 3 s.
II
II
Programmation
Activer l'éclairage d'orientation (10 % d'efficacité lumineuse)
Fonction « veilleuse » : si l'intensité de la lumière naturelle d'une pièce/d'un couloir
diminue et que la luminosité passe en dessous de la valeur définie sur le détecteur
(p. ex. 400 lux), l'éclairage est régulé pour atteindre environ 10 % de l'efficacité
lumineuse maximale du luminaire. Si le détecteur perçoit des mouvements, il règle
l'éclairage conformément à la luminosité définie. S'il ne perçoit aucun mouvement,
il laisse s'écouler la durée programmée, puis règle l'éclairage de façon à ce qu'il
restitue 10 % de l'intensité lumineuse maximale.
Si la luminosité ambiante dépasse la valeur limite définie, le détecteur de présence
éteint automatiquement l'éclairage d'orientation.
Confirmation par un bref clignotement de la LED bleue et rouge du détecteur.
Activer l'éclairage d'orientation (10 % d'efficacité lumineuse), mais avec une durée d'allumage
prédéfinie entre 1 et 60 min
L'éclairage a été activé, automatiquement ou manuellement. Si le détecteur de
présence ne perçoit aucun mouvement, il laisse s'écouler la durée programmée,
puis règle l'éclairage de façon à ce qu'il restitue 10 % d'efficacité lumineuse. La
durée d'allumage sélectionnée pour l'éclairage d'orientation commence (10 min
p. ex.). Si le détecteur perçoit d'autres mouvements pendant cette période, il règle
l'éclairage conformément à la valeur limite définie. Dans le cas contraire, l'éclairage
d'orientation est automatiquement désactivé.
Confirmation par un bref clignotement de la LED bleue et rouge du détecteur.
Désactiver l'éclairage d'orientation (10 % d'efficacité lumineuse)
Confirmation par un bref clignotement de la LED bleue et rouge du détecteur.
Allumer/éteindre les LED
Éteindre les LED = appui sur la touche : la LED bleue s'éteint pendant 3 s.
Allumer les LED = appui sur la touche : la LED bleue clignote pendant 3 s.
Rétablir les préréglages d'usine
Confirmation par un bref clignotement de la LED bleue et rouge du détecteur.
Fermer le mode de programmation
La LED bleue s'éteint, les réglages sont enregistrés.
Le détecteur fonctionne à présent automatiquement, en fonction des valeurs définies.
REMARQUE : si vous ne quittez pas le mode de programmation en appuyant sur la touche,
le détecteur le ferme automatiquement au bout de 10 min d'inactivité.
Autres fonctions disponibles via la télécommande Mobil-PDi/plus
Test de la portée/détection en mode test
L'éclairage raccordé s'allume, pour une vérification facile de la zone de détection de
l'appareil. Affichage instantané du mouvement, sans activation des appareils connectés
au détecteur, par deux clignotements brefs de la LED bleue.
REMARQUE : appuyer à nouveau sur la touche « TEST » ou « RESET » pour quitter le mode test.
Réglage temporaire sur la luminosité définie (alternative au bouton mural)
Appuyez brièvement sur la touche « DIM » : le variateur effectue des boucles, faisant
varier lentement la luminosité entre les valeurs maximale et minimale. Lorsque la
luminosité ambiante souhaitée est atteinte, appuyez sur la touche « Œil ».
Cette luminosité est conservée tant que des personnes se trouvent dans la pièce.
Si les personnes quittent la zone de détection, le détecteur de présence bascule vers
le mode de fonctionnement défini dès que la durée d'allumage programmée est écoulée.
Activation/désactivation manuelle du canal « Éclairage C1 » (alternative au bouton mural)
Interruption des fonctions « TEST », « ACTIVATION/DÉSACTIVATION de l'éclairage »
Le détecteur retourne automatiquement au mode de fonctionnement précédemment sélectionné.
Werbung

Verwandte Anleitungen für ESYLUX PD-C360i/12 mini DIM


Inhaltszusammenfassung für ESYLUX PD-C360i/12 mini DIM
- Seite 1 Technische und optische Änderungen ohne Ankündigung vorbehalten. Aktuelle Informationen zum Produkt finden Sie immer auf der ESYLUX Homepage. Technical and design features may be subject to change. You can find out more about this product on the ESYLUX homepage. Des modifications techniques et esthétiques peuvent être apportées sans préavis. Pour plus d’informations sur ce produit, consultez le site Internet d'ESYLUX.
- Seite 2 PD-C360i/12 mini DIM Technische en optische wijzigingen zonder kennisgeving voorbehouden. Actuele informatie over dit product kunt u vinden op de website van ESYLUX. Ret til tekniske og optiske ændringer uden varsel forbeholdes. Du kan altid finde aktuelle informationer om produktet på ESYLUX hjemmesiden.
- Seite 3 Oikeus teknisiin ja optisiin muutoksiin ilman ennakkoilmoitusta pidätetään. Ajankohtaisia tietoja tuotteesta löytyy aina ESYLUX-kotisivulta. Med forbehold om retten til tekniske og utseendemessige endringer uten forvarsel. Aktuell informasjon om produktet finner du alltid på ESYLUX hjemmesiden. Con riserva di modifiche tecniche ed estetiche senza preavviso. Per ulteriori informazioni su questo prodotto, consultare il sito Internet ESYLUX.
- Seite 4 PD-C360i/12 mini DIM Reservado el derecho a realizar cambios técnicos y visuales sin previo aviso. Encontrará más información actualizada sobre este producto en la página web de ESYLUX. Reservamo-nos o direito de efectuar alterações técnicas e ópticas sem pré-aviso. Para informações actualizadas sobre o produto consulte a página na Internet ESYLUX.