Inhaltsverzeichnis
Werbung
Verfügbare Sprachen
Verfügbare Sprachen
Quicklinks
DVD-R/RW CD-R/RW WRITER
LECTEUR DE DVD-R/RW, CD-R/RW
DVD-R/RW-CD-R/RW-WRITER
REGISTRATORE PER DISCHI DVD-R O -RW E CD-R O -RW
GRABADORA DE DISCOS DVD-R/RW Y CD-R/RW
DVR-R/RW, CD-R/RW WRITER
DVR-A05
Operating instructions
Mode d'emploi
Bedienungsanleitung
Istruzioni per l'uso
Manual de instrucciones
Gebruiksaanwijzing
Werbung
Inhaltsverzeichnis

Verwandte Anleitungen für Pioneer DVR-A05


Inhaltszusammenfassung für Pioneer DVR-A05
- Seite 1 DVD-R/RW CD-R/RW WRITER LECTEUR DE DVD-R/RW, CD-R/RW DVD-R/RW-CD-R/RW-WRITER REGISTRATORE PER DISCHI DVD-R O -RW E CD-R O -RW GRABADORA DE DISCOS DVD-R/RW Y CD-R/RW DVR-R/RW, CD-R/RW WRITER DVR-A05 Operating instructions Mode d’emploi Bedienungsanleitung Istruzioni per l’uso Manual de instrucciones Gebruiksaanwijzing...
- Seite 2 DANGER – VISIBLE AND INVISIBLE LASER RADIATION WHEN OPEN. AVOID DIRECT EXPOSURE TO BEAM.
- Seite 3 Product Name: DVD-R/RW CD-R/RW WRITER Model Number: DVR-A05 Responsible Party Name: PIONEER ELECTRONICS (USA) INC. Custormer Support Division Address: 1925 E. DOMINGUEZ ST. LONG BEACH, CA 90810 U.S.A. Phone: (310) 952-2820...
-
Seite 4: Important Notice
Thank you for buying this Pioneer product. Please read through these operating instructions so you will know how to operate your model properly. After you have finished reading the instructions, put them away in a safe place for future reference. -
Seite 5: Safety Instructions
POWER SOURCES - Operate this product from the type of power source indicated on the marking label. If you are not sure of the type of power available, consult Authorized Pioneer Dealer. OVERLOADING - DO NOT overload wall outlets and extension cords. Doing so can result in fire or electric shock. - Seite 6 FEATURES • Write Speed CLV 1X and 2X at DVD-R CLV 1X, 2X and 4X at High-Speed DVD-R CLV 1X at DVD-RW CLV 1X and 2X at High-Speed DVD-RW CLV 4X, 8X, 12X and 16X at CD-R CLV 4X at CD-RW CLV 4X and 8X at High-Speed CD-RW •...
-
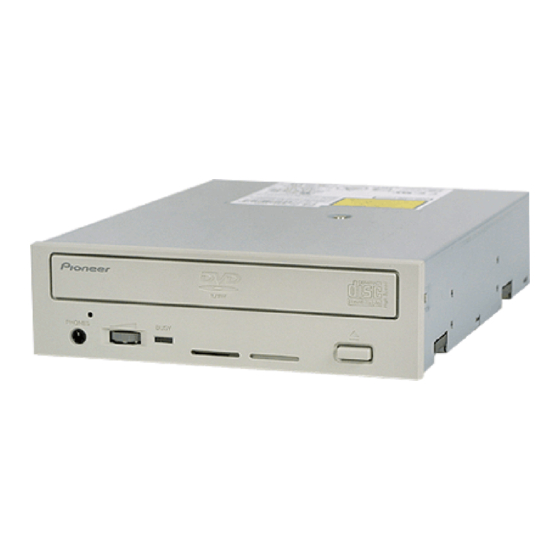
Seite 7: Front View
INTERFACE FRONT VIEW PHONES BUSY 1 Forced Ejection Hole Insert a stiff rod into the hole and push to eject the tray when the tray doesn’t unload by pressing the Eject button. In the normal operation, the eject button should be used to unload the tray. -
Seite 8: Rear View
INTERFACE REAR VIEW MASTER SLAVE CABLE SELECT DC INPUT IDE INTERFACE ANLOG AUDIO 5V G G 12V 8 Audio Output This is a connector for output of analog audio. This connector is compatible with `Molex 70553`, choose a suitable connection cable. Name Function Left channel audio output. -
Seite 9: Installation
INSTALLATION 1 Turn off the power of the personal computer and remove the power cord from the AC outlet, then remove the cover or the front panel. 2 Remove the blank panel installed on the front of the 5.25 inch slot. 3 Install the fixing slide rails on the drive. - Seite 10 CONNECTIONS Pin 1 Audio Cable IDE Interface cable Power cable DC INPUT 5V G G 12V ÷ Turn off the power supply of the personal computer. ÷ Connect the power cable from the personal computer. At the time of connection, pay attention to the polarity of the cable.
-
Seite 11: Specifications
Short-circuit socket x 1 Audio cable x 1 Mounting screw x 4 Operating instructions x 1 NOTE: • Specifications and design subject to possible modifications without notice, due to improvements. Published by Pioneer Corporation. Copyright C 2002 Pioneer Corporation. All rights reserved. - Seite 12 Nous vous remercions pour cet achat d’un produit Pioneer. Nous vous demandons de lire soigneusement ce mode d’emploi ; vous serez ainsi à même de faire fonctionner l’appareil correctement. Après avoir bien lu le mode d’emploi, le ranger dans un endroit sûr pour pouvoir s’y référer ultérieurement.
-
Seite 13: Instructions De Securite
SOURCES D’ALIMENTATION - Utiliser ce produit avec le type d’alimentation indiqué sur l’étiquette de fabrication. En cas de doute à propos du type d’alimentation disponible, consulter un revendeur Pioneer agréé. SURCHARGE - NE PAS surcharger les prises murales et les rallonges pour ne pas entraîner d’incendie ou de secousse électrique. - Seite 14 CARACTERISTIQUES • Vitesse d’écriture Vitesse linéaire constante 1X et 2X pour DVD-R Vitesse linéaire constante 1X, 2X et 4X pour DVD-R haute vitesse Vitesse linéaire constante 1X pour DVD-RW Vitesse linéaire constante 1X et 2X pour DVD-RW haute vitesse Vitesse linéaire constante 4X, 8X, 12X et 16X pour CD-R Vitesse linéaire constante 4X pour CD-RW Vitesse linéaire constante 4X et 8X pour CD-RW haute vitesse •...
-
Seite 15: Vue Avant
INTERFACE VUE AVANT PHONES BUSY 1 Orifice d’éjection forcée Insérer une tige rigide dans l’orifice et pousser pour éjecter le tiroir lorsque celui-ci ne s’ouvre pas lors d’un appui sur la touche d’éjection. En fonctionnement, utiliser uniquement la touche d’éjection pour ouvrir le tiroir. Veiller à ce que l’alimentation du lecteur soit coupée et attendre l’arrêt de la rotation du disque pendant plus d’une minute avant de tenter d’éjecter le tiroir au moyen de l’orifice d’éjection. - Seite 16 INTERFACE VUE DE LA FACE ARRIERE MASTER SLAVE CABLE SELECT DC INPUT IDE INTERFACE ANLOG AUDIO 5V G G 12V 8 Sortie audio Connecteur pour sortie analogique audio. Ce connecteur est compatible avec la norme « Molex 70553 ». Choisir un câble de connexion approprié.
- Seite 17 INSTALLATION 1 Couper l’alimentation de l’ordinateur personnel, débrancher le cordon d’alimentation et déposer le capot ou le panneau avant. 2 Retirer la plaque masquant de la fente de 5,25 pouces. 3 Poser les glissières de fixation sur le lecteur. (S'adresser au magasin ou au fabricant de l’ordinateur lorsque des glissières sont nécessaires.) 4 Introduire le lecteur dans la fente.
- Seite 18 RACCORDEMENT Broche 1 Câble audio Câble d’interface IDE Cordon d’alimentation DC INPUT 5V G G 12V ÷ Mettre l’ordinateur personnel hors tension. ÷ Connecter le cordon d’alimentation de l’ordinateur personnel. Respecter la polarité du cordon lors du raccordement. ÷ Connecter le câble d’interface IDE. Confirmer que la broche 1 du connecteur IDE du lecteur est bien connectée à...
-
Seite 19: Fiche Technique
Vis de fixation x 4 Mode d’emploi x 1 REMARQUE: • Les caractéristiques techniques et présentation de ce produit sont sujets à des changements sans préavis pour améliorations. Publication de Pioneer Corporation. C 2002 Pioneer Corporation. Tous droits de reproduction et de traduction réservés. - Seite 20 Wir danken lhnen für den Kauf dieses Pioneer-Produkts. Lesen Sie sich bitte diese Bedienungsanleitung durch. Dann wissen Sie, wie Sie lhr Gerät richtig bedienen. Bewahren Sie sie an einem sicheren Platz auf, um auch zukünftig nachschlagen zu können. K015 Ge Das Geräuschaufkommen beträgt weniger als 70 dB.
-
Seite 21: Sicherheitsanweisungen
STROMVERSORGUNG - Betreiben Sie das Gerät nur mit dem Stromversorgungstyp, der auf dem Aufkleber angegeben ist. Wenn Sie sich über die vorliegende Netzspannung nicht sicher sind, sprechen Sie bitte mit Ihrem autorisierten Pioneer-Händler. NETZÜBERLASTUNG - NIEMALS Wandsteckdosen und Verlängerungskabel überlasten! Ein Brand oder Stromschlag können die Folge sein. -
Seite 22: Leistungsmerkmale
LEISTUNGSMERKMALE • Schreibgeschwindigkeit CLV 1X und 2X bei DVD-R CLV 1X, 2X und 4X bei Hochgeschwindigkeits-DVD-R CLV 1X bei DVD-RW CLV 1X und 2X bei Hochgeschwindigkeits-DVD-RW CLV 4X, 8X, 12X und 16X bei CD-R CLV 4X bei CD-RW CLV 4X und 8X bei Hochgeschwindigkeits-CD-RW •... - Seite 23 SCHNITTSTELLE VORDERANSICHT PHONES BUSY 1 Loch für erzwungenen Auswurf Wenn die Schublade nach dem Drücken der Eject-Taste nicht ausfährt, führen Sie eine unbiegsame Stange in das Loch ein und drücken sie, um die Disc auszuwerfen. Im normalen Betrieb wird eine Disc mittels Eject-Taste ausgeworfen. Achten Sie vor dem Zugriff auf das Auswurfloch darauf, dass die Netzversorgung des Laufwerks ausgeschaltet ist, und warten Sie länger als eine Minute, bis sich die Disc nicht mehr dreht.
- Seite 24 SCHNITTSTELLE RÜCKANSICHT MASTER SLAVE CABLE SELECT DC INPUT IDE INTERFACE ANLOG AUDIO 5V G G 12V 8 Audioausgang An dieser Buchse liegt das analoge Audiosignal an. Diese Buchse ist zu ‘Molex 70553‘ kompatibel. Wählen Sie ein passendes Verbindungskabel. Stift Bezeichnung Funktion Audioausgangssignal, linker Kanal.
-
Seite 25: Einbau
EINBAU 1 Schalten Sie die Spannungsversorgung des Personal-Computers aus, ziehen Sie den Netzstecker ab und nehmen Sie die Abdeckung oder die Frontplatte ab. 2 Entfernen Sie die Blende von einem leeren 5,25-Zoll-Laufwerkschacht. 3 Befestigen Sie die Klemmschiebeschienen an das Laufwerk. (Wenn Schiebeschienen benötigt werden, wenden Sie sich an das Geschäft, wo Sie den Computer erworben haben, oder an den Hersteller des Computers.) 4 Schieben Sie das Laufwerk in den Schacht ein. - Seite 26 ANSCHLÜSSE Stift 1 Audiokabel IDE-Schnittstellenkabel Spannungskabel DC INPUT 5V G G 12V ÷ Schalten Sie die Spannungsversorgung des Personal-Computers aus. ÷ Schließen Sie das Spannungskabel vom Computer an. Achten Sie dabei auf die richtige Ausrichtung des Steckers. ÷ Schließen Sie das IDE-Schnittstellenkabel an. Vergewissern Sie sich, daß der Stift 1 des IDE-Anschlusses richtig mit dem Stift 1 des Steckers verbunden ist.
-
Seite 27: Technische Daten
5 % bis 90 % (keine Kondensation) [Zubehör] 1 Kurzschlußstecker 1 Audiokabel 4 Montageschraube 1 Bedienungsanleitung HINWEIS: Technische Änderungen zum Zweck der Produktverbesserung ohne vorherige Bekanntmachung vorbehalten. Veröffentlicht von Pioneer Corporation. Urheberrechtlich geschützt C 2002 Pioneer Corporation. Alle Rechte vorbehalten.