Werbung
Quicklinks
0936_Flei_4117_0102
07.07.2009
13:51 Uhr
Seite 1
Brückenstecker
1
Jumper
Fiche de
pontage
DECODER
b
a
1-2
NEM
1
Fig. 3
Einbau eines digitalen Empfängerbausteins: Auf die schraffierte Fläche im Führerstand kann ein DECO-
NEM
DER (DCC: 6876, TWIN: 6846) mit 6-poligem Stecker (NEM 651) geklebt werden. Beim Einbau bitte die
Betriebsanleitung des jeweiligen DECODERs beachten (Fig. 3).
Brückenstecker (Fig. 2) aus der Schnittstelle herausziehen und Stecker des Decoders dafür einstecken. Dabei auf
1
Gleichlage der mit
gekennzeichneten Steckeranschlüsse/Anschlusskabel mit gleicher Farbe achten!
Ersatzhaftreifen: 54 4007
An der schraffierten Stelle kann der Schaltmagnet 9426/9427 eingebaut werden (Fig. 4).
Ölen: Geölt werden Lagerstellen und Getriebe nur an den gekennzeichneten Lagerstellen (Fig. 4 und 6).
Nur FLEISCHMANN-ÖL 6599 verwenden. Nur ein kleiner Tropfen pro Schmierstelle (
Überölung. Zur Dosierung die in der Verschlusskappe der Ölflasche angebrachte Nadel verwenden.
Fig. 2
Fig. 5
6535
Fig. 6
Öffnen der Lok: Ein Öffnen der Lok
ist nur zum Lampenwechsel (6535)
und Einbau eines digitalen Empfän-
gerbausteins (Decoders) erforder-
lich. Schrauben a und b
1-2
entfer-
nen und Lokgehäuse nach oben
abnehmen (Fig. 2).
Lampenwechsel: Kontaktblech c
zur Seite drehen, Lampe 6535 nach
hinten entnehmen. Wiedereinbauen
in umgekehrter Reihenfolge.
1. In Pfeilrichtung abziehen
Fig. 4
9426/9427
Steck-Tauschkupplung
6511
), sonst
Tender: Ein Öffnen des Tenders ist nur zum
Bitte beachten Sie bei Digitalbetrieb/In digital operation please observe/S'il vous plaît observer en operation digitale/Let op
Lampenwechsel, zum Ölen des Getriebes und zum
bij digitale besturing/Per favore di osservare in operazione digitale:
Austausch des Motors erforderlich (Fig. 5/6).
FLEISCHMANN Digital Komponenten sind komplexe elektronische Systeme. Die Kompatibilität und Funktionssicherheit kann daher
nur bei Verwendung von Original FLEISCHMANN Bauteilen und -Komponenten gewährleistet werden. Bei Verwendung von nicht
Original FLEISCHMANN Bauteilen oder von uns nicht freigegebenen Komponenten erlischt die Garantieverpflichtung. Ebenso können
wir dann die Einhaltung der EMV-Richtlinien nicht mehr garantieren. Die Garantieansprüche erlöschen, wenn Sie A) die Artikel zu einem
Lampenwechsel im Tender: Schraube d lösen,
anderen, als von uns als Einsatzzweck vorgesehenen, Zweck verwendet haben, B) die in den Betriebsanleitungen stehenden Hinweise
nicht beachten, C) Folgefehler auf Grund des Einbaus/Umbaus von/mit Fremdkomponenten, für die von uns keine Freigabe erteilt
Gehäuse seitlich aufspreizen und nach oben
wurde und/oder unsachgemäß eingebaut wurden, erleiden. Die Garantie erstreckt sich auch nicht auf verschleißbedingte Störungen,
abziehen.
Beschwerung
entfernen
(Fig.
5).
die durch den Betrieb entstehen.
Kontaktplatine
P2
aus
Halterung
nehmen.
FLEISCHMANN Digital Components are complex electronic systems. Their compatability and functionality can only be guaranteed
Glühlampe aus der Aufnahme im Fahrgestell neh-
when used with original FLEISCHMANN parts and components. The conditions of the guarantee will be considered void if non-origi-
men. Ersatzlampe einsetzen. Kontaktplatine P2
nal FLEISCHMANN parts or other unauthorised parts have been used. The conditions of the guarantee will be considered void, if - you
wieder einsetzen und auf sichere Kontaktgabe ach-
have used the article for a purpose for which it was not intended, - you have not taken due care of the instructions written in the instruc-
ten (Fig. 6).
tion leaflets, - damage occurs as a consequence of installation or conversion using components of other manufacture which have not
been authorised by us, or components which have been incorrectly installed or converted. The guarantee will also not cover preven-
Ersatzglühlampe: 6535
table incidents occuring during operation. The guarantee-period is not extended by repairs or spare part delivery. You can either claim
your guarantee directly at your dealer or by sending in the defectous part, together with a damage report and the customers receipt,
directly to FLEISCHMANN.
Les composants FLEISCHMANN Digital sont des systèmes électroniques complexes. Leur compatibilité et leur sécurité de fonc-
tionnement ne peuvent donc être assurées qu'avec l'utilisation de modules et composants FLEISCHMANN d'origine. L'utilisation de
modules non FLEISCHMANN et de composants non homologués par FLEISCHMANN entraîne l'extinction de toute prétention à garan-
tie et de la garantie de conformité aux directives CEM. Les prétentions à garantie s'éteignent dans les cas suivants : - Utilisation d'ar-
ticles à des fins autres que celles pour lesquelles ils sont prévus, - Non observation des consignes figurant dans les instructions de
service, -
Panne consécutive au montage/transformation de/avec des composants non FLEISCHMANN et non homologués par
FLEISCHMANN et/ou leur montage non conforme. La garantie ne couvre pas non plus les pannes causées par l'usure liée à l'utilisation.
Die Motorschleifkohlen
Class 17
10
sind nicht austauschbar,
Motor ist wartungsfrei,
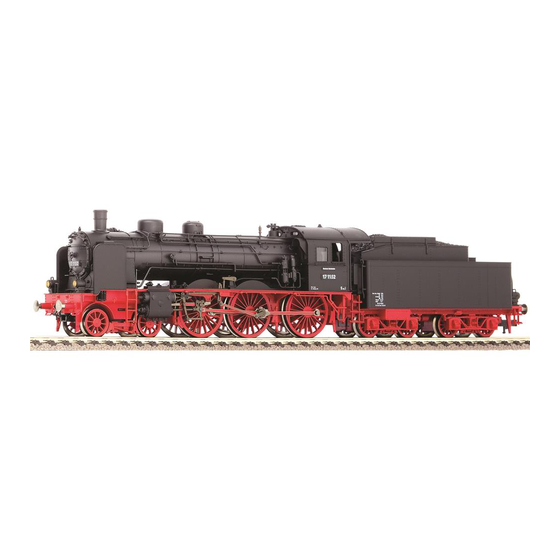
Between 1911 and 1914, in two separate series, 135 items of the compound locomotive S10.1 were built for Prussia and 17 items for
nicht ölen!
Alsace-Lorraine (Fig. 1). The German "Reichsbahn" took over some 132 machines and designated them as class 17.10-11. Preserved
is 17 1055 ex "Osten 1135". She has been reset partially into the original livery and now is owned by the Dresden railway museum.
Opening the loco: Opening the loco is only necessary to change the bulb (6535) install a digital decoder. Remove screws a and
b 1-2. Lift the loco body gently upwards (Fig. 2).
M o t o r w e c h s e l :
Changing the bulb in the loco: (Fig. 2) Turn bulb contact c and pull bulb 6535 backwards out. Reassembly is carried out in reverse
Kontaktplatinen P1 und P2
order.
aus Halterungen nehmen.
Installing the digital decoder: A 6-pole DECODER (DCC: 6876, new: 687401) (NEM 651) can be glued onto the
Halteklammern H1 und H2
surface indicated in Fig. 2/3. Please consult the instructions included with the DECODER for fitting advice. Pull the jumper out of the
interface and insert the decoders plug instead. Take care, that the pins marked "1" / cables with the same colour are on the same side.
lösen und nach oben abhe-
The indicated area can be used for locating the switching magnet 9426/9427 (Fig. 4).
ben. Motor aus Lagerung
Lubrication: The bearings and gear-box need only be lightly oiled at the bearing points marked (Fig. 4 and 6). Only use FLEISCH-
nehmen. Ersatzmotor ein-
MANN-oil 6599. Only put a tiny drop in each place (
setzen. Der Einbau erfolgt in
the oil bottle for your use.
umgekehrter
Reihenfolge.
Changing bulbs (tender): Opening the tender is only necessary to change bulbs, oil the gear train and to change the motor. Undo
Auf richtige Einbaulage des
screw d, spread out the housing at its sides and lift up the tender body (Fig. 5). Remove the weight from the tender body. Take the con-
Motors achten. Die rote
tact plate P2 out of its retainers and extract the bulb from its bearing in the loco chassis (Fig. 6). Insert spare bulb. While reinstalling the
Motormarkierung muss in
contact plate P2 take care of the contacts! Spare bulb: 6535
Fahrtrichtung rechts liegen.
The motor brushes do not need to be changed! Motor is maintenance-free, do not lubricate!
Bei Halteklammer H1 auf
Changing the Motor (Fig. 6): Take the contact plates P1 and P2 out of their retainers. Gently remove the motor retainer clips H1 and
sicheren Kontakt zwischen
H2. Lift up the motor and take it out (Fig. 7). Reassembly is carried out in inverse order. When installing the new motor, please take care
to insert the new motor correctly. The red marking on the motor should ly on the right side of the tender. The motor retainer clip H1
Platine und Motor achten
must form a good contact between the P1/2 PCB's and the motor contacts. Exchange Motor: 50 4138
(Fig. 6).
Exchange coupling: Clip exchange coupling: 6511 · FLEISCHMANN-PROFI Clip coupling: 6515. 1. Pull off in direction of arrow. ·
2. Insert exchange coupling in direction of arrow until clipped in position.
Tauschmotor: 50 4138
Série 17
10
rot/red/rouge
Entre 1911 et 1914, 135 articles de la locomotive compound S10.1 ont été construits pour la Prusse et 17 articles pour l'Alsace-Lorraine
(fig. 1). Après la remise de trois locomotives à l'etranger à titre de prestation de réparation, la "Reichsbahn" reprit les 132 véhicules
restants dans sa série 17.10-11 sous les numéros 17 1001-17 1123 et 17 1145-17 1153. La 17 1055 (ancienne Osten 1135) a été con-
servée puis remise partiellement dans son état d'origine. Aujourd'hui, elle est exposée au Verkehrsmuseum de Dresden.
Ouverture de la locomotive : Vous n'avez besoin d'ouvrir la locomotive que pour remplacer de lampes et pour monter un module
récepteur digital (decodeur). Dévisser les vis a, b 1-2 et soulever soigneusement le carrosserie vers la haut (Fig. 2).
Remplacement de la lampe à la locomotive : Tournez le contact c de la lampe et retirer la lampe vers l'arriere. Le remontage s'effec-
tue de façon inverse. Lampe de rechange : 6535.
Montage d'un module récepteur digital : La zone hachurée permet de coller un DECODER (DCC : 6876, nouveau : 687401)
(NEM 651) à 6 pôles (Fig. 3). Pour le montage, se référer au mode d'emploi du decodeur. Extraire la fiche de pontage et brancher la
fiche à 6 pôles du decodeur en veillant à ce que les repères "1" soient la même côte. (les fils en couleur de decodeur et du connecteur
forment en suite une liaison continue). L'aimant permanent 9426/9427 peut être monté à l'endroit indiqué (Fig. 4). Bandages de
2. Ersatzkupplung in Pfeil-
rechange: 54 4007
richtung einstecken, bis
Graissage : Les supports et les engrenages doivent être huilés uniquement aux endroits indiqués (Fig. 4 et 6). N'utilisez que l'huile
Halteklammern einrasten
FLEISCHMANN 6599. Une seule goutte par point à lubrifier (
petit flacon convient parfaitement à cet usage.
Ouverture de la tender: Une ouverture du tender est indispensable pour remplacer les lampes, lubrifier le mécanisme
et remplacer le moteur. Retirer le vis d et retirer la carrosserie en la soulevant (Fig. 5). Enlever le lest. Démonter la platine de contact P2
de son support. Enlever la lampe et la remplacer. Remonter la platine de contact P2 et s'assurer du bon contact électrique (Fig. 6).
PROFI-Steckkupplung
Lampes de remplacement : 6535 Les charbons du moteur ne doivent pas être remplacés ! Moteur sans entretien, ne pas huiler.
Remplacement du moteur : Sortir les platines de contact P1 et P2 de leur support. Libérer les clames de maintien H1 et H2 les sou-
6515
lever. Retirer le moteur vers le haut (Fig. 6). Au remontage (s'effectue en de façon inverse) veiller à ce que le moteur pose correctement
dans le logement. Tenir compte du marquage rouge/noir sur le moteur. Assurer une bonne contact électrique de la clame H1. Moteur
de rechange: 50 4138
Attelages à emboîtement : 6515. 1. Retirer dans le sens de la flèche. · 2. Replacer le nouvel attelage jusqu'à enclancheent de la buttée.
with variants
Spare traction tyres: 54 4007
), otherwise it will be overoiled. An applicator needle is located in the cap of
avec variantes
), afin d'éviter tout excès. L'aiguille montée dans le bouchon du
Changement des attelages : Attelage à emboîtement d'autres marques : 6511 · FLEISCHMANN-PROFI-
Werbung

Verwandte Anleitungen für FLEISCHMANN BR 17.10


Inhaltszusammenfassung für FLEISCHMANN BR 17.10
- Seite 1 FLEISCHMANN parts and components. The conditions of the guarantee will be considered void if non-origi- men. Ersatzlampe einsetzen. Kontaktplatine P2 nal FLEISCHMANN parts or other unauthorised parts have been used. The conditions of the guarantee will be considered void, if - you Brückenstecker...
- Seite 2 Zabawka ze wzgledu na cechy dzialania, budowe modelu z ostrymi krawedziami oraz Lorena. Il tedesco “Reichsbahn” ha preso circa 132 macchine e loro ha designati come il BR 17.10-11 di classe. Conservato è 17 1055 ex öligem Lappen nachreiben. Dazu FLEISCHMANN-Öl 6599 verwenden.