Werbung
Quicklinks
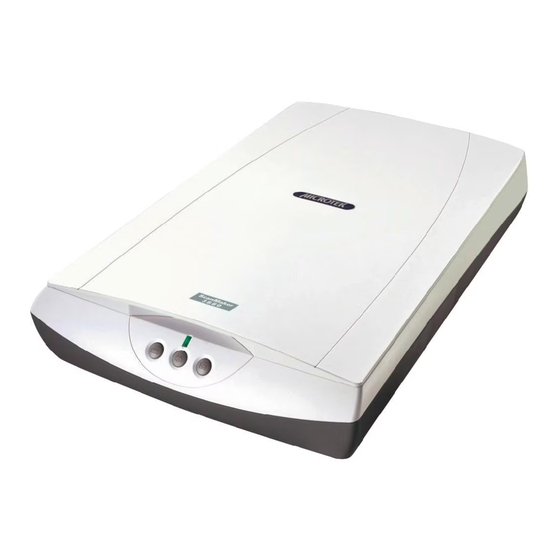
Installing your Microtek ScanMaker 3880
Unpack Contents
Unpack your scanner package and check for major
components.
•
ScanMaker 3880 scanner
•
LightLid 35
*
•
Power adapter
•
Hi-Speed USB cable
•
Software CD
* The LightLid 35 is available either as standard
equipment or an optional accessory depending on
the scanner configuration that you purchased.
Karton auspacken
Desembalar el contenido
Öffnen Sie den Scannerkarton und prüfen Sie alle
Desembale el escáner y compruebe si se incluyen
beiliegenden Teile.
todos los componentes.
•
ScanMaker 3880-Scanner
•
Escáner ScanMaker 3880
•
LightLid 35
*
•
LightLid 35
*
•
Netzteil
•
Adaptador de alimentación
•
Hi-Speed USB-Kabel
•
Cable USB de alta velocidad
•
Software-CD
•
CD de software
* LightLid 35 está disponible como equipo de serie o
* Der LightLid 35 iststandardmäßig oder optional
comoaccesorio opcional dependiendo de la
erwerbbar je nach Konfiguration des von
configuración del escáner adquirido.
Ihnengekauften Scanners.
Install Software
Important:
Do not remove the yellow stickers from your
scanner until you are told to do so. You must install software
before connecting your scanner.
Always close any open programs and turn off
Anti-virus utilities before installing software.
Wichtig:
Entfernen Sie den gelben Aufkleber erst vom
Scanner, wenn Sie dazu aufgefordert werden. Installieren Sie
erst die Software und schließen Sie dann den Scanner an.
Schließen Sie vor dem Installieren von Software
stets alle offenen Programme und deaktivieren Sie
Antivirenprogramme.
Importante:
no retire del escáner las pegatinas de color
amarillo hasta que no se le indique expresamente. Antes de
conectar el escáner es necesario instalar el software.
Cierre todos los programas abiertos y desactive
las utilidades antivirus antes de instalar el software.
A. Place the Microtek CD-ROM into the CD-ROM drive.
B. Follow the on-screen instructions to install the driver and software.
NOTE: If the Microtek Software Installer screen does not come up automatically, double-click the following in succession: "My
Computer"; the CD-ROM icon; then cdsetup.exe to start the installer program.
Software installieren
Instalar el software
A. Legen Sie die Microtek CD-ROM ins CD-ROM-
A. Inserte el CD-ROM de Microtek en la unidad de
Laufwerk.
CD-ROM.
B. Installieren Sie Treiber und Software gemäß
B. Siga las instrucciones de la pantalla para
Anweisungen auf dem Bildschirm.
instalar el controlador y el software.
HINWEIS: Erscheint der Installationsbildschirm der Microtek-
NOTA: si no aparece automáticamente la pantalla de
Software nicht automatisch, doppelklicken Sie nacheinander
instalación del escáner, haga doble clic en estos elementos:
auf: »Arbeitsplatz«; das CD-ROM-Symbol; dann cdsetup.exe,
"Mi PC"; el icono del CD-ROM; y cdsetup.exe para iniciar el
um die Installation zu starten.
programa de instalación.
Unlock Scanner
A. Remove the yellow "Step 3" sticker from your
scanner.
B. With the scanner power off, tilt the front right
corner of the scanner to see the locking switch at
the bottom.
C. Pull the carriage lock protector (ivory white in
appearance) out.
D. Push the locking switch to the position as
indicated in the graphic above, with the icon on
the lock showing as "unlocked" .
NOTE: To lock the scanner (for shipping and other reasons),
Unlocked
tilt the front right corner of the scanner to see the locking
Entriegelt
switch at the bottom. Next, push the locking switch to the
Desbloqueado
"Locked" position. Do not turn the scanner upside down and
attempt to lock the scanner this way.
Scanner entriegeln
Desbloquear el escáner
A. Ziehen Sie den gelben »Schritt 3«-Aufkleber vom
A. Retire la etiqueta amarilla "Paso 3" del escáner.
Scanner ab.
B. Con el escáner apagado, incline la esquina
B. Stellen Sie die vordere, rechte Ecke des
frontal derecha del escáner para ver el
ausgeschalteten Scanners schräg, um den
interruptor de bloqueo en la parte inferior.
Sicherungsschalter auf der Unterseite zu sehen.
C. Retire el protector de bloqueo del carro (de
C. Ziehen Sie Verriegelungsschutz des Schlittens
aspecto blanco marfil).
(elfenbeinfarben) heraus.
D. Presione el interruptor de bloqueo hasta la
D. Drücken Sie den Sicherungsschalter zur oben
posición indicada en el gráfico, con el icono en
abgebildeten Position, so dass das Symbol auf
el candado que se muestra como "desbloqueado" .
dem Schalter auf »Entriegeln« steht.
NOTA: para bloquear el escáner (para su traslado o por otros
motivos), incline la esquina frontal derecha del escáner para
HINWEIS: Zur Verriegelung des Scanners (für Lieferung und
ver el tornillo de bloqueo en la parte inferior. A continuación,
aus anderen Gründen) stellen Sie die vordere, rechte Ecke des
presione el interruptor de bloqueo a la posición de bloqueo.
Scanners schräg, um den Sicherungsschalter auf der
No dé la vuelta al escáner para intentar bloquearlo de este
Unterseite zu sehen. Drücken Sie den Sicherungsschalter
modo.
dann auf »Verriegeln«. Drehen Sie den Scanne
Connect Scanner
To the power adapter
A. Remove the yellow "Step 4" sticker from your scanner.
B. Connect the power adapter to the back of the scanner.
C. Plug the power adapter into a power source. The green LED on the scanner's front panel will light up.
C
B
To the Hi-Speed USB cable
D. Connect one end of the Hi-Speed USB cable to your computer.
E. Connect the other end of the Hi-Speed USB cable to the scanner.
The system will detect your scanner automatically.
NOTE: If your computer has both Hi-Speed USB (USB 2.0) and USB 1.1 ports, connect the cable to the Hi-Speed USB port. Use the
USB 1.1 port only if your computer does not have Hi-Speed USB.
D
E
Scanner anschließen
Conectar el escáner
An das Netzteil
Al adaptador de alimentación
A. Ziehen Sie den gelben »Schritt 4«-Aufkleber vom
A. Retire la etiqueta amarilla "Paso 4" del escáner.
Scanner ab.
B. Conecte el adaptador de alimentación a la parte
B. Schließen Sie das Netzteil an die Rückseite des
posterior del escáner.
Scanners an.
C. Conecte el adaptador de alimentación a una toma
C. Verbinden Sie das Netzteil mit einer Stromquelle.
de corriente.
Die grüne LED auf dem Bedienfeld des Scanners
Se encenderá el indicador luminoso de color
leuchtet jetzt grün.
verde situado en la parte frontal del escáner.
An das Hi-Speed USB-Kabel
Al cable USB de alta velocidad
D. Verbinden Sie ein Ende des Kabels mit dem
D. Conecte un extremo del cable al ordenador.
Computer.
E. Conecte el otro extremo del cable al escáner.
E. Verbinden Sie das andere Kabelende mit dem
El sistema detectará el escáner
Scanner.
automáticamente.
Der Scanner wird vom PC automatisch erkannt.
NOTA: si su ordenador dispone de puertos USB de alta
HINWEIS: Besitzt Ihr Computer Hi-Speed USB- (USB 2.0)
velocidad (USB 2.0) y USB 1.1, conecte el cable al puerto USB
de alta velocidad. Utilice el puerto USB 1.1 sólo si su
und USB 1.1-Anschlüsse, verbinden Sie das Kabel mit dem Hi-
ordenador no tiene un puerto USB de alta velocidad.
Speed USB-Anschluss. Verwenden Sie den USB 1.1-Anschluss
nur, wenn Ihr Computer kein Hi-Speed USB besitzt.
Scanning Basics
1. Place the scan material
2. Launch ScanWizard 5
A. To scan photos, place the photo to be scanned
To launch ScanWizard 5 as a stand-alone program,
on the scanner bed. The top end of the original
double-click the ScanWizard 5 icon on your desktop.
should be positioned towards the front of the
The Standard Control Panel will appear, and the scanner
scanner with the surface to be scanned facing
will automatically perform a "fast preview" of your
down.
image, based on settings specified under the Original,
Scan Type, and Purpose categories (buttons).
B. To scan film, use the LightLid 35. See "Using
the LightLid 35" (back section) for more
details.
Scangrundlagen
1. Scanvorlage auflegen
A. Legen Sie zu scannende Fotos auf das Scannerbett. Die Oberkante der Vorlage muss zur Vorderseite des
Scanners und die zu scannende Fläche nach unten weisen.
B. Scannen Sie Film mit dem LightLid 35. Details hierzu siehe »Den LightLid 35 verwenden« (weiter hinten).
2. ScanWizard 5 ausführen
Zum Start von ScanWizard 5 als eigenständiges Programm doppelklicken Sie auf das Symbol ScanWizard 5 auf
dem Desktop. Das Standardsteuerfeld erscheint und der Scanner macht anhand der Einstellungen unter Original,
Bildtyp und Verwendung (Schaltflächen) automatisch eine »schnelle Vorschau« vom Bild.
3. Vorgaben wählen
Mit den folgenden Schaltflächen ändern Sie Einstellungen wunschgemäß.
Original – Legt die Kategorie des Mediums (Vorlage) fest.
Bildtyp – Legt den Bildausgabetyp fest (Farbe, Graustufen, Schwarzweiß).
Verwendung – Legt die Auflösung je nach Verwendungszweck fest.
HINWEIS: Klicken Sie die Schaltflächen Ausgabegröße, Einstellen und Zurücksetzen an, um Weiteres einzustellen.
Details zur Verwendung des Professionellen Steuerfelds sind im ScanMaker 3880-Beilage-PDF-Dokument auf der
Microtek CD-ROM angegeben.
4. Vorlagen scannen
A. Klicken Sie auf Scanziel in der ScanWizard 5 Standardsteuerung.
B. Bei Anzeige des Dialogfelds Speichern unter geben Sie Zielordner, Dateiname und Format des
Ausgabebildes an, und klicken Sie dann auf Speichern. Das Bild wird digitalisiert und am angegebenen Ziel
gespeichert.
Bild nach dem Speichern an Programm senden:
Ist diese Option angewählt, wird das gescannte Bild zuerst gespeichert und dann automatisch zur
Bildbearbeitung oder zum E-Mail-Editor, je nach Angabe im Zielfeld.
Scanner Buttons
The ScanMaker 3880 is equipped with three scanner buttons, providing quick access to the most frequently used functions. These
buttons are Scan, Copy, and E-mail.
•
Scan: Captures images that can be saved as files or sent to an image-editing application.
•
Copy: Scans the image and sends it to your printer.
•
E-mail: Scans the image and delivers it directly to your e-mail editor.
Scannertasten
Botones del escáner
Der ScanMaker 3880 besitzt drei Scannertasten, über die man
El escáner ScanMaker 3880 está equipado con tres botones que
schnell häufig benötigte Funktionen aufrufen kann. Diese Tasten sind
ofrecen un acceso rápido a las funciones utilizadas más
Scannen, Kopieren, und E-Mail.
frecuentemente. Los botones inteligentes son Digitalizar, Copiar,
y Correo electrónico.
•
Scannen: Liest Bilder ein, die als Dateien gespeichert oder zur
Bildbearbeitung übertragen werden können.
•
Digitalizar: captura imágenes que se pueden guardar como
archivos o enviar a
•
Kopieren: Scannt das Bild und sendet es zum Drucker.
una aplicación de edición de imágenes.
•
E-Mail: Scannt das Bild und überträgt es direkt zum E-Mail-Editor.
•
Copiar: digitaliza la imagen y la envía a la impresora.
•
Correo electrónico: digitaliza la imagen y la envía
directamente al editor
de correo electrónico.
3. Select preferences
4. Scan your material
Use the following buttons to change the settings
A. Click the Scan to button from the ScanWizard 5
according to your preferences.
Control Panel.
Original – Defines the category of the media (scan
B. When the Save As dialog box appears, specify the folder
material).
location, a file name, and the format for the output
image, then click Save. The image is scanned and saved
Scan Type – Selects the output image type (color,
to the specified location.
gray, or B&W).
Send image to application after saving:
Purpose – Sets the image resolution to match your
If this option is checked, the scanned image is saved first,
target application.
then automatically delivered to an image-editing software,
NOTE: Click the Scale Output, Adjust, and Reset buttons if
or an e-mail editor as indicated in the destination box.
you need to make further adjustments.
For details on how to use the Advanced Control Panel,
refer to the ScanMaker 3880 Supplement PDF
document in the Microtek CD-ROM.
Conceptos básicos
1. Colocar el material que desea digitalizar
A. Para digitalizar fotografías, coloque la fotografía en el cristal del escáner. El extremo superior del original debe de
estar colocado hacia la parte frontal del escáner, con la superficie a digitalizar hacia abajo.
B. Para digitalizar películas, utilice LightLid 35. Consulte "Uso de LightLid 35" (sección posterior) para obtener más
información.
2. Iniciar ScanWizard 5
Para iniciar ScanWizard 5 como programa independiente, haga doble clic en el icono ScanWizard 5 del escritorio.
Aparecerá el Panel de control estándar y el escáner realizará automáticamente una "vista previa rápida" de la
imagen, según las opciones especificadas en las categorías Original, Tipo de digitalización y Finalidad.
3. Seleccionar las preferencias
Utilice los siguientes botones para modificar las opciones según sus preferencias.
Original - define la categoría del soporte (material de digitalización).
Tipo de digitalización - selecciona el tipo de imagen que se obtendrá (color, grises o b/n).
Finalidad - define la resolución de la imagen para que se ajuste a la aplicación de destino.
NOTA: haga clic en Escala, Ajustar y Restaurar si tiene que realizar más ajustes.
Para obtener más información sobre cómo utilizar el Panel control avanzado, consulte Suplemento de ScanMaker 3880
en el CD-ROM de Microtek.
4. Digitalizar el material
A. Haga clic en Digitalizar a del panel de control de ScanWizard 5.
B. Cuando aparezca el cuadro de diálogo Guardar como, especifique la ubicación de la carpeta, un nombre de
archivo y el formato de la imagen de salida y haga clic en Guardar. La imagen se digitalizará y se guardará en la
ubicación especificada.
Enviar la imagen a una aplicación después de guardar:
Si está activada esta opción, la imagen digitalizada se guardará primero y después se enviará a un programa de
edición de imágenes o de correo electrónico según indique el cuadro de destino.
E-mail
Scan
Copy
TURN OVER TO CONTINUE
Werbung

Verwandte Anleitungen für Microtek ScanMaker 3880


Inhaltszusammenfassung für Microtek ScanMaker 3880
- Seite 1 Antes de conectar el escáner es necesario instalar el software. The ScanMaker 3880 is equipped with three scanner buttons, providing quick access to the most frequently used functions. These Cierre todos los programas abiertos y desactive buttons are Scan, Copy, and E-mail.
- Seite 2 Para acceder a los manuales en formato PDF: Inserte el CD-ROM de software del escáner en la unidad de CD- consulte las instrucciones de instalación de esta guía o el archivo PDF Suplemento de ScanMaker 3880 que se Computer ab und beachten Sie die Installa-tionshinweise in dieser Anleitung oder im ScanMaker 3880-Beilage- ROM del equipo.