Pioneer DDJ-SX2 Bedienungsanleitung
Vorschau ausblenden
Andere Handbücher für DDJ-SX2:
- Bedienungsanleitung (18 Seiten) ,
- Bedienungsanleitung (33 Seiten)
Inhaltsverzeichnis
Werbung
Verfügbare Sprachen
Verfügbare Sprachen
Quicklinks
DDJ-SX2
http://pioneerdj.com/support/
http://serato.com/
The Pioneer DJ support site shown above offers FAQs, information on software and various other types of
information and services to allow you to use your product in greater comfort.
For the latest version of the Serato DJ software, access Serato.com and download the software from there.
Le site de support DJ de Pioneer indiqué ci-dessus propose une FAQ, des informations sur le logiciel et divers
types d'informations et de services qui permettent une utilisation plus confortable de ce produit.
Pour la toute dernière version du logiciel Serato DJ, accédez à Serato.com et téléchargez le logiciel de ce site.
Die oben gezeigte Pioneer DJ-Support-Website enthält häufig gestellte Fragen, Informationen über Software
und andere wichtige Informationen und Dienste, die Ihnen helfen, Ihr Produkt optimal zu verwenden.
Für die neueste Version der Serato DJ-Software gehen Sie zu Serato.com und laden die Software von dort
herunter.
Il sito di supporto DJ Pioneer indicato qui sopra offre una sezione FAQ, informazioni sul software ed
informazioni e servizi di vario tipo, per permettere un uso più confortevole dei nostri prodotti.
Per ottenere la più recente versione di Serato DJ, raggiungere Serato.com e scaricare il software di lì.
De bovengenoemde Pioneer DJ ondersteuningswebsite biedt een overzicht van de vaak gestelde vragen,
informatie over software en allerlei andere soorten informatie en diensten die u in staat stellen dit product met
meer gemak te gebruiken.
Ga voor de nieuwste versie van de Serato DJ-software naar Serato.com en download de software van deze site.
El sitio de asistencia Pioneer DJ mostrado arriba ofrece las preguntas frecuentes, información del software y
varios otros tipos de información y servicios que le permitirán usar su producto con mayor confort.
Para la versión más reciente del software Serato DJ, acceda a Serato.com y descargue el software desde allí.
O site de suporte da Pioneer DJ mostrado acima oferece FAQs, informações sobre o software e outros tipos
de informações e serviços para permitir utilizar o produto com um maior conforto.
Para obter a versão mais recente do software Serato DJ, aceda a Serato.com e transfira o software a partir daí.
На указанном выше сайте поддержки Pioneer DJ содержатся раздел часто задаваемых вопросов,
информация по программному обеспечению, а также различные другие типы информации и услуг,
позволяющие использовать ваше изделие более лучшим образом.
Относительно самой последней версии программного обеспечения Serato DJ зайдите на Serato.com и
загрузите оттуда программное обеспечение.
Operating Instructions (Quick Start Guide)
Mode d'emploi (Guide de démarrage rapide)
Bedienungsanleitung (Kurzanleitung)
Istruzioni per l'uso (Guida di avvio veloce)
Handleiding (Snelstartgids)
Manual de instrucciones (Guía de inicio rápido)
Manual de instruções (Guia de início rápido)
Инструкции по эксплуатации (Краткое руководство пользователя)
DJ Controller
Contrôleur pour DJ
DJ Controller
DJ Controller
DJ Controller
Controlador DJ
Controlador para DJ
DJ Контроллер
Werbung
Inhaltsverzeichnis

Verwandte Anleitungen für Pioneer DDJ-SX2


Inhaltszusammenfassung für Pioneer DDJ-SX2
- Seite 1 For the latest version of the Serato DJ software, access Serato.com and download the software from there. Le site de support DJ de Pioneer indiqué ci-dessus propose une FAQ, des informations sur le logiciel et divers types d’informations et de services qui permettent une utilisation plus confortable de ce produit.
-
Seite 2: Operating Environment
A damaged power cord can cause a fire or give you an electrical shock. Check the power cord once in a while. When you find it damaged, ask your nearest PIONEER authorized service center or your dealer for a replacement. S002*_A1_En... -
Seite 3: Before Start
The Serato DJ software and driver software are not included. may differ from the final specifications. Access and download the software from the Pioneer DJ support site. Please note that depending on the operating system version, web http://pioneerdj.com/support/ browser settings, etc., operation may differ from the procedures... -
Seite 4: For Windows
After installing the driver software, install the Serato DJ software. software. For information on the latest system requirements, compatibility, and supported For Mac OS X operating systems, see “Software Info” of “DDJ-SX2” on the Pioneer DJ sup- Only install the Serato DJ software. port site below. Installation Procedure (Windows) http://pioneerdj.com/support/... - Seite 5 Installation procedure (Mac OS X) Do not connect this unit and the computer until installation is completed. If any other programs are running on the computer, quit them. 1 Unzip the downloaded Serato DJ software file. 2 Double-click the unzipped software file to launch the installer.
-
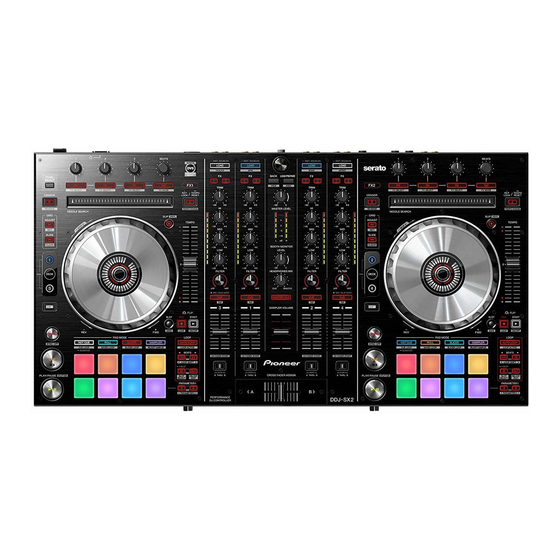
Seite 6: Part Names And Functions
Part names and functions For further details on each unit, refer to the Operating Instructions and Deck section the Serato DJ software manual. For instructions on obtaining the Operating Instructions and the Serato DJ software manual, see Acquiring the manual on page 3 . INST. - Seite 7 Allows you to record or call sequences such as HOT CUE operation. ton, the beat grid interval can be adjusted. This function (Serato Flip) needs to be activated before it can be used. For details, visit the Pioneer DJ support site below. [SHIFT] + press: http://pioneerdj.com/support/ Sets a beat marker.
-
Seite 8: Mixer Section
a Crossfader Assign Switch Mixer section Assigns the channel output to the crossfader. b Crossfader Outputs the sound assigned with the crossfader assign switch. INST. DOUBLES INST. DOUBLES INST. DOUBLES INST. DOUBLES [SHIFT] + move: Uses the crossfader start function. c MASTER LEVEL control Adjusts the master sound level output. -
Seite 9: Rear Panel
Rear panel 1 MASTER OUT 1 terminals 7 SIGNAL GND terminal Connect powered speakers, etc., here. Connects an analog player’s ground wire here. This helps reduce noise when the analog player is connected. 2 MASTER OUT 2 terminals 8 MIC1 terminal Connect to a power amplifier, etc. - Seite 10 Operation Wait until all connections between devices have been completed 5 Connect the power plug to the AC adapter. before connecting the AC adapter. Slide the power plug into the AC adapter’s guide rails as shown on the Be sure to turn off the power and unplug the AC adapter from the diagram and press in until a click is heard.
-
Seite 11: Starting The System
1 The [BUY/ACTIVATE] icon may appear on the right side of the screen displayed when Serato DJ is launched for the first time, but for those using DDJ-SX2 there is no need to activate or purchase a license. You can purchase extended packs such as DVS and use them as additional options. - Seite 12 2 Press the rotary selector, move the cursor to the Importing tracks library on the computer’s screen, then turn the rotary selector and select the track. The following describes the typical procedure for importing tracks. There are various ways to import tracks with the Serato DJ software. For details, see the Serato DJ software manual.
-
Seite 13: Quitting The System
Adjust the sound level output from the [MASTER OUT 1] and [MASTER Power Sources OUT 2] terminals to an appropriate level. Operate this product only from the recommended power sources. If you are unsure of the power source, consult an authorized Pioneer representative. Monitoring sound with headphones Power-Cord Protection When unplugging the unit, pull on the plug –... -
Seite 14: Power Plug
For details, see Mounting the power plug on page 14 . If there are irregularities with the AC adapter or power plug, ask your nearest Pioneer authorized service center or your dealer to carry out Removing the power plug repair work. -
Seite 15: Additional Information
“Troubleshooting” section of this unit’s operating Audio Section instructions and the [FAQ] for the [DDJ-SX2] on the Pioneer DJ sup- Sampling rate ..................44.1 kHz port site. -
Seite 16: Milieu De Fonctionnement
être posés de façon à ne pas être écrasés. Un câble abîmé peut provoquer un risque d’incendie ou un choc électrique. Vérifier le câble d’alimentation de temps en temps. Contacter le service après-vente PIONEER le plus proche ou le revendeur pour un remplacement. S002*_A1_Fr... -
Seite 17: Informations Préliminaires
Serato DJ est une application logicielle DJ de Serato. En reliant l’ordi- 2 Sur le site de support DJ de Pioneer, cliquez sur nateur sur lequel ce logiciel est installé à cet appareil, il est possible [Manuals] dans [DDJ-SX2]. -
Seite 18: Pour Windows
Pour les toutes dernières informations sur la configuration requise, la compa- tibilité et les systèmes d’exploitation pris en charge, reportez-vous à “Software Ne raccordez cet appareil et l’ordinateur que lorsque l’installation est Info” de “DDJ-SX2” sur le site de support DJ de Pioneer ci-dessous. terminée. http://pioneerdj.com/support/ Le fonctionnement sur tous les ordinateurs n’est pas garanti, même lorsque les... - Seite 19 6 Cliquez sur [Close] pour fermer l’installateur Serato Marche à suivre (Mac OS X) Ne raccordez cet appareil et l’ordinateur que lorsque l’installation est terminée. Si des programmes sont ouverts sur l’ordinateur, fermez-les. 1 Décompressez le fichier du logiciel Serato DJ téléchargé.
-
Seite 20: Noms Et Fonctions Des Éléments
Noms et fonctions des éléments Pour plus d’informations sur chaque appareil, reportez-vous au mode Section Platines d’emploi et au manuel du logiciel Serato DJ. Pour les instructions sur l’obtention du mode d’emploi et du manuel du logiciel Serato DJ, reportez-vous à la page 3 , Obtention du manuel. -
Seite 21: Touche Cue
HOT CUE. Active le mode DUAL DECK sur la platine droite. Cette fonction (Serato Flip) doit être activée avant de pouvoir l’utiliser. Pour plus d’informations, consultez le site de support DJ de Pioneer p Touche GRID ADJUST ci-dessous. Il est possible d’ajuster l’intervalle de la grille rythmique en tenant la http://pioneerdj.com/support/... -
Seite 22: Section Mixeur
a Commutateur d’affectation de crossfader Section Mixeur Affecte la sortie de canal au crossfader. b Crossfader Restitue le son affecté avec le commutateur d’affectation de INST. DOUBLES INST. DOUBLES INST. DOUBLES INST. DOUBLES crossfader. [SHIFT] + déplacement : Utilise la fonction de lancement par le crossfader. c Commande MASTER LEVEL Ajuste le niveau du son principal. -
Seite 23: Panneau Arrière
Panneau arrière 1 Prises MASTER OUT 1 7 Prise SIGNAL GND Raccordez des enceintes amplifiées, etc. ici. Pour raccorder le fil de terre d’un lecteur analogique. Ceci permet de réduire le bruit lorsqu’un lecteur analogique est raccordé. 2 Prises MASTER OUT 2 8 Prise MIC1 À... - Seite 24 Fonctionnement Raccordez l’adaptateur secteur en dernier lieu, après avoir raccordé 5 Branchez la fiche d’alimentation sur l’adaptateur tous les autres appareils. secteur. Veillez à toujours éteindre l’appareil et à débrancher l’adaptateur Faites glisser la fiche d’alimentation dans les glissières de l’adaptateur secteur de la prise d’alimentation avant de raccorder des appareils secteur comme indiqué...
-
Seite 25: Ouverture Du Système
1 L’icône [BUY/ACTIVATE] peut apparaître sur le côté droit de l’écran affiché la première fois que Serato DJ est lancé, mais pour ceux qui utilisent DDJ-SX2 il n’est pas nécessaire d’activer ou d’acheter une licence. Vous pouvez acheter des packs étendus tels que DVS et les utiliser comme des options supplémentaires. - Seite 26 2 Appuyez sur le sélecteur rotatif, amenez le curseur Importation de morceaux dans la bibliothèque sur l’écran de l’ordinateur, puis tournez le sélecteur rotatif et sélectionnez le morceau. La marche à suivre pour l’importation de morceaux est la suivante. Il existe différentes manières d’importer des morceaux avec le logi- ciel Serato DJ.
-
Seite 27: Fermeture Du Système
Commande MASTER LEVEL Le mode d’emploi de cet appareil peut être téléchargé du site de support DJ de Pioneer. Pour le détail, reportez-vous à Acquisition du b Commande BOOTH MONITOR LEVEL Mode d’emploi de cet appareil (p. 3 ). - Seite 28 L’ouverture ou le retrait du couvercle est susceptible de vous exposer à un choc électrique ou d’autres dangers. Contactez un service après- vente agréé Pioneer pour faire réparer ce produit (reportez-vous à la carte Réparation et Support jointe). Ne pas toucher.
-
Seite 29: Informations Supplémentaires
“En cas de panne” dans le mode d’emploi de cet appareil et USB, CD/LINE, MIC1, MIC2 ..........20 Hz à 20 kHz les [FAQ] du [DDJ-SX2] sur le site de support DJ de Pioneer. Rapport S/B (sortie nominale, A-WEIGHTED) http://pioneerdj.com/support/... -
Seite 30: Betriebsumgebung
Ein beschädigtes Netzkabel kann einen Brand oder elektrischen Schlag verursachen. Prüfen Sie das Netzkabel von Zeit zu Zeit. Sollte es beschädigt sein, wenden Sie sich an Ihre nächste autorisierte PIONEER-Kundendienststelle oder Ihren Händler, um es zu ersetzen. S002*_A1_De... -
Seite 31: Lieferumfang
Nachschlagen ab. — Anweisungen zur Erhalten der Bedienungsanleitung siehe 2 Klicken Sie auf [Software Info] unter [DDJ-SX2] auf Übernehmen der Anleitung (S. 3 ). der Pioneer DJ-Support-Website. In dieser Anleitung werden die Namen von auf dem Produkt und auf dem Computerbildschirm angezeigten Bildschirmen und Menüs,... - Seite 32 Wenn während der Installation [Windows-Sicherheit] auf dem http://pioneerdj.com/support/ Bildschirm erscheint, klicken Sie auf [Diese Treibersoftware trotzdem installieren] und fahren mit der Installation fort. 2 Klicken Sie auf [Software Download] unter [DDJ-SX2] Wenn das Installationsprogramm fertiggestellt wird, erscheint eine auf der Pioneer DJ-Support-Website. Fertigstellungsmeldung.
-
Seite 33: Installationsverfahren (Mac Os X)
Installationsverfahren (Mac OS X) 5 Lesen Sie die Bedingungen der Lizenzvereinbarung sorgfältig durch, und wenn Sie zustimmen markieren Sie Verbinden Sie dieses Gerät und den Computer nicht, bevor die [I agree to the license terms and conditions] und klicken Installation abgeschlossen ist. dann auf [Install]. -
Seite 34: Bezeichnungen Und Funktionen Der Komponenten
Bezeichnungen und Funktionen der Komponenten Weitere Einzelheiten zu jedem Gerät finden Sie in den Deck-Sektion Bedienungsanleitungen und dem Serato DJ-Software-Handbuch. Einzelheiten zum Herunterladen der Bedienungsanleitungen und des Serato DJ-Software-Handbuchs finden Sie unter Übernehmen der Anleitung auf Seite 3 . INST. DOUBLES INST. - Seite 35 Wenn die Jog-Scheibe gedreht wird, während die [GRID ADJUST]- Diese Funktion (Serato Flip) muss vor der Verwendung aktiviert werden. Taste gedrückt wird, kann der Beatgrid-Intervall angepasst werden. Einzelheiten finden Sie auf folgender Pioneer-DJ-Support-Website. http://pioneerdj.com/support/ [SHIFT] + drücken: Setzt einen Beat-Marker. (Grid Set) e HOT CUE-Modus-Taste Stellt den Hot-Cue-Modus ein.
-
Seite 36: Mixer-Sektion
9 Kanalfader Mixer-Sektion Verschieben: Stellt den Pegel der Audiosignale ein, die in jedem Kanal ausgege- ben werden. [SHIFT] + verschieben: INST. DOUBLES INST. DOUBLES INST. DOUBLES INST. DOUBLES Verwenden Sie die Kanalfader-Start-Funktion. a Crossfader-Assign-Schalter Weist den Kanalausgang zum Crossfaders zu. b Crossfader Gibt den mit dem Crossfader-Assign-Schalter zugewiesenen Sound aus. -
Seite 37: Rückseite
Rückseite 1 MASTER OUT 1-Buchsen 7 SIGNAL GND-Buchse Schließen Sie hier Aktivlautsprecher usw. an. Hier wird der Massedraht eines Plattenspielers angeschlossen. Dadurch wird Rauschen beim angeschlossenem Plattenspieler 2 MASTER OUT 2-Buchsen vermieden. Schließen Sie einen Endstufenverfstärker usw. an. 8 MIC1-Buchse 3 BOOTH OUT-Buchsen Hier wird ein Mikrofon angeschlossen. -
Seite 38: Bedienung
Bedienung Warten Sie, bis alle Verbindungen zwischen den Geräten hergestellt 5 Schließen Sie den Netzstecker am Netzteil an. sind, bevor Sie das Netzteil anschließen. Schieben Sie den Netzstecker in den Führungsschienen in das Netzteil, Schalten Sie die Stromversorgung aus und ziehen Sie das Netzteil wie in der Abbildung unten gezeigt und drücken Sie ihn ein bis er mit aus der Netzsteckdose, bevor Sie Geräte anschließen oder einem Klickgeräusch einrastet. -
Seite 39: Starten Des Systems
1 Wenn Serato DJ zum ersten Mal gestartet wird, wird eventuell das [BUY/ACTIVATE]-Symbol auf der rechten Bildschirmseite angezeigt. Für Anwender von DDJ-SX2 muss jedoch keine Lizenz aktiviert oder erworben werden. Erweiterungspakete wie DVS können gekauft und als zusätzliche Optionen verwendet werden. -
Seite 40: Importieren Von Tracks
1 Drücken Sie die Taste [BACK] am Gerät, bewegen Sie Importieren von Tracks den Cursor zum Crates-Feld auf dem Computerbildschirm und drehen Sie dann den Drehregler zum Wählen des Im Folgenden wird das typische Verfahren zum Importieren von Tracks beschrieben. Crate usw. -
Seite 41: Mithören Von Ton Mit Kopfhörern
Anweisungen zu den einzelnen Funktionen finden Sie in der Bedienungsanleitung und der Serato DJ-Software-Anleitung. a MASTER LEVEL Regler Die Bedienungsanleitung dieses Geräts kann von der Pioneer DJ-Support-Website heruntergeladen werden. Einzelheiten siehe b BOOTH MONITOR LEVEL-Regler Erhalten der Bedienungsanleitung dieser Einheit (S. 3 ). -
Seite 42: Wartung
Abziehen des Netzsteckers tet. Einzelheiten siehe Anbringen des Netzsteckers auf Seite 14 . Wenn anormale Zustände am Netzteil oder Netzstecker vorliegen, wen- den Sie sich an die nächste Pioneer-Kundendienststelle oder an Ihren Während Sie die Taste [PUSH] am Netzteil drücken, Händler. -
Seite 43: Netzstecker
Netzstecker Dieses Produkt wird mit den unten aufgeführten Typen von Netzsteckern geliefert. Verwenden Sie den geeigneten Netzstecker für das Land oder die Region, in dem Sie sich befinden. Typ 1 (für Europa) Typ 2 (für das Vereinigte Königreich) -
Seite 44: Zusätzliche Informationen
überprüfen Sie bitte die Frequenzeigenschaften Punkte im Abschnitt „Störungssuche“ in der Bedienungsanleitung USB, CD/LINE, MIC1, MIC2 ...........20 Hz bis 20 kHz dieser Einheit und [FAQ] für [DDJ-SX2] auf der Pioneer Signalrauschabstand (Nennausgang, A-WEIGHTED) DJ-Support-Website. USB ....................107 dB http://pioneerdj.com/support/... -
Seite 46: Condizioni Ambientali Di Funzionamento
Controllate il filo di alimentazione regolarmente. Quando localizzate un eventuale danno, rivolgetevi al più vicino centro assistenza autorizzato della PIONEER oppure al vostro rivenditore per la sostituzione del filo di alimentazione. S002*_A1_It... -
Seite 47: Prima Di Cominciare
Il software e il software del driver di Serato DJ non sono inclusi. quelle finali. Accedere al sito di supporto di Pioneer DJ e scaricare il software. Tenere presente che le procedure di uso possono differire da quanto http://pioneerdj.com/support/ descritto in questo manuale a seconda del sistema operativo, delle L’utente deve eseguire da sé... -
Seite 48: Procedura Di Installazione
Internet. Per ottenere informazioni sui requisiti di sistema più recenti, sulla compatibilità In Mac OS X e sui sistemi operativi supportati, vedere “Software Info” in “DDJ-SX2” del sito Installare solo Serato DJ. di supporto DJ Pioneer riportato di seguito. http://pioneerdj.com/support/... - Seite 49 6 Fare clic su [Close] per chiudere l’installatore di Serato Procedura di installazione (Mac OS X) Non collegare questa unità ed il computer se non ad installazione terminata. Se altri programmi sono avviati nel computer, chiuderli. 1 Decomprimere il file scaricato del software di Serato 2 Fare doppio clic sul file decompresso del software per avviare il programma di installazione.
-
Seite 50: Nome Delle Varie Parti E Funzioni
Nome delle varie parti e funzioni Per ulteriori dettagli su ogni unità, fare riferimento alle Istruzioni per Sezione deck l’uso e al manuale del software di Serato DJ. Per istruzioni su come ottenere le Istruzioni per l’uso e il manuale del software di Serato DJ, vedere Acquisizione del manuale a pagina 3 . - Seite 51 HOT CUE. Attiva la modalità DUAL CHECK sul deck destro. Questa funzione (Serato Flip) deve essere attivata per poter essere utilizzata. Per i dettagli, visitare il sito di supporto di DJ Pioneer in basso. p Pulsante GRID ADJUST http://pioneerdj.com/support/ Se la jog dial viene girata mentre si preme il pulsante [GRID ADJUST], l’intervallo della griglia delle battute può...
-
Seite 52: Sezione Mixer
a Interruttore Crossfader Assign Sezione mixer Assegna l’uscita del canale al crossfader. b Crossfader Emette l’audio assegnato all’interruttore Crossfader Assign. INST. DOUBLES INST. DOUBLES INST. DOUBLES INST. DOUBLES [SHIFT] + movimento: Utilizza la funzione di avvio con crossfader. c Controllo MASTER LEVEL Regola il livello di uscita audio principale. -
Seite 53: Pannello Posteriore
Pannello posteriore 1 Terminali MASTER OUT 1 7 Terminale SIGNAL GND Collegare qui diffusori attivi, ecc. Collega qui il filo di terra di lettori analogici. Questo aiuta a ridurre il rumore quando si usano lettori analogici. 2 Terminali MASTER OUT 2 8 Terminale MIC1 Da collegare ad un amplificatore di potenza, ecc. - Seite 54 Impiego Prima di ricollegare l’adattatore di CA, attendere che tutti i collega- 5 Collegare la spina di alimentazione all’adattatore di menti fra dispositivi siano stati fatti. Prima di fare o modificare collegamenti fra dispositivi, non mancare Fare scivolare la spina di alimentazione lungo le guide nell’adattatore di spegnere l’apparecchio e di scollegare l’adattatore di CA.
-
Seite 55: Avvio Del Sistema
Schermata del computer subito dopo il lancio di Serato DJ 1 L’icona [BUY/ACTIVATE] può apparire sulla destra della schermata che appare al primo avvio di Serato DJ, ma chi usa DDJ-SX2 non ha bisogno di attivare o acquistare licenze. È possibile acquistare pacchetti di espansione come DVS e utilizzarli come opzioni aggiuntive. - Seite 56 2 Premere la manopola selettrice, portare il cursore Importazione dei brani sulla library dello schermo del computer, quindi girare la manopola selettrice e scegliere il brano. La seguente è la procedura normale di importazione di brani. Serato DJ consente di importare brani in vari modi. Per dettagli, vedere le istruzioni per l’uso di Serato DJ.
-
Seite 57: Spegnimento Del Sistema
Le Istruzioni per l’uso di questa unità possono venire scaricate dal 9 Interruttore Crossfader Assign sito di supporto DJ Pioneer. Per dettagli, vedere Come procurarsi le a Controllo MASTER LEVEL “Istruzioni per l’uso” di questa unità (p. 3 ). Le Istruzioni per l’uso di Serato DJ possono venire scaricate presso b Controllo BOOTH MONITOR LEVEL “Serato.com”. - Seite 58 Premere il pulsante [PUSH] dell’adattatore di CA, far Se ci sono anomalie nell’adattatore di CA o nella spina, chiedere ripara- zioni al centro di assistenza autorizzato Pioneer o al proprio negoziante scivolare la spina dall’adattatore come visto in figura e di fiducia.
-
Seite 59: Informazioni Aggiuntive
Se si ritiene il componente sia guasto, controllare la voci Sezione audio della sezione “Diagnostica” delle istruzioni per l’uso di questa unità e Frequenza di campionamento ............44,1 kHz le [FAQ] del [DDJ-SX2] del sito di supporto per DJ di Pioneer. Convertitore A/D, D/A ................24 bit http://pioneerdj.com/support/ Caratteristiche di frequenza A volte il problema risiede in un altro componente. - Seite 60 Kontroleer het netsnoer af en toe. Wanneer u de indruk krijgt dat het beschadigd is, dient u bij uw dichtstbijzijnde erkende PIONEER onderhoudscentrum of uw dealer een nieuw snoer te kopen.
-
Seite 61: Alvorens Te Beginnen
Mac OS X: 10.9, 10.8 en 10.7 ® Intel processor, Core™ i3, i5 en i7 ® 2 Klik op [Software Info] onder [DDJ-SX2] op de Pioneer 1,07 GHz of hoger, Intel processor, 64-bit versie Core™ 2 Duo 2,4 GHz of hoger DJ-ondersteuningssite. -
Seite 62: Voor Windows
Nadat u de stuurprogrammatuur (driver) hebt geïnstalleerd, moet u de Serato DJ-software installeren. 2 Klik op [Software Download] onder [DDJ-SX2] op de 3 Pak het gedownloade softwarebestand Serato DJ uit. Pioneer DJ-ondersteuningssite. 4 Dubbelklik op het uitgepakte softwarebestand om 3 Klik op het pictogram Serato DJ en klik vervolgens op het installatieprogramma te starten. - Seite 63 6 Klik op [Close] om het Serato DJ installatieprogramma af te sluiten. Installatieprocedure (Mac OS X) Sluit dit toestel niet op de computer aan voor de installatie voltooid is. Als er andere programma’s geopend zijn op de computer, sluit u die dan.
-
Seite 64: Overzicht Van De Bedieningstoetsen
Overzicht van de bedieningstoetsen Raadpleeg de handleiding en de handleiding van de software Serato DJ Deckgedeelte voor meer details over het toestel. Zie Verkrijgen van de handleiding op bladzijde 3 voor instructies hoe u de handleiding en de handleiding van de software Serato DJ kunt verkrijgen. - Seite 65 Hiermee kunt u sequenties zoals HOT CUE-bediening opnemen of oproepen. De DUAL DECK-stand voor het rechter deck inschakelen. Deze functie (Serato Flip) moet voor gebruik worden geactiveerd. Bezoek voor details de onderstaande ondersteuningssite van Pioneer DJ. p GRID ADJUST-toets http://pioneerdj.com/support/ Wanneer je de jog-draaiknop draait en tegelijkertijd de [GRID ADJUST]- toets indrukt, kun je het beatpatroon-interval aanpassen.
- Seite 66 a Crossfader-toewijzingsschakelaar Mengpaneel-gedeelte Wijst het door het kanaal uitgestuurde geluidssignaal toe aan de crossfader. b Crossfader-regelaar Stuurt het geluidssignaal uit dat is toegewezen met de toewijzings- INST. DOUBLES INST. DOUBLES INST. DOUBLES INST. DOUBLES schakelaar voor de crossfader. [SHIFT] + verplaats: De startfunctie van de crossfader-regelaar wordt gebruikt.
-
Seite 67: Achterpaneel
Achterpaneel 1 MASTER OUT 1-aansluitingen 7 SIGNAL GND aansluiting Hierop kunt u luidsprekers met eigen stroomvoorziening enz. Sluit hierop de aardingsdraad van een analoge platenspeler aan. aansluiten. Dit vermindert storende geluiden bij aansluiten van een analoge platenspeler. 2 MASTER OUT 2-aansluitingen 8 MIC1-aansluiting Voor aansluiten van een eindversterker e.d. - Seite 68 Bediening Wacht tot alle verbindingen tussen de apparatuur gemaakt zijn voor 5 Sluit de stroomstekker aan op de netstroomadapter. u de netstroomadapter aansluit. Schuif de stroomstekker langs de geleiderails in de netstroomadapter zoals Schakel altijd eerst de stroom uit en trek de stekker uit het stopcon- u kunt zien op de afbeelding hieronder en druk hem vast tot u een klik hoort.
-
Seite 69: Opstarten Van Het Systeem
1 Het pictogram [BUY/ACTIVATE] wordt mogelijk rechts in het scherm weergegeven wanneer Serato DJ voor het eerst wordt gestart, maar als je DDJ-SX2 gebruikt, hoef je geen licentie te activeren of te kopen. Je kunt uitgebreide packs zoals DVS kopen en als bijkomende optie gebruiken. - Seite 70 2 Druk de draaiknop in, verplaats de cursor naar de Muziekstukken importeren bibliotheek op het computerscherm en draai vervolgens aan de draaiknop om het muziekstuk te selecteren. Hier volgt een beschrijving van de typische procedure voor het importe- ren van muziekstukken. Er zijn verschillende manieren om muziekstukken te importeren met de Serato DJ-software.
-
Seite 71: Over De Netstroomadapter
Voor meer informatie over deze functies b BOOTH MONITOR LEVEL-instelling raadpleegt u de handleiding en de Serato DJ-softwarehandleiding. U kunt de handleiding van dit toestel downloaden via de Pioneer c HEADPHONES MIX instelling DJ-ondersteuningssite. Zie Verkrijgen van de Handleiding van dit toestel (blz. -
Seite 72: Onderhoud En Reparatie
Neem De stroomstekker kan losraken van de netstroomadapter en in contact op met een erkende servicevertegenwoordiger van Pioneer het stopcontact blijven zitten als er iemand struikelt over het om dit product te laten repareren (raadpleeg de bijgevoegde Service &... - Seite 73 Verwijderen van de stroomstekker Houd de [PUSH] knop op de netstroomadapter ingedrukt en schuif de stroomstekker van de netstroomadapter zoals u kunt zien op de afbeelding hieronder om hem te verwijderen. Wanneer de stroomstekker op de juiste manier is bevestigd, is er geen reden hem te verwijderen.
-
Seite 74: Aanvullende Informatie
CD/LINE ................... 96 dB apparatuur die gebruikt wordt. Als u het probleem niet kunt verhel- PHONO .................... 87 dB pen, verzoekt u dan uw dichtstbijzijnde officiële Pioneer onderhouds- MIC ....................80 dB dienst of uw vakhandelaar om het apparaat te laten repareren. -
Seite 76: Entorno De Funcionamiento
Una cable de alimentación dañado podrá causar incendios o descargas eléctricas. Revise el cable de alimentación está dañado, solicite el reemplazo del mismo al centro de servicio autorizado PIONEER más cercano, o a su distribuidor. S002*_A1_Es... -
Seite 77: Antes De Empezar A Usar La Unidad
Descarga del manual del software Serato 1 Inicie un navegador de Web en el ordenador y acceda al sitio de asistencia Pioneer DJ de abajo. http://pioneerdj.com/support/ 2 Haga clic en [Software Info] bajo [DDJ-SX2] en el sitio de asistencia Pioneer DJ. - Seite 78 “Software Info” de No conecte esta unidad y el ordenador hasta completar la instalación. “DDJ-SX2” en el sitio de asistencia de Pioneer DJ siguiente. http://pioneerdj.com/support/ Inicie la sesión como el usuario que fue establecido como adminis- La operación no se garantiza en todos los ordenadores, aunque se cumplan...
- Seite 79 Procedimiento de instalación (Mac OS X) 5 Lea con cuidado los términos del acuerdo de licencia y, si está de acuerdo, seleccione [I agree to the license No conecte esta unidad y el ordenador hasta completar la instalación. terms and conditions] y luego haga clic en [Install]. Si está...
-
Seite 80: Nombres Y Funciones De Los Controles
Nombres y funciones de los controles Para más información sobre cada unidad, consulte el Manual de ins- Sección de deck trucciones y el manual de software Serato DJ. Para instrucciones sobre cómo obtener el Manual de instrucciones y el manual de software Serato DJ, vea Adquisición del manual en la página 3 . -
Seite 81: Botón Cue
Esta función (Serato Flip) deberá activarse antes de poder ser utilizada. Cuando se gira el dial jog mientras se pulsa el botón Para detalles, visite el sitio de asistencia Pioneer DJ siguiente. [GRID ADJUST], el intervalo de beat grid se puede ajustar. - Seite 82 a Conmutador de asignación de crossfader Sección de mezclador Asigna la salida de canales al crossfader. b Crossfader Da salida al sonido asignado con el interruptor de asignación del crossfader. INST. DOUBLES INST. DOUBLES INST. DOUBLES INST. DOUBLES [SHIFT] + mover: Utiliza la función de inicio del crossfader.
-
Seite 83: Panel Trasero
Panel trasero 1 Terminales MASTER OUT 1 7 Terminal SIGNAL GND Conecte aquí altavoces con amplificador, etc. Conecta aquí el cable de tierra de un reproductor analógico. Esto ayuda a reducir el ruido cuando se conecta un reproductor 2 Terminales MASTER OUT 2 analógico. - Seite 84 Operación Espere hasta que todas las conexiones entre los aparatos estén 5 Conecte la clavija de alimentación al adaptador de CA. terminadas antes de conectar el adaptador de CA. Deslice la clavija de alimentación hacia los raíles guía del adaptador de Asegúrese de desconectar la alimentación y desenchufar el adapta- CA como se muestra en el diagrama y presione hasta que se oiga un dor de CA de la toma de corriente antes de hacer o cambiar conexio-...
-
Seite 85: Inicio Del Sistema
1 El icono [BUY/ACTIVATE] puede aparecer en el lado derecho de la pantalla visualizada cuando se inicia Serato DJ por primera vez, pero no es necesario activar ni adquirir una licencia para aquellos que usan DDJ-SX2. Puede obtener paquetes ampliados como DVS y utilizarlos como opcio- nes adicionales. - Seite 86 2 Pulse el selector giratorio, mueva el cursor a la librería Importación de pistas de la pantalla del ordenador, y luego gire el selector giratorio y seleccione la pista. A continuación se describe el procedimiento típico para importar pistas. Hay varias formas de importar pistas con el software Serato DJ. Para detalles, vea el manual del software Serato DJ.
-
Seite 87: Acerca Del Adaptador De Ca
Serato DJ. c Control HEADPHONES MIX El manual de instrucciones de esta unidad se puede descargar del sitio de asistencia Pioneer DJ. Para detalles, vea Adquisición del d Botón MASTER CUE Manual de instrucciones de esta unidad (página 3 ). - Seite 88 Si hay irregularidades con el adaptador de CA o la clavija de alimenta- oiga un clic. ción, pida a su centro de servicio autorizado por Pioneer más cercano o a su concesionario que realice el trabajo de reparación. No use esta unidad con una moneda, clip para papel u otro objeto de metal metido entre el adaptador de CA y la clavija de alimentación.
- Seite 89 Clavija de alimentación Este producto viene con los tipos de clavijas de alimentación mostra- dos más abajo. Use la clavija de alimentación apropiada para el país o región en que usted se encuentre. Tipo 1 (para Europa) Tipo 2 (para el Reino Unido)
-
Seite 90: Información Adicional
Frecuencia de muestreo ..............44,1 kHz problemas” del manual de instrucciones de esta unidad y las [FAQ] Convertidor A/D y D/A .................24 bits para el [DDJ-SX2] en el sitio de asistencia Pioneer DJ. Características de frecuencia http://pioneerdj.com/support/ USB, CD/LINE, MIC1, MIC2 ..........20 Hz a 20 kHz Algunas veces, el problema puede estar en otro componente. -
Seite 92: Ambiente De Funcionamento
Um cabo de alimentação danificado pode provocar um incêndio ou um choque eléctrico. Verifique periodicamente o cabo de alimentação. Quando estiver danificado, solicite um cabo de alimentação de substituição junto do seu revendedor ou centro de assistência autorizado PIONEER. S002*_A1_Pt... -
Seite 93: Antes De Começar
Antes de instalar o software O software Serato DJ e o software controlador não estão incluídos. Conteúdo da embalagem Aceda e transfira o software a partir do site de suporte da Pioneer DJ. http://pioneerdj.com/support/ Transformador de CA O utilizador é responsável por preparar o computador, dispositivos Ficha de alimentação... - Seite 94 Para Mac OS X tibilidade e os sistemas operativos suportados, consulte as “Software Info” do Instale apenas o software Serato DJ. “DDJ-SX2” no site de suporte da Pioneer DJ abaixo. http://pioneerdj.com/support/ Não é garantido um funcionamento em todos os computadores, mesmo se Procedimento de instalação (Windows)
- Seite 95 Procedimento de instalação (Mac OS X) 5 Leia atentamente os termos do contrato de concessão de licença e, se concordar, seleccione [I agree to the Não ligue esta unidade e o computador até a instalação estar license terms and conditions], e, em seguida, clique em concluída.
-
Seite 96: Nomes De Peças E Funções
Nomes de peças e funções Para obter informações mais detalhadas sobre cada unidade, consulte o Secção do deck Manual de instruções e o manual do software Serato DJ. Para instruções sobre como obter o Manual de instruções e o manual do software Serato DJ, consulte Adquirir o manual na página 3 . - Seite 97 Esta função (Serato Flip) tem de ser ativada antes de poder ser utilizada. p Botão GRID ADJUST Para obter detalhes, visite o site de suporte da Pioneer DJ abaixo. Quando o jog dial é rodado enquanto prime o botão [GRID ADJUST], http://pioneerdj.com/support/...
-
Seite 98: Secção Do Misturador
a Interruptor de atribuição do crossfader Secção do misturador Atribui a saída do canal para o crossfader. b Crossfader Emite o som atribuído com o interruptor de atribuição do crossfader. INST. DOUBLES INST. DOUBLES INST. DOUBLES INST. DOUBLES [SHIFT] + deslocar: Utiliza a função de início do crossfader. -
Seite 99: Painel Posterior
Painel posterior 1 Terminais MASTER OUT 1 7 Terminal SIGNAL GND Ligue os altifalantes alimentados, etc, aqui. Permite ligar um fio de ligação à terra do leitor analógico aqui. Isto ajuda a reduzir o ruído quando o leitor analógico está ligado. 2 Terminais MASTER OUT 2 8 Terminal MIC1 Ligue a um amplificador alimentado, etc. - Seite 100 Funcionamento Aguarde até todas as ligações entre os dispositivos estarem comple- 5 Ligue a ficha de alimentação ao transformador de CA. tas antes de ligar o transformador de CA. Faça deslizar a ficha de alimentação para o interior das guias do trans- Certifique-se de desligar a energia e desligar o transformador de CA formador de CA conforme apresentado no diagrama e pressione até...
-
Seite 101: Iniciar O Sistema
1 O ícone [BUY/ACTIVATE] pode surgir no lado direito do ecrã que aparece quando se executa o Serato DJ pela primeira vez, mas se estiver a ser utilizado o DDJ-SX2, não é preciso ativar ou comprar uma licença. Podem ser adquiridos pacotes de expansão, tais como DVS, e estes podem ser utilizados como opções adicionais. - Seite 102 2 Prima o selector rotativo, mova o cursor para a Importar faixas biblioteca no ecrã do computador e, em seguida, rode o selector rotativo e seleccione a faixa. A seguir é descrito o procedimento típico para importar faixas. Existem várias formas para importar faixas com o software Serato DJ.
-
Seite 103: Acerca Do Transformador De Ca
9 Interruptor de atribuição do crossfader As instruções de funcionamento desta unidade podem ser trans- feridas a partir do site de suporte da Pioneer DJ. Para obter mais a Controlo MASTER LEVEL informações, consulte Adquirir o Manual de instruções desta unidade (pág. - Seite 104 Abrir ou retirar a tampa expõe-no a possíveis choques eléctricos ou outros perigos. Contacte um representante de assistência técnica autorizado da Pioneer para reparar este produto (consulte o cartão de assistência e suporte incluído). A ficha de alimentação pode ser desconectada do transformador de CA e permanecer na tomada de alimentação se alguém tropeçar no...
- Seite 105 Ficha de alimentação Este produto é fornecido com os tipos de fichas de alimentação apresen- tadas abaixo. Utilize a ficha de alimentação apropriada para o país ou região onde se encontra. Tipo 1 (para a Europa) Tipo 2 (para o Reino Unido)
-
Seite 106: Informações Adicionais
Conversor A/D, D/A................24 bits Problemas” das instruções de funcionamento desta unidade e as Característica de frequência [FAQ] para o [DDJ-SX2] no site de suporte da Pioneer DJ. USB, CD/LINE, MIC1, MIC2 ..........20 Hz a 20 kHz http://pioneerdj.com/support/ Relação sinal/ruído (saída nominal, A-WEIGHTED) Algumas vezes o problema está... - Seite 108 проветриваемом помещении или в месте с высокой времени проверяйте сетевой шнур. В случае влажностью, открытом для прямого солнечного обнаружения повреждения обратитесь за заменой света (или сильного искусственного света). в ближайший официальный сервисный центр D3-4-2-1-7c*_A1_Ru фирмы PIONEER или к Вашему дилеру.
- Seite 109 DDJ-SX2 — Files MIC1 DDJ-SX2 More Downloads ® ® DDJ-SX2...
- Seite 110 — — E-mail me Serato newsletters — ® ™ ® ™ ® ™ ® ™ ® ™ ® ™ ® ™ ® ™ DDJ-SX2 Pioneer_DDJ_SX2_Driver_x.xxx.exe DDJ-SX2...
- Seite 111 [I agree to the license terms and conditions Install [Agree Close Disagree Close Serato DJ [Applications...
- Seite 112 INST. DOUBLES INST. DOUBLES INST. DOUBLES INST. DOUBLES FLIP FLIP SLOT START SLOT START SAVE LOOP ON/OFF SAVE LOOP ON/OFF SYNC OFF SYNC OFF CUE LOOP SAVED LOOP SLICER LOOP VELOCITY SAMPLER CUE LOOP SAVED LOOP SLICER LOOP VELOCITY SAMPLER 4 BEAT 4 BEAT FLIP...
- Seite 113 LOOP 2X SHIFT SHIFT LOOP IN SYNC SHIFT SHIFT SHIFT SHIFT LOOP OUT SHIFT SHIFT DECK DECK3 FLIP MODE SLOT DECK1 DECK1 DECK3 FLIP MODE REC FLIP MODE START DECK4 DECK2 DECK2 DECK4 GRID ADJUST HOT CUE GRID ADJUST SHIFT SHIFT GRID SLIDE GRID SLIDE...
- Seite 114 SHIFT INST. DOUBLES INST. DOUBLES INST. DOUBLES INST. DOUBLES SHIFT MASTER LEVEL BOOTH OUT HEADPHONES MIX MASTER CUE FX 1 SAMPLER VOLUME FX 2 TRIM EQ HI MID LOW) FILTER CUE/MIC TALK OVER FX BEATS INPUT SELECT MIC1 MIC2 SHIFT SHIFT SHIFT SHIFT...
- Seite 115 MASTER OUT 1 SIGNAL GND MASTER OUT 2 MIC1 BOOTH OUT MIC2 STANDBY/ON DC IN PHONO/LINE INPUT SELECT] PHONES INPUT SELECT Ø Ø — PC HEADPHONES LEVEL — PHONO PHONES PHONO/LINE INPUT SELECT — LINE PHONO/LINE — PC CROSS FADER CURVE —...
- Seite 116 PHONES INST. DOUBLES INST. DOUBLES INST. DOUBLES INST. DOUBLES FLIP FLIP SLOT START SLOT START SAVE LOOP ON/OFF SAVE LOOP ON/OFF SYNC OFF SYNC OFF CUE LOOP SAVED LOOP SLICER LOOP VELOCITY SAMPLER CUE LOOP SAVED LOOP SLICER LOOP VELOCITY SAMPLER 4 BEAT 4 BEAT [MASTER OUT 1...
- Seite 117 Serato DJ Serato Serato DJ Serato DJ Serato DJ BUY/ACTIVATE Online Library Vertical Horizontal...
- Seite 118 Files Files Files Files LOAD MASTER OUT 1 MASTER OUT INST. DOUBLES INST. DOUBLES INST. DOUBLES INST. DOUBLES Files INST. DOUBLES INST. DOUBLES INST. DOUBLES INST. DOUBLES INST. DOUBLES INST. DOUBLES FLIP FLIP SLOT START SLOT START SAVE LOOP ON/OFF SAVE LOOP ON/OFF...
- Seite 119 HEADPHONES LEVEL MASTER LEVEL BOOTH MONITOR LEVEL HEADPHONES MIX MASTER CUE HEADPHONES LEVEL INPUT SELECT CROSS FADER CURVE MASTER LEVEL TRIM EQ (HI MID LOW STANDBY/ON FILTER THRU] INPUT SELECT INST. DOUBLES INST. DOUBLES INST. DOUBLES INST. DOUBLES FLIP SLOT START SAVE LOOP...
- Seite 120 Монеты, скрепки или другие металлические предметы Сверху Сбоку Не прикасайтесь.
- Seite 121 PUSH...
- Seite 122 NEEDLE SEARCH DDJ-SX2 MASTER OUT 1 MASTER OUT 2 MASTER OUT 1 MASTER OUT 2 BOOTH OUT PHONO/LINE MIC1 Ø MIC2 Ø MASTER OUT 1 MASTER OUT 2 BOOTH OUT Ø PHONES Ø Ø ©...
-
Seite 123: Серийный Номер
Дату изготовления оборудования можно определить по серийному номеру, который содержит информацию о месяце и годе производства. Серийный номер 12 цифр 2 цифры 10 цифр Дата изготовления оборудования P1 - Год изготовления Год 2001 2002 2003 2004 2005 2006 2007 2008 2009 2010 Символ... - Seite 124 Примечание: В соответствии со статьей 5 Закона Российской Федерации “О защите прав потребителя” и Указанием Правительства Российской Федерации № 720 от 16 июня 1997 года корпорация Pioneer Europe NV устанавливает условие на следующую продолжительность срока службы официально поставляемых на Российский рынок товаров.