VQ Fly Baby Big Montageanleitung
R/c flugmodell
Verfügbare Sprachen
Verfügbare Sprachen
Quicklinks
Radio Control Model
R/C Flugmodell
INSTRUCTION MANUAL
MONTAGEANLEITUNG
SPECIFICATIONS
Wingspan
Length
Electric Motor
Gas Engine
Radio
6 Channel / 6 Servos
TECHNISCHE DATEN
Spannweite
Lange
Elektroantrieb
(siehe nächste Seite)
Verbrennerantrieb
Fernsteuerung
6 Kanal / 6 Servos
WARNING! This radio controlled model is NOT a toy. If modified or flown carelessly it could go out of controll and
cause serious human injury or property damage. Before flying your airplane, ensure the air field is spacious enough.
Always fly it outdoors in safe areas and seek professional advice if you are unexperienced. This model was carefully
manufactured and assembled. Please check all glueing joints, especially on the fuselage and firewall.
ACHTUNG! Dieses ferngesteuerte Modell ist KEIN Spielzeug! Es ist für fortgeschrittene Modellflugpiloten bestimmt,
die ausreichende Erfahrung im Umgang mit derartigen Modellen besitzen Bei unsachgemäßer Verwendung kann
hoher Personen- und/oder Sachschaden entstehen. Fragen Sie in einem Modellbauverein in Ihrer Nähe um
professionelle Unterstützung, wenn Sie Hilfe im Bau und Betrieb benötigen. Der Zusammenbau dieses Modells ist
durch die vielen Abbildungen selbsterklärend und ist für fortgeschrittene, erfahrene Modellbauer bestimmt. Dieses
Modell wurde mit großer Sorgfalt hergestellt und montiert. Prüfen Sie trotzdem alle Klebeverbindungen, besonders
am Rumpf und Motorspant und kleben Sie diese ggf. nach.
94.8in.
64.9 in.
(See next page)
25 - 35cc
2410mm
1650mm
25 - 35cc
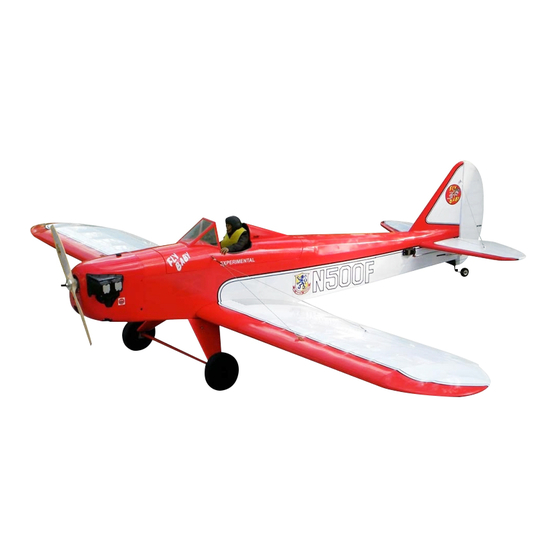
FLY BABY
BIG
BIG
Pictures can vary from actual model
Abb. kann vom tatsächlichen Modell abweichen

Verwandte Anleitungen für VQ Fly Baby Big

Inhaltszusammenfassung für VQ Fly Baby Big
- Seite 1 Radio Control Model R/C Flugmodell FLY BABY INSTRUCTION MANUAL MONTAGEANLEITUNG Pictures can vary from actual model Abb. kann vom tatsächlichen Modell abweichen SPECIFICATIONS Wingspan 94.8in. Length 64.9 in. Electric Motor (See next page) Gas Engine 25 - 35cc Radio 6 Channel / 6 Servos TECHNISCHE DATEN Spannweite 2410mm...
- Seite 2 RECOMMENDED ACCESSORIES (Purchase separately) Empfohlenes Zubehör (Nicht im Lieferumfang enthalten) Benzinmotor: für einfachen Kunstflug: NGH GT-25, (# C5218) für kraftvollen Kunstflug und Seglerschlepp: NGH GT-35, (# C5402) Elektroantrieb: für einfachen Kunstflug: Brushless Combo BOOST 120, (# C4344) 2 x LEMONRC 4500-14,8V (# C2146) od. 2 x RED POWER 4250-14,8V (# C4546) für kraftvollen Kunstflug und Seglerschlepp: Brushless Combo BOOST 160, (# C4534) 2 x LEMONRC 5000-18,5V (# C4852) od.
- Seite 7 FUSELAGE SIDE VIEW Elevator servo Throttle servo Rudder servo Hohenruder servo Seitenruder servo Rudder cable. FUSELAGE Throttle servo TOP VIEW Rudder servo 0.4mm steel wire HORIZONTAL STABILIZER HORIZONTAL STABILIZER ELEVATOR ELEVATOR...
- Seite 8 3x12mm screw ..2 Cut away only the film. 3x12mm screw BOTTOM - VIEW / Unteransicht Control horn ....2 2x30mm screw ..4 3x12mm screw ...8 The thread for aileron servo extension cord 8mm dowel ..4 Connector ..2 8mm dowel Do the same way with 8mm dowel another half wing.
- Seite 10 TOP VIEW / Draufsicht Metal hook ....2 .....2 1mm dia. Cable ...1 roll 2mm metal tube .....16 Do the same way with another half wing. 5 min. Epoxy Secure the wind-shield in place with adhesive tape. To the side of the fuselage Control surface / Ruderausschlage 80mm 12mm...