Pettec Remote Vibra Bedienungsanleitung
Inhaltsverzeichnis
Verfügbare Sprachen
Verfügbare Sprachen
Inhaltsverzeichnis

Inhaltszusammenfassung für Pettec Remote Vibra
- Seite 1 Remote Vibra Trainer Advance Funk Vibrations Trainer Advance Bedienungsanleitung Operating manual...
-
Seite 2: Sicherheitshinweise
JETZT GEHT‘S LOS..Vielen Dank, dass Sie sich für unser Produkt entschieden haben. Der PetTec Funk Vibrations Trainer Advance ist eine ganz neue effektive Hilfe, um Ihren Hund schonend zu erziehen. Sicherheitshinweise Für die sichere Inbetriebnahme des PetTec Funk Vibrations Trainer Advance beachten Sie bitte folgende Hinweise. -
Seite 3: Übersicht Funk Fernbedienung
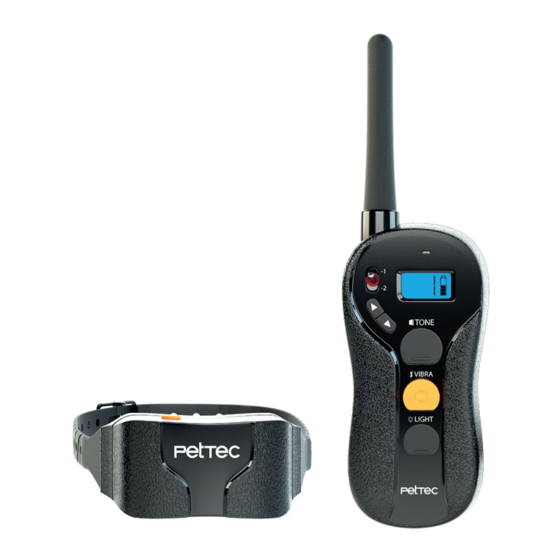
Übersicht Funk Fernbedienung LED Batterieanzeige LCD-Display zur Funktionsübersicht Auswahl des Funk Trainer (maximal zwei Geräte) Einstellbare Vibrationsstärke (16 Stufen) Unterschiedliche Tastenoberflächen für intuitive Bedienung Antenne Gürtelclip Wasserdichter Ladeanschluss Öffnung für Halsband Übersicht Funk Trainer Halsband Festverbaute Kontaktstellen Wasserdichter Ladeanschluss Taste zum ein- und ausschalten... - Seite 4 TECHNISCHE DATEN Features Blaues LCD Display Intuitive Bedienung > 6 Tage Akkulaufzeit Trainer > 12 Tage Akkulaufzeit Fernbedienung IPX7 Wasserdicht 600m Reichweite Einstellbare Ladezeit Vibrationsstufen Fakten Trainer Fernbedienung 79x39x31mm 105x50x23mm Maße 105g Gewicht 22-64cm Halsbandlänge...
-
Seite 5: Funkfernbedienung
INBETRIEBNAHME Funk Fernbedienung Drehen Sie die beiliegende Antenne auf die vorgesehene Windung, bis die Antenne nahtlos auf der Vorrichtung angebracht ist. Das Display sowie die Hintergrundbeleuchtung der Funk Fernbedienung werden eingeschaltet, sobald eine der Tasten betätigt wird. Anschließend ist die Hintergrundbe- leuchtung für 30 Sekunden aktiv und erlischt, wenn keine weitere Nutzung erfolgt. - Seite 6 Funk Trainer Durch betätigen der gelben Taste (ca. eine Sekunde) beginnt die LED grün zu blinken. Im Normalfall leuchtet die LED einmal alle fünf Sekunden auf und signalisiert die Empfangsbereitschaft. Durch erneutes betätigen der gelben Taste (ca. drei Sekunden) wird der Trainer ausgeschaltet.
-
Seite 8: Anbringung Des Halsbandes
Anbringung des Halsbandes Das Halsband muss fest angelegt werden, so dass die Kontaktstellen eng am Hund anliegen und die Vibrationssignale effektiv übertragen werden können. Die richtige Anbringung des Halsbandes können Sie testen, in dem Sie prüfen, ob noch ein bis zwei Finger unter das Halsband passen. -
Seite 9: Maximale Reichweite
Individuell geeignete Vibrationsstufen Der PetTec Funk Vibrations Trainer Advance bietet bis zu 16 verschiedene Vibrations- stufen, dabei ist Stufe 1 das schwächste Signal und Stufe 16 das stärkste. Das passende Vibrationssginal für Ihren Hund ist abhängig vom Temperament und der Empfänglichkeit für Vibrationen. -
Seite 10: Led Benachrichtigungen Der Funk Fernbedienung
LED Benachrichtigungen der Funk Fernbedienung Taste Funktion Bedeutung der LED TONE (schwarz mit Strich) Gibt ein hörbares Tonsignal wieder VIBRA (gelb mit Punkt) Überträgt ein Vibrations- signal, welches mit Hilfe der Funk Fernbedienung Rotes LED Licht leuchtet als festlegt wird Benachrichtigung solange die LIGHT (schwarz mit Strich) Gibt ein sichtbares... -
Seite 11: Led Benachrichtigungen Des Funk Trainers
LED Benachrichtigungen des Funk Trainers Funk Trainer Funktionen Grüne LED Benachrichtigungen Einschalten Blinkt einmalig Normale Bedienung – guter Akkuzustand Blinkt alle fünf Sekunden Tonsignal Leuchtet solange die Taste gedrückt wird Lichtsignal Blinkt fünf Mal innerhalb von drei Sekunden Synchronisationsmodus Blinkt sekundenweise für 16 Sekunden Synchronisation abgeschlossen Blinkt fünf Mal hintereinander Akku geladen... -
Seite 12: Laden Der Akkus
Laden der Akkus 1. Laden Sie den Akku beider Geräte vor der ersten Anwendung vollständig auf 2. Laden Sie den Akku nicht in der Nähe von brennbaren Substanzen auf 3. Der Akku beider Geräte muss komplett aufgeladen werden, wenn die letzte Nutzung schon über drei Monate zurückliegt Der Akku muss aufgeladen werden, wenn: 4. -
Seite 13: Fernbedienung Und Trainer Aufladen
Fernbedienung und Trainer aufladen Laden Sie die Funk Fernbedienung und den Funk Trainer mit Hilfe des Ladekabels vollständig auf, bis die Ladenbalken auf der Funkfernbedienung vollständig sind bzw. die LED auf dem Funk Trainer dauerhaft grün leuchtet. Solange keiner von beiden Fällen eingetroffen ist, sind die Geräte nicht vollständig geladen. -
Seite 14: Verbinden Von Fernbedienung Und Trainer
Verbinden von Fernbedienung und Trainer Wenn die Funk Fernbedienung und der Funk Trainer nicht mehr miteinander kommu- nizieren, so dass bei Betätigung der Tasten auf der Funk Fernbedienung keine Reaktion vom Funk Trainer erfolgt, müssen diese wie folgt neu verbunden werden. 1. - Seite 15 Hund und Mensch. Doch häufig stoßen Hundehalter bei der Erziehung ihrer Vierbeiner an die eigenen Grenzen. Der Remote Vibra Trainer ist eine neue innovative Hilfe für Ihr normales Hundetraining. Mit dem Trainer können Sie besonders schnell und direkt auf das Verhalten Ihres Hundes reagieren und neue Verhaltensweisen antrainieren.
- Seite 32 Remote Vibra Trainer Advance Funk Vibrations Trainer Advance © PetTec Torstraße 49 10119 Berlin Deutschland www.pettec.com E-Mail: info@pettec.com PetTec ist eine Marke der Ströer Products GmbH Bildnachweis: © knape www.istockphoto.com Entsorgung von Batterien: Gemäß Batterienverordnung sind wir verpflichtet, Sie als Verbraucher auf Folgendes hinzuweisen: Sie sind gesetzlich verpflichtet, Batterien und Akkus zurückzugeben.