SilverStone FS202 Handbuch

Verwandte Anleitungen für SilverStone FS202


Inhaltszusammenfassung für SilverStone FS202
- Seite 1 FS202 Front Panel Storage Front Panel Storage One 3.5" device bay to two 2.5" SAS/SATA 6Gbit/s One 3.5" device bay to two 2.5" SAS/SATA 6Gbit/s trayless hot-swap cage trayless hot-swap cage...
- Seite 2 The following manual and guides were carefully prepared by the SilverStone engineering team to help you maximize the potential of your SilverStone product. Please keep this manual for future reference when upgrading or performing maintenance on your system. A copy of this manual can also...
- Seite 3 Product Ov Introduction To accommodate PC user’s need for more storage flexibility and convenience, SilverStone created a line of front bay storage products C user’s need for more storage flexibility and convenience, SilverStone created a line of front b called the FS series. These are 3.5” bay chassis designed to fit 2.5” SAS/SATA drives. Equipped with release handle made out of finely These are 3.5”...
-
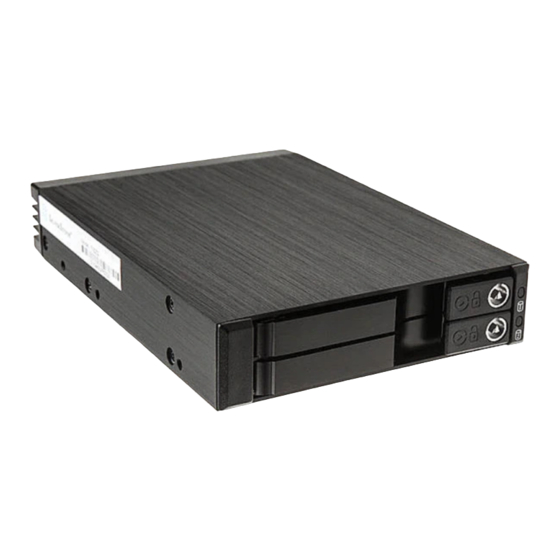
Seite 4: Product Overview
Front Panel Storage Product Overview A1 = Triangle safety lock A2 = Drive power & access LED A1 = Dreieckigen Metallschloss A1 = 三角安全鎖 A2 = HDD 電源 & LED狀態燈號 A2 = HDD/SSD Strom & LED ablesen A1 = Serrure triangulaire de sécurité DEL power A1 = 三角安全鎖... - Seite 5 Front Panel Storage Product Overview A3 = 15pin power connector x 1 A4 = SATA-1 7pin data connector x 1 A5 = Drive LED switch (enable/disable) A6 = SATA-2 7pin data connector x 1 A3 = 15pin Netzanschluss x 1 A3 = 15pin 電源接頭...
-
Seite 6: Installation Chart
Front Panel Storage Installation Chart Before you begin, please make sure that you have all components collected check that all components do not have compatibility problems with each other or with the case if possible, assemble the components outside the case first to make sure they are working keep the motherboard manual ready for reference during installation prepare a Phillips screwdriver. - Seite 7 Front Panel Storage Installation Chart Install drive Legen Sie die Festplatte ein 安裝硬盤 Installer le disque dur 安装硬盘 Instalar el disco duro ハードディスクをインストール します Installare i dischi 하드디스크를 장착합니다 Вставить диск ติ ด ตั ้ ง ฮาร์ ด ดิ ส ก์ Close drive door Machen Sie den Vorderrahmen 關上硬槃門...
- Seite 8 Front Panel Storage Installation Chart Connect SATA and power cable Schließen Sie SATA an die Leitung an 連接SATA 線與電源線 Brancher le SATA et le câble d’alimentation 连接SATA 线与电源线 Conecta SATA y la cable de alimentación SATAを電力線と接続します Collegare SATA e cavo di alimentazione SATA와...
- Seite 9 Front Panel Storage Installation Chart Installation complete Komplettinstallation 完成 Installation complète 完成 Instalación completada インストール完成 Completamento installazione 설치가 완성되었습니다 Установка завершена ติ ด ตั ้ ง เสร็ จ...
- Seite 10 Front Panel Storage Indicator Status State Drive in Drive Access A5 turn OFF Color Green Orange Green Blinking * When A5 switch is turn to OFF position, drive access would no longer be detected. Instead, the front LED would display solid blue color and that means it is with the power ON function only but without blinking accessing signal.
- Seite 11 Front Panel Storage Indicator Status Estado HDD in HDD Acceso A5 apagado Color Verde Naranja Verde Intermitente * Cuando el interruptor A5 está en posición OFF, la función de acceso de HDD/SSD está desactivada. En este caso, el indicador de acceso LED frontal demuestra en azul continuo solo y significa que solo está...
- Seite 12 Front Panel Storage Indicator Status 狀態 HDD 置入 HDD 存取 A5 關閉 顏色 Green Orange Green 閃爍 *當A5開關切為OFF位置時,HDD讀取信號閃爍指示燈將關閉,LED在將電源開啟的狀態下顯示為藍燈恆亮。 状态 HDD 置入 HDD 存取 A5 关闭 颜色 Green Orange Green 闪烁 *当A5开关切为OFF位置时,HDD读取信号闪烁指示灯将关闭,LED在将电源开启的状态下显示为蓝灯恒亮。 状態 HDD入れる HDDアクセス A5 オフ 色 緑 オレンジ 緑 閃爍...
- Seite 13 Front Panel Storage Indicator Status 상태 HDD 설치 HDD액세스 A5 오프 색깔 녹색 오렌지 색상 녹색 깜빡임 * A5가 오프 위치에 있으면 HDD/SSD 업로드 기능이 정지합니다. 이때 전면의 LED 램프는 파란색만 켜지고 전원만 들어와 있음을 의미합니다. 깜빡이는 업로드 신호는 없습니다. ลั...
-
Seite 14: Warranty
Replacement product will be warranted for remainder of the warranty period or thirty days, whichever is longer. All products should be sent back to the place of purchase if it is within 30 days of purchase, after 30 days, customers need to initiate RMA procedure with SilverStone Technology in USA by first downloading the “USA RMA form for end-users”... - Seite 16 G11224880...