Inhaltsverzeichnis
Werbung
Verfügbare Sprachen
Verfügbare Sprachen
Werbung
Kapitel
Inhaltsverzeichnis
Fehlerbehebung

Verwandte Anleitungen für Blaupunkt LS 2400


Inhaltszusammenfassung für Blaupunkt LS 2400
- Seite 1 LS 2400 Bluetooth-Soundboard Bluetooth sound board...
-
Seite 2: Inhaltsverzeichnis
LS2400.book Seite 2 Donnerstag, 7. Januar 2016 2:24 14 LS 2400 Inhalt 1. Herzlichen Dank für Ihr Vertrauen! ..........3 2. Sicherheitshinweise ................4 3. Lieferumfang ..................7 4. Geräteübersicht ................. 8 5. Aufstellen des Gerätes ..............11 Senkrecht stehend ................ 12 Waagerecht liegend .............. -
Seite 3: Herzlichen Dank Für Ihr Vertrauen
LS2400.book Seite 3 Donnerstag, 7. Januar 2016 2:24 14 LS 2400 HERZLICHEN DANK FÜR IHR VERTRAUEN! Wir gratulieren Ihnen zu Ihrem neuen Blaupunkt 2.1 Soundsystem und sind über- zeugt, dass Sie mit diesem modernen Gerät zufrieden sein werden. Um eine stets optimale Funktion und Leistungsbereitschaft Ihres 2.1 Soundsys- tems zu garantieren und um Ihre persönliche Sicherheit zu gewährleisten:... -
Seite 4: Sicherheitshinweise
LS2400.book Seite 4 Donnerstag, 7. Januar 2016 2:24 14 LS 2400 SICHERHEITSHINWEISE Bestimmungsgemäße Verwendung Dies ist ein Gerät der Unterhaltungselektronik. Das Gerät ist für die Tonwiedergabe von Audio- / Videogeräten vorgesehen. Das Gerät ist für den privaten Gebrauch konzipiert und nicht für die gewerbliche Nutzung geeignet. -
Seite 5: Umgebungsbedingungen
LS2400.book Seite 5 Donnerstag, 7. Januar 2016 2:24 14 LS 2400 Umgebungsbedingungen • Schützen Sie das Gerät vor Feuchtigkeit, Tropf- oder Spritzwasser: Es besteht die Gefahr eines elektrischen Schlages. Stellen Sie keine mit Flüssigkeit gefüll- ten Gegenstände, wie z. B. Vasen, auf das Gerät oder in unmittelbare Nähe. - Seite 6 LS2400.book Seite 6 Donnerstag, 7. Januar 2016 2:24 14 LS 2400 • Ziehen Sie die Netzstecker aus der Steckdose, ..wenn eine Störung auftritt, ... wenn Sie das Gerät nicht benutzen, ... wenn Sie das Gerät reinigen wollen und ...
-
Seite 7: Lieferumfang
LS2400.book Seite 7 Donnerstag, 7. Januar 2016 2:24 14 LS 2400 • Wenn Batteriesäure ausgelaufen ist, vermeiden Sie den Kontakt mit Haut, Au- gen und Schleimhäuten. Spülen Sie bei Kontakt mit der Säure die betroffe- nen Stellen sofort mit reichlich klarem Wasser und suchen Sie umgehend einen Arzt auf. -
Seite 8: Geräteübersicht
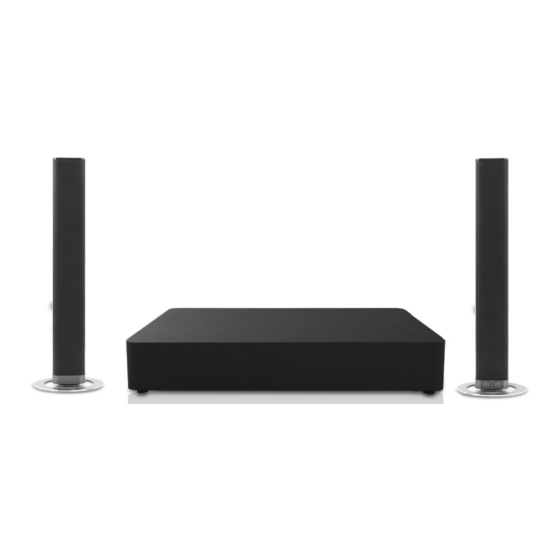
LS2400.book Seite 8 Donnerstag, 7. Januar 2016 2:24 14 LS 2400 GERÄTEÜBERSICHT Soundbar links rechts linker Lautsprecher rechter Lautsprecher Gerät in Standby-Betrieb schalten / aus Standby-Betrieb einschalten SOURCE Anschlussart wählen LED-Anzeige Standby-Betrieb: leuchtet rot AUX: leuchtet grün OPTICAL: leuchtet orange... -
Seite 9: Kabelloser Subwoofer
LS2400.book Seite 9 Donnerstag, 7. Januar 2016 2:24 14 LS 2400 3,5 mm Ø Stereo-Klinkenbuchse: Analoger Eingang zur Verbindung mit externen Audiogeräten OPTICAL TOSLINK-Buchse: Digitaler optischer Eingang zur Verbin- dung z. B. mit Fernseher, DVD-Player COAXIAL Cinchbuchse: Digitaler elektrischer Eingang zur Verbin- dung z. B. -
Seite 10: Fernbedienung
LS2400.book Seite 10 Donnerstag, 7. Januar 2016 2:24 14 LS 2400 Fernbedienung Infrarot-Sender auf Bluetooth schalten MUTE Stummschalttaste COAXIAL auf Eingang COAXIAL schalten VOL + Lautstärke erhöhen Bei BT: zum nächsten Titel VOL– Lautstärke verringern MUSIC voreingestellte Klangfarbe für Musik (MUSIC) wählen MOVIE voreingestellte Klangfarbe für Filme (MOVIE) wählen... -
Seite 11: Aufstellen Des Gerätes
LS2400.book Seite 11 Donnerstag, 7. Januar 2016 2:24 14 LS 2400 AUFSTELLEN DES GERÄTES Sie haben drei verschiedene Möglichkeiten das Soundsystem aufzustellen. senkrecht, stehend waagerecht, liegend waagerecht, hängend Die Lautsprecher stehen Die Lautsprecher sind di- Die Lautsprecher sind di- einzelnd und sind über rekt verbunden. -
Seite 12: Senkrecht Stehend
LS2400.book Seite 12 Donnerstag, 7. Januar 2016 2:24 14 LS 2400 SENKRECHT STEHEND 1. Lösen Sie die beiden Standfüße voneinander, in dem Sie sie gegeneinander drehen. 2. Stecken Sie die Standfüße auf den passenden Lautsprecher. 3. Stellen Sie die Lautsprecher hin... -
Seite 13: Waagerecht Liegend
LS2400.book Seite 13 Donnerstag, 7. Januar 2016 2:24 14 LS 2400 WAAGERECHT LIEGEND 1. Stecken Sie die beiden unteren Enden der Lautsprecher ineinan- der. 2. Verdrehen Sie die Lautsprecher gegeneinander. 3. Ziehen Sie die Schutzfolien von den Kunststofffüßen. 4. Kleben Sie die Kunststofffüße an die Unterseite der Lautsprecher. - Seite 14 LS2400.book Seite 14 Donnerstag, 7. Januar 2016 2:24 14 LS 2400 Lassen Sie ggf. die Wandmontage durch einen Fachmann ausführen. 1. Lösen Sie die 4 Schrauben an den seitlichen Enden auf der Rückseite des Gerätes. 2. Befestigen Sie mit diesen Schrauben die beiden Wandhal- terungen am Gerät.
-
Seite 15: Stromversorgung
LS2400.book Seite 15 Donnerstag, 7. Januar 2016 2:24 14 LS 2400 STROMVERSORGUNG Fernbedienung • Die Fernbedienung wird mit einer eingelegten Batterie geliefert. Ziehen Sie vor der Inbetriebnahme den Kunststoffstreifen aus der Fernbedienung. Batterie der Fernbedienung einlegen/wechseln GEFAHR! Explosionsgefahr bei unsachgemäßem Auswechseln der Batte- rie. -
Seite 16: Anschlüsse
LS2400.book Seite 16 Donnerstag, 7. Januar 2016 2:24 14 LS 2400 ANSCHLÜSSE VORSICHT: Achten Sie darauf, dass die anzuschließenden Geräte ausgeschaltet sind, bevor Sie sie anschließen. Lesen Sie auch die Bedienungsanleitungen der Geräte, die Sie anschließen wollen. HINWEIS: Es ist möglich, dass an der Tonqelle, z. B. dem Fernseher, der entspre- chede digitale Tonausgang (Optisch oder Coaxial) gewählt werden muss. -
Seite 17: Bedienung
LS2400.book Seite 17 Donnerstag, 7. Januar 2016 2:24 14 LS 2400 BEDIENUNG LAUTSPRECHER UND SUBWOOFER VERBINDEN Der Subwoofer und der Lautsprecher sollten in einem Raum stehen und nicht weiter als 6 Meter voneinander entfernt sein. Automatisches Verbinden Das automatische Verbinden startet, wenn Sie die Netzstecker des Lautsprechers und des Subwoofers mit einer Steckdose verbinden. -
Seite 18: Lautstärke Einstellen
LS2400.book Seite 18 Donnerstag, 7. Januar 2016 2:24 14 LS 2400 • Um den Lautsprecher und den Subwoofer vom Netz zu trennen, ziehen Sie den Netzstecker aus der Steckdose. Lautstärke einstellen • Drücken Sie während der Wiedergabe die Tasten VOL +/– auf der Fernbedie- nung bzw. -
Seite 19: Quellen Aufrufen
2. Schalten Sie das Abspielgerät (z. B. Smartphone) ein und starten Sie dort die Bluetooth-Verbindung. 3. Das Abspielgerät sollte nun die Gerätekennung „Blaupunkt LS 2400“ emp- fangen. Falls nicht, drücken Sie kurz die II/ PAIR Taste. 4. Stellen Sie am Abspielgerät die Verbindung zum Soundsystem her. Im Falle einer Passwortabfrage geben Sie „0000“... -
Seite 20: Reinigung
Produkt in Übereinstimmung mit den grundlegenden Anforde- rungen und geltenden Vorschriften der R&TTE-Richtlinie 1999/5/EG, der EMV-Richtlinie 2004/108/EG, der ErP Richtlinie 2009/125/EG, der Niederspannungs-Richtlinie 2006/95/EG und der RoHS-Richtlinie 2011/65/EU befindet. Die vollständige Konformitätserklärung und diese Bedienungsanleitung im PDF- Format finden Sie im Internet unter www.blaupunkt.de. -
Seite 21: 11. Problemlösungen
LS2400.book Seite 21 Donnerstag, 7. Januar 2016 2:24 14 LS 2400 11. PROBLEMLÖSUNGEN Sollte Ihr Gerät einmal nicht wie gewünscht funktionieren, gehen Sie bitte erst diese Checkliste durch. Vielleicht ist es nur ein kleines Problem, das Sie selbst be- heben können. -
Seite 22: 12. Entsorgen
LS2400.book Seite 22 Donnerstag, 7. Januar 2016 2:24 14 LS 2400 12. ENTSORGEN Altgeräte und Batterien dürfen nicht im normalen Hausmüll entsorgt werden. Die Verpackung bewahren Sie nach Möglichkeit bis zum Ablauf der Garantiezeit auf. Danach entsorgen Sie sie bitte umweltge- recht. -
Seite 23: 13. Technische Daten
LS2400.book Seite 23 Donnerstag, 7. Januar 2016 2:24 14 LS 2400 13. TECHNISCHE DATEN Elektrische Daten Lautsprecher Netzspannung: 220-240 V~ 50/60 Hz Schutzklasse: Leistungsaufnahme: Maximal ca. 30 W In Standby: < 0,5 W Elektrische Daten Subwoofer Netzspannung: 220-240 V~ 50/60 Hz... - Seite 24 LS2400.book Seite 24 Donnerstag, 7. Januar 2016 2:24 14 LS 2400...
- Seite 25 LS2400.book Seite 24 Donnerstag, 7. Januar 2016 2:24 14...
- Seite 26 LS2400.book Seite 25 Donnerstag, 7. Januar 2016 2:24 14...
- Seite 28 Contents Important Safety Instructions ....................2 Safety ......................................2 Warning .....................................3 What’s in the Box ........................4 Placement and Mounting ....................... 5 Placement ....................................5 Stand Mounting (if using option-A) ..........................5 Horizontal Mounting ................................6 Installing the Rubber Feet (if using option-B) ......................6 Wall Mounting (if using option-C) ...........................7 Identifying the Parts .......................
-
Seite 29: Important Safety Instructions
Important Safety Instructions The lightning flash with arrowhead symbol, CAUTION within an equilateral triangle, is intended to alert the user to the presence of uninsulated RISK OF ELECTRIC SHOCK DO NOT OPEN “dangerous voltage” within the product’s e n c l o s u r e t h a t m a y b e o f s u f f i c i e n t CAUTION: TO REDUCE THE RISK OF ELECTRIC magnitude as to constitute a risk of electric SHOCK, DO NOT REMOVE COVER (OR BACK). -
Seite 30: Warning
Caution: Use of controls or adjustments or performance of procedures other than those described herein, may result in hazardous radiation exposure or other unsafe operation. To reduce the risk of fire or electric shock, do not expose this apparatus to rain or moisture. The apparatus must not be exposed to dripping or splashing and objects filled with liquids, such as vases, must not be placed on apparatus. -
Seite 31: What's In The Box
What’s in the Box Main Unit (Left / Right) Remote Control Stand (Left / Right) Instruction Manual AC Power Cord x 2 Wall Bracket 3.5mm to 3.5mm Audio Cable Wireless Subwoofer Rubber Feet • Design and specifications are subject to change without notice. -
Seite 32: Placement And Mounting
Placement and Mounting As the unit can be used either a single sound bar or a 2-piece Tube speakers. Placement • You are suggested putting the unit with below options: Option - A Option - B Option - C Stand Mounting (if using option-A) Main Unit (Left) Main Unit (Right) Stand (Right) -
Seite 33: Horizontal Mounting
Horizontal Mounting Installing the Rubber Feet (if using option-B) You can extend the height of the unit. Note: Ensure the surface is clean prior to sticking the rubber foot to the bottom of the unit. 1. Turn the unit upside down. 2. -
Seite 34: Wall Mounting (If Using Option-C)
Wall Mounting (if using option-C) Note: • Installation must be carried out by qualified personnel only. Incorrect assembly can result in severe personal injury and property damage (if you intend to install this product yourself, you must check for installations such as electrical wiring and plumbing that may be buried inside the wall). It is the installer’s responsibility to verify that the wall will safely support the total load of the unit and wall brackets. -
Seite 35: Identifying The Parts
Identifying the Parts Main Unit (Left) (Right) 6 VOL+/VOL- 1 Left Speaker Increase/decrease the volume level. 2 Right Speaker 7 AUX Socket Connect to an external audio device. Switch the unit between on and Standby mode. 8 OPTICAL Socket 4 SOURCE 9 COAXIAL Socket Select the play function. -
Seite 36: Wireless Subwoofer
Wireless Subwoofer 1 AC~ Power Cord Connect to power. 2 PAIR button Pair with the main unit. 3 PAIR Indicator Pair indicator lights up when the pairing succeeds 4 Speaker Remote Control Switch the unit between ON and STANDBY mode. 2 MUTE Mute or resume the sound. -
Seite 37: Preparations
Preparations Prepare the Remote Control The provided Remote Control allows the unit to be operated from a distance. Even if the Remote Control is operated within the • effective range (6m), remote control operation may be impossible if there are any obstacles between the 30˚... -
Seite 38: Connections
Connections Media player COAXIAL Use the AUX Socket A. Use a 3.5mm to 3.5mm audio cable (included) to connect the TV’s headphone socket to the AUX socket on the unit. B. Use a RCA to 3.5mm audio cable (not included) to connect the TV’s audio output sockets to the AUX socket on the unit. -
Seite 39: Pairing The Wireless Subwoofer With The Main Unit
Pairing the Wireless Subwoofer with the Main Unit • Automatic pairing The subwoofer and soundbar will automatically pair when both units are plugged into the mains sockets and turned on. No cable is needed for connecting the two units. • When the subwoofer is pairing with the main unit, the Pair Indicator will flash fast. -
Seite 40: Select Modes
Select Modes Press the SOURCE button repeatedly on the unit or press the HDMI (ARC), AUX, OPTICAL, BT (Bluetooth) buttons on the remote control to select the desired mode. In AUX mode: the status indicator lights up Green. In OPTICAL mode: the status indicator lights up Orange. In COAXIAL mode: the status indicator lights up Orange flashes. -
Seite 41: Bluetooth Operation
3 Activate your Bluetooth device and select the search mode. “Blaupunkt LS 2400” will appear on your Bluetooth device list. 4 Select “Blaupunkt LS 2400” in the pairing list. After the “Paired” voice prompt, the system is successfully connected and the Blue indicator will light up solidly. -
Seite 42: Troubleshooting
1. Pair your device with the player. 2. Play music via your device (if it supports A2DP). 3. Use supplied remote control to control play (if it supports AVRCP). PAIR button on the remote control. - To pause/resume play, press the BF / - To skip to a track, press the buttons on the remote control. -
Seite 43: Specifications
Specifications Soundbar Power Supply ............................AC 220-240V~ 50/60Hz Power consumption of standby mode ........................< 0.5W Output Power ...................................20W x 2 Power Consumption ................................30W Frequency Response ............................200Hz - 20KHz Audio input sensitivity (AUX) ............................700mV Dimension: Horizontal installing (L x W x H) ....................... 906 x 60 x 60mm Stand installing (L x W x H) ........................