Herunterladen Inhalt Inhalt Diese Seite drucken
Vorschau ausblenden Andere Handbücher für COIP 150:

Werbung

Verfügbare Sprachen

Verfügbare Sprachen

COIP 150
HD Outdoor IP Camera
Schnellstartanleitung
Guide de démarrage rapide
Guida rapida
Quick Start Guide
DEUTSCH
QR code
FRANÇAISE
ITALIANO
ENGLISH
Please read carefully before using this equipment.

Werbung

Inhaltsverzeichnis
loading

Inhaltszusammenfassung für switel COIP 150

  • Seite 1 COIP 150 HD Outdoor IP Camera Schnellstartanleitung Guide de démarrage rapide Guida rapida Quick Start Guide DEUTSCH QR code FRANÇAISE ITALIANO ENGLISH Please read carefully before using this equipment.
  • Seite 2: Installation

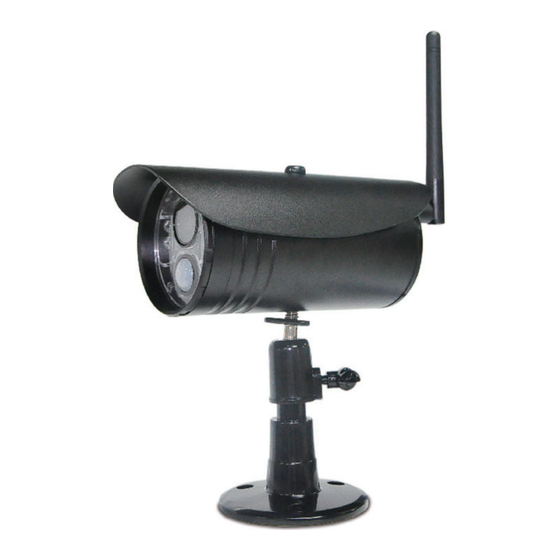
    1 ÜBERSICHT Bevor Sie das Produkt benutzen, lesen Sie bitte die Anleitung sorgfältig durch, um jegliche Schäden am Produkt aufgrund fehlerhafter Bedienung oder Miss- brauch zu vermeiden. Antenne (bei der Installation Antenne festziehen und nach oben stellen) Regenschutz Infrarotlicht Kameralinse Spannungsversorgungsanzeige Internetverbindungsanzeige („Link“)
  • Seite 3: Hinzufügen Über Wifi

    Laden Sie die U-life-APP herunter und installieren Sie sie. Suchen Sie mit Ihrem iPhone/iPad im AppStore nach "U-life Plus" (oder scannen Sie den QR-Code) und installieren Sie die App. U-life Plus Suchen Sie mit Ihrem Android-Smartphone bei GooglePlay nach "U-life Plus" (oder scannen Sie den QR-Code) und installieren Sie die App.
  • Seite 4 (Fig. 1) Kamera Stecker Netzteil Tippen Sie auf um die Kamera hinzuzufügen (Fig. 2) Tippen Sie auf “Verbindung über WiFi". (Fig. 3) (Fig. 2) (Fig. 3) Tippen Sie auf das QR-Code-Icon und scannen Sie den QR-Code auf der Rückseite der Kamera. Der Standardname der Kamera ist “ipcamera” (kann geän- dert werden).
  • Seite 5: Hinzufügen Durch Scannen Des Qr-Codes

    Hinzufügen durch Scannen des QR-Codes Kamera anschliessen > SET-Taste 1 s drücken > Tippen Sie auf "QR code scan" > Scannen Sie den QR-Code auf der Kamera > Wählen Sie den Router und geben Sie das Passwort ein > Verfahren Sie weiter wie angegeben (Fig. 8 Serie). (Fig.8 Serie) Positionieren Sie das Smartphone mit dem QR Code ca.
  • Seite 6: Entfernen Der Kamera

    (Fig. 10a) Ihr Freund öffnet die „U-life Plus“-App, tippt auf um die Kamera hinzuzufügen und anschliessend auf „Weiteren Benutzer hinzufügen“ (Fig. 10b). Ihr Freund scannt den Code, den er von Ihnen erhalten hat (s. o.) und die Verbin- dung zur Ihrer Kamera wird hergestellt. (Fig.
  • Seite 7: Bedienung

    3 BEDIENUNG Eine bestehende Verbindung bietet Echtzeitüberwachung, Fotografieren, Aufnehmen von Videos und Änderung der Einstellungen. (Fig. 12) Wechsel zwischen Standard- und HD-Ansicht. Multi-Ansicht (bis zu 4 verbundene Kameras gleichzeitig). Videoaufnahme; zum Beenden der Aufzeichnung erneut tippen. Das Video wird in Ihrem Smartphone gespeichert.
  • Seite 8: Anzeigen Der Kamera

    (Fig. 13) (Fig. 14) (Fig. 15) Diese Kamera ist kompatibel mit der universellen App, die verfügbaren Funktionen sind abhängig vom Kamera-Modell. 4 ANZEIGEN DER KAMERA Einschalten und Star- Verbindungsanzeige blinkt nach 10 s.rot, leuchtet dann dauerhaft rot, Spannungsversorgungsanzeige dauerhaft grün. Scannen des QR- Verbindungsanzeige blinkt rot, Spannungsversor- Codes...
  • Seite 9: Technische Daten

    6 TECHNISCHE DATEN • Bildsensor: 1/4 inch, CMOS • Kameraauflösung: 720P HD • Aufnahmewinkel: 61° • Nachtsichtreichweite: ≤ 5m • Schutzklasse: IP66 • Betriebsspannung: DC +12V /1A • Zulässige Umgebungsbedingungen: -10°C~+50°C, 15%~85% rel. Luftfeuchtigkeit • Abmessungen (L x B x H): 130 x 69 x 56 mm (ohne Fuss) •...
  • Seite 10: Fehlerbehebung

    chen. Mögliche Sonderzeichen sind: " @, #, &, *, ~, {, }, -, =, +, /, ?, (, )", nicht zu- lässig sind "%", "\", "<>". Sprachenspezifische Umlaute sind ebenfalls nicht zuläs- sig. Wenn die Kamera nicht mehr ordnungsgemäss funktioniert, trennen Sie für kurze Zeit die Spannungsversorgung;...
  • Seite 11: Garantie

    Fahrlässigkeit des Herstellers beruhen. Sollte Ihr Gerät dennoch einen Defekt inner- halb der Garantiezeit aufweisen, wenden Sie sich bitte unter Vorlage Ihrer Kaufquit- tung ausschliesslich an das Geschäft, in dem Sie Ihr SWITEL-Gerät gekauft haben. Alle Gewährleistungsansprüche nach diesen Bestimmungen sind ausschliesslich ge- genüber Ihrem Fachhändler geltend zu machen.
  • Seite 12: Konformitätserklärung

    Dieses Gerät erfüllt die Anforderungen der Richtlinie 2014/53/EU. Die Konformität mit der o. a. Richtlinie wird durch das CE-Zeichen auf dem Gerät bestätigt. Für die komplette Konformitätserklärung nutzen Sie bitte den kostenlosen Download von unserer Website www.switel.com. Telgo AG, Rte. D’Englisberg 11, 1763 Granges-Paccot, Switzerland...
  • Seite 13: Préparation À L'installation

    1 APPARITION Avant d'utiliser le produit, lisez attentivement le guide pour éviter tout dommage au produit en raison d'un mauvais fonctionnement ou d'une mauvaise utilisation. Antenne (lors de l'installation Antenne, serrer et faire antenne vers le haut) Couverture pluie Lumière infrarouge Objectif de la caméra Voyant d'alimentation Voyant lumineux du réseau...
  • Seite 14 Téléchargez et installez l'application client-end. Ouvrez l'App Store sur iPhone / iPad, recherchez "U-life Plus" et install.Or balayer le code QR à installer directement. U-life Plus Entrez le magasin "Google Play" sur le smartphone Android. Recherchez "U-life Plus" et installez ou scannez le QR Code pour l'installer directement. U-life Plus Prenez l'opération de Android client-end comme exemple, Et se référer à...
  • Seite 15 Caméra Puissance Puissance (Fig. 1) adaptateur la source Cliquez pour ajouter l'équipement; (Figure 2) Cliquez sur "Ajout WiFi" (Figure 3). (Fig. 2) (Fig. 3) Cliquez sur l'icône du code QR et numérisez le code QR du l'ID de l'appareil photo sur l'appareil photo. Le nom par défaut du Appareil photo est "ipcamera" et peut être modifié.
  • Seite 16 Ajout du mode en numérisant le code QR Allumez l'appareil photo > Appuyez sur SET pendant 1 seconde > Cliquez sur Ajouter en balayant le code QR pour ajouter la caméra > Scan ID du périphérique > Entrez le nom et le mot de passe pour Wifi. Exécutez les opérations comme indiqué.
  • Seite 17 (Fig. 10a) Votre ami ouvre l’appli « U-life Plus »-, tape sur pour ajouter la caméra et ensuite sur « Partager un caméra avec des amis » (fig.10b). Votre ami scanne le code que vous lui avez envoyé (v. ci-dessous) et la connexion avec votre caméra est établie.
  • Seite 18 3 VUE DU MONITEUR ET OPÉRATIONS Avec une connexion réussie, la vue du moniteur la surveillance en temps réel, la prise de photos, l'enregistrement de vidéos, modifier le réglage et d'autres opérations. (Fig. 12) Cliquez pour passer de la définition standard à la haute définition de la vidéo en temps réel.
  • Seite 19 (Fig. 13) (Fig. 14) (Fig. 15) Cette caméra est compatible avec l'application universelle, réelle fonction est soumise à la caméra. 4 INDICATEUR DE CAMÉRA Cours d'alimentation Le feu rouge continue après le lien Au début Lumière attendant 10s: puissance Le témoin lumineux reste allumé Cours d'intelligence Lien clignotant rouge, puissance Numérisation du code QR...
  • Seite 20: Paramètres Techniques

    6 PARAMÈTRES TECHNIQUES • Capteur d'imagerie : 1/4 inch, CMOS • Résolution de l'a camera : 720P high definition • Angle de vue : 61° • Plage de vision nocturne : ≤5m • Etanchéité : IP66 • Tension de travai l: DC +12V /1A •...
  • Seite 21: Dépannage

    Message Push: lorsque la source thermique est détectée, message d'alarme peut être envoyé au serveur et ton téléphone Surveillance à distance: après la connexion de l'appareil photo internet avec succès, l'application peut afficher le moniteur via internet, n'importe quand, n'importe où. Les caractères spéciaux sont accessibles uniquement en anglais et d'autres signes de ponctuation utilisés dans d'autres langue incompatible avec celle en mode anglais ne peut pas être saisi.
  • Seite 22: Remarques D'entretien

    N‘utilisez pas de produits d‘entretien ou de solvants. Garantie Les appareils SWITEL sont contrôlés et fabriqués suivant les meilleurs procédés. Des matériaux sélectionnés et des technologies de pointe leur garantissent un fonctionnement irréprochable et une longue durée de vie. La garantie ne s‘applique pas si la cause d‘une erreur de fonctionnement du téléphone portable repose sur l‘opérateur de réseau de téléphonie mobile.
  • Seite 23: Mettre L'appareil Au Rebut

    La conformité avec la directive mentionnée ci-dessus est confirmée sur l‘appareil par la marqe CE. Vous avez la possibilité de télécharger gratuitement la déclaration intégrale de conformité sur notre site Internet www.switel.com. Telgo AG, Rte. D’Englisberg 11, 1763 Granges-Paccot, Switzerland...
  • Seite 24: Installazione

    1 ASPETTO Prima di utilizzare il prodotto, si prega di leggere attentamente la guida per evi- tare eventuali danni al prodotto in virtù di funzionamento difettoso o di uso im- proprio. Antenna (quando si installa antenna, stringere e fare verso l'alto antenna) Parapioggia Luce infrarossa Obiettivo della fotocamera...
  • Seite 25 Open App Store su iPhone / iPad, cercare "U-Life Plus" e install. Or la scansione del codice QR per l'installazione direttamente. U-life Plus Inserire il negozio "Google Play" su smartphone Android. La ricerca di "U-Life Plus" e install.Or la scansione del QR codice per installarlo direttamente. U-life Plus Prendere il funzionamento di Android client-end, come ad esempio, e si riferiscono ad Android client-end per IOS client-end.
  • Seite 26 Energia Fonte di potere (Fig. 1) Telecamera adattatore Clicca per aggiugere attrezzature; (Fig. 2) Clicca "WiFi aggiungendo". (Fig. 3) (Fig. 2) (Fig. 3) Clicca sull'icona il codice QR e la scansione del codice QR del ID della telecamera sulla fotocamera. Il nome predefinito del telecamera è “ipcamera“ e può...
  • Seite 27: Aggiungere Telecamera Per Multi-Utenti

    Aggiunta modalità tramite scansione del codice QR Telecamera Accensione > Premere SET per 1 secondo > Fare clic su Aggiungi la scansione del codice QR per aggiungere la telecamera > Scan ID del dispositivo > Inserire il nome e la password per l'accesso ai Wi-Fi. Eseguire le operazioni secondo le istruzioni.
  • Seite 28 (Fig. 10a) Il vostro amico apre l’app “U-life Plus”, tocca il simbolo per aggiungere la videocamera e successivamente tocca la scritta “Condividi con amici” (Fig. 10b). Il vostro amico esegue la scansione del codice che ha ricevuto da voi (vedi sopra) e si instaura in tal modo il collegamento con la videocamera.
  • Seite 29 3 MONITOR VISTA E OPERAZIONI Con una connessione di successo, monitorare View supporta monitoraggio in tempo reale, scattare foto, registrare video, modificando impostazione e altre operazioni. (Fig. 12) Clicca per passare dalla definizione standard e alta definizione di video in tempo reale.
  • Seite 30 (Fig. 13) (Fig. 14) (Fig. 15) Questa telecamera è compatibile con applicazione universale, reale funzione è soggetto a fotocamera. 4 TELECAMERA INDICATORE DI ISTRUZIONI Corso di alimentazione La luce rossa continua a dopo il collega- all'avvio mento in attesa della luce per 10s: potere spia continua a Corso di intelligente Collegamento luce rossa lampeggiante,...
  • Seite 31: Parametri Tecnici

    6 PARAMETRI TECNICI • Sensori di immagini: 1/4 inch, CMOS • Risoluzione: 720P high definition • Angolo di vista: 61° • Gamma di visione notturna: ≤5m • Grado impermeabile: IP66 • Tensione di funzionamento: DC +12V /1A • Temperatura di lavoro: -10°C~+50°C •...
  • Seite 32: Risoluzione Dei Problemi

    usare di nuovo). Spingere un messaggio: quando viene rilevata sorgente termica, messaggio di allarme può essere inviato al server e spinto il tuo telefono. Monitoraggio remoto: dopo che la fotocamera è collegata a Internet con successo, applicazione può visualizzare il monitor tramite Internet, sempre e ovunque. I caratteri speciali sono accessibili solo in inglese modalità, e altri segno di punteggiatura usata in altri lingua in contrasto con quella in modalità...
  • Seite 33: Indicazioni Per La Cura

    Garanzia Gli apparecchi SWITEL sono costruiti e collaudati in osservanza dei processi di produzione più moderni. L‘impiego di materiali selezionati e tecnologie altamente sviluppate sono garanti di una perfetta funzionalità e lunga durata in vita. Non si considera caso di garanzia un malfunzionamento dell‘apparecchio la cui causa vada...
  • Seite 34: Dichiarazione Di Conformità

    La conformità con la direttiva di cui sopra viene confermata dal marchio CE applicato sull‘apparecchio. Per la dichiarazione di conformità completa si prega di voler usufruire del servizio gratuito di download dal nostro sito web www.switel.com. Telgo AG, Rte. D’Englisberg 11, 1763 Granges-Paccot, Switzerland...
  • Seite 35 1 APPEARENCE Before using the product, please read the guide carefully to avoid any damages to the product in virtue of faulty operation or misuse. Antenna (when installing antenna, tighten up and make antenna upwards) Rain cover Infrared light Camera Lens Power indicator light Indicator light of network link status (Link light)
  • Seite 36 Download and install client-end APP. Open the App Store on iPhone/iPad, search for "U-life Plus" and install. Or scan the QR code to install it directly. U-life Plus Enter the "Google Play" store on Android smartphone. Search for "U-life Plus" and install.Or scan the QR code to install it directly.
  • Seite 37 Power Power source (Fig. 1) Camera adapter Click to add equipment; (Fig. 2) Click “WiFi adding". (Fig. 3) (Fig. 2) (Fig. 3) Click the QR code icon and scan the QR code of the camera ID on the ca- mera. The default name of the camera is “ipcamera” and can be modified. Finally, click "Next"...
  • Seite 38 Adding mode by scanning the QR code Power camera on > Press SET for 1 second > Click Add by scanning the QR code to add the camera > Scan device ID > Enter the name and password for access to WiFi.
  • Seite 39 (Fig. 10a) Your friend opens the "U-life Plus" app, taps to add the camera and then "Add another user" (Fig. 10b). Your friend will scan the code he has received from you (see below) and connect to your camera. (Fig. 10b) Remove the camera from your account To release the camera for a new user (for example, on sale), remove it from...
  • Seite 40 3 MONITOR VIEW AND OPERATIONS With a successful connection, monitor view supports real-time monitoring, taking pho- tos, recording videos, modifying setting and other operations. (Fig. 12) Click to switch between standard definition and high definition of real-time video. Click to enter multi-video view, monitor at most 4 real-time video. Click to start recording video, click again to stop recording.
  • Seite 41 (Fig. 13) (Fig. 14) (Fig. 15) This camera is compatible with universal app, actual function is subject to camera. 4 CAMERA INDICATOR INSTRUCTION Course of powering Red light keeps on after link on start light waiting for 10s: power indicator light keeps on Course of intelligent Link red light flashing, power- scanning of QR code...
  • Seite 42: Technical Parameters

    6 TECHNICAL PARAMETERS • Imaging sensor: 1/4 inch, CMOS • Camera resolution: 720P high definition • View angle: 61° • Night vision range: ≤5m • Waterproof grade: IP66 • Working voltage: DC +12V /1A • Working temperature: -10°C~+50°C • Working humidity: 15%~85%RH •...
  • Seite 43: Troubleshooting

    Remote monitoring: after the camera is connected to Internet successfully, app can view the monitor via Internet, anytime, anywhere. Special characters are accessible only under English mode, and other punctuation mark used in other language inconsistent with that under English mode cannot be input.
  • Seite 44: Maintenance

    If your device does show signs of a defect within the period of guaran- tee, please contact the sales outlet where you purchased the SWITEL device, produ- cing the purchase receipt as evidence. All claims under the terms of guarantee in accordance with this agreement can only be asserted at the sales outlet.
  • Seite 45: Declaration Of Conformity

    Conformity with the above mentioned directive is confirmed by the CE mark on the device. To view the complete Declaration of Conformity, please refer to the free download available on our web site www.switel.com. Telgo AG, Rte. D’Englisberg 11, 1763 Granges-Paccot, Switzerland...
  • Seite 48 Bei technischen Fragen nutzen Sie bitte das Service-Formular auf unserer Webseite: http://www.switel.com/de/produktanfragen-und-technische-unterstuetzung/ In the case of technical questions, please use the service form on our website: http://www.switel.com/en/product-information-technical-support/ En cas des questions téchniques, veuillez, s'il vous plaît utiliser le formulaire de service sur notre site: http://www.switel.com/fr/support-technique/...

Inhaltsverzeichnis