
Verwandte Anleitungen für NEFF E 1452 Serie


Inhaltszusammenfassung für NEFF E 1452 Serie
- Seite 1 Gebrauchsanleitung Instructions for use Istruzioni per l’uso Οδηγίες χρήσεως E 1452 . .
- Seite 2 Quellenstraße 2 Per Telefon: D-81701 München A-1100 Wien Für Österreich: Fax: +49 (0) 89 / 45 90-35 32 Fax: +43 (0) 1/ 6 05 75-5 12 60 Tel: 08 10 / 70 04 00 Internet: www.neff.de Internet: www.neff.at zum Regionaltarif...
-
Seite 3: Inhaltsverzeichnis
Inhaltsverzeichnis Inhaltsverzeichnis Worauf Sie achten müssen ..4 Backen ..... . 19 Verpackung und Altgeräte ..4 Backtabelle . -
Seite 4: Worauf Sie Achten Müssen
Worauf Sie achten müssen Lesen Sie bitte sorgfältig diese Gebrauchsanleitung. Nur dann können Sie Ihren Herd sicher und richtig bedienen. Diese Gebrauchsanleitung gilt für mehrere Geräte- Ausführungen. Es ist möglich, dass einzelne Ausstattungsmerkmale beschrieben sind, die nicht auf Ihr Gerät zutreffen. Heben Sie die Gebrauchs- und die Montagean- leitung gut auf. -
Seite 5: Vor Dem Einbau
Vor dem Einbau Transportschäden Prüfen Sie das Gerät nach dem Auspacken. Bei einem Transportschaden dürfen Sie das Gerät nicht anschließen. Elektrischer Anschluss Nur ein konzessionierter Fachmann darf das Gerät anschließen. Bei Schäden durch falschen Anschluss haben Sie keinen Anspruch auf Garantie. Sicherheitshinweise Dieses Gerät ist nur für den privaten Haushalt bestimmt. -
Seite 6: Ursachen Für Schäden
Ursachen für Schäden Backbleche, Alufolie oder Schieben Sie auf dem Backofenboden kein Geschirr auf dem Backblech ein. Legen Sie ihn nicht mit Alufolie aus. Backofenboden Stellen Sie kein Geschirr auf den Backofenboden. Es entsteht ein Wärmestau. Die Back- und Bratzeiten stimmen nicht mehr und das Email wird beschädigt. -
Seite 7: Ihr Neuer Herd
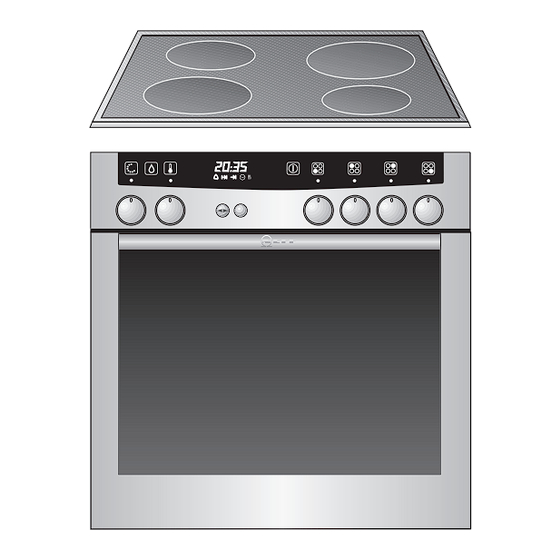
Ihr neuer Herd Hier lernen Sie Ihr neues Gerät kennen. Wir erklären Ihnen das Bedienfeld mit den Schaltern und Anzeigen. Sie erhalten Informationen zu den Heizarten und dem beigelegten Zubehör. Das Bedienfeld Funktions- Temperaturwähler Elektronikuhr Schalter für Kochstellen wähler mit Anzeigelampe Anzeigelampe für EasyClean ®... -
Seite 8: Temperaturwähler
Temperaturwähler Stellungen: 50 –275 Temperatur in °C. Versenkbare Zum Aus- und Einrasten drücken Sie auf den Schalter Schalter. Einschubhöhen Ihr Backofen ist mit 4 Einschubhöhen ausgestattet. Die Einschubhöhen werden von unten nach oben gezählt. Sie sind am Backofen gekennzeichnet. Beim Arbeiten mit Heißluft-Funktion Einschub- höhe »2«... -
Seite 9: Zubehör
Zubehör Ihr Backofen ist mit folgendem Zubehör ausgestattet: Universalpfanne mit Rost Rost Backblech Email Weiteres Zubehör erhalten Sie im Fachhandel: Bestell-Nr. Universalpfanne Z 1232 X0 Universalpfanne Antihaftbeschichtung Z 1233 X0 Glaspfanne Z 1262 X0 Auflaufpfanne Z 1272 X0 Backblech Alu Z 1332 X0 Backblech Email Z 1342 X0... -
Seite 10: Vor Dem Ersten Benutzen
Vor dem ersten Benutzen Vorreinigung Entnehmen Sie das Zubehör aus dem Backofen. Entfernen Sie Rückstände der Verpackung, z. B. Styroporteilchen vollständig aus dem Backofen. Reinigen Sie das Gerät außen mit einem weichen feuchten Tuch. Entnehmen Sie Einhängegitter und Teleskop- schienen aus dem Backofen. Reinigen Sie den Backofen und das Zubehör mit heißer Spüllauge. -
Seite 11: Kochen
Kochen Bedienen der Die Kennzeichnung auf der Bedienblende zeigt Ihnen, welcher Schalter zu welcher Kochstelle Kochstellen gehört. Nach dem Einstellen einer oder mehrerer Kochstellen leuchtet die Anzeigelampe. Die Einstellung der Kochstellen ist stufenlos möglich. Dem Kochfeld liegt eine gesonderte Gebrauchs- anleitung bei. -
Seite 12: Elektronikuhr
Elektronikuhr Sie können die Elektronikuhr mit einer Hand bedienen. Dazu müssen Sie nach einem Druck der Funktionstaste die Zeit am Drehknopf einstellen. Einstellungen sind möglich, solange die Funktionsanzeige blinkt (~ 4 Sekunden). Das Bedienfeld Schnellaufheizung Kurzzeitwecker Tageszeit Drehknopf Funktionstaste Kann durch leichtes Drücken aus- bzw. -
Seite 13: Kurzzeitwecker
Kurzzeitwecker > Drücken Sie die Taste und stellen die Zeit ein (Beispiel: Minuten). Nach dem Einschalten wird die restliche Zeit angezeigt. Nach Ablauf der Zeit ertönt ein Signal und die Anzeige blinkt. Zum vorzeitigen Beenden des > Signaltons drücken Sie die Taste Zeitschaltautomatik Sie können den Backofen über die Elektronikuhr ein- bzw. - Seite 14 Automatische Ein- und Das Backen oder Braten beginnt für die eingestellte Ausschalten Dauer zu einem von Ihnen gewählten späteren Zeitpunkt. Wählen Sie das Heizsystem und die Backofentemperatur. > Drücken Sie die Taste bis das Symbol blinkt und stellen Sie die Betriebszeit-Dauer am Drehknopf ein (Beispiel: Stunde und...
-
Seite 15: Backofen-Funktionen
Backofen-Funktionen CircoTherm Heißluft Durch das Heizsystem in der Backofenrückwand wird die erwärmte Luft im Backofen umgewälzt, wodurch ein besonders guter Wärmeübergang auf das Back- oder Bratgut erreicht wird. Vorteile: – Backen und Braten bis zu 3 Ebenen gleichzeitig möglich (Hinweis siehe Tabelle) –... - Seite 16 Thermogrillen Beim Thermogrillen werden abwechselnd der Flächengrill und das Gebläse ein- und ausgeschaltet. Die durch den Flächengrill erzeugte Wärme wird durch das Gebläse gleichmäßig im Backraum verteilt. Vorteile: – besonders geeignet für Geflügel und größere Fleischstücke. Unterhitze Hier wird nur der Heizkörper an der Unterseite des Backofens eingeschaltet.
- Seite 17 EasyClean ® -Reinigungssystem Um Ihnen die Reinigung des Backofens zu erleichtern ist Ihr Gerät mit einer Reinigungshilfe ausgestattet. Durch eine automatisch gesteuerte Verdampfung von Reinigungslösung weichen die Schmutzrückstände auf dem Email durch Wärme und Wasserdampf auf und lassen sich anschließend leichter entfernen.
-
Seite 18: Backofen Ein- Und Ausschalten
Backofen ein- und ausschalten Bevor Sie Ihren Backofen einschalten entscheiden Sie, welches Heizsystem Sie benutzen möchten. Einschalten: Stellen Sie den Funktionswähler auf das gewählte System ein. Stellen Sie den Temperaturwähler auf die erforderliche Temperatur ein. (Temperaturangaben siehe Back-/Brattabellen). Die eingestellte Temperatur wird automatisch geregelt. -
Seite 19: Backen
Backen Backen in Backformen Stellen Sie die Backformen immer in die Mitte des Rostes. Wir empfehlen dunkle Backformen aus Metall. Hinweise Das Bräunungsergebnis können Sie durch Verändern der Temperatureinstellung beeinflussen. Für helle Backformen aus dünnwandigem Material oder für Glasformen verlängert sich die Backzeit und der Kuchen bräunt nicht so gleichmäßig. -
Seite 20: Backtabelle
Backtabelle Die Angaben in der Tabelle sind Richtwerte, gültig für emaillierte Backbleche und dunkle Backformen. Die Werte können je nach Art und Menge des Teiges und je nach Backform variieren. Hinweise in der Tabelle zum Vorheizen beachten. Wir empfehlen beim ersten Versuch, die niedrigere der angegebenen Temperaturen einzustellen. -
Seite 21: Ober- Und Unterhitze
CircoTherm Ober- und Unterhitze Gebäckart Einschub- Temperatur Backdauer Einschub- Temperatur höhe in ° C Minuten höhe in ° C Hefeteig Blechkuchen mit trockenem Belag z. B. Streusel 1 Blech 170 – 180 035 – 050 180 – 190 2 Bleche 1 + 3 170 –... -
Seite 22: Backen Mit Der Pizzastufe
& Backen mit der Pizzastufe Die Angaben in der Tabelle sind Richtwerte, gültig für emaillierte Backbleche. Die Werte können je nach Art und Menge des Teiges und je nach Backform variieren. Hinweise in der Tabelle zum Vorheizen beachten. Wir empfehlen beim ersten Versuch, die niedrigere der angegebenen Temperaturen einzustellen. -
Seite 23: Tipps Und Tricks
Tipps und Tricks Der Blechkuchen ist unten Nehmen Sie nicht benötigte Backbleche oder die zu hell Universalpfanne aus dem Backofen. Der Formkuchen ist unten Schieben Sie Backformen nicht auf dem Backblech zu hell sondern auf dem Rost ein. Kuchen oder Gebäck sind Schieben Sie Kuchen oder Gebäck höher ein. -
Seite 24: Braten
Braten Legen Sie den Rost in die Universalpfanne ein und schieben Sie gemeinsam in dieselbe Einschubhöhe ein. Fleisch kann besonders wirtschaftlich bei einem Gewicht von über 750 g im Backofen gebraten werden. Braten im offenen Geschirr Spülen Sie die Universalpfanne bzw. das Bratge- schirr mit Wasser aus und legen Sie das Fleisch ein. - Seite 25 Hinweise Große, hohe Braten, Gans, Pute, Ente = Lange Bratdauer, niedrige Temperatur Mittelgroße, niedrige Braten = Mittlere Bratdauer, mittlere Temperatur Kleine, flache Braten = Kurze Bratdauer, hohe Temperatur Bratdauer je cm Fleischhöhe ohne Knochen ca. 13 – 15 Minuten Bratdauer je cm Fleischhöhe mit Knochen ca.
-
Seite 26: Brattabelle
Brattabelle Die Angaben in der Tabelle sind Richtwerte. Die Werte können je nach Art und Menge und je nach dem Bratgeschirr variieren. CircoTherm Ober- und Unterhitze Bratgut Einschub- Temperatur Bratdauer Einschub- Temperatur höhe in ° C Minuten höhe in ° C Schwein Braten mit Schwarte (z. -
Seite 27: Grillen
Grillen Beim Grillen ist Vorsicht geboten. Kinder grundsätzlich fernhalten. Hinweise Grillen Sie bei geschlossener Backofentür. Die Grilltemperaturen sind regelbar. Verwenden Sie immer den Rost und die Universal- pfanne. Legen Sie das Grillgut immer auf die Mittes des Rostes. Schaltet sich der Grillheizkörper automatisch aus, wurde der Überhitzungsschutz wirksam. -
Seite 28: Thermogrillen
Thermogrillen Für besonders knuspriges Geflügel oder Braten (Schweinebraten mit Schwarte). Verwenden Sie den Rost und die Universalpfanne. Wenden Sie große Braten nach ca. der Hälfte der Grillzeit. Stellen Sie Glasgeschirr nach dem Grillen nicht auf eine kalte oder nasse Unterlage, sondern auf ein trockenes Küchentuch, damit das Glas nicht zerspringt. -
Seite 29: Flächengrillen
Flächengrillen Für flache kleinere Gerichte. Verwenden Sie immer den Rost und die Universalpfanne. Wenden Sie das Grillgut nach ca. zwei Drittel der Zeit. Streichen Sie den Rost und das Grillgut nach Belieben leicht mit Öl ein. Die Angaben in den Tabellen sind Richtwerte. Die Werte können je nach Art und Menge des Grillgutes variieren und gelten für das Einschieben in den kalten Backofen. -
Seite 30: Auftauen Und Garen
Auftauen und Garen Auftauen mit CircoTherm Heißluft Wichtige Hinweise Verwenden Sie zum Auftauen und Garen von Gefrier- oder Tiefkühlprodukten nur CircoTherm Heißluft. Beachten Sie bei allen tiefgekühlten Lebensmitteln grundsätzlich die Angaben des Herstellers. Aufgetaute Gefrier- oder Tiefkühlprodukte (vor allem Fleisch) benötigen generell kürzere Garzeiten als frische Produkte, weil das Frosten eine Art Vorgaren bewirkt. - Seite 31 Auftauen und Garen Tauen Sie rohe Tiefkühlprodukte oder Lebens- mittel aus einem Gefriergerät bei 50° C auf. Bei höheren Auftautemperaturen besteht die Gefahr des Austrocknens. Tauen Sie in Alufolie oder geschlossenen Alubehältern verpackte Tiefkühl-Gerichte bei 130 – 140° C auf. Tiefkühl-Backwaren bei 100 –...
-
Seite 32: Einkochen Von Obst Und Gemüse
Einkochen von Obst und Gemüse Einkochen mit CircoTherm Heißluft Im Backofen können Sie die Inhalte von bis zu sechs Einweckgläser mit , 1 oder 1 Liter gleichzeitig einkochen. Hinweise Obst und Gemüse müssen frisch und in einwand- freiem Zustand sein. Beim Vorbereiten und Verschließen ist Sauberkeit oberstes Gebot. - Seite 33 Verschließen der Gläser Wischen Sie die Ränder der Einweckgläser mit einem sauberen feuchten Tuch ab. Legen Sie die Gummiringe und Deckel nass auf und verschließen Sie die Gläser mit einer Klammer. Einsetzen der Gläser Schieben Sie die Universalpfanne in Einschubhöhe 1 ein. Stellen Sie die Einweckgläser im Dreieck auf (siehe Abb.), dabei ca.
-
Seite 34: Reinigen Und Pflegen
Reinigen und Pflegen Wichtige Hinweise Verwenden Sie zum Reinigen keine Scheuermittel, keine scharfen Mittel und keine kratzenden Gegenstände. Kratzen Sie eingebrannte Speisenrückstände nicht ab, sondern weichen Sie diese mit einem feuchten Tuch und Spülmittel auf. Besonders empfehlenswerte Reinigungsprodukte können über den Kundendienst bezogen werden. Gerät aussen Edelstahl-/Aluminiumfront Tragen Sie handelsübliche Spülmittel auf einen... - Seite 35 Hinweise: Um Verschmutzungen zu vermeiden verwenden Sie: • CircoTherm Heißluft. Beim Arbeiten mit CircoTherm Heißluft ist die Verschmutzung geringer als bei den anderen Betriebsarten. • zum Backen von sehr feuchten Kuchen die Universalpfanne. • zum Braten geeignetes Geschirr (Bräter). Zur leichteren Reinigung können Sie die Backofenlampe einschalten und die Backofentür aushängen.
-
Seite 36: Katalytische Backofenverkleidung
Katalytische Backofenverkleidung Selbstreinigende Flächen Die Rückwand ist mit selbstreinigendem Email im Backofen beschichtet. Sie reinigt sich selbst, während der Backofen im Betrieb ist. Größere Spritzer verschwinden manchmal erst nach mehrmaligem Betrieb des Backofens. Reinigen Sie die Rückwand nie mit Backofenreiniger. Eine leichte Verfärbung des Emails hat auf die Selbstreinigung keinen Einfluss. -
Seite 37: Easyclean Reinigungssystem
EasyClean ® Um Ihnen die Reinigung des Backofens zu Reinigungssystem erleichtern, ist Ihr Gerät mit einer Reinigungshilfe ausgestattet. Durch eine automatisch gesteuerte Verdampfung von Reinigungslösung weichen die Schmutzrückstände auf dem Email durch Wärme und Wasserdampf auf und lassen sich anschließend leichter entfernen. - Seite 38 Nach dem Abschalten der Hinweis: Reinigungshilfe Lassen Sie das Restwasser nicht längere Zeit, z. B. über Nacht im Backofen. Öffnen Sie die Backofentür und nehmen Sie das Restwasser mit einem großen saugfähigen Schwammtuch auf. Reinigen Sie den Backofen mit dem laugen- getränkten Schwammtuch, einer weichen Bürste, oder einem Topfreiniger aus Plastik.
-
Seite 39: Aus- Und Einhängen Der Backofentür
Aus- und Einhängen der Backofentür Backofentür Hinweis: Zur bequemeren Reinigung nach der automatischen Reinigungshilfe bietet Ihnen das Gerät folgende Möglichkeiten. Aushängen Öffnen Sie die Backofentür ganz. Klappen Sie die Sperrhebel links und rechts ganz auf. Stellen Sie die Backofentür schräg, bis Sie einen Widerstand spüren. -
Seite 40: Heizkörper Absenken
Heizkörper absenken Damit Sie die Backofendecke besser reinigen können, klappen Sie den Grillheizkörper herunter. Achtung: Der Heizkörper muss abgekühlt sein. Drücken Sie den Haltebügel nach oben, bis er hörbar ausrastet. Halten Sie den Heizkörper fest und klappen Sie ihn nach unten. Nach dem Reinigen Klappen Sie den Heizkörper wieder nach oben. -
Seite 41: Teleskopauszüge
Teleskopauszüge Aushängen Die Teleskopauszüge können Sie zum Reinigen herausnehmen. Sie müssen wieder auf der gleichen Seite eingehängt werden. Drücken Sie vorne das Gestell nach oben und hängen Sie es aus. Ziehen Sie hinten das Gestell nach vorne und hängen Sie es aus. Reinigen Sie die Teleskopauszüge mit Spülmittel und Spülschwamm oder mit einer Bürste. -
Seite 42: Störungen Und Reparaturen
Störungen und Reparaturen Bei Störungen oder Reparaturen, die Sie nicht selbst beheben können, ist der Kundendienst für Sie da. Anschriften siehe Kundendienststellenverzeichnis. Achtung: Es kostet Ihr Geld, wenn Sie wegen eines Bedienfehlers den Kundendienst rufen. E-Nummer und Sie finden diese Angaben auf dem Geräteschild. FD-Nummer Das Geräteschild finden Sie hinter der Backofentür, links unten am seitlichen Rand des Backofens. -
Seite 43: Was Ist, Wenn Etwas
Was ist wenn? Nicht immer ist der Ruf nach dem Kundendienst erforderlich. In manchen Fällen können Sie selbst Abhilfe schaffen. In der nachfolgenden Tabelle finden Sie einige Tipps. Grundsätzlicher Hinweis: Arbeiten an der Geräte-Elektronik dürfen nur von einem Fachmann ausgeführt werden. Vor Beginn solcher Arbeiten muss das Gerät unbedingt stromlos gemacht werden: Durch Betätigen des Sicherungs- automaten, oder durch Herausdrehen der... - Seite 44 was ist . . . Mögliche Ursache Abhilfe . . . wenn beim Braten oder Zu hohe Brattemperatur. Grillen Qualm entsteht? Rost oder Universal- Rost in Universalpfanne legen und pfanne falsch einge- zusammen in eine Einschubhöhe schoben. schieben..wenn emaillierte Einschub- Normale Erscheinung Nicht möglich.
-
Seite 45: Prüfgerichte
Prüfgerichte Nach Norm DIN 44547 und EN 60350 Beachten Sie die Hinweise zum Vorheizen. Die Tabellenwerte gelten ohne Schnellaufheizung Backen Betriebsart Einschub- Temperatur Backdauer höhe in ° C in Min. Spritzgebäck (vorheizen) 140 – 150 25 – 35 140 – 160 20 –... - Seite 46 Table of contents Inhaltsverzeichnis Important Information ..47 Description of Oven Features ..58 Packaging and old appliances ..47 Switching the oven ON and OFF . 61 Before installation .
-
Seite 47: Important Information
Important information Before using your new appliance, please read these Instructions for Use carefully. They contain important information concerning your Personal safety as well as on use and care of the appliance. The Instructions for Use apply to several versions of this appliance. -
Seite 48: Before Installation
Before installation Transport damage Check the appliance after unpacking it. Do not connect the appliance if it has been damaged in transport. Electrical connection The cooker may only be connected by an approved specialist. Losses resulting from damage caused by incorrect connection will invalidate warranty claimes. -
Seite 49: Reasons For Damage
Reasons for damage Baking tray, aluminium foil Do not place the baking tray on the oven floor. or dishes on the oven floor Do not cover it with aluminium foil. Do not place dishes on the oven floor. This will cause heat accumulation. The baking and roasting times will no longer be correct and the enamel will be damaged. -
Seite 50: Your New Cooker
Your new cooker Here you will learn more about your new oven. The control panel and its switches and indicators are explained here. The heating modes and the accessories included with your oven will be explained here. The control panel Function Temperature selector Electronic... -
Seite 51: Temperature Selector
Temperature selector Settings 50 –275 Temperature in °C. Press-down To engage and disengage, depress the switch, switches making sure that it is in OFF position. Shelf positions Your oven features 4 shelf positions. The shelf positions are counted from bottom to top. The numbers are marked in the oven. -
Seite 52: Accessories
Accessories Your appliance is supplied with: Universal pan with wire shelf Wire shelf Baking tray, enamelled The following accessories can be obtained from a specialist dealer: Order no. Universal pan Z 1232 X0 Universal pan, non-stick Z 1233 X0 Glass pan Z 12623 X0 Soufflé... -
Seite 53: Before Using Your Appliance For The First Time
Before using your appliance for the first time Preliminary Take the accessories out of the oven. cleaning Remove all packaging remnants, e.g. polystyrene parts, from the oven. Clean the appliance exterior with a soft moistened cloth. Remove the shelf supports and telescopic rails from the oven. -
Seite 54: Cooking
Cooking Operating the symbol on the switch panel represents the different hotplates and their respective switches. hotplates After switched on one or more hotplates, the control lamp lights up. The hotplate heat settings are infinitely variable. Separate operating instructions apply to the hotplate. -
Seite 55: Electronic Clock
Electronic clock The electronic clock can be operated with one hand; after pressing the button, set the time with the rotary knob. Settings can be made for as long as the function display flashes (~4 seconds). The control panel Rapid heat up Minute timer Time of day Rotary knob... -
Seite 56: Minute Timer
Minute timer > Press the button and set the cooking time (e.g. minutes). When the timer switches on, the remaining time is displayed. When the time has elapsed, a signal is emitted and the symbol flashes. To stop the signal, >... - Seite 57 Automatic switch on and If the food is to be baked or roasted later on, both switch off the ON time and OFF time must be set. Select the heating system and the oven temperature. > Press the button until the symbol flashes and set the ON time with the rotary knob (example: hour and...
-
Seite 58: Description Of Oven Features
Description of Oven Features Circotherm A fan system located in the rear oven wall circulates the hot air in the oven, achieving an especially effective heat transfer to the food being baked or roasted. Advantages: – Simultaneous baking and roasting possible on up to 3 levels –... - Seite 59 Circo-roasting With circo-roasting, the air circulating fan and the grilling radiators are activated in alternation. The heat generated by the grilling radiator is evenly distributed in the oven cavity. Advantage: – Particularly effective with poultry and larger cuts of meal. Bottom heat With this setting, only the heating element at the bottom of the oven cavity is activated.
- Seite 60 EasyClean ® system The oven cleaning function featured in your oven is (oven cleaning system) intended to help you keep your oven neat and tidy. An amount of cleaning solution is vaporised automatically. The combined effects of heat and steam soften the soil deposits on the oven wall enamel and facilitate their removal.
-
Seite 61: Switching The Oven On And Off
Switching the Oven ON and OFF Before switching on your oven, you should decide which heating system you wish to use. Switching the oven ON: Use the function selector to determine the desired system. Set the temperature control knob to the desired temperature. -
Seite 62: Baking
Baking Using baking tins Always place baking tins in the centre of the baking wire shelf. We recommend dark metallic baking tins. Notes Light coloured baking tins made from thin-wall materials lead to longer baking times and uneven browning of the cake. You can influence the degree of browning by changing the temperature setting. -
Seite 63: Cooking Tips And Helpful Hints
Cooking Tips and Helpful Hints The bottom of a cake baked Remove from the oven all baking tray or universal on a baking tray stays too pan currently not in use. light The bottom of a cake baked Use a wire grill and not a baking tray to support the in a tin stays too light cake tin during baking. -
Seite 64: Roasting
Roasting Place the wire shelf in the universal pan and slide both into the oven at the same shelf position. Meat can be roasted in the oven in a particularly economical fashion if the weight of the cut exceeds 750 grams. Roasting in an uncovered Rinse the universal pan and/or the roaster with water, and place the meat into it. - Seite 65 Tips Big, high roasts, goose, turkey, duck = Long roasting times, low temperatures Medium sized, low roasts = Medium roasting times, medium temperatures Small, flat roasts = Short roasting times, high temperatures Roasting time per cm of meat height without bones app.
-
Seite 66: Grilling
Grilling Exercise CAUTION when grilling. Always keep children at a safe distance. Notes on grilling Always close the oven door when grilling. The grilling temperatures are variable. Always use the wire shelf and the universal pan. Always place food to be grilled in the centre of the wire shelf. -
Seite 67: Circo-Roasting
Circo-roasting Use this method for particularly crispy poultry or roast (e.g., pork roast with rind). Use the wire shelf and universal pan together. Turn large roasts after about half of the total grilling time has elapsed. To prevent breakage after removing them from the oven, place glass utensils on a dry kitchen towel instead of cold or wet surfaces. -
Seite 68: Defrosting And Cooking
Defrosting and cooking Defrosting with circotherm Important heating system For defrosting and cooking of frozen or deep- information frozen foods, use only the circotherm heating system. With all deep-frozen foods, follow the food processing company‘s instructions on the package. As a rule, defrosted frozen or deep-frozen foods (especially meats) require less cooking time than fresh products, since freezing has a pre-cooking effect. - Seite 69 Defrosting and cooking Raw deep-frozen products or foods from a freezer always defrost at 50° C. Higher defrosting temperatures may cause the food to dry out. Defrost deep-frozen meals packed in aluminium foil or closed aluminium containers at a setting of 130 –...
-
Seite 70: Cleaning And Care
Cleaning and Care Important cleaning For cleaning, do not use abrasives, no corrosive basics cleaners, and no sharp objects. Do not scratch off burnt-in food residues, but soak them off with a moist cloth and dishwashing detergent. Cleaning products we particularly recommend can be purchased from our customer service. - Seite 71 Note: To prevent soiling use: • CircoTherm hot air. The CircoTherm hot air mode causes less soiling than the others. • the universal pan to bake very moist cakes. • suitable utensils (frying pan) for frying. For easier cleaning you can switch on the oven lamp and take off the oven door.
-
Seite 72: Catalytic Oven Surfaces
Catalytic oven surfaces Cleaning the catalytic The rear wall of the oven is coated with self-cleaning surfaces of the oven enamel. The surface cleans itself while the oven is in operation. Large splashes sometimes only disappear after the oven has been used several times. Never use oven cleaner on the back wall of the oven. -
Seite 73: Easyclean System (Oven Cleaning System)
EasyClean ® The oven cleaning function featured in your oven is System intended to help you keep your oven neat and tidy. An amount of cleaning solution is vaporised automatically. The combined effects of heat and steam soften the soil deposits on the oven wall enamel and facilitate their removal. - Seite 74 After deactivating the oven Cleaning tips: cleaning function Never leave the residual water in the oven for any length of time, e.g. overnight. Open the oven door and pick up the remaining water with a large absorbent sponge cloth. Using the detergent-soaked sponge cloth, a soft brush or a plastic pot scrubber, wipe of the oven interior.
-
Seite 75: Removing/Installing The Oven Door
Removing/installing the oven door Oven door Note: To make the manual cleaning steps following the automatic oven cleaning function more convenient, the appliance features the following options. Removing the oven door Fully open the oven door. Move the catch levers on the right and left-hand sides to the fully open position. -
Seite 76: Heating Elements
Lowering the In order to clean the oven ceiling more easily turn heating element down the grill heating element. Warning: The heating element must have cooled down. Press the retaining clip upward until you hear the click. Hold the heating element and fold it down. After cleaning Fold the heating element back up. -
Seite 77: Telescopic Pull-Outs
Telescopic pull-outs Removing You can remove the telescopic pull-outs for cleaning. You must replace them on the same side. At the front, press the rack up and take it off its hinges. At the back, pull the rack forward and take it off its hinges. -
Seite 78: Service And Repair Information
Service and Repair Information In the event of problems or repairs that you cannot solve or perform yourself, our customer service will be happy to help. Check the customer service directory for a customer service facility in your area. Caution: Calling the customer service because of an operator error can be very costly! E No and FD No You can find this information on the appliance’s... -
Seite 79: Trouble-Shooting Guide
Trouble-shooting Guide Calling the customer service is not always really necessary. In some cases, you can remedy the situation yourself. The following table may contain some helpful tips. Important general safety guidelines: Service or repair work on the electronic components may only be performed by a qualified expert. - Seite 80 Problem Possible cause Remedy . . . if smoke is generated during Roasting temperature roasting or grilling? to high. Wire shelf or universal Place wire shelf into universal pan and pan slid in incorrectly. insert together in shelf position..if enamelled slide-in parts Normal occurrence due Not available.
- Seite 81 Indice Inhaltsverzeichnis Aspetti a cui prestare attenzione . 82 Funzioni del forno ... . . 93 Imballaggio e apparecchio dismesso 82 Accendere e spegnere il forno . . 96 Prima del montaggio ... . 83 Riscaldamento rapido .
-
Seite 82: Aspetti A Cui Prestare Attenzione
Aspetti a cui prestare attenzione Prima di usare il nuovo apparecchio, leggete attentamente le istruzioni per l'uso. Esse contengono informazioni importanti per la Vostra sicurezza, e anche per l'uso e la manutenzione dell'apparecchio. Questo libretto di istruzioni per l'uso è previsto per più... -
Seite 83: Prima Del Montaggio
Prima del montaggio Danni imputabili al trasporto Controllare l’apparecchio dopo averlo disimballato. Non allacciare l’apparecchio se si riscontrano danni di trasporto. Collegamento elettrico L’allacciamento della cucina deve essere effettuato esclusivamente da personale autorizzato. Il diritto alla garanzia si estingue in caso di danno causato da un allacciamento errato. -
Seite 84: Cause Di Danni
Cause di danni Teglia da forno, foglio di Non inserire alcuna teglia sul fondo del forno. alluminio o stoviglie sul Non rivestirlo con fogli di alluminio. fondo del forno Non mettere alcuna stoviglia sul fondo del forno. Ciò causerebbe un accumulo di calore. I tempi di cottura non corrisponderebbero più... -
Seite 85: La Vostra Nuova Cucina
La vostra nuova cucina Illustriamo qui il vostro nuovo elettrodomestico, con la descrizione del pannello comandi dotato di interruttori e display. Si forniscono inoltre informazioni in merito ai tipi di riscaldamento e agli accessori in dotazione. Pannello comandi Selettore Selettore Orologio Interruttori per le zone di cottura funzioni... -
Seite 86: Selettore Temperatura
Selettore Posizioni: temperatura 50 –275 Temperatura in °C. Comando a Premete sul selettore per farlo uscire o rientrare. scomparsa Altezze Il forno è dotato di 4 altezze d’inserimento. d’inserimento Le altezze d’inserimento si contano dal basso verso l’alto. Esse sono indicate sul forno. Nel funzionamento con funzioni aria calda non usare l’altezza d’inserimento »2«, per non pregiudicare la circolazione dell’aria. -
Seite 87: Accessori
Accessori Fornitura di serie: Leccarda con griglia Griglia Teglia da forno smaltata Troverete altri accessori presso i rivenditori specializzati. Cod. di ordinazione Leccarda Z 1232 X0 Leccarda con rivestimento antiaderente Z 1233 X0 Tegame di vetro Z 1262 X0 Tegame per sformati Z 1272 X0 Teglia da forno in alluminio Z 1332 X0... -
Seite 88: Precede Il Primo Impiego
Precede il primo impiego Pulizia preliminare Estrarre gli accessori dal forno. Rimuovere completamente dal forno i residui dell’imballaggio, per es. i frammenti di polistirolo. Pulite l'apparecchio all'esterno con un panno morbido, umido. Estrarre dal forno griglie di aggancio. Pulite il forno e gli accessori con una soluzione di lavaggio ben calda. -
Seite 89: Cucinare
Cucinare Uso delle zone Il simbolo sul pannello di comando indica di cottura l'appartenenza del selettore alla zona di cottura. Dopo avere regolato una o più zone di cottura, la lampada spia s'illumina. É possibile la regolazione continua delle zone di cottura. -
Seite 90: Orologio Elettronico
Orologio elettronico Potete impostare l'orologio elettronico con una sola mano. A tal fine, dopo avere premuto un tasto, regolate l'ora con la manopola. Le regolazioni sono possibili finché lampeggia l'indicazione della funzione (~4 secondi). Pannello commandi Riscaldamento rapido Avvisatore contaminuti Manopola Selettore delle funzioni Emerge e scompare con... -
Seite 91: Avvisatore Contaminuti
Avvisatore > Premere il tasto e regolare il tempo contaminuti (esempio: minuti). Dopo l'attivazione viene visualizzato il tempo residuo. Alla fine della durata viene emesso un segnale acustico ed il simbolo lampeggia. Per disattivare anzi tempo il segnale acustico, > premere il tasto Timer automatico Tramite l’orologio elettronico potete inserire e... - Seite 92 Accensione e spegnimento Se la cottura o l’arrosto al forno deve iniziare in un automatici momento successivo, è necessaria la regolazione. Selezionate il sistema di riscaldamento e la temperatura del forno. > Premere il tasto finché il simbolo non lampeggia, e regolare con la manopola la durata di funzionamento (esempio: hora e...
-
Seite 93: Funzioni Del Forno
Funzioni del forno CircoTherm aria calda Con un sistema di riscaldamento, disposto nella parete posteriore del forno, l'aria riscaldata viene ricircolata nel forno, ottenendo così un'ottima trasmissione del calore alle pietanze da cuocere o arrostire. Vantaggi: – È possibile la cottura contemporanea su 3 altezze –... - Seite 94 Grill con ventola Nella cottura al grill, l'elemento riscaldante del grill e il ventilatore vengono accesi e spenti alternativamente. Il calore prodotto dall'elemento riscaldante del grill viene distribuito uniformemente dalla ventola nel vano del forno. Vantaggi: – molto indicato per polli e pezzi di carne grandi. Riscaldamento inferiore Si accende solo l'elemento riscaldante nella parte inferiore del forno.
- Seite 95 Sistema di pulizia EasyClean ® Per rendere più semplice la pulizia del forno, l’apparecchio è dotato di un sistema ausiliario di pulizia. Per mezzo dell'evaporazione guidata automaticamente di una soluzione di lavaggio, i residui di sporco sullo smalto si ammorbidiscono a causa del calore e del vapore acqueo, e infine si possono rimuovere più...
-
Seite 96: Accendere E Spegnere Il Forno
Accendere e spegnere il forno Prima di accendere il forno, decidete quale sistema di riscaldamento volete usare. Accendere: Disponete il selettore delle funzioni sul sistema scelto. Con il selettore della temperatura, impostate la temperatura richiesta. La temperatura impostata viene regolata automaticamente. -
Seite 97: Cottura Al Forno
Cottura al forno Cuocere negli stampi Poggiate gli stampi sempre sul centro della griglia. Consigliamo stampi in metallo scuri. Avvertenze Con gli stampi da forno chiari di materiale a parete sottile o con stampi di vetro il tempo di cottura si prolunga ed il dolce non s’indora uniformemente. -
Seite 98: Consigli E Astuzie
Consigli e astuzie Il dolce su teglia da forno Togliete dal forno le teglie e la leccarda non sotto è troppo chiaro utilizzate. Il dolce in stampo sotto è Introducete lo stampo non su teglia da forno, ma troppo chiaro sulla griglia. -
Seite 99: Arrosti Al Forno
Arrosti al forno Mettete la griglia nella leccarda e inseriteli insieme sullo stesso livello. Il pezzo di carne con un peso superiore a 750 g può essere arrostito molto economicamente nel forno. Arrosto in contenitore aperto Sciacquate con acqua la leccarda o il contenitore per arrosto e mettete in esso la carne. - Seite 100 Avvertenze Grandi arrosti alti, oca, tacchino, anatra = lungo tempo di cottura, temperatura più bassa Arrosti bassi di media grandezza = tempo di cottura medio, temperatura media Piccoli arrosti piani = breve tempo di cottura, temperatura alta Tempo di cottura per ogni cm d’altezza della carne senz’osso ca.
-
Seite 101: Cottura Al Grill
Cottura al grill Fare attenzione quando si usa il grill. Tenere sempre lontano i bambini. Avvertenze Cuocete al grill con la porta del forno chiusa. Le temperature del grill si possono regolare. Introducete sempre insieme griglia e leccarda. Mettete la pietanza da cuocere al grill sempre al centro della griglia. -
Seite 102: Grill Con Ventola
Grill con ventola Per polli o arrosti (arrosto di maiale con cotenna) molto croccanti. Usate la griglia e la leccarda. Rivoltate i grandi pezzi di arrosto dopo circa la metà del tempo cottura. Dopo la cottura al grill, non poggiate le stoviglie di vetro su una superficie fredda o bagnata, ma su un canovaccio asciutto, per evitare che il vetro si rompa. -
Seite 103: Scongelare E Cuocere
Scongelare e cuocere Scongelamento con aria calda CircoTherm Avvertenze importanti Per scongelare e cuocere prodotti congelati o surgelati utilizzare solo aria calda CircoTherm. Per tutti gli alimenti surgelati, osservate in linea di massima le indicazioni del produttore. I prodotti congelati o surgelati (soprattutto la carne) dopo essere stati scongelati richiedono generalmente tempi di cottura più... - Seite 104 Scongelamento e cottura Scongelate i prodotti surgelati crudi o alimenti congelati in linea di massima a 50° C. A temperature di scongelamento più alte vi è pericolo di essiccazione. Scongelate a 130 –140° C le pietanze surgelate confezionate in foglio di alluminio o in contenitori chiusi di alluminio.
-
Seite 105: Pulizia E Manutenzione
Pulizia e manutenzione Avvertenze Per la pulizia non adoperate mai sostanze abrasive, importanti prodotti corrosivi e oggetti che graffiano. Non raschiate residui di cibo bruciati, ma ammorbiditeli con un panno umido e detergente. Prodotti di pulizia particolarmente consigliabili possono essere acquistati tramite il servizio assistenza clienti. - Seite 106 Avvertenze: per evitare sporcizia usare: • Aria calda Circo Therm. Nell'impiego di Aria calda Circo Therm lo sporco è minore rispetto agli altri tipi di funzionamento. • per cuocere dolci molto umidi la leccarda. • per l'arrosto il contenitore adatto ( pentola per arrosti ).
-
Seite 107: Rivestimento Catalitico Del Forno
Rivestimento catalitico del forno Pulizia delle superfici La parete posteriore è rivestita con uno strato di catalitiche del forno smalto autopulente. Si pulisce automaticamente mentre il forno è in funzione. Talvolta gli spruzzi di dimensioni maggiori vengono eliminati soltanto dopo ripetuti cicli di funzionamento del forno. -
Seite 108: Sistema Di Pulizia Easyclean
Sistema di pulizia Per rendervi più agevole la pulizia del forno, EasyClean ® l'apparecchio è dotato di un sistema ausiliario di pulizia. Per mezzo dell'evaporazione guidata automaticamente di una soluzione di lavaggio, i residui di sporco sullo smalto si ammorbidiscono, a causa del calore e del vapore acqueo, e infine possono essere rimossi più... - Seite 109 Dopo avere disinserito il Avvertenze: sistema ausiliario di pulizia Non lasciare l'acqua residua nel forno per lungo tempo, p. es. durante tutta la notte. Aprite la porta del forno e assorbite l'acqua residua con un panno-spugna grande, molto assorbente. Pulite il forno con il panno-spugna imbevuto della soluzione di lavaggio, con una spazzola morbida, oppure con una paglietta di plastica per lavare le pentole.
-
Seite 110: Della Porta Del Forno
Smontare la porta del forno Porta del forno Avvertenza: oltre il sistema ausiliario automatico di pulizia, per una pulizia più comoda l'apparecchio Vi offre le possibilità seguenti. Sganciare Aprite completamente la porta del forno. Ribaltate completamente in fuori le leve di arresto a sinistra e a destra. -
Seite 111: Elementi Riscaldanti
Abbassare l’ele- Per pulire meglio il soffitto del forno, abbassare mento riscaldante l’elemento riscaldante del grill. Attenzione: l’elemento riscaldante deve essere freddo. Premere la staffa d’arresto verso l’alto, finché non si sente lo scatto di sgancio. Sostenere l’elemento riscaldante ed abbassarlo lentamente. -
Seite 112: Guide Telescopiche Per Leccarde
Guide telescopiche Sganciare per leccarde Le guide telescopiche possono essere smontate per la pulizia. Esse devono poi essere agganciate sullo stesso lato. Premere avanti verso l’alto e sganciare la guida. Tirare dietro verso avanti e sganciare la guida. Pulire le guide telescopiche con detersivo liquido per stoviglie e spugna oppure con una spazzola. -
Seite 113: Guasti E Riparazioni
Guasti e riparazioni In caso di guasti o di riparazioni, che non siete in grado di effettuare Voi stessi, il servizio assistenza clienti è a Vostra disposizione. Trovate gli indirizzi nell'elenco dei centri di assistenza. Attenzione: non spendete inutilmente il vostro denaro, chiamando il servizio assistenza per un Vostro errore nell'uso. -
Seite 114: Che Fare Se Qualcosa Non Funziona
Che fare in questi casi? Non sempre è necessario telefonare al servizio assistenza clienti. In molti casi potete rimediare Voi stessi. Nella tabella seguente trovate alcuni suggerimenti. Avvertenza fondamentale: I lavori ai componenti elettronici dell'apparecchio devono essere eseguiti solo da un tecnico. - Seite 115 Che fare se . . . Causa possibile Rimedio . . . dell’arrosto o alla griglia si Temperatura di cottura sviluppa fumo? troppo alta. Griglia o leccarda inserite Disporre la griglia nella leccarda ed male. introdurle insieme in una altezza d’inserimento.
- Seite 116 Περιεχ µενα Περιεχ µενα Τι πρέπει να προσέχετε ..117 Λειτουργίες φούρνου ... 128 Συσκευασία και παλιά συσκευή . . . 117 Θέση...
-
Seite 117: Τι Πρέπει Να Προσέχετε
Τι πρέπει να προσέχετε Προτού χρησιµοποιήσετε την καινούργια συσκευή, διαβάστε µε προσοχή τις οδηγίες χρήσης. Περιέχουν σηµαντικές πληροφορίες για την ασφάλειά σας καθώς και για τη χρήση και τη συντήρηση της συσκευής. Tο παρ ν εγχειρίδιο οδηγιών χρήσης ισχύει για διάφορα... -
Seite 118: Πριν Τον Εντοιχισµ
Πριν τον εντοιχισµ Ζηµιές µεταφοράς Μετά την αφαίρεση απ τη συσκευασία, ελέγξτε τη συσκευή. Σε περίπτωση ζηµιάς κατά τη µεταφορά δεν επιτρέπεται να συνδέσετε τη συσκευή. Ηλεκτρική σύνδεση Μ νο ένας αδειούχος ηλεκτρολ γος επιτρέπεται να συνδέσει την ηλεκτρική κουζίνα. Σε περίπτωση ζηµιών... -
Seite 119: Αιτίες Για Τις Ζηµιές
Αιτίες για τις ζηµιές Ταψί, αλουµιν χαρτο ή Μην τοποθετείτε ταψιά πάνω στον πάτο του µαγειρικ σκεύος πάνω φούρνου. Μην απλώνετε αλουµιν χαρτο πάνω στον πάτο του φούρνου στον πάτο του φούρνου. Μην τοποθετείτε κανένα µαγειρικ σκεύος πάνω στον πάτο του φούρνου. ∆ιαφορετικά... -
Seite 120: Η Νέα Σας Ηλεκτρική Κουζίνα
Η νέα σας ηλεκτρική κουζίνα Εδώ γνωρίζετε την καινούργια σας συσκευή. Στη συνέχεια σας εξηγούµε το πεδίο χειρισµού µε τους διακ πτες και τις ενδείξεις. Επιπλέον θα βρείτε πληροφορίες για τους τρ πους ψησίµατος και τα συνηµµένα εξαρτήµατα. Το πεδίο χειρισµού ∆ιακ... -
Seite 121: Ιακ Πτης Επιλογής Θερµοκρασίας
∆ιακ πτης επιλογής Θέσεις/Eπιλογές: θερµοκρασίας 50 –275 Θερµοκρασία σε °C (θερµ ς αέρας) Χωνευτοί διακ πτες Για να µπουν µέσα ή να βγουν έξω, πατάτε στον διακ πτη. Ο διακ πτης µως πρέπει να βρίσκεται στη θέση εκτ ς λειτουργίας. Ύψη... -
Seite 122: Εξαρτήµατα
Εξοπλισµ ς Ως εξαρτήµατα, συνοδεύοντα κάθε µοντέλο, περιέχονται Ταψί γενικής χρήσης µε σχάρα Σχάρα Εµαγιέ λαµαρίνα Περαιτέρω εξαρτήµατα µπορείτε να προµηθευτείτε απ τα Αριθµ ς ειδικά καταστήµατα: παραγγελίας Ταψί γενικής χρήσης Z 1232 X0 Ταψί γενικής χρήσης µε αντικολλητική επίστρωση Z 1233 X0 Γυάλινο... -
Seite 123: Πρίν Τη Χρήση Για Πρώτη Φορά
Πριν τη χρήση για πρώτη φορά Προκαταρκτικ ς Βγάλτε τα εξαρτήµατα απ τον φούρνο. καθαρισµ ς Αποµακρύνετε απ τον φούρνο λα τα κατάλοιπα απ τη συσκευασία, π.χ. κοµµατάκια απ φελιζ λ. Kαθαρίστε τη συσκευή εξωτερικά µε ένα υγρ µαλακ πανί. Αφαιρέστε... -
Seite 124: Μαγείρεµα
Μαγείρεµα Χειρισµ ς των H ένδειξη στο ταµπλ χειρισµού σας δείχνει, µατιών της κουζίνας ποιος διακ πτης αντιστοιχεί σε κάθε µάτι της κουζίνας. ταν ανάψετε ένα ή περισσ τερα µάτια, ανάβει η κίτρινη ενδεικτική λυχνία. H ρύθµιση της θερµοκρασίας των µατιών δεν είναι βαθµιδωτή. -
Seite 125: Ηλεκτρονικ Ρολ Ι
Ηλεκτρονικ ρολ ι Μπορείτε να χειριστείτε το ηλεκτρονικ ρολ ι µε το ένα χέρι. Γι' αυτ πρέπει µετά το πάτηµα του πλήκτρου να ρυθµίσετε τον χρ νο µε τον περιστρεφ µενο διακ πτη. Ρυθµίσεις είναι δυνατές, σο αναβοσβήνει η ένδειξη λειτουργίας (~δευτερ... -
Seite 126: Υπενθυµιστής Χρ Νου
Υπενθυµιστής > Πατήστε το πλήκτρο και ρυθµίστε την ώρα χρ νου (παράδειγµα: λεπτά). Μετά τη θέση σε λειτουργία δείχνεται ο υπολειπ µενος χρ νος. Μετά τη λήξη του χρ νου ηχεί ένα σήµα και το σύµβολο αναβοσβήνει. Για την πρ ωρη διακοπή... - Seite 127 Αυτ µατη θέση σε και Αν το ψήσιµο κρέατος ή γλυκισµάτων πρ κειται ν' εκτ ς λειτουργίας αρχίσει σε ένα µετέπειτα χρονικ σηµείο, χρειάζεται να ρυθµίσετε τη διάρκεια και τη λήξη της λειτουργίας. Επιλέξτε το είδος ψησίµατος και τη θερµοκρασία του φούρνου. >...
-
Seite 128: Λειτουργίες Φούρνου
Λειτουργίες φούρνου Θερµ ς αέρας CircoTherm Mε το σύστηµα θέρµανσης που βρίσκεται στο πίσω τοίχωµα του φούρνου ανακυκλώνεται ο θερµ ς αέρας µέσα στο φούρνο. Mε αυτ τον τρ πο επιτυγχάνεται µια ιδιαίτερα καλή µετάδοση της θερµ τητας στο φαγητ που ψήνεται. Πλεονεκτήµατα: –... - Seite 129 Θερµογκρίλ Kατά τη λειτουργία γκρίλ µε αέρα ανάβουν και σβήνουν εναλλακτικά το γκρίλ και ο ανεµιστήρας. H θερµ τητα που παράγεται απ το θερµαντικ σώµα του γκριλ µοιράζεται οµοι µορφα στο θάλαµο του φούρνου. Πλεονεκτήµατα: – Kατάλληλο ιδιαίτερα για πουλερικά και µεγάλα κοµµάτια...
- Seite 130 Σύστηµα καθαρισµού EasyClean ® H συσκευή είναι εφοδιασµένη µε ένα καθαριστικ βοήθηµα για διευκ λυνσή σας στον καθαρισµ του φούρνου. Mε τη βοήθεια µιας αυτ µατα ρυθµιζ µενης εξάτµισης καθαριστικού διαλύµατος µαλακώνουν µε τη θερµ τητα και τους υδρατµούς τα κατάλοιπα πάνω στο εµαγιέ και µπορούν στη συνέχεια...
-
Seite 131: Θέση Του Φούρνου Σε Και Εκτ Σ Λειτουργίας
Θέση του φούρνου σε και εκτ ς λειτουργίας Πριν θέσετε τον φούρνο σας σε λειτουργία, αποφασίστε ποι σύστηµα θέρµανσης θέλετε να χρησιµοποιείσετε. Θέση σε λειτουργία: Ρυθµίστε τον διακ πτη επιλογής λειτουργίας στο σύστηµα που επιλέξατε. Ρυθµίστε τον διακ πτη επιλογής θερµοκρασίας στην... -
Seite 132: Ψήσιµο Αρτοσκευασµάρων
Ψήσιµο αρτοσκευασµάτων Ψήσιµο σε φ ρµες Πάντοτε να βάζετε τη φ ρµα στο κέντρο της σχάρας. Συνιστούµε σκούρες φ ρµες ψησίµατος απ µέταλλο. Υποδείξεις Για ανοιχτ χρωµες φ ρµες ψησίµατος µε λεπτά τοιχώµατα ή για γυάλινες φ ρµες παρατείνεται η διάρκεια... -
Seite 133: Υποδείξεις Και Τεχνάσµατα
Υποδείξεις και Τεχνάσµατα Το γλυκ ταψιού έχει πολύ Βγάλτε τα ταψιά που δεν χρησιµοποιείτε απ το ανοιχτ χρώµα στο κάτω φούρνο. µέρος του Το γλυκ φ ρµας έχει πολύ Μη βάζετε τις φ ρµες στο φούρνο πάνω σε ταψί ανοιχτ χρώµα στο κάτω αλλά... -
Seite 134: Ψήσιµο Φαγητού
Ψήσιµο Eγκαταστήστε τη σχάρα στο ταψί γενικής χρήσης και βάλτε τα και τα δύο στην ίδια θέση ύψους στο φούρνο. Kρέας µε βάρος πάνω απ 750 γραµµάρια µπορεί να ψηθεί ιδιαίτερα οικονοµικά στο φούρνο. Ψήσιµο σε ανοικτ σκεύς Ξεπλύνετε το ταψί γενικής χρήσης ή το µαγειρικ σκεύος... - Seite 135 Υποδείξεις Μεγάλα, ψηλά ψητά, χήνα, γαλοπούλα, πάπια = µεγάλη διάρκεια ψησίµατος, χαµηλή θερµοκρασία Μεσαία, χαµηλά ψητά = µεσαία διάρεκια ψησίµατος, µέτρια θερµοκρασία Μικρά ψητά σε φέτες = µικρή διάρκεια ψησίµατος, υψηλή θερµοκρασία ∆ιάρκεια ψησίµατος ανά cm ύψους κρέατος χωρίς κ καλα περ. 13-15 λεπτά ∆ιάρκεια...
-
Seite 136: Γκριλ
Γκριλ H λειτουργία του γκριλ απαιτεί προσοχή. Kρατήστε πάντοτε µακριά τα παιδιά. Υποδείξεις Ψήνετε στο γκριλ µε κλειστή την π ρτα του φούρνου. Oι θερµοκρασίες του γκριλ είναι ρυθµιζ µενες. Πάντοτε να βάζετε τη σχάρα και το ταψί γενικής χρήσης µαζί στο φούρνο. Πάντοτε... -
Seite 137: Θερµογκριλ
Θερµολκριλ Για ιδιαίτερα ξεροψηµένα πουλερικά και ψητ (χοιριν µε κρούστα) Xρησιµοποιήστε τη σχάρα και το ταψί γενικής χρήσης. Γυρίστε µεγάλα κοµµάτια ψητού µετά απ την πάροδο του µισού περίπου χρ νου του ψησίµατος. Nα µη βάζετε γυάλινα σκεύη µετά το ψήσιµο στο γκριλ... -
Seite 138: Απ Ψυξη Και Άχνισµα
Απ ψυξη και άχνισµα Ξεπάγωµα µε θερµ αέρα CircoTherm Σηµαντικές υποδείξεις Για το ξεπάγωµα και το µαγείρεµα κατεψυγµένων προϊ ντων χρησιµοποιείτε µ νο τον θερµ αέρα CircoTherm. Nα προσέχετε πάντοτε τα στοιχεία του παρασκευαστή σε λα τα κατεψυγµένα προϊ ντα. Aποψυγµένα... - Seite 139 Απ ψυξη και άχνισµα Aποψύχετε ωµά κατεψυγµένα είδη ή τρ φιµα απ ψύκτη πάντοτε στους 50° C. Σε υψηλ τερες θερµοκρασίες απ ψυξης υπάρχει κίνδυνος να στεγνώσουν. Aποψύχετε κατεψυγµένα φαγητά που είναι συσκευασµένα σε αλουµιν χαρτο ή σε κλειστά δοχεία απ αλουµίνιο στους 130 –140° C. Aποψύχετε...
-
Seite 140: Καθαρισµ Σ Και Φροντίδα
Καθαρισµ ς και φροντίδα Σηµαντικές Μη χρησιµοποιείτε για τον καθαρισµ µέσα υποδείξεις τριψίµατος, διαβρωτικά µέσα και αντικείµενα που δηµιουργούν αµυχές. Μην ξύνετε τα καµένα κατάλοιπα φαγητών, αλλά τα µαλακώνετε µε βρεγµένο πανί και απορρυπαντικ πιάτων. Ιδιαίτερα συνιστώµενα προϊ ντα καθαρισµού µπορείτε... - Seite 141 Φούρνος Καθαρίζετε τον φούρνο µετά απ κάθε χρήση, ιδιαίτερα µετά απ ψήσιµο κρέατος ή ψήσιµο το γκριλ. Οι ρύποι καίγονται κατά την επ µενη θέρµανση του φούρνου. Μετά το κάψιµο οι ρύποι µπορούν να αποµακρυνθούν µ νο πολύ δύσκολα. Υποδείξεις: Για...
-
Seite 142: Καταλυτική Επένδυση Φούρνου
Καταλυτική επένδυση φούρνου Καθαρισµ ς των καταλυτικών Το πίσω τοίχωµα καλύπτεται µε αυτοκαθαριζ µενο επιφανειών µέσα στο φούρνο εµαγιέ. Αυτοκαθαρίζεται, ταν ο φούρνος βρίσκεται σε λειτουργία. Οι µεγάλες πιτσιλιές αποµακρύνονται µερικές φορές µετά απ επανειληµµένη λειτουργία του φούρνου. Μην καθαρίζετε ποτέ το πίσω τοίχωµα µε απορρυπαντικ... -
Seite 143: Σύστηµα Καθαρισµού Easyclean
Σύστηµα καθαρισµού H συσκευή είναι εφοδιασµένη µε ένα βοηθητικ σύστηµα καθαρισµού φούρνου για να σας EasyClean ® διευκολύνει στον καθαρισµ του φούρνου. Mε τη βοήθεια µιας αυτ µατα ρυθµιζ µενης εξάτµισης διαλύµατος απορρυπαντικού µαλακώνουν τα κατάλοιπα πάνω στο εµαγιέ µε τη θέρµανση και τους... - Seite 144 Μετά τη διακοπή της Yποδείξεις: λειτουργίας του συστήµατος Μην αφήνετε το υπ λοιπο νερ για πολύ, π.χ. λη καθαρισµού του φούρνου τη νύχτα, στο φούρνο. Aνοίξτε την π ρτα του φούρνου και αφαιρέστε το υπ λοιπο νερ µε ένα µεγάλο απορροφητικ πανί.
-
Seite 145: Αφαίρεση Και Εγκατάσταση Της Π Ρτας Του Φούρνου
Αφαίρεση και εγκατάσταση της π ρτας του φούρνου Yπ δειξη: Για πι άνετο καθαρισµ µετά απ τη χρήση του αυτ µατου συστήµατος καθαρισµού, η συσκευή σας προσφέρει τις ακ λουθες δυνατ τητες. Aφαίρεση Aνοίξτε εντελώς την π ρτα του φούρνου. Aνεβάστε... -
Seite 146: Θερµαντικά Σώµατα
Κατέβασµα Για να µπορείτε να καθαρίσετε καλύτερα το πάνω θερµαντικού εσωτερικ µέρος του φούρνου, κατεβάστε το στοιχείου θερµαντικ στοιχείο.. Προσοχή: Το θερµαντικ στοιχείο πρέπει να έχει κρυώσει. Πιέστε το τ ξο συγκράτησης προς τα πάνω, µέχρι να ξεκουµπώσει αισθητά. Κρατήστε το θερµαντικ στοιχείο και τραβήξτε το... -
Seite 147: Ράγες Τηλεσκοπικού Τύπου
Ράγες τηλεσκοπικού Ξεκρέµασµα τύπου Για τον καθαρισµ µπορείτε να αφαιρέσετε τις ράγες τηλεσκοπικού τύπου. Αυτές πρέπει να κρεµαστούν ξανά στην ίδια πλευρά. Πιέστε µπροστά τον σκελετ προς τα πάνω και ξεκρεµάστε τον. Τραβήξτε πίσω τον σκελετ προς τα εµπρ ς και ξεκρεµάστε... -
Seite 148: Επισκευές Βλάβης
Επισκευές και Βλάβης Σε περίπτωση βλαβών ή επισκευών, που δεν είστε σε θέση να τις αντιµετωπίσετε µ νοι σας, υπάρχει για σας το τµήµα εξυπηρέτησης πελατών. Tις διευθύνσεις θα τις βρείτε στον κατάλογο των γραφείων εξυπηρέτησης πελατών. Προσοχή: Σε περίπτωση που καλέσετε το τµήµα εξυπηρέτησης... -
Seite 149: Τί Συµβαίνει, Ταν Κάτι Δε Λειτουργεί
Τί συµβαίνει, ταν κάτι δε λειτουργεί; ∆εν είναι πάντοτε απαραίτητο να καλείτε το τµήµα εξυπηρέτησης πελατών. Σε ορισµένες περιπτώσεις µπορείτε να βοηθήσετε µ νοι τον εαυτ σας. Στον ακ λουθο πίνακα θα βρείτε ορισµένες χρήσιµες συµβουλές. Γενική υπ δειξη: Eργασίες στο ηλεκτρονικ σύστηµα της συσκευής επιτρέπεται να γίνουν µ νο απ ειδικ... - Seite 150 τι συµβαίνει ... Πιθανή αιτία Αντιµετώπιση . . . ταν κατά το ψήσιµο ή το Πολύ υψηλή ψήσιµο στο γκριλ σχηµατιστεί θερµοκρασία ψησίµατος καπν ς; Η σχάρα ή το ταψί Βάλτε τη σχάρα µέσα στο ταψί γενικής χρήσης δεν γενικής χρήσης και βάλτε τα µαζί σε έχουν...
- Seite 151 Notizen...
- Seite 152 Notes...
- Seite 153 Note...
- Seite 154 Σηµειώσεις 203 299...
- Seite 156 5750 203 299 Printed in Germany 0806 Es.