Futurelight EX-6/32 Bedienungsanleitung
24-kanal dmx-controller

Verwandte Anleitungen für Futurelight EX-6/32


Inhaltszusammenfassung für Futurelight EX-6/32
- Seite 1 BEDIENUNGSANLEITUNG USER MANUAL EX-6/32 24-channel DMX-controller © Für weiteren Gebrauch aufbewahren! Copyright Keep this manual for future needs! Nachdruck verboten! Reproduction prohibited!
-
Seite 2: Inhaltsverzeichnis
MULTI-LANGUAGE-INSTRUCTIONS Inhaltsverzeichnis/Table of contents 1. EINFÜHRUNG............................... 3 2. SICHERHEITSHINWEISE..........................3 3. BESTIMMUNGSGEMÄSSE VERWENDUNG ....................3 4. GERÄTEBESCHREIBUNG .......................... 4 4.1 Features ..............................4 4.2 Geräteübersicht............................5 5. SETUP................................6 5.1 Installation ..............................6 5.2 Musiksteuerung............................6 5.3 Anschluss an den Projektor ........................6 6. -
Seite 3: Einführung
- sich die letzte Version der Anleitung im Internet herunter laden 1. EINFÜHRUNG Wir freuen uns, dass Sie sich für einen FUTURELIGHT EX-6/32 entschieden haben. Sie haben hiermit ein leistungsstarkes und vielseitiges Gerät erworben. Wenn Sie nachfolgende Hinweise beachten, sind wir sicher, dass Sie lange Zeit Freude an Ihrem Kauf haben werden. -
Seite 4: Bestimmungsgemässe Verwendung
Das Gerät darf nicht in Betrieb genommen werden, nachdem es von einem kalten in einen warmen Raum gebracht wurde. Das dabei entstehende Kondenswasser kann unter Umständen Ihr Gerät zerstören. Lassen Sie das Gerät solange uneingeschaltet, bis es Zimmertemperatur erreicht hat! Der Aufbau entspricht der Schutzklasse III. -
Seite 5: Geräteübersicht
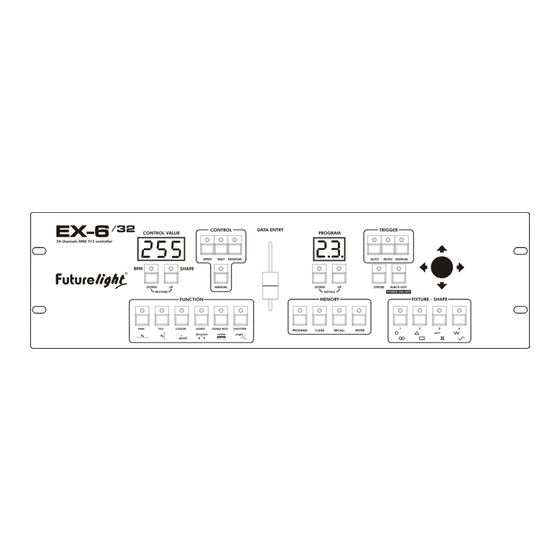
eingebautes Mikrofon • Mikrofonempfindlichkeit einstellbar • Black-Out-Funktion • 24 Steuerkanäle • Für 19"- Rackeinbau 4.2 Geräteübersicht Übersicht über die Bedienelemente 1) CONTROL VALUE DISPLAY 2) BPM Taste 3) SHAPE Taste Wenn diese LED leuchtet lassen sich die Muster über die Projektorwahltasten 1-4 auswählen. 4) SPEED-TASTE 5) WAIT-TASTE 6) RANDOM-TASTE... -
Seite 6: Setup
22) ENTER-TASTE Zur Bestätigung der Eingabe. 23) PROJEKTORWAHLTASTEN Zur Auswahl des gewünschten Projektors bzw. Musters. Rückseite: 24) DMX-Ausgangsbuchse 25) Netzanschlussbuchse 26) PC – Kontakt – Software upgrade 27) AUDIO IN-Anschlussbuchse 5. SETUP 5.1 Installation Stellen Sie das Gerät auf einer ebenen Fläche auf oder installieren Sie es in Ihrem Rack. Rackinstallation: Dieses Gerät ist für ein 19"-Rack (483 mm) vorgesehen. -
Seite 7: Bedienung
Laden Sie die zip-Datei auf Ihren Rechner. Entpacken Sie die Dateien auf Ihre Festplatte. Verbinden Sie den EX-6/32 über ein serielles Kabel mit Ihrem Controller (COM 1). Starten Sie auf Ihrem PC das Programm Controller.exe. Clicken Sie im Programmmenü der PC-Software auf die Schaltfläche "Kontaktaufnahme mit Controller". - Seite 8 Projektorbibliothek: - CC-150 - SC-335 - CC-200 - SC-370 - CF-200 - SC-375 - CY-200 - SC-380 - CY-250 - SL-1200 - DJ-250 - TB-3 - DJ-200 - TC-3 - DJ COLOR-200 - TC-150 - MCF-200 - TC-250 - MIRACLE - TG-3 - MH-420 - TMH-150...
-
Seite 9: Abrufen Eines Programms
Drücken Sie INSTALL UP Taste (controll Anzeige: 6) Beenden Sie die Installation mit der ENTER Taste und speichern Sie die modifizierte Daten. Abrufen eines Programms Wählen Sie das gewünschte Programm über die Program Up/Down-Tasten aus. Das Programm startet 1,5 Sekunden nach der Anzeige auf dem Program-Display. Die Auswahl "Ch"... - Seite 10 Programm einzugliedern drücken Sie nur die Clear-Taste. Muster zeichnen Mit dem EX-6/32 können Sie bis zu 8 verschiedene Muster zeichnen. Wählen Sie über die Projektorwahltasten die Geräte aus, für die Sie die Muster erstellen möchten. Drücken Sie die Shape-Taste. Wenn die Shape-LED leuchtet, können Sie die gewünschte Form über die Projektor- wahltasten 1-4 auswählen.
-
Seite 11: Problembehebung
7. PROBLEMBEHEBUNG PROBLEM URSACHE LÖSUNG Gerät lässt sich nicht anschalten. Die Anschlussleitung des Netzteils Überprüfen Sie die ist nicht angeschlossen. Anschlussleitung und eventuelle Verlängerungsleitungen. Nach entschalten Gerät controller nicht korrekt controller muss updated leuchtet nur BO led fortlaufend updated, oder beim letzten versuch werden, sehe Anleitung.