Inhaltsverzeichnis
Werbung
Verfügbare Sprachen
Verfügbare Sprachen
Werbung
Kapitel
Inhaltsverzeichnis

Verwandte Anleitungen für Durabase wm-1020 slim


Inhaltszusammenfassung für Durabase wm-1020 slim
-
Seite 2: Inhaltsverzeichnis
INHALT KAPITEL 1: VOR DER INBETRIEBNAHME • Sicherheitshinweise • Empfehlungen KAPITEL 2: INSTALLATION • Entfernen der Transportschrauben • Einstellen der Gerätefüße • Elektrischer Anschluss • Wasseranschluss • Abwasseranschluss KAPITEL 3: TECHNISCHE DATEN KAPITEL 4: BEDIENFELD • Start/Pause-Taste • Funktionsstatus-Anzeigen • Funktionstasten •... -
Seite 3: Kapitel 1: Vor Der Inbetriebnahme
KAPITEL 1: VOR DER INBETRIEBNAHME SICHERHEITSHINWEISE • • • • Benutzen Sie keine Mehrfachsteckdose oder Verlängerungsschnur. • • • • Stecken Sie keinen Stecker mit einer beschädigten oder gebrochenen Leitung in die Steckdose. • • • • Beschädigte Stromkabel müssen vom Hersteller oder vom Kundendienst bzw. -
Seite 4: Kapitel 2: Installation
KAPITEL 2: INSTALLATION Vor der Inbetriebnahme Ihrer Waschmaschine müssen Sie die folgende. Punkte beachten. ENTFERNEN DER TRANSPORTSCHRAUBEN • • • • Die Transportschrauben, die sich an der Rückseite Ihrer Maschine befinden, müssen vor der Inbetriebnahme entfernt werden. • • • • Lösen Sie die Schrauben, indem Sie sie mit einem passenden Schraubenzieher gegen den Uhrzeigersinn drehen. -
Seite 5: Elektrischer Anschluss
• • • • Nachdem die Maschine waagerecht steht, ziehen Sie die Kontermuttern aus Plastik fest, indem Sie sie abwärts drehen. • • • • Stellen Sie nie Kartons, Holzblöcke oder ähnliches Material unter die Maschine, um Unebenheiten im Untergrund auszugleichen. ELEKTRISCHER ANSCHLUSS •... -
Seite 6: Abwasseranschluss
• Bei einem Wasserdruck zwischen 1 und 10 bar bietet Ihre Maschine die effektivste Leistung (1 bar Druck bedeutet, dass bei vollständig geöffnetem Wasserhahn mehr als 8 Liter Wasser in der Minute fließen). • Nachdem alle Anschlüsse fertig sind, prüfen Sie die Anschlüsse auf Dichtigkeit, indem Sie den Wasserhahn vollständig öffnen. -
Seite 7: Kapitel 3: Technische Daten
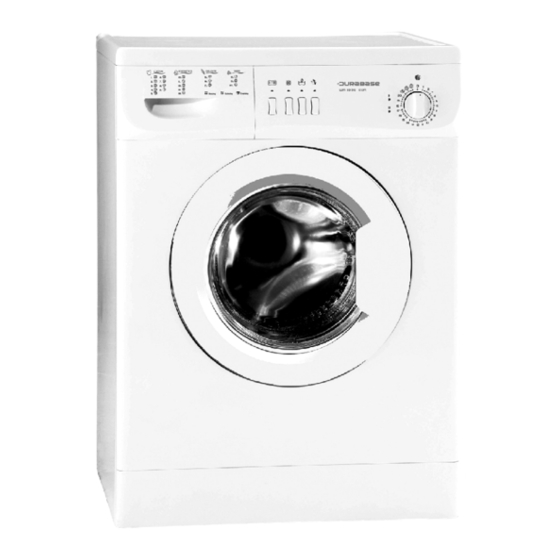
KAPITEL 3: TECHNISCHE DATEN WM 1020 Slim AAC5 Maximale Füllmenge (kg) Empfohlene Füllmenge (kg) Höhe (cm) Breite (cm) 59,6 Tiefe (cm) Maximale Schleuder-Umdrehung (U/Min.) 1000 1-Deckel 5-Handgriff 2-Waschmittelfach 6-Filterabdeckung 3-Bedienelemente 7-Fußleiste 4-Tür Diese technischen Angaben gelten für Maschinen mit einfachem Zufluss (Kaltwasser) und doppeltem Zufluss (Kalt-/Warmwasser) -
Seite 8: Kapitel 4: Bedienfeld
KAPITEL 4: BEDIENFELD 1 Waschmittelfach 5 Programmknopf 2 Anzeige Start/Pause 6 Taste Start/Pause 3 Anzeige-Funktionsstatus 7 Funktionstasten 4 Anzeige Programmbereitschaft 8 Anzeige Programmende Unser vollelektronisches Produkt ist mit Soft-Touch Tasten ausgestattet. Um die Funktionen zu aktivieren, bitte die Tasten leicht berühren. -
Seite 9: Start/Pause-Taste
START/PAUSE-TASTE Dient zum Starten eines ausgewählten Programms oder zur Unterbrechung während des Betriebs. WARNHINWEIS! Bevor Sie ein Programm auswählen oder ein laufendes Programm ändern, muss der Programm-Knopf auf O (Aus) gestellt werden. ANZEIGE-FUNKTIONSSTATUS Wenn die Start/Pause-Taste oder eine andere Funktionstaste gedrückt ist, leuchtet die entsprechende Anzeige auf. -
Seite 10: Programmknopf
PROGRAMMKNOPF Mit dem Programmknopf können Sie das Waschprogramm wählen, mit dem Sie Ihre Wäsche waschen wollen. Sie können das Programm auswählen, indem Sie den Knopf in beide Richtungen drehen. Sie müssen darauf achten, dass der Programmknopfschalter genau auf dem Programm steht, das Sie auswählen wollen. -
Seite 11: Vor Dem Waschen
KAPITEL5: WASCHVORGANG • Stecken Sie den Netzstecker in die Steckdose. • Öffnen Sie den Wasserhahn Erster Waschgang Es ist möglich, dass nach den Tests und Prüfungen im Werk noch Wasser in Ihrer Maschine verblieben ist. Es wird empfohlen, den ersten Waschgang ohne Wäsche durchzuführen, um dieses Wasser zu entfernen. - Seite 12 • Wenden Sie die Innenseite von Kleidern, Strickwäsche T-Shirts und Sweat-Shirts nach außen. • Waschen Sie ihre kleinen Wäschestücke, wie Socken und Taschentücher in einem Waschbeutel. Waschen bis 90 ˚C Waschen bis 60 ˚C Waschen bis 30 ˚C Nicht in der Maschine waschen Einlegen der Wäsche in die Maschine •...
-
Seite 13: Bedienung Der Maschine
• Sie können flüssige Waschmittel bei allen Programmen ohne Vor- waschgang benutzen. Hierfür befestigen Sie die Dosierungsplatte für Flüssigwaschmittel im 2. Fach der Waschmittelschublade und dosieren die Menge des Waschmittels entsprechend. BEDIENUNG DER MASCHINE Programmwahl und Leistungsmerkmale Wählen Sie aus Tabelle 1 auf Seite 14 das für Ihre Kleidung passende Programm und die zusätzlichen Funktionen aus. - Seite 14 • Die Tür wird nach ungefähr zwei Minuten nach dem Programmende entriegelt. Sie können die Tür dann öffnen, indem Sie den Griff der Tür zu sich heranziehen, und dann die Kleidung herausnehmen. • Nachdem Sie die Maschine entladen haben, lassen Sie die Tür offen, damit die Maschine innen trocknen kann.
-
Seite 17: Kapitel 6: Wartung Und Reinigung
KAPITEL 6: WARTUNG UND REINIGUNG • Ziehen Sie den Netzstecker. • Schließen Sie den Wasserhahn. WASSER ZUFLUSSFILTER An beiden Seiten des Wasserzuflussschlauches befinden sich Filter, die verhindern sollen, dass Schmutz o. ä. mit dem Wasser in die Maschine gelangt. Sollte die Maschine bei geöffnetem Wasserhahn nicht genügend Wasser erhalten, sollte der Filter gereinigt werden. -
Seite 18: Waschmittelfach
WARNHINWEIS! Gefahr durch Verbrühungen! Da das Wasser in der Pumpe heiß sein kann, warten Sie ab, bis es abgekühlt ist. WASCHMITTELFACH Waschmittel kann mit der Zeit in dem Waschmittelfach oder dessen Gehäuse Ablagerungen bilden. Zum Herausnehmen des Waschmittelfachs gehen Sie wie folgt vor: •... -
Seite 19: Siphon
Siphon Ziehen Sie das Waschmittelfach heraus. Nehmen Sie den Siphon heraus und reinigen Sie ihn von Weichspülerresten. Stecken Sie den Siphon wieder an seinen Platz.Prüfen Sie, ob er richtig sitzt. Das Gehäuse Reinigen Sie die Oberflächen des Gehäuses Ihrer Waschmaschine mit lauwarmem Wasser und einem Reinigungsmittel, daf das Gehäuse nicht angreift. -
Seite 20: Kapitel 7: Praktische Hinweise Für Fleckenentfernung
KAPITEL 7: PRAKTISCHE HINWEISE FÜR FLECKENENTFERNUNG Alkoholische Getränke: Der verschmutzte Bereich sollte zunächst mit kaltem Wasser ausgewaschen werden, dann mit Glyzerin und Wasser behandelt und danach mit einer Wasser- Essig-Mischung gespült werden. Schuhcreme: Die Verfärbung sollte vorsichtig abgerieben werden, ohne das Kleidungsstück zu beschädigen, und dann mit Waschmittel eingerieben und gespült werden. - Seite 21 Creme, Eiscreme und Milch: Weichen Sie die Kleidung 30 Minuten lang in kaltem Wasser ein und waschen Sie den betroffenen Teil mit Waschmittel. Sollte der Fleck noch nicht entfernt sein, behandeln Sie das Kleidungsstück mit Seifenwasser und zwar in der Menge, die der Hersteller für diesen Stoff zulässt (benutzen Sie bei Buntwäsche kein Seifenwasser).
- Seite 22 Fehler Möglicher Grund Fehlerbehebung Stecken Sie den Netzstecker Der Netzstecker ist nicht eingesteckt in die Steckdose. Wechseln Sie die Sicherung Ihre Sicherung ist defekt. aus. Prüfen Sie die Der Strom ist abgeschaltet. Stromversorgung. Ihre Maschine Die Start/Pause-Taste wurde nicht Drücken Sie die Taste läuft nicht.
- Seite 23 THE CONTENTS SECTION 1:BEFORE USING • Safety warnings • Recommendations SECTION 2:INSTALLATION • Removal of transportation screws • Adjustment of feet • Electrical connection • Water supply connection • Water drain connection SECTION 3:TECHNICAL SPECIFICATIONS SECTION 4:CONTROL PANEL • Start/Pause button •...
-
Seite 24: Section 1:Before Using
SECTION 1:BEFORE USING SAFETY WARNINGS • • • • Do not use a multiple socket or extension cord. • Do not insert a plug with damaged or broken cord into the socket. • If the cord is damaged it should be replaced by the manufacturer or appointed service agent in order to avoid a hazard. -
Seite 25: Section 2:Installation
• • • • If you will not use your machine for a long time, unplug your machine, close the water supply and leave the door open in order to keep the inside of the machine dry and for prevention from unpleasant odour. •... -
Seite 26: Electrical Connection
• • • • You can adjust the balance of your machine from its feet. • • • • First, loosen the plastic adjustment nut. • • • • Adjust by rotating the feet upwards or downwards. • • • • After the balance has been reached, tighten the plastic adjustment nut again by rotating it upwards. -
Seite 27: Water Drain Connection
• Water pressure of 1-10 bars from your tap will enable your machine to work more efficiently.(1 bar pressure means water flow of more than 8 liters in 1 minute from a fully opened tap). • After connections are completed, check for the non-leakage of the connection joints by turning on your tap completely. -
Seite 28: Section 3:Technical Specifications
SECTION 3:TECHNICAL SPECIFICATIONS WM 1020 Slim AAC5 Maximum dry laundry capacity (kg) Recommended loading (kg) Height (cm) Width (cm) 59,6 Depth (cm) Maximum spin cycle ( rpm ) 1000 (*) Maximum spin cycles depend on the model you’ve chosen 1-Upper tray 5-Handle 2-Detergent drawer 6-Filter cover... -
Seite 29: Section 4:Control Panel
SECTION 4:CONTROL PANEL A2 (4 buttons) 1-Detergent drawer 6-Program knob 2-Start/pause light 7-Start/pause button 3-Function indicator lights 8-Function buttons 5-Program ready light 9-Program end light... -
Seite 30: Start/Pause Button
START/PAUSE BUTTON Used to start a selected program or pause during running. WARNING! It is required for the program knob to be brought to O(off) position before selecting the program or changing a continuing program. FUNCTION INDICATOR LIGHTS When the start/pause button or any function button is pressed,the corresponding light turns on.The light turns off when the function button or start/pause button is re-pressed, or when the process the selected function is completed. -
Seite 31: Function Buttons
FUNCTION BUTTONS Rinse hold This function is recommended to be used when the clothes cannot be taken immediately after the end of the program.This will prevent occurrence of wrinkles. When this button is pressed, the last rinsing water is not drained. For the program to continue from the same point, repress the same button. -
Seite 32: Program Knob
WARNING! Functions vary depending on the model you have chosen.If you forgot to use additional function and your machine starts to wash push the additional function button if the indicator light is on. Additional function will be activated.If the indicator light is not on,additional function will not be activated. -
Seite 33: Section 5:Washing Your Laundry
SECTION 5: WASHING YOUR LAUNDRY • Plug the machine. • Open the tap water. First wash cycle There may be water left inside your machine after factory tests and trials.It is recommended that the first wash cycle should be made without any laundry so that carry out this water;... - Seite 34 • Pull the textiles like trousers,knitted fabric,t-shirt and sweat shirt inside out. • Wash your small clothes like socks and handkerchiefs in a washing bag. Wash up tol 90 ˚C Wash up to 60 ˚C Wash up to 30 ˚C Not washable in washing machine Placement of the clothes into the machine...
-
Seite 35: Running The Machine
• You can use fluid detergents in all programs without pre-washing. For this, mount the fluid detergent level plate in the second compartment of the detergent drawer and arrange the amount of fluid detergent according to the levels on this plate. RUNNING THE MACHINE Program selection and features Select the program and additional functions appropriate for your clothes from... -
Seite 36: Section 6:Maintenance And Cleaning
• The door will be unlocked in approximately two minutes after the program ends.You can open the door by pulling the handle of the door towards yourself and take out your clothes. • After you unload your clothes leave the door open to dry the interior of your machine. -
Seite 39: Pump Filter
• Remove the water inlet hose. • Remove the filters found on the water inlet valves by using a pincer and wash thoroughly with a brush. • Clean the filters of the water inlet hoses located on the tap side by removing manually together with the seal. -
Seite 40: Detergent Drawer
WARNING! Danger of being scalded! Since the water inside the pump maybe hot, wait for it to cool. DETERGENT DRAWER Detergents may form a sediment in your detergent drawer or in housing of the detergent drawer in time. To clean the sediment, pull out the detergent drawer from time to time.To pull out the detergentdrawer: •... -
Seite 41: Siphon Plug
SIPHON PLUG Pull out the detrgent drawer. Remove the siphon plug and clean the residues of the softener thoroughly. Fit the cleaned siphon plug in its location. Check if it placed properly. THE CABINET Clean the exterior surface of the cabinet of your machine with lukewarm water and a cleaning substance that will not irritate the cabinet. -
Seite 42: Section 7:Practical Information
SECTION 7:PRACTICAL INFORMATION Alcoholic beverages: The stain point, should first be washed with cold water, than should be wiped with glycerine and water and be rinsed with water mixed with vinegar. Shoe Polish: The stain should be slightly scratched without ruining the cloth, rubbed with detergent and rinsed. -
Seite 43: Section 8:Avoiding Minor Faults
Mould: Mould stains should be cleaned as soon as possible. The stain should be washed with detergent, and if it does not disappear, it should be wiped with oxygenated water (in proportion of 3%). Ink: Hold the stained area under cold water and wait until the inky water completely runs off. - Seite 44 METHODS OF FAILURE PROBABLE CAUSE ELIMINATION Insert the plug into the It is unplugged. socket. Your fuse is defected. Change your fuse. The electric power is Check the electric off. power. Start/pause button has Press the start/pause Your machine does not not been pressed.
- Seite 45 METHODS OF FAILURE PROBABLE CAUSE ELIMINATION There is a small It does not prevent amount of clothes in operation of the the device. machine. Do not exceed the Excessive amount of recommended quantity clothes are filled in the Your machine is of clothes and spread machine or the clothes vibrating.
- Seite 46 METHODS OF FAILURE PROBABLE CAUSE ELIMINATION Clothes exceeding the Put the clothes in your maximum capacity machine in a manner has been filled in your not to exceed its machine. maximum capacity. Use the amount of The washing result is Your water may be detergent according to not good.
-
Seite 47: Section 9:Automatic Failure Detection System
METHODS OF FAILURE PROBABLE CAUSE ELIMINATION The unbalanced load control system will try to distribute your clothes in a homogenous manner. No failure. The The spining process is After your clothes are unbalanced load not done or starts with distributed, passage to control may works in delay . - Seite 48 FAILURE FAILURE PROBABLE THE PROCESS CODE INDICATOR FAILURE TO BE DONE Turn on the tap to the end.Water may be cut, check it.If the problem is still The water level continuing,your in your machine machine will The program is below heater. automatically Err 02 ready light...
- Seite 49 FAILURE FAILURE PROBABLE THE PROCESS CODE INDICATOR FAILURE TO BE DONE Shut down your The heater of your machine and The start/pause machine or the unplug. Turn off Err 05 light and program heat sensor has your tap and apply end light blink.
-
Seite 50: Section 10:International Washing Signs
SECTION 10: INTERNATIONAL WASHING SIGNS Washing Do not wash Lukewarm iron. Medium hot iron. temparature. (hand wash) Do not tumble Hot iron. Do not iron. Hang to dry. dry. Drip dry. Dry flat. Do not bleach. Handy to bleach. All of these are dry cleaning symbols. The letters are to instruct the cleaner what type of solvent to be used. - Seite 51 Dieses Elektrohaushaltsgerät ist entsprechend der EU-Richtlinie 2002/96/EG über Elektro- und Elektronik-Altgeräte (WEEE) gekennzeichnet. Bitte sorgen Sie dafür, dass das Gerät ordnungsgemäß entsorgt wird, damit mögliche negative Auswirkungen auf Umwelt und Gesundheit vermieden werden, die bei einer unsachgemäßen Entsorgung des Altgerätes entstehen könnten. Bitte erfragen Sie bei der Gemeindestelle die zuständige Entsorgungsstelle.
- Seite 52 52008357...