AquaMaster Tools P50 Pro2 Benutzerhandbuch

Verwandte Anleitungen für AquaMaster Tools P50 Pro2


Inhaltszusammenfassung für AquaMaster Tools P50 Pro2
- Seite 1 Temp meter P50 Pro2 Measures pH Temp User manual Benutzerhandbuch Handleiding Manuel d’utilisation Manuale utente Manual del usuario...
- Seite 2 About Aqua Master Tools Established in 2018 Aqua Master Tools is the Dutch supplier of user-friendly and reliable pH, EC, and temperature meters. Our meters are used for swimming pools, aquariums, Jacuzzi’s, ponds, and liquid plant nutrition. We understand the importance of convenient, accurate and high-quality meters - and we are on a continuous quest to innovate our products.
-
Seite 3: Inhaltsverzeichnis
Table of Contents User manual English 4 - 7 Benutzerhandbuch Deutsch 8 - 11 Handleiding Nederlands 12 - 15 Manuel d’utilisation en français 16 - 19 Manuale utente Italiano 20 - 23 Manual del usuario en español 24 - 27 Visit www.aquamastertools.com or scan the QR code to watch our HOW-TO VIDEOS... -
Seite 4: User Manual English
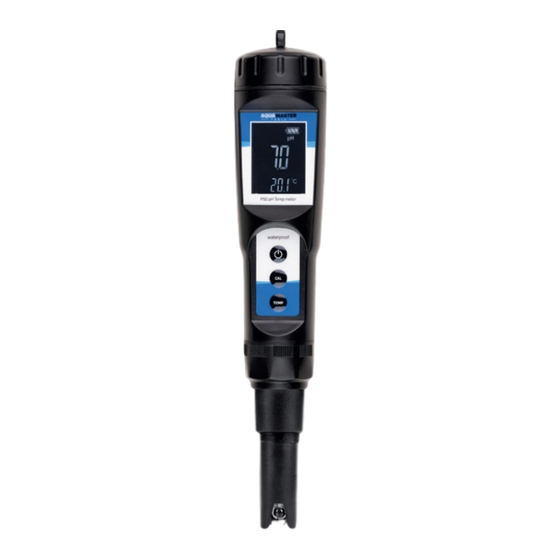
User manual English 1. Cap 5. Celsius/Fahrenheit button 2. Display 6. Electrode 3. On/off button 7. Screw cap 4. CAL button 8. Protective cover... -
Seite 5: Operation And Use
Operation and use Watch the How-to videos at Aqua Master Tools’ website. 1. Prior first usage - soak your pH meter in tap water for 12 hours. 2. Remove the protective cover. 3. Gently clean the electrode with distilled water and dry it off. 4. - Seite 6 Replacing the electrode Watch the How-to videos at Aqua Master Tools’ website. 1. Properly unscrew the sealing ring in the lower part of the meter. 2. Remove the defected/old electrode by gently pulling it. 3. Carefully place the new electrode with the recess in the correct position so that the connectors properly connect and do not damage the meter or electrode.
-
Seite 7: Replacing The Batteries
Warning or issues • Always make sure that there are no air bubbles present in the solution during calibration. This could affect the measurements. • Make sure the calibration solution is 25°C when calibrating the meter. Failure to do so may affect the result of the calibration. •... -
Seite 8: Benutzerhandbuch Deutsch
Benutzerhandbuch Deutsch 1. Verschluss 5. Celsius/Fahrenheit-Taste 2. Display 6. Elektrode 3. Ein-/Aus-Schalter 7. Drehverschluss 4. CAL Taste 8. Schutzkappe... -
Seite 9: Bedienung Und Betrieb
Bedienung und Betrieb Sehen Sie sich die Anleitungsvideos auf der Website von Aqua Master Tools an. Weichen Sie Ihr pH-Messgerät vor dem ersten Gebrauch 12 Stunden lang in Leitungswasser ein. Entfernen Sie die Schutzkappe. Reinigen Sie die Elektrode sorgfältig mit destilliertem Wasser und trocknen Sie diese. -
Seite 10: Elektrode Ersetzen
Elektrode ersetzen Sehen Sie sich die Anleitungsvideos auf der Website von Aqua Master Tools an . 1. Lösen Sie die Elektrode durch Drehen am Gewinde des Dichtungsrings am unteren Teil des Messgeräts. 2. Ziehen Sie die defekte/alte Elektrode vorsichtig ab. 3. -
Seite 11: Warnung Oder Probleme
Warnung oder Probleme • Achten Sie darauf, dass während des Kalibriervorgangs keine Luftbläschen in der Flüssigkeit sind. Dies kann die Messungen beeinflussen. • Sorgen Sie dafür, dass die Temperatur der Kalibrierflüssigkeit während des Kalibriervorgangs bei 25°C liegt. Ist dies nicht der Fall, kann dies das Resultat der Kalibrierung beeinflussen. -
Seite 12: Handleiding Nederlands
Handleiding Nederlands 1. Dop 5. Celsius/Fahrenheit knop 2. Display 6. Elektrode 3. Aan/uit knop 7. Draaidop 4. CAL knop 8. Beschermkapje... -
Seite 13: Bediening En Gebruik
Bediening en gebruik Bekijk de How-to videos op de Aqua Master Tools website. 1. Laat uw pH meter voor het eerste gebruik 12 uur weken in kraanwater. 2. Verwijder het beschermkapje. 3. Reinig de elektrode zorgvuldig met gedistilleerd water en droog deze af. -
Seite 14: Specificaties
Elektrode vervangen Bekijk de How-to videos op de Aqua Master Tools website. 1. Draai het schroefdraad van de afdichtingsring van het onderste deel van de meter goed los. 2. Verwijder de kapotte/oude elektrode door er zachtjes aan te trekken. 3. Plaats de nieuwe elektrode zorgvuldig met de uitsparing op de juiste plaats zodat de connectoren goed aansluiten en de meter of de elektrode niet beschadigen. -
Seite 15: Batterijen Vervangen
Waarschuwing of problemen • Zorg ervoor dat er tijdens het kalibreren geen luchtbelletjes aanwezig zijn in de vloeistof. Dit kan de metingen beï n vloeden. • Zorg ervoor dat de kalibratie vloeistof 25 oC is tijdens het kalibreren van de meter. Indien dit niet het geval is kan dit het resultaat van de kalibratie beï... -
Seite 16: Manuel D'utilisation En Français
Manuel d’utilisation en français 1. Capuchon 5. Bouton Celsius/Fahrenheit 2. Écran 6. Électrode 3. Bouton On/Off 7. Bouchon à vis 4. Bouton CAL 8. Housse de protection... -
Seite 17: Fonctionnement Et Utilisation
Fonctionnement et utilisation Regardez les vidéos “How-to” sur le site Web d’Aqua Master Tools. Avant la première utilisation, faites tremper votre pH-mètre dans de l’eau du robinet pendant 12 heures. Retirer le couvercle de protection. Nettoyer délicatement l’électrode avec de l’eau distillée et la sécher. Appuyer sur le bouton On/off pour mettre le compteur en marche. - Seite 18 Remplacement de l’électrode Regardez les vidéos “How-to” sur le site Web d’Aqua Master Tools. Dévissez correctement la bague d’étanchéité située dans la partie inférieure du compteur. Retirer l’électrode défectueuse/ancienne en la tirant doucement. Placez soigneusement la nouvelle électrode avec l’évidement dans la bonne position afin que les connecteurs se connectent correctement et n’endommagent pas le compteur ou l’électrode.
-
Seite 19: Remplacement Des Piles
Avertissement ou problèmes • Assurez-vous toujours qu’il n’y a pas de bulles d’air dans la solution pendant l’étalonnage. Cela pourrait affecter les mesures. • S’assurer que la solution d’étalonnage est à 25°C lors de l’étalonnage du compteur. Le non-respect de cette consigne peut affecter le résultat de l’étalonnage. -
Seite 20: Manuale Utente Italiano
Manuale utente Italiano 1. Coperchio 5. Pulsante Celsius/ 2. Schermo Fahrenheit 3. Pulsante di accensione/ 6. Elettrodo spegnimento 7. Coperchio a vite 4. Pulsante CAL 8. Cover protettiva... -
Seite 21: Funzionamento E Utilizzo
Funzionamento e utilizzo Guarda i video di istruzioni sul sito web di Aqua Master Tools. 1. Prima del primo utilizzo: immergere il pHmetro in acqua di rubinetto per 12 ore. 2. Rimuovere il coperchio protettivo. 3. Pulire delicatamente l’elettrodo con acqua distillata e asciugarlo. 4. - Seite 22 Sostituzione dell’elettrodo Guarda i video di istruzioni sul sito web di Aqua Master Tools. Svitare correttamente l’anello di tenuta nella parte inferiore del misuratore. Rimuovere l’elettrodo difettoso/vecchio tirandolo delicatamente. Posizionare con cura il nuovo elettrodo con la rientranza nella posizione corretta, in modo che i connettori si colleghino correttamente e non danneggino lo strumento o l’elettrodo.
-
Seite 23: Sostituzione Delle Batterie
Avvertimenti o problemi • Verificare sempre che non siano presenti bolle d’aria nella soluzione durante la calibrazione. Questo potrebbe influire sulle misurazioni. • Assicurarsi che la soluzione di calibrazione sia a 25°C durante la calibrazione dello strumento. La mancata osservanza di questa precauzione può... -
Seite 24: Manual Del Usuario En Español
Manual del usuario en español 1. Tapa 5. Botón Celsius/Fahrenheit 2. Pantalla 6. Electrodo 3. Botón de encendido/ 7. Tapón de rosca apagado 8. Cubierta protectora 4. Botón CAL... -
Seite 25: Funcionamiento Y Uso
Funcionamiento y uso Vea los vídeos explicativos en la página web de Aqua Master Tools. 1. Antes de utilizarlo por primera vez, sumerja el medidor de pH en agua del grifo durante 12 horas. 2. Retire la cubierta protectora. 3. Limpie suavemente el electrodo con agua destilada y séquelo. 4. - Seite 26 Sustitución del electrodo Vea los vídeos explicativos en la página web de Aqua Master Tools. 1. Desenrosque correctamente el anillo de sellado en la parte inferior del medidor. 2. Retire el electrodo defectuoso/viejo tirando suavemente de él. 3. Coloque con cuidado el nuevo electrodo con el rebaje en la posición correcta para que los conectores se conecten correctamente y no dañen el medidor o el electrodo.
-
Seite 27: Sustitución De Las Pilas
Advertencia o problemas • Asegúrese siempre de que no haya burbujas de aire en la solución durante la calibración. Esto podría afectar a las mediciones. • Asegúrese de que la solución de calibración esté a 25°C cuando calibre el medidor. No hacerlo puede afectar al resultado de la calibración. - Seite 28 Aqua Master Tools Ambachtsweg 55c 1271 AL Huizen The Netherlands www.aquamastertools.com...