Herunterladen Inhalt Inhalt Diese Seite drucken

Werbung

Verfügbare Sprachen
  • DE

Verfügbare Sprachen

  • DEUTSCH, seite 9
Conductivity meter
E60 Pro
Measures EC PPM TDS Temp
User manual
Benutzerhandbuch
Handleiding
Manuel d'utilisation
Manuale utente
Manual del usuario

Werbung

Inhaltsverzeichnis
loading

Inhaltszusammenfassung für AquaMaster Tools E60 Pro

  • Seite 1 Conductivity meter E60 Pro Measures EC PPM TDS Temp User manual Benutzerhandbuch Handleiding Manuel d’utilisation Manuale utente Manual del usuario...
  • Seite 2 About Aqua Master Tools Established in 2018 Aqua Master Tools is the Dutch supplier of user-friendly and reliable pH, EC, and temperature meters. Our meters are used for swimming pools, aquariums, Jacuzzi’s, ponds, and liquid plant nutrition. We understand the importance of convenient, accurate and high-quality meters - and we are on a continuous quest to innovate our products.
  • Seite 3: Inhaltsverzeichnis

    Table of Contents User manual English 4 - 7 Benutzerhandbuch Deutsch 8 - 11 Handleiding Nederlands 12 - 15 Manuel d’utilisation en français 16 - 19 Manuale utente Italiano 20 - 23 Manual del usuario en español 24 - 27 Visit www.aquamastertools.com or scan the QR code to watch our HOW-TO VIDEOS...
  • Seite 4: User Manual English

    User manual English 1. Cap 5. MODE button 2. On/off button 6. Electrode 3. Celsius/Fahrenheit & 7. Screw cap Calibration button 8. Protective cover 4. Display...
  • Seite 5: Operation And Use

    Operation and use Watch the How-to videos at Aqua Master Tools’ website. 1. Remove the protective cover. 2. Gently clean the electrode with distilled water and dry it off. 3. Press the On/off button to start the meter. 4. Insert the meter upright into the solution up to the edge and stir gently.
  • Seite 6 Replacing the electrode Watch the How-to videos at Aqua Master Tools’ website. 1. Properly unscrew the sealing ring in the lower part of the meter. 2. Remove the defected/old electrode by gently pulling it. 3. Carefully place the new electrode with the recess in the correct position so that the connectors properly connect and do not damage the meter or electrode.
  • Seite 7: Replacing The Batteries

    When is calibration required? • If the electrode has been replaced. • If the meter was last calibrated over a month ago. • If the meter is used on a regular basis. • If high precision is needed. Warning or issues •...
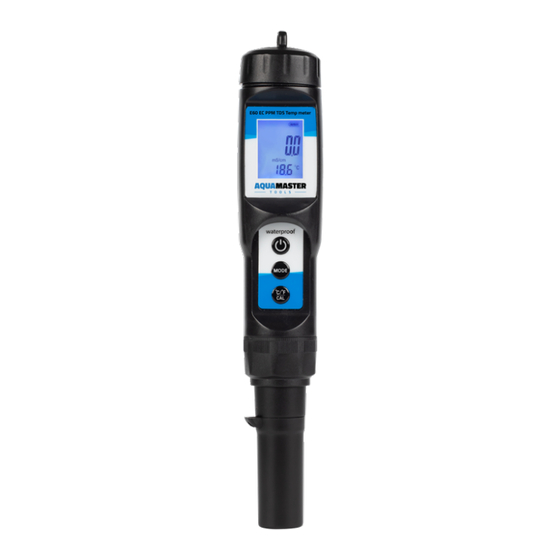
  • Seite 8: Benutzerhandbuch Deutsch

    Benutzerhandbuch Deutsch 1. Verschluss 5. MODE Taste 2. Ein-/Aus-Schalter 6. Elektrode 3. Celsius/Fahrenheit-Taste 7. Drehverschluss & Kalibrierungstaste 8. Schutzkappe 4. Display...
  • Seite 9: Bedienung Und Betrieb

    Bedienung und Betrieb Sehen Sie sich die Anleitungsvideos auf der Website von Aqua Master Tools an. Entfernen Sie die Schutzkappe. Reinigen Sie die Elektrode sorgfältig mit destilliertem Wasser und trocknen Sie diese. Drücken Sie zum Einschalten des Messgeräts auf den Ein-/ Aus-Schalter.
  • Seite 10: Elektrode Ersetzen

    Elektrode ersetzen Sehen Sie sich die Anleitungsvideos auf der Website von Aqua Master Tools an . 1. Lösen Sie die Elektrode durch Drehen am Gewinde des Dichtungsrings am unteren Teil des Messgeräts. 2. Ziehen Sie die defekte/alte Elektrode vorsichtig ab. 3.
  • Seite 11: Wann Kalibriert Werden Muss

    Wann kalibriert werden muss: • Wenn die Elektrode ausgetauscht wurde. • Wenn die letzte Kalibrierung des Messgeräts mehr als einen Monat zurückliegt. • Wenn das Messgerät sehr oft gebraucht wird. • Wenn höchste Präzision erforderlich ist. Warnung oder Probleme • Achten Sie darauf, dass während des Kalibriervorgangs keine Luftbläschen in der Flüssigkeit sind.
  • Seite 12: Handleiding Nederlands

    Handleiding Nederlands 1. Dop 5. MODE knop 2. Aan/uit knop 6. Elektrode 3. Celsius/Fahrenheit & 7. Draaidop Kalibratie knop 8. Beschermkapje 4. Display...
  • Seite 13: Bediening En Gebruik

    Bediening en gebruik Bekijk de How-to videos op de Aqua Master Tools website. 1. Verwijder het beschermkapje. 2. Reinig de elektrode zorgvuldig met gedistilleerd water en droog deze af. 3. Druk op de Aan/uit toets zodat de meter opstart. 4. Steek de meter rechtop in de oplossing tot de rand en roer zachtjes. Wacht enkele seconden tot de juiste waarde op het display verschijnt.
  • Seite 14: Specificaties

    Elektrode vervangen Bekijk de How-to videos op de Aqua Master Tools website. 1. Draai het schroefdraad van de afdichtingsring van het onderste deel van de meter goed los. 2. Verwijder de kapotte/oude elektrode door er zachtjes aan te trekken. 3. Plaats de nieuwe elektrode zorgvuldig met de uitsparing op de juiste plaats zodat de connectoren goed aansluiten en de meter of de elektrode niet beschadigen.
  • Seite 15: Batterijen Vervangen

    Wanneer kalibreren? • Als de elektrode is vervangen. • Als de meter langer dan een maand geleden voor het laatst is gekalibreerd. • Als de meter heel vaak gebruikt wordt. • Als er hoge precisie nodig is. Waarschuwing of problemen •...
  • Seite 16: Manuel D'utilisation En Français

    Manuel d’utilisation en français 1. Capuchon 5. Bouton MODE 2. Bouton On/Off 6. Électrode 3. Bouton Celsius/Fahrenheit 7. Bouchon à vis et calibrage 8. Housse de protection 4. Écran...
  • Seite 17: Fonctionnement Et Utilisation

    Fonctionnement et utilisation Regardez les vidéos “How-to” sur le site Web d’Aqua Master Tools. Retirer le couvercle de protection. Nettoyer délicatement l’électrode avec de l’eau distillée et la sécher. Appuyer sur le bouton On/off pour démarrer le compteur. Insérez le lecteur verticalement dans la solution jusqu’au bord et remuez doucement.
  • Seite 18 Remplacement de l’électrode Regardez les vidéos “How-to” sur le site Web d’Aqua Master Tools. Dévissez correctement la bague d’étanchéité située dans la partie inférieure du compteur. Retirer l’électrode défectueuse/ancienne en la tirant doucement. Placez soigneusement la nouvelle électrode avec l’évidement dans la bonne position afin que les connecteurs se connectent correctement et n’endommagent pas le compteur ou l’électrode.
  • Seite 19: Remplacement Des Piles

    Quand l’étalonnage est-il nécessaire ? • Si l’électrode a été remplacée. • Si le compteur a été étalonné pour la dernière fois il y a plus d’un mois. • Si le compteur est utilisé régulièrement. • Si une haute précision est nécessaire. Avertissement ou problèmes •...
  • Seite 20: Manuale Utente Italiano

    Manuale utente Italiano 1. Coperchio 4. Schermo 2. Pulsante di accensione/ 5. Pulsante MODE spegnimento 6. Elettrodo 3. Pulsante Celsius/ 7. Coperchio a vite Fahrenheit & calibrazione 8. Cover protettiva...
  • Seite 21: Funzionamento E Utilizzo

    Funzionamento e utilizzo Guarda i video di istruzioni sul sito web di Aqua Master Tools. 1. Rimuovere il coperchio protettivo. 2. Pulire delicatamente l’elettrodo con acqua distillata e asciugarlo. 3. Premere il pulsante on/off per avviare il misuratore. 4. Inserire lo strumento in posizione verticale nella soluzione fino al bordo e mescolare delicatamente.
  • Seite 22 Sostituzione dell’elettrodo Guarda i video di istruzioni sul sito web di Aqua Master Tools. Svitare correttamente l’anello di tenuta nella parte inferiore del misuratore. Rimuovere l’elettrodo difettoso/vecchio tirandolo delicatamente. Posizionare con cura il nuovo elettrodo con la rientranza nella posizione corretta, in modo che i connettori si colleghino correttamente e non danneggino lo strumento o l’elettrodo.
  • Seite 23: Sostituzione Delle Batterie

    Quando è necessaria la calibrazione? • Se l’elettrodo è stato sostituito. • Se lo strumento è stato calibrato per l’ultima volta più di un mese fa. • Se lo strumento viene utilizzato regolarmente. • Se è necessaria una precisione elevata. Avvertimenti o problemi •...
  • Seite 24: Manual Del Usuario En Español

    Manual del usuario en español 1. Tapa 4. Pantalla 2. Botón de encendido/ 5. Botón MODE apagado 6. Electrodo 3. Botón Celsius/Fahrenheit 7. Tapón de rosca y Calibración 8. Cubierta protectora...
  • Seite 25: Funcionamiento Y Uso

    Funcionamiento y uso Vea los vídeos explicativos en la página web de Aqua Master Tools. 1. Retire la cubierta protectora. 2. Limpie suavemente el electrodo con agua destilada y séquelo. 3. Pulse el botón de encendido/apagado para poner en marcha el medidor.
  • Seite 26 Sustitución del electrodo Vea los vídeos explicativos en la página web de Aqua Master Tools. 1. Desenrosque correctamente el anillo de sellado en la parte inferior del medidor. 2. Retire el electrodo defectuoso/viejo tirando suavemente de él. 3. Coloque con cuidado el nuevo electrodo con el rebaje en la posición correcta para que los conectores se conecten correctamente y no dañen el medidor o el electrodo.
  • Seite 27: Sustitución De Las Pilas

    ¿Cuándo es necesaria la calibración? • Si se ha sustituido el electrodo. • Si el medidor se calibró por última vez hace más de un mes. • Si el medidor se utiliza de forma habitual. • Si se necesita una gran precisión. Advertencia o problemas •...
  • Seite 28 Aqua Master Tools Ambachtsweg 55c 1271 AL Huizen The Netherlands www.aquamastertools.com...

Inhaltsverzeichnis