oventrop Regusol EL130 Handbuch
Thermische solaranlage
Inhaltsverzeichnis
Verfügbare Sprachen
Verfügbare Sprachen
D
Inhalt:
1. Solarkreis . . . . . . . . . . . . . . . . . . . . . . . . . . . . . . . . . . 2
2. Sicherheitshinweise . . . . . . . . . . . . . . . . . . . . . . . . . . 3
4. Inbetriebnahme . . . . . . . . . . . . . . . . . . . . . . . . . . . . . 7
5. Service-Infos . . . . . . . . . . . . . . . . . . . . . . . . . . . . . . . 11
6. Wartung . . . . . . . . . . . . . . . . . . . . . . . . . . . . . . . . . . . 12
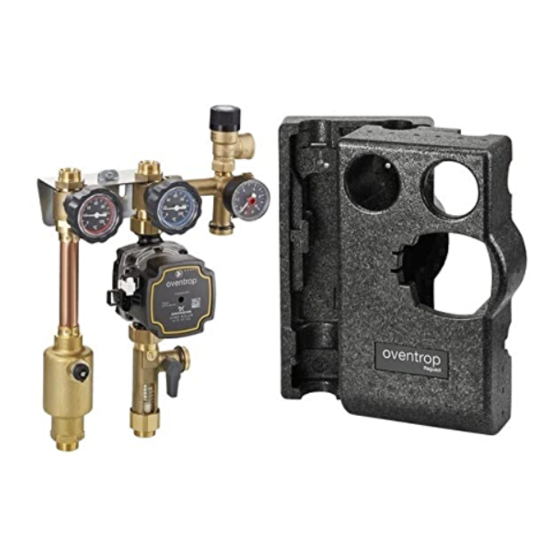
Bild 1: Komponenten einer Solaranlage
Standard Solaranlage mit „Regusol EL130"-
Solarstation, Art.-Nr. 136 65 91
bestehend aus:
(1) Vorlauf Kugelhahn mit integriertem Sperrventil und Ther-
mometer
(2) Rücklauf Kugelhahn mit integriertem Sperrventil, Ther-
mometer und Anschluss für Sicherheitsgruppe
(3) Umwälzpumpe
(4) Entlüfter
(5) Elektrischer Regler
(6) Durchflussmesser mit Absperrung, seitlicher Füll- und
Entleerungskugelhahn
(7) Füll- und Entleerungskugelhahn
(8) Manometer
(9) Sicherheitsventil 6 bar
Premium Armaturen + Systeme
Thermische Solaranlage
Aufbau, Inbetriebnahme und Wartung
Bild 2: „Regusol L"-Solarstation
Kollektoren und Zubehör
bestehend aus:
(10) Membran Ausdehnungsgefäß (MAG) Anschluss-Set
(11) Membran Ausdehnungsgefäß (MAG) Schnellkupplung
(12) Membran Ausdehnungsgefäß (MAG)
(13) Auffanggefäß, temperaturbeständig
(14) OKP-Röhrenkollektor oder OKF-Flachkollektor
(15) Entlüfter mit Kugelhahn
(16) Befüll- und Spülarmatur
(17) Brauchwassermischer (Brawa-Mix)
(18) 6 bar Sicherheitsventil
Anleitung für den Heizungsfachmann
1
Kapitel
Inhaltsverzeichnis

Verwandte Anleitungen für oventrop Regusol EL130


Inhaltszusammenfassung für oventrop Regusol EL130
-
Seite 1: Inhaltsverzeichnis
6. Wartung ........12 Bild 1: Komponenten einer Solaranlage Bild 2: „Regusol L“-Solarstation Standard Solaranlage mit „Regusol EL130“- Kollektoren und Zubehör Solarstation, Art.-Nr. 136 65 91... -
Seite 2: Solarkreis
– Sicherheitsventil (6 bar, 120°C, kurzzeitig 160°C) als zu- sätzliche Absicherung der Solaranlage zwischen Solar- station und Speicher (siehe Bild 7) Bild 6: Befüll- und Spülarmatur, OV-Art.-Nr. 136 30 51 Bild 7: 6 bar Sicherheitsventil, Oventrop Art.-Nr. 136 41 40 Bild 3: Entlüfter, OV Art.-Nr, 136 83 04... -
Seite 3: Sicherheitshinweise
2. Sicherheitshinweise Schutz vor Verbrühungen Im Solarspeicher können Temperaturen > 60°C 2.1 Allgemein auftreten. Damit es an den Zapfstellen nicht zu Verbrühungen kommt, können folgende tech- Die nachfolgenden Sicherheitshinweise sollen Sie vor Ge- nische Maßnahmen durchgeführt werden: fährdungen und Gefahren schützen, die bei wissentlicher oder unwissentlicher falscher Handhabung des Gerätes –... - Seite 4 Blitzschutz - Überspannungsschutz Statik Die einschlägigen Regeln für den Blitzschutz finden sich in Grundsätzlich gilt: Der Fachhandwerker übernimmt mit der DIN EN 62305 Teil 3 / VDE 0185-305-3 (Blitzschutz, der Errichtung der Solaranlage die Verantwortung dafür, Schutz von baulichen Anlagen und Personen) und im Bei- dass die Kombination aus Anlage und Dach den statischen blatt 2 (Photovoltaik- und Solarthermie Anlagen).
-
Seite 5: Solaranlagen Mit Besonderer Temperatursicherung
3. Solaranlagen mit besonderer Temperatursicherung Für einige Solaranlagen mit im Hochformat montierten Kol- könnte dieser ansonsten die Solarstation erreichen und eventuell Bauteile schädigen. In der nachfolgenden Tabelle lektoren vom Typ OKF sollten besondere Maßnahmen für sind die betroffenen Anlagentypen und entsprechende Tem- die Temperatursicherung getroffen werden. - Seite 6 Bild 13: Solaranlage mit zusätzlichem Vorschaltgefäß (18) und elektronischem Absperrventil (19) Montageschritte für Solaranlage mit zusätzlichem – Automatische Entlüfter (15) absperrbar zum Solarkreis Vorgefäß und elektromotorisches Absperrventil installieren (siehe Bild 1). Im Betriebszustand muss der (siehe Bild 13) Entlüfter abgesperrt sein. Vorteilhafter ist es, auf diese zu verzichten und statt dessen spezielle Luftabscheider –...
-
Seite 7: Inbetriebnahme
4. Inbetriebnahme Vorlauf, Griff ca. 45°: Rücklauf, Griff 90°: – Anlage niemals bei sehr hohen Kollektortemperaturen – Vorlauf offen – Rücklauf geschlossen mit Solarflüssigkeit befüllen! Bei Sonneneinstrahlung – Sperrventil außer Funktion – Sperrventil ohne Bedeutung Kollektoren vorher abdecken und abkühlen lassen! Bei hohen Temperaturen im Solarkreis (Kollektoren >... -
Seite 8: Dichtigkeit Prüfen
4.2 Dichtigkeit prüfen – Sichtprüfung für alle Verbindungsstellen durchführen – Prüfdruck 4-5 bar – Druckschwankungen auch durch wechselnde Sonnen- einstrahlung möglich Vorgehensweise – Kugelhähne und Schwerkraftbremse (1) und (2) stellen wie in Bild 17 – seitlicher Füll- und Entleerungskugelhahn (6) von dem Durchflussmesser schließen –... - Seite 9 4.3.1 Pumpenstrang entlüften Solarkreispumpe ggf. entlüften – Solarkreispumpe (3) von Hand kurz einschalten (maxi- – Kugelhähne (1) und (2) stellen wie in Bild 21, Schwer- male Drehzahl wählen) und über Messingschraube an kraftbremse im Rücklauf muss aber noch in Funktion Stirnseite entlüften.
-
Seite 10: Betriebszustand
4.4 Betriebszustand 4.5 Anlagendruck einstellen – Kugelhähne und Schwerkraftbremse (1) und (2) stellen – Vorraussetzung: Korrekter Vordruck des MAG bei In- wie in Bild 24 stallation. Bei befüllter Anlage kann der Vordruck nur ermittelt werden, wenn das MAG abgesperrt und druck- –... -
Seite 11: Service-Infos
5. Service-Infos Störung Ursache Behebung Keine Spannungsversorgung Elektrischen Anschluss prüfen Pumpe läuft nicht – kein Geräusch, T am Regler nicht erreicht Einstellwerte Regler prüfen keine Vibrationen Falls gestattet: Speichermaximaltemperatur erreicht Speichermaximaltemperatur anheben – Maximale Pumpenstufe (an der Pumpe) und Pumpendrehzahl Pumpe läuft nicht –... -
Seite 12: Wartung
Regler – Temperaturanzeigewerte des Reglers mit Vor- und Rücklauf - temperatur an Thermometern (Kugelhähnen) abgleichen Tabelle 4: Wartungshinweise OVENTROP GmbH & Co. KG Paul-Oventrop-Straße 1 D-59939 Olsberg Telefon +49 (0)29 62 82-0 Telefax +49 (0)29 62 82-400 Eine Übersicht der weltweiten Technische Änderungen vorbehalten.