Inhaltsverzeichnis
Werbung
Quicklinks
Space Heater
EN
Recreational Vehicle warm-air heater
SL3511, SL5511, SL5512, SL5611, SL6511, SL7512
Underfloor Installation Instructions
Heizung
DE
Warmluftheizung für Freizietfahrzeuge
SL3511, SL5511, SL5512, SL5611, SL6511, SL7512
Montageanleitung für Unterboden Installation
Radiateur
FR
Radiateur à air chaud pour véhicule de loisir
SL3511, SL5511, SL5512, SL5611, SL6511, SL7512
Consignes d'installation sous plancher
Stufa
IT
Apparecchio di riscaldamento ad aria calda
per veicoli da diporto
SL3511, SL5511, SL5512, SL5611, SL6511, SL7512
Istruzioni per l'installazione sotto il pavimento
Calefactor
ES
Calefactor de aire caliente para vehículos
recreativos
SL3511, SL5511, SL5512, SL5611, SL6511, SL7512
Instrucciones de instalación bajo el suelo
Ruimteverwarming
NL
Recreatievoertuig heteluchtverwarming
SL3511, SL5511, SL5512, SL5611, SL6511, SL7512
Installatie-instructies onder de vloer
Kupévärmare
SE
Varmluftsvärmare för fritidsfordon
SL3511, SL5511, SL5512, SL5611, SL6511, SL7512
Anvisningar för undergolvinstallation
Werbung
Inhaltsverzeichnis

Verwandte Anleitungen für Whale SL3511


Inhaltszusammenfassung für Whale SL3511
- Seite 1 Space Heater Recreational Vehicle warm-air heater SL3511, SL5511, SL5512, SL5611, SL6511, SL7512 Underfloor Installation Instructions Heizung Warmluftheizung für Freizietfahrzeuge SL3511, SL5511, SL5512, SL5611, SL6511, SL7512 Montageanleitung für Unterboden Installation Radiateur Radiateur à air chaud pour véhicule de loisir SL3511, SL5511, SL5512, SL5611, SL6511, SL7512 Consignes d’installation sous plancher...
-
Seite 2: Inhaltsverzeichnis
Installation Instructions and the Operating Instructions provided with this appliance can result in serious material damage and serious risk to health or life of persons. Only install and operate this appliance and its control panel if they are all in perfect condition. If damaged, contact Whale Support immediately. -
Seite 3: Sicherheit
Betriebsanleitung kann zu schweren Sachschäden und ernsthafter Gefahr für die Gesundheit oder das Leben von Personen führen. Montieren und benutzen Sie dieses Gerät und das Bedienfeld nur, wenn sich alles in einwandfreiem Zustand befindet. Wenn sie beschädigt sind, wenden Sie sich sofort an den Whale Support. - Seite 4 • Avant de commencer le travail, veiller à ce que le véhicule soit isolé de toute source d’alimentation. • Une installation ou une réparation incorrecte de systèmes de chauffage Whale peut provoquer un incendie ou une fuite de monoxyde de carbone pouvant entraîner de graves blessures oui même la mort.
- Seite 5 • Prima di iniziare i lavori, accertare che il veicolo sia isolato da qualsiasi fonte di elettricità. • L’installazione o la riparazione inappropriata dei sistemi di riscaldamento Whale può causare incendi o perdite di monossido di carbonio letale, che possono provocare gravi lesioni o la morte.
-
Seite 6: Seguridad
Antes de la instalación, asegúrese de que el aparato se encuentre en buen estado. Si observa daños en él, no lo instale y póngase en contacto con el servicio técnico de Whale llamando al +44 (0) 345 9090 911. Todos los productos de gas de Whale deben ser instalados y revisados por un técnico de sistemas de gas cualificado de acuerdo con las instrucciones de... - Seite 7 • Controleer voordat u met de installatie begint of het voertuig is losgekoppeld van elke stroombron. • Onjuiste installatie of reparatie van Whale verwarmingssystemen kan brand of lekkage van dodelijke koolmonoxide veroorzaken, wat kan leiden tot ernstige letsels of de dood.
- Seite 8 Installera och använd denna enhet och dess kontrollpanel endast när allting är i perfekt skick. Vid skador, kontakta Whale-supporten omedelbart.
-
Seite 9: Heater Dimensions
2. Heater Dimensions Heizungsabmessungen / Dimensions du radiateur / Dimensioni dell’apparecchio di riscaldamento / Densiones del calefactor / Afmetingen verwarming / Värmardimensioner >5mm 50mm 50mm 35mm 35mm 35mm 50mm Figure 1. Heat Air Dimensions Including Clearance / Bild 1. Heizungsabmessungen einschließlich des Abstands / Figure 1. -
Seite 10: Heater Layout
3. Heater Layout Heizungsabmessungen / Structure du radiateur / Disposizione dell’apparecchio di riscaldamento / Disposición del calefactor / Lay-out verwarming / Värmardimensioner Blown Air Outlet Grille Combustion Exhaust 3 GT (SL35X1) 1.00m ≤ 2.00m 4 G / 5 GE (SL55X1 / SL55X2) 4 GT (SL56X1) 1.50m ≤... - Seite 11 Accessory Reference Description Zubehör Referenz Beschreibung Accessoires Référence Description Accessorio Riferimento Descrizione Accesorio Referencia Descripción Toebehoren Referentie Omschrijving Tillbehör Referens Beskrivning Air ducting ø65mm Lüftungskanal ø65mm Conduit d’air ø65mm Condotto dell’aria ø65mm Conducto de aire ø65mm Luchtkanalen ø65mm Luftkanal ø65mm Air duct Y piece ø90 x 90 x 90mm Lüftungskanal-Y-Stück ø90 x 90 x 90mm Conduit d’air pièce en Y ø90 x 90 x 90mm...
-
Seite 12: Installation Instructions
4. Installation Instructions These symbols indicate that this appliance is suitable for use in road and leisure accommodation vehicles ONLY, it is NOT suitable for static homes. This symbol indicates that the appliance is NOT suitable for use on boats. Installation Location •... -
Seite 13: Consignes D'installation
4. Consignes d’installation Ces symboles indiquent que l’appareil est destiné à être utilisé dans les véhicules routiers et de loisir habitables UNIQUEMENT, il n’est PAS destiné aux habitations statiques. Ce symbole indique que l’appareil n’est PAS destiné à être utilisé sur des bateaux. Lieu d’installation •... -
Seite 14: Installatie-Instructies
4. Instrucciones de instalación Estos símbolos indican que el aparato es adecuado ÚNICAMENTE para vehículos de carretera y habitacionales recreativos, NO para hogares estáticos. Este símbolo indica que el aparato NO es adecuado para embarcaciones. Installation Location • Si el calefactor se instala en el exterior, asegúrese de instalarlo en una posición en la que esté protegido contra las salpicaduras de agua y de manera que quede a suficiente distancia del suelo. - Seite 15 4. Installationsanvisningar Dessa symboler talar om att enheten är lämplig att använda i flyttbara fordon och fritidsfordon ENBART, den är INTE lämplig för stationära bostäder. Denna symbol talar om att enheten INTE är lämplig att använda ombord båtar. Installationsplats • Om värmaren installeras exteriört måste man säkerställa att den placeras på...
-
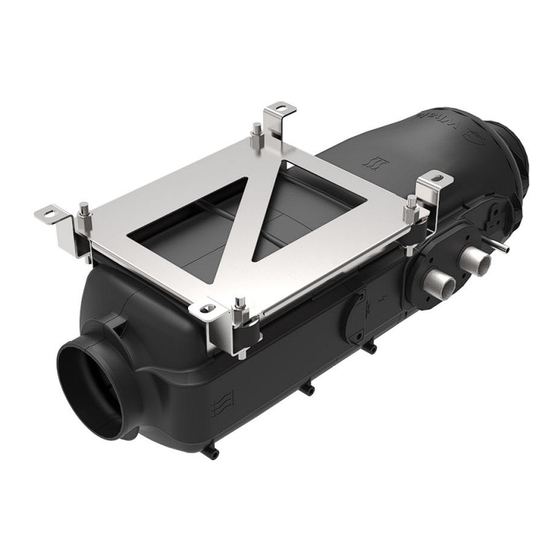
Seite 16: Z Bracket
Figure 6. Heat Air Gas Bracket (SL3511/SL5511/SL5611/SL6511) / Bild 6. Heizluft-Gashalterung (SL3511/SL5511/SL5611/SL6511) / Figure 6. Support de radiateur à air chaud au gaz (SL3511/SL5511/SL5611/SL6511) / Figura 6. Soporte del sistema de gas de Heat Air (SL3511/SL5511/SL5611/SL6511) / Figura 6. Supporto per gas Heat Air (SL3511/SL5511/SL5611/SL6511) / Afbeelding 6. Heat Air Gasbeugel (SL3511/SL5511/SL5611/SL6511) / Figur 6. - Seite 17 4.1 Z Bracket 4.1.Z-Halterung / Support en Z / Supporto a Z / Soporte en Z / Z-beugel / Z-fäste 28mm 34mm 6 x Ø9mm 195mm 218mm 263mm 286mm Figure 7. Heat Air Gas & Electric Bracket (SL5512/SL7512) / Bild 7. Heizluft-Gas- und Elektrohalterung (SL5512/SL7512) / Figure 7.
- Seite 18 Le radiateur doit être installé en se servant d’un support Whale, 4x M8 antirotation via des boulons de plancher et des écrous M8 Nylock et des rondelles. D’autres supports et fixations ne peuvent être utilisés qu’avec l’accord préalable de Whale.
-
Seite 19: Installation U Bracket
Figure 8. Heat Air Gas Bracket (SL3511/SL5511/SL5611/SL6511) / Bild 8. Heizluft-Gashalterung (SL3511/SL5511/SL5611/SL6511) / Figure 8. Support de radiateur à air chaud au gaz (SL3511/SL5511/SL5611/SL6511) / Figura 8. Supporto per gas Heat Air (SL3511/ SL5511/SL5611/SL6511) / Figura 8. Soporte del sistema de gas de Heat Air (SL3511/SL5511/SL5611/SL6511) / Afbeelding 8. Heat Air Gasbeugel (SL3511/SL5511/SL5611/SL6511) / Figur 8. - Seite 20 4.2 U Bracket 4.2.U-Winkel / Support en U / Supporto a U / Soporte en U / U-beugel / U-fäste 28mm 34mm 6 X Ø9mm 195mm 228mm 263mm 286mm Figure 9. Heat Air Gas & Electric Bracket (SL5512/SL7512) / Bild 8. Heizluft-Gashalterung (SL5512/SL7512) / Figure 9.
-
Seite 21: Installation
(siehe Schritt 2 unten). Le radiateur doit être installé en se servant d’un support Whale, M8 antirotation via des boulons de plancher et des écrous M8 Nylock et des rondelles. D’autres supports et fixations ne peuvent être utilisés qu’avec l’accord préalable de Whale. -
Seite 22: Flue Installation
5. Flue Installation 5.1 Routing The exhaust outlet must be positioned in such a way that exhaust gases may not enter the vehicle interior or external living space. The diagram below shows the area where the exhaust flue must not be located. If the flue is fitted at a distance which is closer to the window than indicated above in Figure 10, a window cir- cuit-breaker switch must be installed that that disables the heater from operating while the window is open. - Seite 23 5. Instalación del sistema de escape de combustión 5.1 Trazado La salida de escape debe colocarse de tal manera que los gases de escape no puedan acceder al interior del vehículo o al espacio habitacional externo. El siguiente diagrama muestra el área donde no se debe colocar la salida de escape de combustión.
- Seite 24 Min 300mm Prohibited area for heater flue Verbotene Einbauzone für Abgasführung Zone interdite l’échappement Area prohibita per il condotto del fumo dell’apparecchio di riscaldamento Área prohibida para la salida Fuel refuelling/ Prohibited area breather vent Verboden gebied voor de afvoer for heater flue Förbjudet område för värmekanal 300mm...
-
Seite 25: Connection
5.2 Connection 5.2 Anschluss / Connexion / Collegamento / Conexión / Verbinding / Anslutning -25-... - Seite 26 -26-...
-
Seite 27: Installation - Gas & Electric
Only original connection cable from Whale must be used. Do not install the heater directly below a socket. - Seite 28 être réalisée par une personne qualifiée conformément aux règlementations nationales en vigueur et le connecteur doit être installé dans un boîtier de raccordement approprié afin d’empêcher l’accès aux pièces sous tension. Seul un câble de raccordement Whale d’origine doit être utilisé. Ne pas installer le radiateur directement sous une prise.
-
Seite 29: Installatie
Solo se debe utilizar el cable de conexión original de Whale. No instale el calefactor justo debajo de una toma de corriente. - Seite 30 Installationen måste utföras av en kvalificerad person enligt gällande nationella föreskrifter och kontakten måste installeras i lämplig grendosa för att förhindra åtkomst till strömförande delar. Endast originalanslutningskabeln från Whale får användas. Installera inte värmaren direkt nedanför ett uttag.
-
Seite 31: Blown Air
3 GT heater and two fixed open grille fitted for all other models. The ducting layout greatly influences the performance of the heater. For advice on layouts contact the Whale 7. Warmluftführung... -
Seite 32: Blaaslucht Uitlaat
La disposizione dei condotti influenza notevolmente le prestazioni dell’apparecchio di riscaldamento. Contattare la squadra applicativa Whale per ricevere dei consigli sulla disposizione. 7. Aire soplado Entrada de aire soplado El suministro de aire de calefacción no debe estar contaminado por los gases de escape del calefactor o de... - Seite 33 Kanaler måste monteras för att förhindra åtkomst till strömförande eller heta delar. Flexibla ventiler får användas med blåsluftssystemet måste ha minst två fasta öppna grillar monterade. Kanallayouten påverkar värmarens prestanda i mycket stor utsträckning. För råd om layout, kontakta Whale Applications Team.
-
Seite 34: Control Panel Installation
ø 98mm 8. Control Panel Installation Montage des Bedienfelds / Installation du panneau de commande / Installazione del pannello di controllo / Instalación del panel de control / Installatie controlepaneel / Installation av kontrollpanelen 50mm ø 57mm LIN (RJ12) 5 - 30mm -34-... -
Seite 35: System Commissioning
Whale® is a registered trademark of Munster Simms Engineering Ltd. 12. Warranty This Whale product is covered by a 2 year warranty. Please see the enclosed document for details of our Statement of Limited Warranty. Caravan or Motorhome manufacturer’s warranty terms may apply, please refer to manufacturer’s handbook for details. -
Seite 36: Eu-Konformitätserklärung
Warenzeichen der Munster Simms Engineering Ltd. 12. Garantie Auf diese Whale Produkte wird eine Garantie von 2 Jahren gewährt. Beachten Sie bitte das beigefügte Dokument mit den Hinweisen zu unserer eingeschränkten Garantieerklärung. Möglicherweise gelten die Garantiebedingungen des Wohnwagen- oder Wohnmobilherstellers, Einzelheiten entnehmen Sie bitte dem Herstellerhandbuch. -
Seite 37: Mise En Service Du Système
Munster Simms Engineering Ltd. 12. Garantie Ce produit Whale est couvert par une garantie de 2 ans. Veuillez consulter le document joint pour connaître notre Déclaration de garantie limitée. Les conditions de garantie de la caravane ou du camping-car peuvent s’appliquer, veuillez vous référer au manuel du fabricant pour plus d’informations. -
Seite 38: Dichiarazione Di Conformità Ue
Engineering Ltd. 12. Garanzia Questo prodotto Whale è coperto da una garanzia di 2 anni. Vedere il documento allegato per i dettagli della nostra dichiarazione di garanzia limitata. I termini di garanzia del produttore del camper o della roulotte potrebbero trovare applicazione; vedere il manuale del produttore per i dettagli. © Copyright Whale 2020 –... -
Seite 39: Declaración Ue De Conformidad
Munster Simms Engineering Ltd. 12. Garantía Este producto de Whale está cubierto por una garantía de 2 años. Consulte los documentos adjuntos para obtener más información sobre nuestra Declaración de garantía limitada. Puede que se apliquen las condiciones de garantía del fabricante de caravanas o autocaravanas;... -
Seite 40: Inbedrijfstelling Van Het Systeem
Munster Simms Engineering Ltd. 12. Garantie Dit Whale product heeft een garantie van 2 jaar. Raadpleeg het bijgevoegde document voor meer informatie over onze beperkte garantieverklaring. De garantievoorwaarden van de caravan- of camperfabrikant kunnen van toepassing zijn, raadpleeg het handboek van de fabrikant voor meer informatie. © Auteursrecht Whale 2020 - Alle rechten voorbehouden. -
Seite 41: Patent Och Varumärken
Munster Simms Engineering Ltd. 12. Garanti Denna Whale-produkt omfattas av 2 års garanti. Se bifogade dokument avs. detaljer om vår begränsade garanti. Garantivillkoren från husvagns- eller husbilstillverkaren kan gälla, se tillverkarens manual för detaljer. © Copyright Whale® 2020 – med ensamrätt. Mångfaldigande, helt eller delvis, utan tillstånd är förbjudet. - Seite 42 Notes: -42-...
- Seite 43 Notes: -43-...
- Seite 44 Munster Simms Engineering Ltd 2 Enterprise Road, Bangor, N. Ireland BT19 7TA Tel: +44 (0)345 9090 911 info@whalepumps.com whalepumps.com 181.372_v4_0420...