Herunterladen Diese Seite drucken

Werbung

Verfügbare Sprachen
  • DE

Verfügbare Sprachen

  • DEUTSCH, seite 1
DCF-Funkuhr mit XXL-Anzeige
DCF radio-controlled clock with XXL display | Radio reloj
DCF con cifras extragrandes | Horloge radio-pilotée DCF
avec affichage XXL | Radiosveglia DCF con display XXL |
Zegar radiowy DCF z wyświetlaczem XXL |
Bedienungsanleitung
CK 2302
Operating instructions | Instrucciones de operación | Mode d'emploi
Istruzioni per l'uso | Instrukcja obsługi

Werbung

loading

Inhaltszusammenfassung für ADE CK 2302

  • Seite 1 DCF con cifras extragrandes | Horloge radio-pilotée DCF avec affichage XXL | Radiosveglia DCF con display XXL | Zegar radiowy DCF z wyświetlaczem XXL | Bedienungsanleitung CK 2302 Operating instructions | Instrucciones de operación | Mode d‘emploi Istruzioni per l‘uso | Instrukcja obsługi...
  • Seite 2 Liebe Kundin, lieber Kunde ! Sie haben sich für den Kauf eines qualitativ hochwertigen Produkts der Marke ADE entschieden, das intelligente Funktionen mit einem außergewöhnlichen Design vereint. Mit dieser Funkuhr haben Sie die Uhrzeit stets präzise im Blick. Die langjährige Erfahrung der Marke ADE stellt eine technisch hohen Standard und bewährte...
  • Seite 3 Geweckt werden ................... 11 Sonstige Funktionen ..................12 Maßeinheit der Temperatur wechseln ..........12 Zwischen Sommer- und Winterzeit umstellen ........12 Funkuhr auf Auslieferzustand zurücksetzen ........12 Batterien wechseln ..................12 Reinigen ........................12 Störung / Abhilfe ....................13 Technische Daten ....................13 Garantie........................13 Konformitätserklärung ..................14 Entsorgen .......................14 DCF-Funkuhr CK 2302...
  • Seite 4 ‚ Achten Sie beim Einsetzen und Wechseln der Batterien auf die richtige Polarität (+/-). ‚ Setzen Sie die Batterien keinen extremen Bedingungen aus, indem Sie diese z. B. auf Heizkörpern oder unter direkter Sonneneinstrahlung lagern. Erhöhte Auslaufgefahr! DCF-Funkuhr CK 2302...
  • Seite 5 Daten an (z. B. die Raumtemperatur) und verfügt über eine Weckfunktion. Der Artikel ist für den Privatgebrauch und den Einsatz in trockenen Räumen konzipiert. Lieferumfang ‚ Funkuhr ‚ 4 Batterien Typ LR06 (AA), 1,5 V ‚ Bedienungsanleitung DCF-Funkuhr CK 2302...
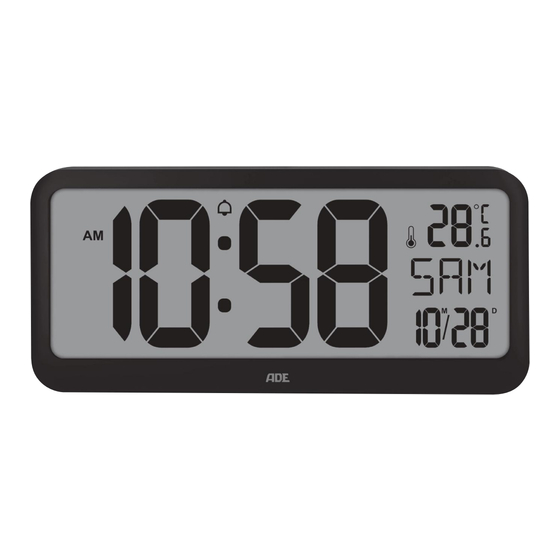
  • Seite 6 Auf einen Blick Auf einen Blick DCF-Funkuhr CK 2302...
  • Seite 7 Achten Sie auf die richtige Polarität (+/-). 3. Setzen Sie die Batteriefach-Abdeckung wieder auf und schieben Sie sie nach oben. Die Verschlusslasche muss hörbar einrasten. Sobald die Batterien eingelegt sind, schaltet die Uhr auf Empfang, siehe nächstes Kapitel. DCF-Funkuhr CK 2302...
  • Seite 8 Warten Sie ab, bis die Funkuhr zu einem späteren Zeitpunkt automatisch wieder auf Empfang schaltet. In den Nachtstunden ist der Empfang meistens besser. Nehmen Sie die Einstellungen manuell vor, wenn an Ihrem Standort der Emp- fang nicht möglich ist, siehe „Uhrzeit und Datum manuell einstellen“. DCF-Funkuhr CK 2302...
  • Seite 9 Uhrzeit im Display läuft normal weiter. ‚ Bei erfolgreichem Empfang stellt sich die Funkuhr auf die Uhrzeit des Zeitzei- chen-Senders ein. Haben Sie bereits manuelle Zeit- und Datumseinstellungen vorgenommen, werden diese automatisch angepasst. DCF-Funkuhr CK 2302...
  • Seite 10 Die Funkuhr schaltet sich mehrmals täglich ein und synchronisiert die Uhrzeit mit dem Funksignal vom Sender DCF77. Im Falle eines Nicht-Empfangs, z. B. bei einem starken Gewitter, läuft das Gerät präzise weiter und schaltet dann zur nächsten vorgesehenen Zeit wieder automatisch auf Empfang. DCF-Funkuhr CK 2302...
  • Seite 11 Weckfunktion aus- und einschalten Ausgehend von der normalen Zeitanzeige: − Drücken Sie 1x die Taste Sobald das Wecksymbol erlischt, ist die Weckfunktion deaktiviert und Sie werden nicht mehr geweckt. Durch erneutes Drücken von , ist die Weckfunktion wieder aktiv. DCF-Funkuhr CK 2302...
  • Seite 12 − Verwenden Sie keinesfalls harte, kratzende oder scheuernde Reini- gungsmittel o. Ä., um die Uhr zu reinigen. Hierbei könnte die Oberflä- che zerkratzen. − Entstauben Sie die Funkuhr bei Bedarf mit einem weichen, trockenen Tuch. Die Scheibe kann auch mit handelsüblichem Glasreiniger gesäubert werden. DCF-Funkuhr CK 2302...
  • Seite 13 Die Uhrzeit weicht genau um eine, ‚ Wahrscheinlich haben Sie eine falsche Zeit- zwei, drei etc. Stunden ab. zone eingestellt. Technische Daten Modell: DCF-Funkuhr CK 2302 Batterie: 4x LR06 (AA), 1,5 V Bemessungsstrom: 38 mA Temperatur-Messbereich: ca. -10 °C - 50 °C (14 °F - 122 °F)
  • Seite 14 Konformitätserklärung Konformitätserklärung Hiermit erklärt die GRENDS GmbH, dass die digitale Funkuhr CK 2302 den Richtlinien 2014/30/EU und 2011/65/EU entspricht. Die Erklärung verliert ihre Gültigkeit, falls an dem Artikel eine nicht mit uns abgestimmte Änderung vorgenommen wurde. Hamburg, April 2023 GRENDS GmbH...
  • Seite 15 − Vor dem Entsorgen müssen die Batterien vollständig entladen werden. Lassen Sie hierfür das Gerät so lange eingeschaltet, bis im Display keine Anzeige mehr sicht- bar ist. − Nehmen Sie danach die Batterien aus dem Gerät wie im Abschnitt „Inbetriebnah- me“ beschrieben. DCF-Funkuhr CK 2302...
  • Seite 16 With this radio-controlled clock, you always have the exact time in view. The wealth of experience of the ADE brand ensures a high technical standard and proven quality. We wish you easy timing at any time!
  • Seite 17 Change temperature unit ................26 Switching between summer and winter time ........26 Resetting the radio-controlled clock to factory setting ....26 Changing the battery ..................26 Cleaning ........................26 Fault/Remedy......................27 Technical data .......................27 Warranty .........................27 Declaration of conformity ................28 Disposal ........................28 CK 2302 DCF radio-controlled clock...
  • Seite 18 ‚ When inserting and changing batteries, pay attention to the correct polarity (+/-). ‚ Do not subject the batteries to any extreme conditions, by – for example – storing them on radiators or under direct sunlight. Increased risk of leakage! CK 2302 DCF radio-controlled clock...
  • Seite 19 (e.g. the room temperature) and has an alarm function. The item is designed for private use and for use in dry areas. Scope of delivery ‚ Radio-controlled clock ‚ 4x 1.5 V LR06 (AA) batteries ‚ Operating Manual CK 2302 DCF radio-controlled clock...
  • Seite 20 Overview Overview CK 2302 DCF radio-controlled clock...
  • Seite 21 (+/-). 3. Replace the battery compartment cover and push it upwards. The locking tab must snap audibly into place. Once the batteries are inserted, the clock switches to the receiving mode, see next chapter. CK 2302 DCF radio-controlled clock...
  • Seite 22 Wait until the radio-controlled clock automatically switches to receiving mode at a later point in time. The reception is usually better at night. Manually perform the settings if reception is not possible at your location, see "Setting the time and date manually". CK 2302 DCF radio-controlled clock...
  • Seite 23 ‚ Upon successful signal reception, the radio-controlled clock adjusts itself to the time of the time signal transmitter. If you have already made manual time and date settings, they will be adjusted automatically. CK 2302 DCF radio-controlled clock...
  • Seite 24 DCF77. In the event the signal is not received, e.g. during a strong storm, the device continues to run precisely and then switches to receiving mode again at the next scheduled time. CK 2302 DCF radio-controlled clock...
  • Seite 25 Starting from normal time display: − Press the button once. Once the alarm symbol goes out, the alarm function is disabled and you will not be alarmed any more. Pressing again activates the alarm function. CK 2302 DCF radio-controlled clock...
  • Seite 26 − Never use harsh, scouring or abrasive cleaning agents or the like to clean the clock. Otherwise, the surface could be scratched. − Remove dust from the radio-controlled clock by a soft, dry cloth as needed. The glass can also be cleaned with commercially available glass cleaners. CK 2302 DCF radio-controlled clock...
  • Seite 27 The time differs by exactly one, ‚ You have probably set an incorrect time two, three, etc. hours. zone. Technical data Model: CK 2302 DCF radio-controlled clock Battery: 4x LR06 (AA), 1.5 V Rated current: 38 mA Temperature measuring range: approx.
  • Seite 28 Declaration of conformity Declaration of conformity GRENDS GmbH hereby declares that the CK 2302 digital radio-controlled clock complies with Directives 2014/30/EU and 2011/65/EU. This declaration loses its validity if any modification is made to the item that has not been agreed with us in advance.
  • Seite 30 ADE, que aúna unas funciones inteligentes con un diseño extraordinario. Con este reloj radio controlado tendrá siempre a la vista la hora exacta. La larga experiencia de la marca ADE le asegura unos elevados estándares técnicos y es garantía de calidad.
  • Seite 31 Cambiar de hora de verano a hora de invierno .........41 Restaurar el reloj radio controlado a la configuración de fábrica..............41 Cambio de la pila ..................41 Limpieza .........................41 Problema/Solución .....................42 Datos técnicos.......................42 Garantía ........................42 Declaración de conformidad ................43 Eliminación ......................43 Reloj radio controlado DCF CK 2302...
  • Seite 32 ‚ Cuando coloque y cambie las pilas, preste atención a la polaridad correcta (+/-). ‚ No exponga las pilas a condiciones extremas, poniéndolas, por ejemplo, sobre radiadores o expuestas directamente al sol. ¡Riesgo elevado de fugas! Reloj radio controlado DCF CK 2302...
  • Seite 33 El artículo está concebido exclusivamente para el uso particular en un espacio interior seco. Volumen de entrega ‚ Reloj radio controlado ‚ 4 pilas tipo LR06 (AA), 1,5 V ‚ Manual de instrucciones Reloj radio controlado DCF CK 2302...
  • Seite 34 De un vistazo De un vistazo Reloj radio controlado DCF CK 2302...
  • Seite 35 3. Vuelva a colocar la tapa del compartimiento de las pilas y deslícela hacia arriba. La pestaña de bloqueo debe encajar de forma audible. En cuanto se ponen las pilas, el reloj se conecta como receptor; consulte el capítulo siguiente. Reloj radio controlado DCF CK 2302...
  • Seite 36 No hay indicación de datos del emisor de señal horaria Compruebe que la ubicación del radio reloj es la adecuada, para ello consulte "Seleccionar ubicación". Vuelva a iniciar manualmente el procedimiento de recepción, consulte "Iniciar manualmente el proceso de recepción". Reloj radio controlado DCF CK 2302...
  • Seite 37 − Horas − Minutos − Formato de fecha (día/mes o mes/día) − Año − Mes − Día − Idioma (se refiere únicamente al indicador del día de la semana) 6. Por último, pulse para salir. Reloj radio controlado DCF CK 2302...
  • Seite 38 En la parte posterior, el reloj radio controlado tiene tres anillas para colgarlo y dos soportes plegables. − Cuelgue o fije el radio reloj lo más cerca posible de una ventana. Normalmente, la señal se recibe mejor de ese modo. Reloj radio controlado DCF CK 2302...
  • Seite 39 DCF77. En caso de no recibirse la señal, por ejemplo por una tormenta intensa, el aparato sigue funcionando con precisión y se vuelve a conectar nuevamente en la siguiente hora prevista. Reloj radio controlado DCF CK 2302...
  • Seite 40 Tan pronto como se apague el símbolo de la alarma , la función de despertador se desactiva y no vuelve a sonar. Si se vuelve a pulsar , vuelve a activarse la función de alarma. Reloj radio controlado DCF CK 2302...
  • Seite 41 Podría arañar la superficie. − Retire el polvo del radio reloj con un paño seco y suave si es necesario. El cristal puede limpiarse con un limpiacristales de uso común. Reloj radio controlado DCF CK 2302...
  • Seite 42 La hora es diferente exactamente ‚ Probablemente ha seleccionado una zona en una, dos o tres horas. horaria equivocada. Datos técnicos Modelo: Reloj radio controlado DCF CK 2302 Pilas: 4 x LR06 (AA), 1,5 V Intensidad de corriente: 38 mA Rango de medición de aprox.
  • Seite 43 Declaración de conformidad Declaración de conformidad GRENDS GmbH declara por la presente que el reloj radio controlado digital CK 2302 cumple con las directivas 2014/30/UE y 2011/65/UE. Esta declaración perderá su validez si se ha realizado una modificación en el artículo que no haya sido previamente autorizada por nuestra parte.
  • Seite 44 Chère cliente, cher client ! Nous sommes ravis que vous ayez choisi un appareil de haute qualité de la marque ADE, qui allie des fonctions intelligentes à un design exceptionnel. Grâce à cette horloge radiopilotée, vous êtes toujours ponctuel. Les années d’expérience de la marque ADE garantissent une haute technicité...
  • Seite 45 Passer de l’heure d’été à l’heure d’hiver et vice versa ......55 Revenir aux paramètres d’usine ...............55 Changement des piles ................55 Nettoyage ......................55 Problèmes/solutions ...................56 Caractéristiques techniques ................56 Garantie........................56 Déclaration de conformité ................57 Mise au rebut ......................57 Horloge radio pilotée CK 2302 à signal DCF...
  • Seite 46 ‚ Ne soumettez pas les piles à des conditions extrêmes en les conservant sur des radiateurs ou en les exposant au rayonnement direct du soleil. Risque accru de fuite pour les piles ! Horloge radio pilotée CK 2302 à signal DCF...
  • Seite 47 Cet article est réservé à un usage privé, en intérieur et dans un milieu sec. Contenu de l’emballage ‚ Horloge radio-pilotée ‚ 4 Piles de type LR06 (AA), 1,5 V ‚ Mode d’emploi Horloge radio pilotée CK 2302 à signal DCF...
  • Seite 48 Aperçu Aperçu Horloge radio pilotée CK 2302 à signal DCF...
  • Seite 49 3. Remettez le couvercle du compartiment à piles en place et faites-le glisser vers le haut. La languette de fermeture du couvercle doit produire un son audible. Dès que les piles sont insérées, l’horloge se met en mode réception, voir le prochain chapitre. Horloge radio pilotée CK 2302 à signal DCF...
  • Seite 50 Aucun affichage de données de l’émetteur de signal horaire Assurez-vous que l’emplacement de l’horloge est approprié. (Voir « Choisir l’emplacement ».) Relancez le processus de réception manuellement, voir « Activer manuellement la réception du signal ». Horloge radio pilotée CK 2302 à signal DCF...
  • Seite 51 − Minutes − Format de la date (jour/mois ou mois/jour) − Année − Mois − Jour − Langue (uniquement pour l’affichage des jours de la semaine) 6. Appuyez sur pour terminer les réglages. Horloge radio pilotée CK 2302 à signal DCF...
  • Seite 52 Le boîtier de l’horloge est muni de trois œillets de suspension à l’arrière ainsi que deux pieds rabattables. − Placez l’horloge le plus près possible d’une fenêtre. En général, c’est à cet endroit que la réception est la meilleure. Horloge radio pilotée CK 2302 à signal DCF...
  • Seite 53 DCF77. En cas de non-réception, comme cela peut se produire par temps d’orage, l’appareil continue de fonctionner avec précision puis se remet automatiquement en mode de réception à l’heure programmée suivante. Horloge radio pilotée CK 2302 à signal DCF...
  • Seite 54 Depuis l’affichage normal de l’heure : − Appuyez 1 fois sur la touche Dès que le symbole d’alarme disparaît, elle se désactive et l’alarme ne sonnera plus. Si vous appuyez sur , la fonction d'alarme se réactive. Horloge radio pilotée CK 2302 à signal DCF...
  • Seite 55 Cela pourrait rayer la surface. − Au besoin, nettoyer la poussière sur l’horloge à l’aide d’un chiffon doux et sec. La vitre se nettoie également avec un nettoyant classique pour le verre. Horloge radio pilotée CK 2302 à signal DCF...
  • Seite 56 ‚ Vous avez apparemment défini un mauvais deux, trois heures ou plus. fuseau horaire. Caractéristiques techniques Modèle : Horloge radio pilotée CK 2302 à signal DCF Pile : 4 piles LR06 (AA), 1,5 V Intensité nominale : 38 mA Plage de températures environ -10 °C à...
  • Seite 57 Déclaration de conformité Déclaration de conformité GRENDS GmbH déclare que l’horloge numérique CK 2302 est conforme aux directives 2014/30/UE et 2011/65/UE. Cette déclaration perd sa validité si l’article subit des modifications sans notre assentiment. Hambourg, avril 2023 GRENDS GmbH Mise au rebut Élimination de l‘emballage...
  • Seite 58 Gentile cliente! La ringraziamo per aver scelto un prodotto di alta qualità della ADE che unisce funzioni intelligenti e un design fuori dal comune. Questo orologio radiocontrollato permette di vedere l'orario in modo preciso. La lunga esperienza della ADE garantisce standard tecnici elevati e qualità...
  • Seite 59 Impostazione dell'ora legale e dell'ora solare ........68 Ripristino dell'orologio radiocontrollato alle impostazioni di fabbrica ..............68 Sostituzione della batteria .................68 Pulizia ........................68 Risoluzione dei problemi ..................69 Dati tecnici ......................69 Garanzia ........................69 Dichiarazione di conformità ................70 Smaltimento ......................70 Radiosveglia DCF CK 2302...
  • Seite 60 ‚ Durante l'inserimento e la sostituzione delle batterie, prestare attenzione alla corretta polarità (+/-). ‚ Non sottoporre le batterie a temperature estreme, ad esempio conservandole vicino a termosifoni o alla luce diretta del sole. Serio rischio di fuoriuscita di liquido! Radiosveglia DCF CK 2302...
  • Seite 61 (ad es. la temperatura ambiente) e ha una funzione di sveglia. L'articolo è per uso privato in ambienti interni asciutti. Ambito della fornitura ‚ Radiosveglia ‚ 4 batterie di tipo LR06 (AA) da 1,5 V ‚ Istruzioni per l'uso Radiosveglia DCF CK 2302...
  • Seite 62 Descrizione Descrizione Radiosveglia DCF CK 2302...
  • Seite 63 3. Riposizionare il coperchio del vano batterie e farlo scorrere verso l’alto. Fino a quando la linguetta scatta in posizione. Appena le batterie sono state inserite, l'orologio entra in modalità di ricezione (vedere il capitolo successivo). Radiosveglia DCF CK 2302...
  • Seite 64 Attendere che l'orologio radiocontrollato torni automaticamente a ricevere in un secondo momento. Di solito, la ricezione è migliore durante le ore notturne. Effettuare le impostazioni manuali, se la ricezione non è possibile nella posizione scelta, si veda "Impostazione manuale di ora e data". Radiosveglia DCF CK 2302...
  • Seite 65 ‚ Se la ricezione del segnale va a buon fine, l'orologio radiocontrollato si regola sull'ora ricevuta dal trasmettitore del segnale orario. Se sono già state effettuate impostazioni manuali della data e dell'ora, queste vengono regolate automaticamente. Radiosveglia DCF CK 2302...
  • Seite 66 DCF77. In caso di mancata ricezione, ad esempio durante un forte temporale, il dispositivo continuerà a funzionare normalmente ed accederò alla modalità di ricezione alla prossima ora impostata. Radiosveglia DCF CK 2302...
  • Seite 67 A partire dalla visualizzazione dell'ora normale: − Premere una volta il tasto Non appena il simbolo della sveglia scompare, il funzionamento della sveglia si disattiva e non si viene più svegliati. Premendo di nuovo , la sveglia viene riattivata. Radiosveglia DCF CK 2302...
  • Seite 68 − Non pulire l'orologio con prodotti aggressivi o abrasivi. che potrebbero graffiarne la superficie. − Se necessario, rimuovere la polvere dall'orologio radiocontrollato con un panno morbido e asciutto. Il vetro può essere pulito con un detergente per vetri disponi- bile in commercio. Radiosveglia DCF CK 2302...
  • Seite 69 L'orario lascia il posto a uno, due, ‚ Probabilmente, è stato impostato un fuso tre ecc. ore. orario sbagliato. Dati tecnici Modello: Radiosveglia DCF CK 2302 Batteria: 4 del tipo LR06 (AA) da 1,5 V Corrente nominale: 38 mA Intervallo di misurazione della circa -10 - 50 °C (14 - 122 °F)
  • Seite 70 Dichiarazione di conformità Dichiarazione di conformità Con la presente, GRENDS GmbH dichiara che la radiosveglia digitale CK 2302 è conforme alle direttive 2014/30/UE e 2011/65/UE. La presente dichiarazione perde ogni sua validità qualora al prodotto vengano apportate modifiche senza la nostra autorizzazione.
  • Seite 71 Dichiarazione di conformità Radiosveglia DCF CK 2302...
  • Seite 72 Informacje ogólne Szanowny Kliencie! Zakupiony wysokiej jakości produkt marki ADE łączy w sobie inteligentne funkcje z wyjątkową stylistyką. Dzięki niniejszemu zegarowi radiowemu godzina jest zawsze precyzyjnie w zasięgu wzroku. Wieloletnie doświadczenie marki ADE gwarantuje wysoki standard techniczny oraz sprawdzoną jakość.
  • Seite 73 Zmiana jednostki miary temperatury ............82 Przełączanie między czasem letnim i zimowym .......82 Przestawienie zegara radiowego na ustawienia fabryczne ...82 Wymiana baterii ....................82 Czyszczenie ......................82 Usterka/środek zaradczy ...................83 Danych technicznych ..................83 Gwarancja.......................83 Deklaracja zgodności ..................84 Utylizacja ....................... 84 Zegar radiowy DCF CK 2302...
  • Seite 74 ‚ Podczas wkładania i wymiany baterii należy zwrócić uwagę na prawidłową biegunowość (+/-). ‚ Nie narażać baterii na oddziaływanie skrajnych warunków poprzez np. układanie ich na grzejnikach lub bezpośrednio w miejscach nasłonecznionych. Podwyższone niebezpieczeństwo wycieku! Zegar radiowy DCF CK 2302...
  • Seite 75 (np. temperaturę w pomieszczeniu) i ma funkcję budzika. Produkt przeznaczony jest do użytku prywatnego w suchych pomieszczeniach. Zakres dostawy ‚ Zegar radiowy ‚ 4 baterie typu LR06 (AA), 1,5 V ‚ Instrukcja obsługi Zegar radiowy DCF CK 2302...
  • Seite 76 W skrócie W skrócie Zegar radiowy DCF CK 2302...
  • Seite 77 (+/-). 3. Założyć pokrywę komory na baterie ponownie i przesunąć ją do góry. Zaczep zamykający musi zatrzasnąć się w słyszalny sposób. Kiedy baterie zostaną włożone, zegar przełącza się na odbiór. Patrz następny rozdział. Zegar radiowy DCF CK 2302...
  • Seite 78 Odczekać, aż zegar radiowy automatycznie przełączy się ponownie na tryb odbioru. W godzinach nocnych odbiór jest z reguły lepszy. Wprowadzić ustawienia ręcznie, jeżeli w danej lokalizacji nie ma możliwości odbioru, patrz „Ręczne ustawianie godziny i daty”. Zegar radiowy DCF CK 2302...
  • Seite 79 ‚ Jeżeli odbiór nie zakończył się pomyślnie, symbol odbioru zgaśnie po kilku minutach i godzina na wyświetlaczu będzie pokazywana dalej normalnie. ‚ Przy dobrym odbiorze zegar radiowy przestawia się na czas nadajnika wzorca czasu. Jeżeli dokonano już ręcznego ustawienia godziny i daty, zostaną one automatycznie dopasowane. Zegar radiowy DCF CK 2302...
  • Seite 80 Zegar włącza się kilkukrotnie w ciągu dnia i synchronizuje godzinę z sygnałem radiowym z nadajnika DCF77. W przypadku braku odbioru, np. podczas silnej burzy, urządzenie będzie działało precyzyjnie dalej i o najbliższej przewidzianej godzinie ponownie przełączy się automatycznie na odbiór. Zegar radiowy DCF CK 2302...
  • Seite 81 Wyłączanie i włączanie funkcji alarmu Wychodząc od zwykłego wskazania czasu: − Nacisnąć jeden raz przycisk Kiedy zgaśnie symbol alarmu , funkcja budzenia zostanie wyłączona i budzenie nie będzie już działać. Ponowne naciśnięcie aktywuje funkcję alarmu ponownie. Zegar radiowy DCF CK 2302...
  • Seite 82 − Do czyszczenia zegara nigdy nie używać twardych, zarysowujących lub trących środków czyszczących itp. Może dojść bowiem do zarysowań powierzchni. − W razie potrzeby zegar radiowy z kurzu miękką, suchą ścierką. Tarczę można czyścić również powszechnie dostępnym środkiem do czyszczenia szkła. Zegar radiowy DCF CK 2302...
  • Seite 83 Godzina jest błędna dokładnie o ‚ Prawdopodobnie ustawiono jedną, dwie, trzy itd. godziny. nieprawidłową strefę czasową. Danych technicznych Model: Zegar radiowy DCF CK 2302 Bateria: 4x LR06 (AA), 1,5 V Prąd znamionowy: 38 mA Zakres pomiarowy temperatury: ok. -10°C – 50°C (14°F – 122°F)
  • Seite 84 Deklaracja zgodności Deklaracja zgodności GRENDS GmbH oświadcza niniejszym, że cyfrowy zegar radiowy CK 2302 jest zgodny z dyrektywami 2014/30/UE i 2011/65/UE. Deklaracja traci ważność, jeżeli w przedmiocie dokonano zmian, które nie zostały z nami uzgodnione. Hamburg, kwiecień 2023 r. GRENDS GmbH...