OEM RD 61112 K Bedienungsanleitung
Lcd regler 24 v - 230 v

Inhaltszusammenfassung für OEM RD 61112 K
- Seite 1 BEDIENUNGSANLEITUNG LCD Regler 24 V - 230 V Komfort NC / Control NC RD 61112 K / RD 61112 C 124804.1108 Komfort |Control...
-
Seite 2: Bedienfeld Und Anzeigenelemente
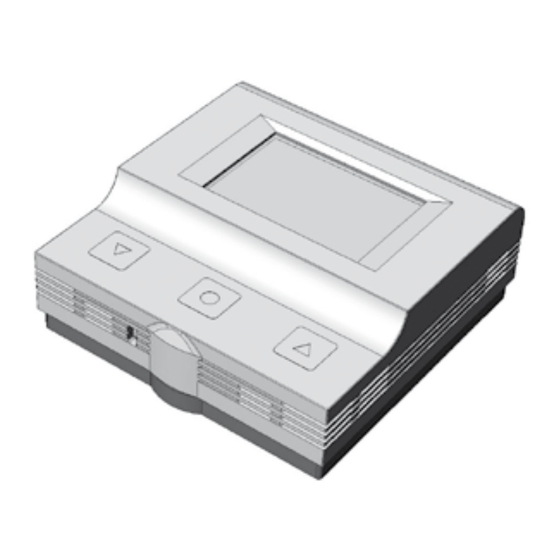
1. Bedieninformationen 1.1 Bedienfeld und Anzeigenelemente Pos. 1: Sensortaste „AB“ Pos. 2: Sensortaste „BESTÄTIGUNG“ Pos. 3: Sensortaste „AUF“ Pos. 4: Wochentage* Pos. 5: Betriebsart „Tagbetrieb“ Pos. 6: Betriebsart „Nachtbetrieb“ Pos. 7: Betriebsart „Automatikbetrieb“ Pos. 8: Speicher „M“ Pos. 9: Auswahl „AUF“/„AB“ Pos. -
Seite 3: Grundeinstellungen
2. Grundeinstellungen 2.1 Uhrzeit und Wochentag einstellen 2.1.2 Tippen Sie oder , um die aktuellen Minuten einzustellen. nach Erstinbetriebnahme/Stromausfall Bestätigen Sie mit Komfort: Bei Erstinbetriebnahme erscheinen der Betriebsmodus Tagbetrieb und die Ist-Temperatur im Display. Nach längerem Stromausfall bleiben alle Einstellungen (Soll-Temperatur, Betriebsmodus, Absenktemperatur) erhalten. Control: Bei Erstinbetriebnahme wird zunächst zur Einstellung der Uhrzeit und Tagesanzeige blinkt. -
Seite 4: Uhrzeit Und Wochentag Einstellen
2.2 Uhrzeit und Wochentag einstellen 2.2.3 Tippen Sie oder , um die aktuelle Stunde einzustellen. Bestätigen Sie mit Komfort: Nicht einstellbar, da nicht benötigt. Control: Uhrzeit und Wochentag für alle Betriebsarten lassen sich im Speicher „M“ einstellen. Ausnahme: Bei Erstinbetriebnahme oder längerem Stromausfall wird sofort zur Eingabe von Uhrzeit und Wochentag aufgefordert: Die Minutenanzeige blinkt. -
Seite 5: Soll-Temperatur (Gewünschte Raumtemperatur)
2.3 Soll-Temperatur (gewünschte Raumtemperatur) 2.2.5 Tippen Sie oder , um den aktuellen Tag einzustellen. Be- stätigen Sie mit Das Einstellen der SOLL-Temperatur erfolgt in Schritten von 0,5 °C und ist im Bereich von 8 °C bis 30 °C möglich. 2.3.1 Tippen Sie oder . Die aktuell eingestellte Soll-Temperatur erscheint. - Seite 6 2.4.5 Tippen Sie oder , um die Einstellung zu beenden oder 2.4.2 Wählen Sie mit oder den Speicher M. Bestätigen Sie mit warten Sie auf das Time-out. 2.5 Stand-by-Modus/Frostschutzfunktion In Zeiten längerer Abwesenheit (z.B. Urlaub) empfehlen wir die Einschaltung Zuletzt eingestelle Absenktemperatur und des Stand-by-Modus.
- Seite 7 3. Betriebsmodi 3.1 Übersicht Betriebsmodi 3.2 Auswahl des Betriebsmodus 3.2.1 Tippen Sie . Der zuletzt eingestellte Betriebsmodus blinkt: Tagbetrieb Energiesparmodus „AUS“. Es findet keine Temperaturabsenkung/-erhöhung statt. Der Regler ist im Normalbetrieb und regelt nach der Soll-Temperatur. Nachtbetrieb: Energiesparmodus „EIN“. Die Soll-Temperatur wird um 2-6 K gesenkt. Die Absenktemperatur Nacht lässt sich unter Punkt 2.4 einstellen.
- Seite 8 4. informationen zur schaltuhr (speicher „M“) 4.1 Wochentage 4.2 auslieferungszustand Wochentage In der Variante Control lassen sich im Speicher „M“ die Heizphasen Auslieferungszustand: Eine Anpassung an die Soll-Temperatur programmieren. Es ist möglich, die Arbeitswoche (Mo-Fr), das Wo- erfolgt von chenende oder alle Wochentage einzeln zu programmieren. • Mo-Fr, 5-8 Uhr und 15-22 Uhr • Sa-So, 6-23 Uhr Heizphasen...
-
Seite 9: Programmierung Der Arbeitswoche (Mo-Fr)
5. schaltuhr: arbeitswoche 5.1 Programmierung der arbeitswoche (Mo-Fr) 5.1.4 = Weiter mit der Programmierung 5.1.1 = Menüauswahl Betriebsmodus Wochentag und Uhrzeit blinken. 5.1.5 = Weiter mit der Programmierung Der zuletzt eingestellte Betriebsmodus blinkt. 5.1.2 = Speicher „M“ wählen Arbeitswoche und Zeitleiste blinken. 5.1.6 = Möglichkeit, Schaltuhr auf Auslieferungszustand zu Speicher „M“... - Seite 10 = Programmierung Arbeitswoche 1 2 3 4 5 5.1.7 5.1.9 / = Stunde einstellen und = Stunde bestätigen 1 2 3 4 5 Wochentage blinken. Die ak- tuelle Programmierung wird in der Zeitleiste angezeigt. 5.1.10 / = Minuten einstellen (viertelstündlich) und = Programmierung Wochenende 6 7 , oder = Stunde bestätigen...
- Seite 11 5.1.12 / = Minuten einstellen (viertelstündlich) und 5.1.15 / = Stunde einstellen und = Stunde bestätigen = Stunde bestätigen Info: 2.Ein- schaltzeit (1 Sek.) 5.1.13 / = Stunde einstellen und 5.1.16 / = Minuten einstellen (viertelstündlich) und = Stunde bestätigen = Minuten bestätigen Darstellung programmierte...
- Seite 12 6. Schaltuhr: Wochenende 6.1 Programmierung des Wochenendes (Sa+So) 6.1.3 Weiter mit Positionen 5.1.8 bis 5.1.16 Ausgangsposition zum Programmieren des Wochenendes ist 5.1.7 1 2 3 4 5 (Wochentage blinken) Nachdem Sie in Position 5.1.16 die Mi- nutenangabe der 2. Ausschaltzeit mit bestätigt haben, ist die Programmierung des Wochenendes abgeschlossen.
-
Seite 13: Programmierung Einzelner Wochentage
7. Schaltuhr: einzelne Wochentage 7.1 Programmierung einzelner Wochentage Ausgangsposition zum Programmieren einzelner Wochentage ist 5.1.7 Nachdem Sie in Position 5.1.16 die Minuten- 7.1.1 = Auswahl des zu programmierenden Wochentages angabe der 2. Ausschaltzeit mit bestätigt haben, blinkt der nächste Wochentag. 7.1.4 = Programmierung des folgenden Wochentages, weiter mit Position 5.1.9... - Seite 14 OPERATING INSTRUCTIONS LCD Thermostat 24 V - 230 V Comfort NC / Control NC RD 61112 K / RD 61112 C 124804.1108 Comfort |Control...