Herunterladen Inhalt Inhalt Diese Seite drucken
Ultrak KC4300E Installationsanleitung

Ultrak KC4300E Installationsanleitung

1/3” ccd schwarz/weiß - kamera
Inhaltsverzeichnis

Werbung

Verfügbare Sprachen

Verfügbare Sprachen

1/3" CCD BLACK-
AND-WHITE
CAMERA
1/3" CCD SCHWARZ/WEI
KAMERA
CAMÉRA
CCD 1/3" NOIR ET BLANC
TELECAMERA B/N CON
CCD 1/3"
INSTALLATION
INSTRUCTIONS
Groupe Bisset
98 Ter, boulevard Héloïse 95103 Argenteuil Cedex France
(33) 0134/234747 FAX (33) 0134/234745
Casarotto Security
Via Treviso, 2/4 31020 San Vendemiano (Treviso) Italy
(39) 0438/410245 FAX (39) 0438/370471
Intervision
Bridge House, Garstang Road Broughton, Preston PR3 5JA England
(44) 01772/861999 FAX (44) 01772/863176
VideV GmbH
Großenbaumer Weg 10 D-40472 Düsseldorf Germany
(49) 0211/41509-0 FAX (49) 0211/424019
KC4300E
ß
-
INSTALLATIONSANLEITUNG
INSTRUCTIONS D'INSTALLATION
ISTRUZIONI PER L'INSTALLAZIONE

Werbung

Inhaltsverzeichnis
loading

Inhaltszusammenfassung für Ultrak KC4300E

  • Seite 1 KC4300E 1/3” CCD BLACK- AND-WHITE CAMERA ß 1/3” CCD SCHWARZ/WEI KAMERA CAMÉRA CCD 1/3” NOIR ET BLANC TELECAMERA B/N CON CCD 1/3” INSTALLATION INSTALLATIONSANLEITUNG INSTRUCTIONS D’INSTALLATION INSTRUCTIONS ISTRUZIONI PER L’INSTALLAZIONE Groupe Bisset 98 Ter, boulevard Héloïse 95103 Argenteuil Cedex France...
  • Seite 2: By Ultrak All Rights Reserved Printed In Korea

    ÜBERARBEITETE AUSGABEN KÖNNEN SOLCHE ÄNDERUNGEN BEINHALTEN. TOUS DROITS RESERVES. AUCUNE PARTIE DE CETTE PUBLICATION NE PEUT ÊTRE REPRODUITE PAR QUELQUE MOYEN QUE CE SOIT SANS ACCORD ECRIT DE ULTRAK. LES INFORMATIONS SONT REPUTEES VRAIES. TOUTEFOIS,UTRAK NE PEUT PAS ÊTRE TENU RESPONSABLE DE TOUTES CONSÉQUENCES RÉSULTANT DE LEUR UTILISATION.
  • Seite 3: Inhaltsverzeichnis

    TABLE OF CONTENTS IMPORTANT SAFEGUARDS & WARNING............4 PURPOSE ......................5 SYSTEM INSTALLATION................... 5 MANUAL IRIS LENS ADJUSTMENT ..............7 VIDEO TYPE AUTO IRIS LENS INSTALLATION AND ADJUSTMENT ....7 DC IRIS LENS INSTALLATION AND ADJUSTMENT ......... 8 BACK FOCUS ADJUSTMENT................9 PHASE ADJUSTMENT..................
  • Seite 4: Important Safeguards & Warning

    COMPLYING WITH ALL FEDERAL, STATE AND LOCAL LAWS AND STATUTES CONCERNING THE MONITORING AND RECORDING OF VIDEO AND AUDIO SIGNALS. ULTRAK SHALL NOT BE HELD RESPONSIBLE FOR THE USE OF THIS PRODUCT IN VIOLATION OF CURRENT LAWS AND STATUTES. English...
  • Seite 5: Purpose

    SECTION 1 KC4300E CCD BLACK & WHITE CAMERA PURPOSE The KC4300E CCD Black & White Camera provides a low cost solution to closed circuit television and security surveillance applications. The KC4300E Camera features: • 1/3” Interline Transfer CCD Image Sensor •...
  • Seite 6 FIGURE 1. KC4300E CAMERA English...
  • Seite 7: Manual Iris Lens Adjustment

    C. The KC4300E Camera has a camera mounting block attached to the bottom of the camera housing. The ¼”-20 UNC threaded mounting hole attaches to the bolt on the camera stand or mounting bracket.
  • Seite 8: Dc Iris Lens Installation And Adjustment

    Reset the level control as noted in step E. DC IRIS LENS INSTALLATION AND ADJUSTMENT The KC4300E Camera supports dc iris lens. Perform the following steps to install and adjust a dc-type auto iris lens. Thread the dc iris lens to the lens mount on the front of the camera.
  • Seite 9: Back Focus Adjustment

    D. The EI switch should be in the OFF position. Apply power to the KC4300E Camera. Adjust the dc iris lens for an optimum picture. Use the IRIS LEVEL control on the back of the camera for optimum picture quality.
  • Seite 10: Phase Adjustment

    If a picture is visible, focus on the picture. If the picture is not visible, open the iris on the lens. Open the lens as wide as possible by adjusting the iris ring on the lens for the brightest picture or by placing the welders glass in front of the lens and forcing the lens to automatically open.
  • Seite 11: Troubleshooting

    SECTION 2 TROUBLESHOOTING AND MAINTENANCE TROUBLESHOOTING If problems occur, verify the installation of the camera with the instructions in this manual and with other operating equipment. Isolate the problem to the specific piece of equipment in the system and refer to the equipment manual for further information.
  • Seite 12: Specifications

    SPECIFICATIONS Dimensions (WxHxD) 2.3 x 2.0 x 4.8 in (58 x 52 x 123 mm) Power supply 230V ac +/- 10%, 50Hz +/- 1Hz Power consumption 3.5W (3.75W max. with auto-iris) Image pickup element 1/3 inch CCD image area sensor (4.9mm H x 3.7mm V) Scanning system 2:1 interlace...
  • Seite 13: Wichtige Sicherheitsmaßnahmen & Warnhinweis

    ERFÜLLUNG DER BEDINGUNGEN ALLER FÖDERALEN, STAATLICHEN UND KOMMUNALEN GESETZE UND STATUTEN IN BEZUG AUF DIE ÜBERWACHUNG UND AUFNAHME VON OPTISCHEN UND AKUSTISCHEN SIGNALEN. ULTRAK/VIDEV KANN NICHT FÜR DEN MIßBRAUCH DIESES PRODUKTS IN BEZUG AUF GELTENDE GESETZE UND STATUTEN BELANGT WERDEN. Deutsch...
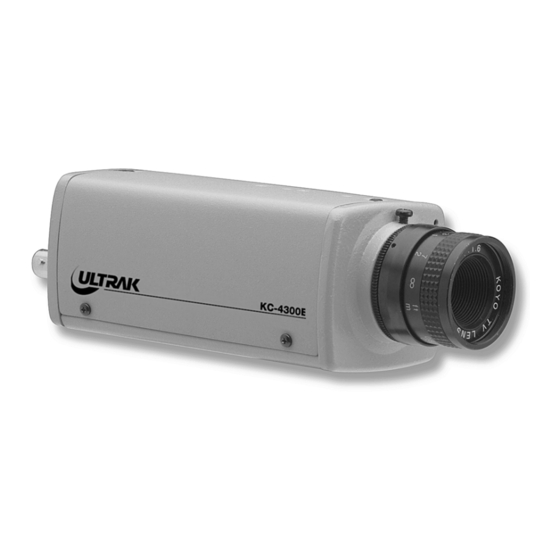
  • Seite 14: Abschnitt 1 Kc4300E Ccd Schwarz/Weiß-Kamera

    Die Installation der KC4300E Kamera muß durch qualifizierte Kundendienst-Mitarbeiter den örtlichen und nationalen, elektrischen und mechanischen Vorschriften entsprechend durchgeführt werden. Führen Sie die folgenden Schritte aus, um die KC4300E Kamera zu installieren. Entnehmen Sie alle Geräteteile der Verpackung und legen Sie die Bestandteile bereit, die Sie während der Installation benötigen:...
  • Seite 15 BESCHREIBUNG KC4300E CAMERA SIEHE ABBILDUNG 1 Deutsch...
  • Seite 16: Einstellung Von Objektiven Mit Manueller Blende

    Der Kamerawandhalter oder die Konsole muß an einem Bauelement (Pfosten oder Dachsparren) befestigt werden, der das Gewicht der Kamera und der Aufhängung stützt. Die KC4300E Kamera verfügt über einen Kamera-Montagesockel an der Unterseite des Kameragehäuses. Das 1/4”-20 UNC Gewinde der Montageöffnung dient zur Aufnahme der Schraube auf dem Kamerawandhalter oder an der Konsole.
  • Seite 17: Installation Und Einstellung Von Ai-Objektiven Mit Automatischer Blende

    INSTALLATION UND EINSTELLUNG VON AI-OBJEKTIVEN MIT AUTOMATISCHER BLENDE Die KC4300E Kamera kann mit AI-Objektiven mit automatischer Blende betrieben werden, um sie wechselnden Lichtverhältnissen anzupassen. Führen Sie die folgenden Schritte durch, um ein AI-Objektiv mit automatischer Blende zu installieren und einzustellen.
  • Seite 18: Installation Und Einstellung Von Objektiven Mit Dc-Blende

    Für Einstellung des Belichtungsgrades: Justieren Sie die Belichtungskontrolle auf eine optimale Bildwiedergabe während des Tages. Eine Justierung bei Dunkelheit könnte zu einer beeinträchtigten Einstellung der Tageslichtkontrolle führen. Stellen Sie die Tiefenschärfe der Kamera ein, bevor Sie die Bildwiedergabe abschließend aussteuern. G.
  • Seite 19: Einstellung Der Tiefenschärfe

    C. Stecken Sie den Verbindungsstecker in die DC Blendenbuchse an der Rückselte der Kamera. Der Verbindungsstecker ist so ausgerichtet, daß nur eine Befestigungsmöglichkelt vorhanden ist. D. Der Schalter EL sollte sich in Position OFF befinden. Versorgen Sle die KC 4300 Kamera mit Spannung. Stelien Sle das DC-Objektiv aufein optimales Bild ein.
  • Seite 20: Phaseneinstellung

    D. Lockem Sie die Halteschraube des Fokussierrings. Justieren Sie den Fokussierring, um ein klares Bild zu erhalten. Ziehen Sle die Halteschraube des Fokussierrings wieder an. G. Fiihren Sie die Feineinsteflung der Bildschärfe mit Hilfe des Fokussierrings am Objektiv durch. H. Entfemen Sie den Filter vom Objektiv. Stellen Sle die Blende des Objektivs auf eine optimale Bildqualität ein.
  • Seite 21: Abschnitt 2 Fehlerbehebung Und Wartung

    ABSCHNITT 2 FEHLERBEHEBUNG UND WARTUNG FEHLERBEHEBUNG Wenn Probleme auftauchen, überpüfen Sie die Installation der Kamera mit den Instruktionen dieser Bedienungsanleitung und mit anderen funktionierenden Geräten, Finden Sie heraus, welches spezifische Teil des Gerätes in dem System das Problem verursacht und schlagen Sie in der Anleitung des Gerätes nach, um weitere Informationen zu erhalten.
  • Seite 22: Technische Daten

    TECHNISCHE DATEN Abmessungen (BxHxT) 58 x 52 x 123 MM Betriebsspannung 230V Wechselspannung +/- 10%, 60Hz +/- 1Hz Leistungsaufnahme 3,5W (max 3,75W mit automatischer Blende) Aufnahmesystem 1/3” CCD Interline Transfer (4,9mm H x 3,7mm V) Abtastsystem 2:1 Interlace Frequenz 15,625kHz (H), 50Hz (V) Synchronisation Line lock Auflösung...
  • Seite 23: Mise En Garde Importante & Attention

    ET DE SE PLIER AUX LOIS LOCALES, DE L’ÉTAT OU FÉDÉRALES CONCERNANT LA VISUALISATION ET L’ENREGISTREMENT DES SIGNAUX AUDIO ET VIDÉO. ULTRAK NE PEUT ÊTRE TENU POUR RESPONSABLE DE L’UTILISATION DE CE PRODUIT EN VIOLATION DES LOIS ET DÉCRETS EN VIGUEUR.
  • Seite 24: Generalites

    Ce manuel décrit comment régler et utiliser la caméra KC4300E. INSTALLATION L ‘installation de la KC4300E doit être faite par du personnel qualifié en accord avec tous les codes locaux et nationaux en matière d’électricité et de mécanique. Suivre les indications suivantes pour installer la caméra.
  • Seite 25 FIGURE 1. CAMERA KC4300E Français...
  • Seite 26: Reglage D'objectif Manuel

    Le support de montage doit être fixé sur un mur ou un plafond capable de supporter le poids de la caméra et du support. C. L a caméra KC4300E possède un trou de fixation fileté sur le dessus et le dessous pour permettre un montage par dessus ou dessous.
  • Seite 27: Installation Et Reglages Des Objectifs Dc

    Régler la commande de niveau comme indiqué en E. INSTALLATION ET RÉGLAGES DES OBJECTIFS DC La caméra KC4300E supporte les objectifs à iris DC. Suivre les étapes suivantes pour installer et régler les objectifs à diaphragme de type DC. Français...
  • Seite 28 Visser l’objectif sur la monture de la caméra. Souder le câble de commande à la fiche mini DIN fournie avec la caméra. Broche Couleur Bobine frein - Bleu Bobine frein + Rouge Bobine Blanc excitation + Bobine Vert excitation - Bobine frein + Bobine frein - Bobine excitation +...
  • Seite 29: Reglage Du Tirage Optique

    RÉGLAGE DU TIRAGE OPTIQUE Pour de meilleurs résultats, régler le tirage optique le soir ou en utilisant un filtre #6 or #8 devant l’objectif. La focalisation de la caméra change complètement si la scène est très éclairée, puis devient sombre . Toutefois, la caméra restera focalisée si l’objectif a été...
  • Seite 30: Recherche De Defauts

    SECTION 2 MAINTENANCE ET DEPANNAGE RECHERCHE DE DÉFAUTS Si des problèmes apparaissent, vérifier l’installation de la caméra avec les instructions de ce manuel et ceux des autres équipements. Isoler le problème à un appareil du système et se référer au mode d’emploi de celui-ci pour de plus amples informations.
  • Seite 31: Specifications

    SPECIFICATIONS Dimensions (LxHxP) 58 x 52 x 123 mm (2.3 x 2.0 x 4.8 in) Alimentation 230V ac +/- 10%, 50Hz +/- 1Hz Consommation électrique 3.5W (3.75W max avec auto iris) Capteur d’image Capteur CCD 1/3 (4.9mm H x 3.7mm V) Système de balayage 2:1 entrelacé...
  • Seite 32: Imformazioni Importanti & Attenzione

    CONTROLLARE E ACCETTARE TUTTE LE LEGGI FEDERALI, SATALI E LOCALI, E GLI STATUTI REALTIVI AL MONITORAGGIO E REGISTRAZIONE DI SEGNALI VIDEO E AUDIO. ULTRAK NON DOVRA’ ESSERE RITENUTA RESPONSABILE PER L’USO DI QUESTO PRODOTTO IN VIOLAZIONE DELLE LEGGI E REGOLAMENTI VIGENTI. Italiano...
  • Seite 33: Introduzione

    SEZIONE 1 KC4300E TELECAMERA CCD B/N INTRODUZIONE La telecamera B/N CCD KC4300E rappresenta un soluzione a basso costo per le applicazioni di sorveglianza e TVCC . Caratteristiche principali della K-350CLL: • CCD 1/3” a trasferimento di linea • Compatibilità con ottiche CS o C-mount •...
  • Seite 34 FIGURA 1. KC4300E Italiano...
  • Seite 35: Regolazione Degli Obiettivi Manuali

    C. La telecamera KC4300E ha due prese filettate per il fissaggio, una sulla parte superiore e l’altra su quella inferiore dell’involucro. Il passo della filettatura è ¼”-20 UNC.
  • Seite 36 dei vari terminali. I colori più utilizzati per i fili di collegamento sono il rosso, bianco e nero. Nome Color del filo Voltaggio + Rosso Video Bianco Massa Nero C. Posizionare il selettore EI posto sul retro della telecamera su OFF D.
  • Seite 37: Installazione Delle Ottiche Autoiris Nd

    INSTALLAZIONE DELLE OTTICHE AUTOIRIS ND La telecamera KC4300E è compatibile con gli obiettivi autoiris No Drive. Attenersi ai passi indicati di seguito per installare e regolare un obiettivo autoiris ND. A. Montare l’ottica DC direttamente sull’innesto posto sul frontale della telecamera B.
  • Seite 38: Regolazione Del Fuoco Meccanico

    REGOLAZIONE DEL FUOCO MECCANICO Per ottenere i migliori risultati regolare il fuoco meccanico durante le ore serali oppure utilizzando un filtro grigio #6 o #8 davanti all’obiettivo. Il fuoco della telecamera varierà leggermente se l’iris dell’obiettivo era regolato sulla scena luminosa, sarà allora necessario regolarlo per una scena scura.
  • Seite 39: Malfunzionamenti

    SEZIONE 2 MALFUNZIONAMENTI E MANUTENZIONE MALFUNZIONAMENTI Se si verificano dei problemi, controllare che l’installazione della telecamera sia avvenuta in modo conforme a quanto indicato nel presente manuale e in quello degli altri apparati ai quali è collegata. Identificare l’apparato dell’impianto con il quale ci sono problemi e riferirsi al relativo manuale istruzioni per maggiori informazioni.
  • Seite 40: Specifiche Tecniche

    SPECIFICHE TECNICHE Dimensioni (LxHxP) 58x52x123 mm Alimentazione 24Vca ± 10%, 50Hz ± 1Hz Consumo 3.5 W (3.75W max. obiettivi autoiris) Sensore CCD 1/3” dimensioni 4.9mmH x 3.7mmV Sistema di Scansione Interlaccio 2:1 Frequenza di scansione 15.625 Khz (H), 50 Hz (V) Sincronizzazione Line Lock Risoluzione...

Inhaltsverzeichnis