Herunterladen Inhalt Inhalt Diese Seite drucken

Werbung

Verfügbare Sprachen
  • DE

Verfügbare Sprachen

  • DEUTSCH, seite 1

Werbung

Inhaltsverzeichnis
loading

Inhaltszusammenfassung für PATONA 216ARC

  • Seite 2: Produktmerkmale

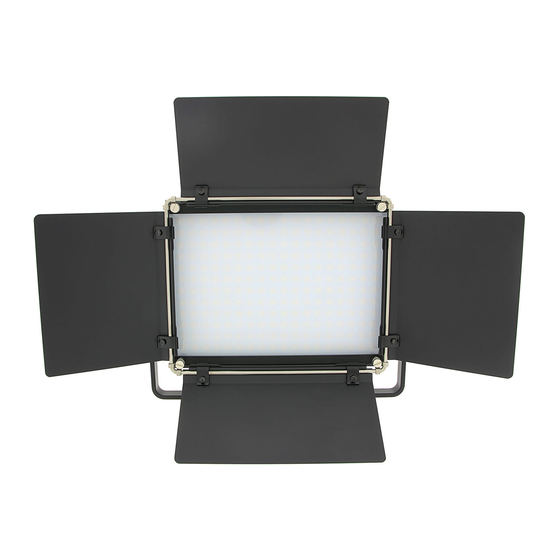
    DE | Photo / Video LED 216ARC RGB Produktmerkmale • Helligkeit bis zu 1200 LUX • Stufenlos dimmbar • 216 RGB-WW LEDs 5050 • Farbtemperatur von 2500K bis 8500K • 1.77 Zoll TFT Farbdisplay • Integrierte Abschirmklappen • Betrieb über SON NP-F Akkus oder DC-Eingang •...
  • Seite 3: Bedienung

    » Betrieb mit externer Stromversorgung 1. Schließen Sie einen passenden Adapter (14V 3A) am DC-Eingang der Fotoleuchte an. 2. Verbinden Sie den Adapter mit einer geeigneten Stromquelle. 3. Stellen Sie den Netzschalter an der Fotoleuchte auf "II". 4. Das LCD leuchtet auf, die Fotoleuchte ist betriebsbereit. »...
  • Seite 4 Farbtemperatur einstellen: Drücken Sie die Taste Fn2, um den Parameter für die Farbtemperatur (COLOR TEMPERATURE) auszuwählen. Verwenden Sie dann den Regler SET, um die Farbtemperatur einzustellen. » Farblicht (HSI) Aktivieren: Wechseln Sie mit der Taste MODE in den Modus COLOR LIGHT HSI. Helligkeit einstellen: Drücken Sie die Taste DIM/Fn1, um den Parameter für die Helligkeit (BRIGHTNESS) auszuwählen.
  • Seite 5: Die Fernbedienung

    Umgebungsfeuchtigkeit max. 20 – 90% Umgebungstemperatur max. 0 – 35°C Lagertemperatur max. -10 – 50°C Gewicht, Größe ca. 1200g, 219 × 170 × 31.4mm Die Fernbedienung » Verbinden der Fernbedienung mit dem Fotolicht Um die Fernbedienung nutzen zu können ist es nötig, das Kanal, Gruppe und ID auf der Fernbedie- nung und dem Fotolicht gleich eingestellt sind.
  • Seite 6: Warnhinweise

    4. Szenenmodus 12. 6500K Farbtemperatur 5. Weißlichtmodus (CCT) 13. Shortcuts für Farbeinstellungen 6. Farblichtmodus (HSI) 14. Gruppenauwahl 7. DIM-Funktion (+) 15. Batteriefachabdeckung 8. DIM-Funktion (-) 16. Batteriefach » Nutzung der Fernbedienung Einschalten/Ausschalten: Drücken Sie die Taste "1", um die Fernbedienung ein- oder auszuschalten. Fernbedienung mit Fotolicht verbinden: Wenn die Fernbedienung eingeschaltet ist, drücken Sie auf die Taste (3) um den 2.4G Modus aufzuru- fen.
  • Seite 7 • Das Fotolicht und sein Zubehör ist kein Kinderspielzeug. • Achten Sie darauf, das Fotolicht nach der Nutzung auszuschalten. Trennen Sie es von der Strom- quelle bzw. entfernen Sie die Akkus. • Lassen Sie das Fotolicht nach dem Gebrauch abkühlen, bevor Sie es verpacken oder abbauen. •...
  • Seite 8: Product Features

    EN | Photo / Video LED 216ARC RGB Product Features • Brightness up to 1200 LUX • • 216 RGB WW LEDs 5050 • Color temperature from 2500K to 8500K • 1.77 inch TFT color display • Integrated barndoors • Operation via SON NP-F batteries or DC input •...
  • Seite 9 1. Connect a suitable adapter (14V 3A) to the DC input of the photo light. 2. Connect the adapter to an appropriate power source. 3. Set the power switch on the photo light to "II". 4. The LCD lights up, the photo light is ready to use. »...
  • Seite 10 » Color light (HSI) Activate: Switch to COLOR LIGHT HSI mode with the MODE button. Adjust brightness: Press the DIM/Fn1 button to select the BRIGHTNESS parameter. Then use the SET knob to adjust the brightness. Adjust saturation: Press the Fn2 button to select the SATURATION parameter. Then use the SET knob to adjust the saturation.
  • Seite 11: The Remote Control

    The Remote Control » Connect the remote control to the photo light In order to be able to use the remote control, it is necessary for the channel, group and ID to be set the same on the remote control and the photo light. You can control multiple photo lights with one remote control.
  • Seite 12 » Using the remote control Turn ON/OFF: Press the power button "1" to turn the remote on or off. Connect remote control to photo light: When the remote control is on, press button (3) to enter 2.4G mode. You can set the values for CH, GR and ID using the direction buttons (9).
  • Seite 13 - 12 -...
  • Seite 14: Caractéristiques Du Produit

    FR | Photo / Video LED 216ARC RGB Caractéristiques du produit • Luminosité jusqu'à 1200 LUX • Intensité variable • 216 LED RGB WW 5050 • Température de couleur de 2500K à 8500K • Écran couleur TFT de 1,77 pouces •...
  • Seite 15 » Fonctionnement avec alimentation externe 1. Connectez un adaptateur approprié (14V 3A) à l'entrée DC de la lampe photo. 2. Connectez l'adaptateur à une source d'alimentation appropriée. 3. Réglez l'interrupteur d'alimentation de la lampe photo sur "II". 4. L'écran LCD s'allume, la lampe photo est prête à l'emploi. »...
  • Seite 16 Appuyez sur le bouton DIM/Fn1 pour sélectionner le paramètre BRIGHTNESS. Utilisez ensuite le bouton SET pour régler la luminosité. Régler la température de couleur : Appuyez sur la touche Fn2 pour sélectionner le paramètre de température de couleur (COLOR TEM- PERATURE).
  • Seite 17 Source de courant 2x SON NP-F ou alimentation DC 15V 3A Connexions Connecteur DC 5,5 mm x 2,5 mm (positif et négatif à l'extérieur) Humidité ambiante max. 20 - 90% Température ambiante max. 0 – 35°C Température de stockage max. -10 – 50°C Poids et taille environ.
  • Seite 18 10. Température de couleur 5600K 3. mode 2.4G 11. Température de couleur 3200K 4. Mode scène 12. Température de couleur 6500K 5. Mode lumière blanche (CCT) 13. Raccourcis pour les paramètres de couleur 6. Mode lumière couleur (HSI) 14. Sélection de groupe 7.
  • Seite 19 • • La lampe photo et ses accessoires ne sont pas des jouets pour enfants. • Assurez-vous d'éteindre la lampe photo après utilisation. Débranchez de la source d'alimentation ou retirez les piles. • Après utilisation, laissez la lampe photo refroidir avant de l'emballer ou de la démonter. •...
  • Seite 20 ES | Photo / Video LED 216ARC RGB Características del producto • Brillo hasta 1200 LUX • • 216 LED RGB WW 5050 • Temperatura de color de 2500K a 8500K • Pantalla a color TFT de 1,77 pulgadas • Aletas de luz integradas •...
  • Seite 21 » Funcionamiento con fuente de alimentación externa 2. Conecte el adaptador a una fuente de alimentación adecuada. » Apague la luz de la foto 1. Coloque el interruptor de encendido en "0". 2. La luz de la foto se apaga. Uso de la luz de la foto 1 WLAN (Icon) e ID.
  • Seite 22 Establecer temperatura de color: Presione el botón Fn2 para seleccionar el parámetro de temperatura de color (TEMPERATURA DE COLOR). Luego use la perilla SET para ajustar la temperatura del color. » Luz de color (HSI) Activar: Cambie al modo COLOR LIGHT HSI con el botón MODE. Ajustar brillo: Presione el botón DIM/Fn1 para seleccionar el parámetro BRIGHTNESS.
  • Seite 23: El Control Remoto

    Humedad ambiental máx. 20 - 90% Temperatura ambiente máx. 0 – 35°C Temperatura de almacena- máx. -10 – 50°C miento Peso y tamaño aprox. 1200 g, 219 × 170 × 31,4 mm El control remoto » Conecte el control remoto a la luz de la foto Activar: Enciende la luz de la foto y presiona el botón con el ícono WiFi.
  • Seite 24 4. Modo de escena 12 Temperatura de color de 6500K 5. Modo de luz blanca (CCT) color 6. Modo de luz de color (HSI) 14. Selección de grupo 7. Función DIM (+) 15. Tapa del compartimento de las pilas 8. Función DIM (-) 16.
  • Seite 25 • La lámpara para fotos y sus accesorios no son juguetes para niños. • Asegúrese de apagar la luz de la foto después de su uso. Desconecte de la fuente de alimentación o retire las baterías. • Después de su uso, deje que la luz de la foto se enfríe antes de empaquetarla o desmontarla. •...
  • Seite 26: Caratteristiche Del Prodotto

    IT | Photo / Video LED 216ARC RGB Caratteristiche del prodotto • • • 216 LED RGB WW 5050 • Temperatura colore da 2500K a 8500K • Display a colori TFT da 1,77 pollici • Alette di luce integrate • Funzionamento tramite batterie SON NP-F o ingresso CC •...
  • Seite 27 » Funzionamento con alimentazione esterna 2. Collegare l'adattatore a una fonte di alimentazione appropriata. » Spegnere la luce della foto 1. Impostare l'interruttore di alimentazione su "0". 2. La luce della foto si spegne. 1 WLAN (Icon) Premere questo pulsante per accedere alle impostazioni Canale (CH), Gruppo (GR) e ID.
  • Seite 28 Imposta la temperatura del colore: Premere il tasto Fn2 per selezionare il parametro della temperatura colore (TEMPERATURA COLO- RE). Quindi utilizzare la manopola SET per regolare la temperatura del colore. » Luce colorata (HSI) Attivare: Passare alla modalità COLOR LIGHT HSI con il pulsante MODE. Regola la luminosità: Premere il pulsante DIM/Fn1 per selezionare il parametro BRIGHTNESS.
  • Seite 29 Temperatura ambiente max. 0 – 35°C Temperatura di conserva- max. -10 – 50°C zione Peso e dimensioni ca. 1200 g, 219 × 170 × 31,4 mm Il controllo remoto » Per poter utilizzare il telecomando, è necessario che il canale, il gruppo e l'ID siano impostati uguali Attivare: Accendi la luce foto e premi il pulsante con l'icona Wi-Fi.
  • Seite 30 5. Modalità luce bianca (CCT) 13. Scorciatoie per le impostazioni del colore 6. Modalità luce colorata (HSI) 14. Selezione del gruppo 7. Funzione DIM (+) 15. Coperchio vano batteria 8. Funzione DIM (-) 16. Vano batteria » Usando il telecomando Accendi / spegni: Premere il pulsante di accensione "1"...
  • Seite 31 vere le batterie. • • • Prestare attenzione ai valori di tensione corretti quando si utilizza un alimentatore. • Prestare attenzione alla compatibilità quando si utilizzano batterie ricaricabili. Utilizzare solo batterie ricaricabili del tipo SON NP-F. - 30 -...
  • Seite 32: Producteigenschappen

    NL | Photo / Video LED 216ARC RGB Producteigenschappen • Helderheid tot 1200 LUX • Traploos dimbaar • 216 RGB WW-leds 5050 • Temperatuur van 2500K tot 8500K • 1,77 inch TFT-kleurendisplay • Geïntegreerde vleugeldeuren • Bediening via SON NP-F-batterijen van DC-ingang •...
  • Seite 33: Licht Selectie

    » Werking met externe voeding 1. Sluit een geschikte adapter (14V 3A) aan op de DC-ingang van de fotolamp. 2. Sluit de adapter aan op een geschikte voedingsbron. 3. Zet de aan/uit-schakelaar van de fotolamp op "II". 4. Het LCD-scherm licht op, de fotolamp is klaar voor gebruik. »...
  • Seite 34 Kleurtemperatuur instellen: Druk op de Fn2-knop om de parameter KLEURTEMPERATUUR te selecteren. Gebruik vervolgens de SET-knop om de kleurtemperatuur aan te passen. » Gekleurd licht (HSI) Activeren: Schakel over naar COLOR LIGHT HSI-modus met de MODE-knop. Helderheid aanpassen: Druk op de DIM/Fn1-knop om de BRIGHTNESS-parameter te selecteren. Gebruik vervolgens de SET-knop om de helderheid aan te passen.
  • Seite 35 Omgevingstemperatuur max. 0 - 35 °C Bewaar temperatuur max. -10 - 50 °C Gewicht en hoogte ca. 1200 g, 219 × 170 × 31,4 mm De afstandsbediening » Sluit de afstandsbediening aan op de fotolamp Om de afstandsbediening te kunnen gebruiken, is het noodzakelijk dat het kanaal, de groep en de ID hetzelfde zijn ingesteld op de afstandsbediening en de fotolamp.
  • Seite 36: Waarschuwingen

    5. Witlichtmodus (CCT) 13. Sneltoetsen voor kleurinstellingen 6. Kleurlichtmodus (HSI) 14. Groepsselectie 7. DIM-functie (+) 15. Deksel van het batterijcompartiment 8. DIM-functie (-) 16. Batterijcompartiment » Gebruik van de afstandsbediening Aanzetten uitzetten: Druk op de knop "1" om de afstandsbediening in of uit te schakelen. Sluit de afstandsbediening aan op de fotolamp: Als de afstandsbediening is ingeschakeld, drukt u op knop (3) om de 2.4G-modus te openen.
  • Seite 37 • Demonteer en/of wijzig de fotolamp niet. • Let bij het gebruik van een voeding op de juiste spanningswaarden. • Let bij het gebruik van oplaadbare batterijen op de compatibiliteit. Gebruik alleen oplaadbare batteri- jen van het type SON NP-F. - 36 -...
  • Seite 38 SV | Photo / Video LED 216ARC RGB Produktfunktioner • Ljusstyrka upp till 1200 LUX • Oändligt dimbar • 216 RGB WW lysdioder 5050 • Färgtemperatur från 2500K till 8500K • 1,77 tum TFT färgskärm • Integrerade gångjärnsdörrar • Drift via SON NP-F-batterier eller DC-ingång •...
  • Seite 39 » Drift med extern strömförsörjning 1. Anslut en lämplig adapter (14V 3A) till fotolampans DC-ingång. 2. Anslut adaptern till en lämplig strömkälla. 3. Ställ strömbrytaren för fotolampan på "II". 4. LCD-skärmen tänds, fotolampan är redo att användas. » Stäng av fotoljuset 1.
  • Seite 40 Använd sedan knappen SET för att justera färgtemperaturen. » Färgat ljus (HSI) Aktivera: Växla till COLOR LIGHT HSI-läge med MODE-knappen. Justera ljusstyrkan: Tryck på knappen DIM/Fn1 för att välja parametern LJUSSTYRKA. Använd sedan SET-knappen för att justera ljusstyrkan. Justera mättnad: Tryck på...
  • Seite 41 Vikt och längd ca 1200g, 219 × 170 × 31,4 mm Fjärrkontrollen » Ansluter fjärrkontrollen till fotolampan För att kunna använda fjärrkontrollen krävs att kanal, grupp och ID ställs in likadant på fjärrkontrollen välja respektive fotoljus. Aktivera: Slå på fotolampan och tryck på knappen med WiFi-ikonen. Ställ in kanal: Tryck på...
  • Seite 42 7. DIM-funktion (+) 15. Batterilucka 8. DIM-funktion (-) 16. Batterifack » Användning av fjärrkontrollen Slå på stänga av: Tryck på "1"-knappen för att slå på eller stänga av fjärrkontrollen. Anslut fjärrkontrollen till fotolampan: När fjärrkontrollen är på, tryck på knappen (3) för att gå in i 2.4G-läget. Du kan ställa in värdena för CH, GR och ID med hjälp av riktningsknapparna (9).
  • Seite 43 - 42 -...
  • Seite 44: Vlastnosti Produktu

    CS | Photo / Video LED 216ARC RGB Vlastnosti produktu • • Plynule stmívatelné • 216 RGB WW LED 5050 • Teplota barev od 2500K do 8500K • 1,77palcový barevný TFT displej • • • • 1. Difuzor 2. LED panel 10.
  • Seite 45 » Provoz s externím napájením » 1 WLAN (Icon) 2 MODE 3 DIM/Fn1 4 Fn2 5 Fn3 6 SET 7 POWER 8 DC » Aktivovat: Upravit jas: Nastavit teplotu barev: - 44 -...
  • Seite 46 » Aktivovat: Upravit jas: Upravit sytost: Nastavit odstín: » Aktivovat: Upravit jas: Vyberte scénu: LED diody Výkon 40W max >95 Studená bílá C max. 1000lx/1m 2500K Teplá bílá W max. 1200lx/1m 8500K Rozsah stmívání 0–100 % >120° 1 kus 4 kusy 0-180° Baterie dálkového ovládání...
  • Seite 47: Dálkové Ovládání

    Hmotnost a velikost Cca. 1200 g, 219 × 170 × 31,4 mm Dálkové ovládání » Aktivovat: Nastavit kanál: Nastavit skupinu: ID sady: » 1.ON/OFF 2. Displej 10. Barevná teplota 5600K 11. Barevná teplota 3200K 12. Barevná teplota 6500K 13. Zkratky pro nastavení barev 7.
  • Seite 48 Zapnout/vypnout: nastavit teplotu barev (2500K - 8500K). nastavit sytost barev a rozsah barev. Nastavení jasu: Nastavení skupiny: Nastavení teploty barev: zkratky: Varování • • • • • • • baterie. • • • • SON NP-F. - 47 -...
  • Seite 49 - 48 -...
  • Seite 50: Cechy Produktu

    PL | Photo / Video LED 216ARC RGB Cechy produktu • • • 216 diod LED RGB WW 5050 • Temperatura barwowa od 2500K do 8500K • • • • 43 kreatywne ustawienia scen • W tym pilot zdalnego sterowania 1.
  • Seite 51 » » 1 WLAN (Icon) 2 MODE SCENE FX. 3 DIM/Fn1 4 Fn2 5 Fn3 6 SET 7 POWER 8 DC KOLOROWE > SCENA.) » Aktywuj: - 50 -...
  • Seite 52 » Aktywuj: Dostosuj nasycenie: » Aktywuj: Diody LED RGB-WW LED 216 sztuk 5w1 (0,5W × 5) maks. 40W >95 Zimna biel C max. 1000lx/1m 2500K max. 1200lx/1m 8500K 0-100% >120° 4 sztuki 0-180° Baterie do pilota 2x 1,5 V AAA Zasilacz 2x SON NP-F lub zasilacz DC 15V 3A max.
  • Seite 53 Waga i rozmiar Pilot » Aktywuj: Grupa zestawów: Ustaw ID: » 10. Temperatura barwowa 5600 K 3. Tryb 2.4G 11. Temperatura barwowa 3200 K 4. Tryb sceny 12. Temperatura barwowa 6500 K 14. Wybór grupy - 52 -...
  • Seite 54 15. Pokrywa komory baterii 8. Funkcja DIM (-) 16. Komora baterii » Korzystanie z pilota padku fotokomórki. Efekty trybu sceny: Ustawienia grupy: Ustawienia temperatury barwowej: Skróty: • • • • pogorszenie widzenia. • • • • • • - 53 -...
  • Seite 55 • torów typu SON NP-F. - 54 -...
  • Seite 56: Pregled Proizvoda

    HR | Photo / Video LED 216ARC RGB • Svjetlina do 1200 LUX • • 216 RGB WW LED dioda 5050 • Temperatura boje od 2500K do 8500K • • Integrirani svjetlosni zaklopci • Rad preko SON NP-F baterija ili DC ulaza •...
  • Seite 57 » Rad s vanjskim napajanjem » 2. Foto svjetlo se gasi. Korištenje foto svjetla 1 WLAN (Icon) Pritisnite ovaj gumb za ulazak u postavke kanala (CH), grupe (GR) i ID-a. 2 MODE 3 DIM/Fn1 4 Fn2 5 Fn3 6 SET 7 POWER 8 DC Izbor svjetla...
  • Seite 58 » Svjetlo u boji (HSI) Aktivirati: Podesite svjetlinu: Pritisnite tipku DIM/Fn1 za odabir parametra SVJETLINA. Pritisnite tipku Fn2 za odabir parametra SATURATION. Postavi nijansu: Pritisnite tipku Fn3 za odabir parametra HUE TONE/COLOR. » Svjetlo scene (FX) Aktivirati: Podesite svjetlinu: Pritisnite tipku DIM/Fn1 za odabir parametra SVJETLINA. Odaberite scenu: Pritisnite tipku Fn2 za odabir parametra za scenu (SCENE).
  • Seite 59 cca. 1200 g, 219 × 170 × 31,4 mm » Aktivirati: Postavi kanal: Pritisnite tipku DIM/FN1 za odabir parametra za CH. Postavi grupu: Pritisnite tipku Fn2 za odabir parametra za GR. Postavi ID: Pritisnite tipku Fn3 za odabir parametra za ID. »...
  • Seite 60 7. DIM funkcija (+) 15. Poklopac pretinca za baterije 8. DIM funkcija (-) 16. Pretinac za baterije » svjetlu. (2500K - 8500K) tipkama za smjer (9). Postavke svjetline: Postavke grupe: Postavke temperature boje: Upozorenja • • • • • Ne postavljajte fotosvjetlo blizu zapaljivih predmeta, plinova ili drugih zapaljivih tvari. •...
  • Seite 61 - 60 -...
  • Seite 62 SR | Photo / Video LED 216ARC RGB • • • • • • • • • » - 61 -...
  • Seite 63 » » > COLOR LIGHT > SCENE). » - 62 -...
  • Seite 64 » » >95 0-100% >120° - 63 -...
  • Seite 65 » » - 64 -...
  • Seite 66 » • • • • • • • - 65 -...
  • Seite 67 • • • • - 66 -...
  • Seite 68 Version: 28042022 PATONA International S.L.U. Untere Giesswiesen 17, 78247 Hilzingen, Germany Made in China...

Inhaltsverzeichnis