Inhaltsverzeichnis
Werbung
Verfügbare Sprachen
Verfügbare Sprachen
Quicklinks
Werbung
Inhaltsverzeichnis

Verwandte Anleitungen für Celestron NexStar 102SLT


Inhaltszusammenfassung für Celestron NexStar 102SLT
- Seite 1 MAKSUTOV-CASSEGRAIN INSTRUCTION MANUAL #23090...
-
Seite 2: Inhaltsverzeichnis
Table of Contents Introduction What’s in the Box Assembly and Setup Celestial Observing Telescope Maintenance Appendix A: Technical Specifications Celestron Two Year Limited Warranty... -
Seite 3: Introduction
INTRODUCTION Congratulations on your purchase of the Celestron NexStar SLT telescope- the perfect combination of power and portability This “Star Locating Telescope” (SLT) features innovative automated technologies that make navigating the night sky as easy as pressing a few buttons In fact, you can have your NexStar SLT up and running after locating just three bright... -
Seite 4: What's In The Box
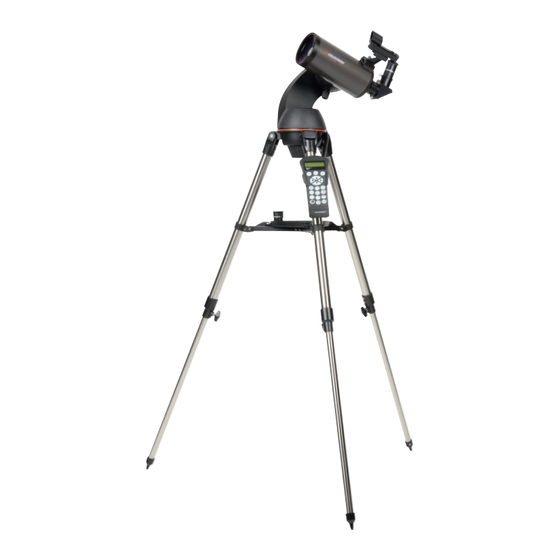
WHAT’S IN THE BOX Corrector Lens Fork Arm Battery Compartment Tripod Coupling Screw Tripod Accessory Tray Tripod Leg Extension Clamp Telescope Optical Tube StarPointer Finderscope Eyepiece Star Diagonal Hand Control PARTS LIST Optical Tube Assembly 1 25” Star Diagonal 25mm and 9mm Eyepieces – 1 25” StarPointer Finderscope and Mounting Bracket Tripod Deluxe Accessory Tray... -
Seite 5: Assembly And Setup
ASSEMBLY AND SETUP Your NexStar SLT comes in three major sections: the optical tube, the fork arm and the tripod These sections can be attached in seconds using the quick release coupling screw located under the tripod mounting platform and the dovetail mounting clamp located on the inside of the fork arm To begin, remove all of the accessories from their individual boxes Remember to save all of the containers so that they can be used to transport the telescope Before attaching the visual accessories, the telescope tube should be mounted to its tripod First, install the accessory tray onto the tripod legs:... - Seite 6 ATTACHING THE FORK ARM TO THE TRIPOD With the tripod properly assembled, the telescope tube and fork arm can easily be attached using the quick Fork Arm Base release coupling screw located underneath the tripod mounting platform To do this: Tripod Mounting 1 Place the fork arm base inside the tripod mounting platform Platform...
- Seite 7 THE EYEPIECE The eyepiece is the optical element that magnifies the image focused by the telescope The eyepiece fits directly Finderscope into the star diagonal To install the eyepiece: 1 Loosen the thumbscrew on the star diagonal so it does not obstruct the inner diameter of the eyepiece end of the diagonal Remove the protective dust cap from the star diagonal’s barrel...
-
Seite 8: The Starpointer Finderscope
THE STARPOINTER FINDERSCOPE The StarPointer is the quickest and easiest way to point your telescope exactly at a desired object in the sky It’s like having a laser pointer that you can shine directly onto the night sky The StarPointer is a zero magnification pointing tool that uses a coated glass window to superimpose the image of a small red dot onto the night sky While keeping both eyes open when looking through the StarPointer, simply move your telescope until the red dot, seen through the StarPointer, merges with the object as seen with your unaided eye The red dot is produced by a... - Seite 9 POWERING THE NEXSTAR SLT The NexStar SLT can be powered by 8 user-supplied AA size alkaline batteries or an optional 12V AC adapter To install batteries into the NexStar SLT: 1 Squeeze the tabs on both sides of the battery compartment cover while lifting upward 2 Insert 8 AA batteries into battery compartment holders 3 Place the battery compartment cover over the batteries and...
- Seite 10 6. MENU: Displays setup and utilities functions, such as tracking rate, user-defined objects, and others. 7. OPTION (CELESTRON LOGO): Works similar to the SHIFT key on a keyboard and can be used in combination with other keys to access more advanced features and functions to be added with later firmware updates.
- Seite 11 ENGLISH...
-
Seite 12: Calculating Magnification
Let’s say, for example, you are using the 25mm eyepiece To determine the magnification you simply divide the focal length of your telescope (for example, the NexStar 102SLT MAK has a focal length of 1325mm) by the focal length of the... -
Seite 13: Celestial Observing
See the “Seeing Conditions” section later in this manual (page12) • To increase contrast and bring out detail on the planetary surface, try using Celestron eyepiece filters I 11 ENGLISH... -
Seite 14: Observing The Sun
OBSERVING THE SUN Although overlooked by many amateur astronomers, solar observation is both rewarding and fun However, because the Sun is so bright, special precautions must be taken when observing our star so as not to damage your eyes or your telescope Use an approved solar filter that covers the entire objective opening Always remove your StarPointer finderscope when viewing the Sun Never project an image of the Sun through the telescope Tremendous heat build-up may result inside the optical tube This can damage the telescope and/or any accessories attached to the telescope... -
Seite 15: Telescope Maintenance
NOT sealed, the cover should be placed over the opening when not in use This will prevent contaminants from entering the optical tube Internal adjustments and cleaning should be done only by the Celestron repair department If your telescope is in need of internal cleaning, please call the factory for a return authorization number and price quote... -
Seite 16: Appendix A: Technical Specifications
APPENDIX A: TECHNICAL SPECIFICATIONS OPTICAL Model # 23090 SPECIFICATIONS NexStar 102SLT Optical Design Maksutov-Cassegrain Aperture 102mm Focal Length 1325mm Focal Ratio Optical Coatings SiO2 Highest Useful 241x Magnification Resolution: Rayleigh 1 37 arc seconds Criterion Dawes Limit 1 14 arc seconds... -
Seite 17: Mechanical Specifications
USB cable (not included) from your PC to the port on the bottom of the hand control, and run Celestron Firmware Manager (CFM), available for free from the support section on Celestron com I 15... -
Seite 18: Celestron Two Year Limited Warranty
NOTE: This warranty is valid to U.S.A. and Canadian customers who have purchased this product from an authorized Celestron dealer in the U.S.A. or Canada. Warranty outside the U.S.A. and Canada is valid only to customers who purchased from a Celestron’s International Distributor or Authorized Celestron Dealer in the specific country. Please contact them for any warranty service. - Seite 19 MAKSUTOV-CASSEGRAIN MODE D’EMPLOI #23090...
- Seite 20 Table des matières Introduction Contenu de la boîte Assemblage et installation Observation céleste Maintenance du télescope Annexe A : Caractéristiques techniques Garantie limitée Celestron de deux ans I 18 FRANÇAIS...
-
Seite 21: Introduction
INTRODUCTION Félicitations pour l'achat du télescope NexStar SLT de Celestron - Une combinaison parfaite de puissance et de mobilité Ce « télescope de localisation des étoiles » (SLT) est équipé de technologies d’automatisation innovantes qui permettent la navigation dans le ciel nocturne d’une simple pression sur un bouton En fait, votre télescope SLT sera configuré et prêt à... -
Seite 22: Contenu De La Boîte
CONTENU DE LA BOÎTE Lentille de correction Bras de fourche Compartiment des piles Vis de fixation du trépied Trépied Plateau à accessoires Pince d'extension de pied de trépied Tube optique Lunette de recherche StarPointer Oculaire Diagonale en étoile Contrôle à main LISTE DES PIÈCES Ensemble du tube optique Diagonale de 1,25”... -
Seite 23: Assemblage Et Installation
ASSEMBLAGE ET INSTALLATION Votre NexStar SLT est livré en trois pièces principales : le tube optique, le bras à fourche et le trépied Ces sections peuvent être attachées en l’espace de quelques secondes grâce aux vis de libération rapide situées sous la plateforme de montage du trépied et la pince de montage à... - Seite 24 INSTALLATION DU BRAS DE FOURCHE AU TRÉPIED Après avoir assemblé le trépied, il est aisé d’y attacher le tube du télescope et le bras à fourche à l’aide de la vis Base du bras à fourche à libération rapide située sous la plateforme de montage du trépied Pour faire cela ! Plateforme de montage du trépied...
-
Seite 25: Mise Au Point
OCULAIRE L'oculaire est l'élément optique qui grossit l'image focalisée Chercheur par le télescope L'oculaire s'adapte directement dans le renvoi coudé Pour installer l'oculaire : 1 Desserrez la vis à main de la diagonale de manière à ce qu’elle ne dépasse plus dans la surface intérieure de l’extrémité... - Seite 26 CHERCHEUR STARPOINTER Le StartPointer est la méthode la plus facile et rapide pour pointer votre télescope exactement vers l'objet céleste souhaité C’est un peu comme si vous utilisiez un pointeur laser pour pointer directement dans le ciel nocturne Le StarPointer est un outil de pointage à...
- Seite 27 ALLUMER LE NEXSTAR SLT Le NexStar SLT peut être alimenté par 8 piles alcalines AA vendues séparément ou par un adaptateur secteur CA 12 V Installer les piles dans le NexStar SLT : 1 Pressez les deux onglets de chaque côté du cache du compartiment à...
- Seite 28 6. MENU : Affiche les fonctions de paramétrage et d'utilitaires, tels que taux de pistage et objets définis par l'utilisateur et autres. 7. OPTIONS (LOGO CELESTRON) : Fonctionne comme la touche MAJ sur un clavier, et peut être utilisé en combinaison avec d'autres boutons pour accéder à...
- Seite 29 I 27 FRANÇAIS...
- Seite 30 360 Bien que cela soit le grossissement maximum utile, la majorité de l’observation s’effectuer avec un grossissement compris entre 20 et 35 de puissance pour chaque pouce d’ouverture, qui est de 80 à 140 fois pour le NexStar 102SLT MAK DÉTERMINER LE CHAMP DE VISION Déterminer le champ de vision est important si vous voulez avoir une idée de la taille angulaire de l'objet observé...
-
Seite 31: Observation Céleste
Consultez la section « Conditions d’observation », plus loin dans ce mode d’emploi (à la page 30) • Pour augmenter le contraste, et faire ressortir les détails sur la surface de la Lune, utilisez les filtres d’oculaire optionnels proposés par Celestron I 29 FRANÇAIS... - Seite 32 OBSERVER LE SOLEIL Bien qu'elle soit souvent laissée de côté par bien des astronomes amateurs, l'observation solaire est à la fois gratifiante et divertissante Cependant, à cause de sa luminosité, des précautions doivent être prises lors de l'observation de notre étoile afin d'éviter d'endommager à...
-
Seite 33: Maintenance Du Télescope
Les réglages internes et le nettoyage ne devraient être effectués que par le service de réparation de Celestron Si votre télescope a besoin d'un nettoyage interne, veuillez appeler l'usine pour obtenir un numéro d'autorisation de retour et... -
Seite 34: Annexe A : Caractéristiques Techniques
ANNEXE A : CARACTÉRISTIQUES TECHNIQUES CARACTÉRISTIQUES Modèle # 23090 OPTIQUES NexStar 102SLT Conception optique Maksutov-Cassegrain Ouverture 102mm Distance focale 1325mm Rapport focal Revêtements optiques SiO2 Grossissement 241x maximum utile Résolution : Limites de 1,37 seconde d'arc Rayleigh 1,14 seconde d'arc... -
Seite 35: Caractéristiques Électroniques
USB (non inclus) entre votre PC et le port situé sur le dessous du contrôle à main, et lancez le logiciel Celestron Firmware Manager (CFM), disponible gratuitement depuis la section d’assistance sur Celestron com I 33 FRANÇAIS... -
Seite 36: Garantie Limitée Celestron De Deux Ans
Cette garantie est valable pour les clients américains et canadiens qui ont acheté ce produit auprès d'un revendeur autorisé Celestron aux États-Unis ou au Canada. La garantie en dehors des É.-U. et du Canada n'est valable que pour les clients ayant acheté le produit d'un distributeur international de Celestron ou d'un distributeur agréé dans le pays en question. - Seite 37 MAKSUTOV-CASSEGRAIN BEDIENUNGSANLEITUNG #23090...
- Seite 38 Inhaltsverzeichnis Einleitung Lieferumfang Zusammenbau und Einrichtung Himmelsbeobachtung Pflege des Teleskops Anhang A: Technische Spezifikationen Zweijährige eingeschränkte Garantie von Celestron I 36 DEUTSCH...
-
Seite 39: Einleitung
EINLEITUNG Herzlichen Glückwunsch zum Kauf Ihres NexStar SLT Teleskops von Celestron – die perfekte Kombination von Leistungskraft und Portabilität Dieses „Star Locating Teleskop“ (SLT) bietet innovative automatisierte Technologien, welche die Navigation im Nachthimmel so einfach wie das Anklicken einiger Tasten macht In der Tat ist Ihr NexStar-Teleskop SLT... -
Seite 40: Lieferumfang
LIEFERUMFANG Korrekturlinse Gabelarm Batteriefach Stativ-Verbindungsschraube Stativ Zubehörablage Klemme für Stativbeinverlängerung Teleskop-Okularrohr StarPointer-Sucherfernrohr Okular Zenitspiegel Handsteuerung TEILELISTE Tubenbaugruppe 1,25 Zoll Zenitspiegel 25 mm und 9 mm Okulare – 1,25 Zoll StarPointer-Sucherfernrohr und Montagehalterung Stativ Deluxe-Zubehörablage NexStar+ Handsteuerung Astronomie-Software Download-Karte I 38 DEUTSCH... -
Seite 41: Zusammenbau Und Einrichtung
ZUSAMMENBAU UND EINRICHTUNG Ihr NexStar SLT wird in drei Hauptteilen geliefert: optischer Tubus, Gabelarm und Stativ Diese Teile können in Sekundenschnelle mit Hilfe der Schnellverschluss-Verbindungsschraube unter der Stativ-Montageplattform und der Schwalbenschwanz-Montageklemme im Innern des Gabelarms zusammengesetzt werden Nehmen Sie zu Beginn alle Zubehörteile aus ihren jeweiligen Kartons Heben Sie alle Behälter auf, so dass sie zum Transport des Teleskops zur Verfügung stehen Das Teleskop sollte vor dem Aufsatz der optischen Zubehörelemente auf dem Stativ installiert werden Installieren Sie zuerst die Zubehörablage auf den Stativbeinen:... -
Seite 42: Aufsatz Des Gabelarms Am Stativ
AUFSATZ DES GABELARMS AM STATIV Wenn Stativ richtig zusammengebaut wurde, können der Teleskoptubus und der Gabelarm einfach mit Gabelarmunterteil Hilfe der Schnellverschluss -Verbindungsschraube unter der Stativ-Montageplattform aufgesetzt werden Um dies zu tun: Stativ-Montageplattform 1 Setzen Sie das Gabelarmunterteil ins Innere der Stativ-Montageplattform Verbindungsschraube 2 Drehen Sie die Verbindungsschraube in die Öffnung unten... -
Seite 43: Fokussierung
DAS OKULAR Das Okular ist ein optisches Element, welches das vom Teleskop fokussierte Bild vergrößert Das Okular wird Suchfernrohr direkt in den Zenitspiegel gesteckt Installation des Okulars: 1 Lösen Sie die Rändelschraube am Zenitspiegel, sodass sie nicht den Innendurchmesser des Okularendes des Zenitspiegels behindert Entfernen... -
Seite 44: Starpointer-Sucherfernrohr
STARPOINTER-SUCHERFERNROHR Der StarPointer ist die schnellste und einfachste Methode zur Anvisierung eines gewünschten Himmelsobjekts mit Ihrem Teleskop Man könnte ihn mit einem Laserpointer vergleichen, mit dem man den Nachthimmel direkt anstrahlen kann Der StarPointer ist ein Zeigehilfsmittel mit Null-Vergrößerung, das ein beschichtetes Glasfenster zur Überlagerung des Nachthimmels mit einem kleinen roten Punkt verwendet Schauen Sie mit beiden Augen durch den StarPointer und verschieben Sie das Teleskop so lange, bis der rote Punkt, der durch den StarPointer sichtbar ist, mit dem Objekt zusammentrifft (wie es mit ununterstütztem Auge beobachtet wird) Der rote Punkt wird durch eine LED (Leuchtdiode) -
Seite 45: Energieversorgung Des Nexstar Slt
ENERGIEVERSORGUNG DES NEXSTAR SLT Das NexStar SLT kann mit 8 vom Benutzer bereitgestellten Alkalibatterien der Größe AA oder mit einem optionalen 12-Volt-Wechselstromadapter betrieben werden Einlegen der Batterien in das NexStar SLT: 1 Drücken Sie die Laschen auf beiden Seiten der Batteriefachabdeckung und ziehen Sie sie hoch 2 Legen Sie 8 AA-Batterien in die Batteriefachhalter ein 3 Legen Sie die Batteriefachabdeckung über die Batterien... - Seite 46 Namen sowie die Offset-Entfernungen zu den nächstgelegenen passenden Objekten an. 6. MENÜ: zeigt Setup- und Utilities-Funktionen an, wie z.B. Nachführ- geschwindigkeit und benutzerdefinierte Objekte und viele andere. 7. OPTION (CELESTRON-LOGO): funktioniert ähnlich Umschalttaste auf einer Tastatur und kann in Kombination mit anderen Tasten verwendet werden, um auf erweiterte Merkmale und Funktionen zuzugreifen, die mit zukünftigen Firmware-...
- Seite 47 I 45 DEUTSCH...
-
Seite 48: Berechnung Der Vergrösserung
Angenommen, Sie verwenden das 25-mm-Okular Um die Vergrößerung zu bestimmen, dividieren Sie einfach die Brennweite Ihres Teleskops (zum Beispiel hat das NexStar 102SLT MAK eine Brennweite von 1325 mm) durch die Brennweite des Okulars, nämlich 25 mm Die Division von 1325 durch 25 ergibt eine Vergrößerungskraft von 53 Obwohl die Vergrößerungsleistung variabel ist, hat jedes Gerät unter einem normalen Himmel eine obere Grenze der... -
Seite 49: Himmelsbeobachtung
Wärmestrahlungsquelle, wie z B ein Dach oder Kamin, stehen Nähere Informationen dazu finden Sie unter „Beobachtungsbedingungen“ weiter unten in diesem Handbuch, (Seite 48) • Celestron-Okularfilter können zur Steigerung des Kontrasts und zur besseren Sichtbarmachung von Details auf der Planetenoberfläche verwendet werden I 47... -
Seite 50: Beobachtung Der Sonne
BEOBACHTUNG DER SONNE Obwohl sie oftmals von Amateurastronomen übersehen wird, ist die Sonnenbeobachtung interessant und macht Spaß Wegen der Helligkeit der Sonne müssen jedoch bei der Beobachtung dieses Sterns besondere Vorsichtsmaßnahmen ergriffen werden, um Schäden an Ihren Augen und am Teleskop zu verhindern Verwenden Sie einen zugelassenen Sonnenfilter, der die gesamte Objektivöffnung abdeckt Entfernen Sie beim Betrachten der Sonne stets Ihr StarPointer-Sucherfernrohr Projizieren Sie niemals ein Bild der Sonne durch das Teleskop Im Inneren des optischen Tubus kann sich starke Hitze ansammeln Sie kann das Teleskop und/oder alle am Teleskop aufgesetzten Zubehörelemente beschädigen... -
Seite 51: Pflege Des Teleskops
Auf diese Weise wird verhindert, dass verschmutzende Substanzen in den optischen Tubus eindringen Interne Einstellungen und Reinigungen dürfen nur durch die Reparaturabteilung von Celestron ausgeführt werden Wenn Ihr Teleskop eine interne Reinigung erfordert, rufen Sie das Werk an, um sich eine Rücksende-Genehmigungsnummer geben... -
Seite 52: Anhang A: Technische Spezifikationen
ANHANG A: TECHNISCHE SPEZIFIKATIONEN OPTISCHE Modellnr. 23090 SPEZIFIKATIONEN NexStar 102SLT Optisches Design Maksutov-Cassegrain Blende 102 mm Brennweite 1325 mm Fokalverhältnis Optische Beschichtungen SiO2 Höchste nützliche 241x Vergrößerung Auflösung: Rayleigh- 1,37 Bogensekunde Kriterium Dawes-Grenze 1,14 Bogensekunde Lichtsammelleistung 212x bloßes Auge 53x (25 mm) Okularvergrößerung... -
Seite 53: Firmware Der Handsteuerung Aktualisieren
Montierung Schließen Sie zum Aktualisieren der Firmware einfach ein Mini-USB-Kabel (nicht im Lieferumfang enthalten) von Ihrem PC an den Anschluss auf der Unterseite der Handsteuerung an und starten Sie den Firmware-Manager (CFM) von Celestron, der kostenlos über den Supportbereich unter celestron com erhältlich ist I 51... -
Seite 54: Zweijährige Eingeschränkte Garantie Von Celestron
HINWEIS: Diese Garantie ist für Kunden in den USA und Kanada gültig, die dieses Produkt von einem autorisierten Celestron-Händler in den USA oder Kanada gekauft haben. Eine Garantie außerhalb der USA und Kanada gilt nur für Kunden, die bei einem internationalen Celestron-Vertrieb oder einem autorisierten Celestron-Händler im jeweiligen Land eingekauft haben. Bitte wenden Sie sich für jeden Garantieservice an diese Ansprechpartner. - Seite 55 MAKSUTOV-CASSEGRAIN MANUAL DE INSTRUCCIONES #23090...
- Seite 56 Índice Introducción Contenido de la caja Montaje e instalación Observación celeste Mantenimiento del telescopio Apéndice A: Especificaciones técnicas Garantía limitada por dos años de Celestron I 54 ESPAÑOL...
-
Seite 57: Introducción
INTRODUCCIÓN Felicidades por adquirir el telescopio NexStar SLT de Celestron, la combinación perfecta de potencia y portabilidad Este «Telescopio con localización de estrellas» (SLT) incluye innovadoras tecnologías automatizadas que hacen que navegar por el firmamento nocturno sea tan sencillo como apretar unos botones De hecho, puede tener su NexStar SLT preparado tras localizar solamente tres objetos celestes brillantes Si es nuevo en el mundo de la astronomía, recomendamos que... -
Seite 58: Contenido De La Caja
CONTENIDO DE LA CAJA Lente correctora Brazo de horquilla Compartimiento de baterías Tornillo de fijación del trípode Trípode Bandeja de accesorios Abrazadera de extensión de trípode Tubo óptico del telescopio Localizador StarPointer Ocular Diagonal estelar Mando manual LISTA DE PIEZAS Estructura del tubo óptico Diagonal estelar de 1,25»... -
Seite 59: Montaje E Instalación
MONTAJE E INSTALACIÓN Su NexStar SLT se compone de tres secciones principales: el tubo óptico, el brazo de horquilla y el trípode Estas secciones pueden montarse en segundos usando el tornillo de fijación de liberación rápida situado bajo la plataforma de montaje del trípode y la fijación de montaje machihembrada situada en el interior del brazo en horquilla Para empezar, retire los accesorios de sus cajas Recuerde conservar los recipientes para usarlos para transportar el telescopio Antes de instalar los accesorios visuals, el tubo del telescopio debe montarse en su trípode En primer lugar, instale la bandeja de accesorios... - Seite 60 FIJAR EL BRAZO DE HORQUILLA AL TRÍPODE Con el trípode correctamente montado pueden instalarse fácilmente el tubo dle telescopio y el brazo en horquilla Base del brazo de usando el tornillo del acoplamiento de liberación rápida horquilla situado bajo la plataforma de montaje del trípode Para hacerlo: Plataforma de montaje 1 Coloque la base del brazo en horquilla dentro de la del trípode...
- Seite 61 OCULAR El ocular es el elemento óptico que aumenta la imagen enfocada por el telescopio El ocular encaja directamente en Localizador la diagonal estelar Para instalar el ocular: 1 Afloje el tornillo de la diagonal estelar de forma que no obstruya el diámetro interno del extremo del ocular de la diagonal estelar Retire la tapa protectora del cañón de la diagonal estelar...
-
Seite 62: Localizador Starpointer
LOCALIZADOR STARPOINTER El StarPointer es la forma más rápida y sencilla de apuntar el telescopio exactamente al objeto celeste deseado Es como tener un puntero láser con el que puede apuntar directamente al fimamento nocturno El StarPointer es una herramienta de apuntado con aumento cero que usa una ventana de cristal tratado para imponer la imagen de un pequeño punto rojo en el cielo nocturno Mientras mantenga ambos ojos abiertos al mirar por el StarPointer, mueva el telescopio hasta que el punto rojo, observado por el StarPointer, se funda con el objeto visto por su ojo sin asistencia El punto rojo es producido por... - Seite 63 ALIMENTACIÓN DEL NEXSTAR SLT El NexStar SLT puede alimentarse con 8 baterías AA alcalinas proporcionadas por el usuario o un adaptador CA opcional de 12V Para instalar las baterías en el NexStar SLT: 1 Apriete las pestañas a ambos lados de la tapa del compartimiento de baterías mientras la levanta 2 Introduzca 8 baterías AA en el soporte del compartimiento de baterías...
- Seite 64 6. MENÚ: Muestra funciones de configuración y utilidades, como velocidad de seguimiento, objetos definidos por el usuario y otros. 7. OPCIÓN (LOGO DE CELESTRON): Funciona de forma similar a la tecla SHIFT de un teclado y puede usarse combinada con otras teclas para acceder a funciones más avanzadas y funciones que se añadirán...
- Seite 65 I 63 ESPAÑOL...
-
Seite 66: Recomendaciones Generales De Observación
Digamos, por ejemplo, que usa el ocular de 25mm Para determinar el aumento solamente tiene que dividir la longitud focal de su telescopio (por ejemplo, el NexStar 102SLT MAK tiene una longitud focal de 1325mm) por la longitud focal del ocular, 25mm Dividiendo 1325 por 25 se obiene un aumento de 53 Aunque la potencia es variable, cada instrumento en un cielo medio tiene un límite a su aumento máximo útil La norma... -
Seite 67: Observación Celeste
Consulte la sección «Condiciones de observación más adelante en este manual (página 66) • Para aumentar el contraste y mostrar detalle de la superficie planetaria, use filtros de ocular Celestron I 65 ESPAÑOL... -
Seite 68: Observación Solar
OBSERVACIÓN SOLAR Aunque es ignorada por muchos astrónomos aficionados, la observación solar es satisfactoria y divertida Sin embargo, como el Sol es tan brillante, deben tomarse precauciones especiales al observar nuestra estrella para evitar dañar los ojos o el telescopio Use un filtro solar aprobado que cubra toda la apertura del objetivo Retire siempre su localizador StarPointer cuando observe el Sol No proyecte nunca una imagen del Sol por el telescopio Puede acumularse un calor tremendo dentro del tubo óptico Ésta puede dañar el telescopio y/o los accesorios fijados a éste Recomendaciones de observación solar... -
Seite 69: Mantenimiento Del Telescopio
óptico Los ajustes y limpieza internos solamente deben ser realizados por el departamento de reparaciones de Celestron Si el telescopio necesita limpieza interna, llame a la fábrica para obtener un número de autorización de devolución y... -
Seite 70: Apéndice A: Especificaciones Técnicas
APÉNDICE A: ESPECIFICACIONES TÉCNICAS ESPECIFICACIONES Modelo # 23090 ÓPTICAS NexStar 102SLT Diseño óptico Maksutov-Cassegrain Apertura 102 mm Longitud focal 1325 mm Apertura focal Recubrimiento de ópticas SiO2 Aumento 241x máximo útil Resolución: Límite Dawes de 1,37 arcosegundos criterio Rayleigh 1,14 arcosegundos Capacidad de captura lumínica... - Seite 71 Actualice el firmware del mando manual por USB sin alimentación externa o sin conectar al soporte Para actualizar el firmware, conecte un cable mini USB (no incluido) de su PC al puerto en la parte inferior del mando manual, y ejecute Celestron Firmware Manager (CFM), disponible gratuitamente en la sección de soporte de Celestron com I 69...
-
Seite 72: Garantía Limitada Por Dos Años De Celestron
NOTA: Esta garantía tiene validez para clientes de EE.UU. y Canadá que hayan adquirido este producto en un vendedor autorizado de Celestron en EE.UU. y Canadá. La garantía fuera de EE.UU. y Canadá solamente es válida para clientes que hayan adquirido de un distribuidor internacional de Celestron o un vendedor autorizado de Celestron en el país en cuestión. Contacte con ellos para obtener servicio de garantía. - Seite 73 MAKSUTOV-CASSEGRAIN MANUALE DI ISTRUZIONI #23090...
- Seite 74 Indice Introduzione Contenuto della confezione Montaggio e configurazione Osservazione celeste Manutenzione del telescopio Appendice A: Specifiche tecniche Garanzia limitata di due anni Celestron I 72 ITALIANO...
-
Seite 75: Introduzione
INTRODUZIONE Congratulazioni per l'acquisto del telescopio NexStar SLT Celestron, la combinazione perfetta di potenza e e trasportabilità Questo "telescopio per la localizzazione dei stelle" (“Star Locating Telescope” - SLT) vanta innovative tecnologie automatiche che rendono la navigazione nel cielo notturno facile come premere un paio di tasti In effetti, è possibile assemblare e mettere in funzione il NexStar STL dopo aver localizzato appena tre oggetti celesti In caso non si sia esperti di astronomia, è... -
Seite 76: Contenuto Della Confezione
CONTENUTO DELLA CONFEZIONE Lenti del correttore Braccio a forcella Vano batterie Vite di accoppiamento del treppiede Treppiede Vassoio portaccessori Morsetto di estensione delle gambe del treppiede Tubo ottico del telescopio Cercatore StarPointer Oculare Diagonale stellare Comando manuale ELENCO COMPONENTI Gruppo tubo ottico Diagonale stellare 1,25'' Oculari da 25mm e 9mm –... -
Seite 77: Montaggio E Configurazione
MONTAGGIO E CONFIGURAZIONE Il NexStar SLT viene fornito in tre sezioni principali: il tubo ottico, il braccio a forcella e il treppiede Tali sezioni possono essere collegate in qualche secondo utilizzando la vite di accoppiamento ad attacco rapido situata al di sotto della piattaforma di montaggio del treppiede e il morsetto di montaggio a coda di rondine posto all'interno del braccio a forcella Per iniziare, rimuovere tutti gli accessori dalle relative confezioni Ricordare di conservare tutti i contenitori in modo da poterli utilizzare per trasportare il telescopio Prima di collegare gli accessori visivi, è... - Seite 78 FISSAGGIO DEL BRACCIO A FORCELLA AL TREPPIEDE Con il treppiede montato correttamente, il tubo del telesco- pio e il braccio a forcella possono essere collegati facilmen- Base del braccio a te utilizzando la vite di accoppiamento ad attacco rapido forcella posizionata sotto la piattaforma di montaggio del treppiede Per fare questo: Piattaforma di...
-
Seite 79: Messa A Fuoco
L'OCULARE L'oculare è l'elemento ottico che ingrandisce l'immagine messa a fuoco dal telescopio L’oculare si monta Cercatore direttamente nella diagonale stellare Per installare l'oculare: 1 Allentare la vita di fissaggio sulla diagonale stellare in modo che non ostruisca il diametro interno dell'estremità oculare della diagonale Rimuovere il tappo di protezione per la polvere dalla canna della diagonale stellare Oculare... - Seite 80 IL CERCATORE STARPOINTER Il cercatore StarPointer rappresenta il modo più facile e veloce per puntare il telescopio in modo esatto su un determinato oggetto nel cielo È come avere un mirino laser puntato direttamente alla volta stellata Lo StarPointer è uno strumento di puntamento privo di ingrandimento che utilizza una finestra di vetro rivestito per sovrapporre l'immagine di un puntino rosso sull'oggetto della volta stellata Osservare attraverso il mirino StarPointer con entrambi gli occhi aperti e muovere il telescopio fino a quando il punto rosso, visto attraverso il mirino, si congiunge con l'oggetto come se fosse osservato ad...
- Seite 81 ALIMENTAZIONE DEL TELESCOPIO NEXSTAR SLT Il telescopio NexStar SLT può essere alimentato da 8 batterie alcaline di tipo AA fornite dall'utente oppure da un adattatore CA opzionale da 12 V Per installare le batterie nel telescopio NexStar SLT procedere come segue 1 Comprimere le alette ai lati del coperchio del vano batterie e spingere verso l'alto 2 Inserire 8 batterie AA negli spazi appositi...
- Seite 82 6. MENU: Visualizza le funzioni di configurazione e di utilità, quali la velocità di tracciabilità, gli oggetti definiti dall’utente e altro. 7. OPTION (OPZIONI) (LOGO CELESTRON): Funziona in modo simile al tasto SHIFT di una tastiera e può essere usato insieme ad altri tasti per accedere a funzioni più...
- Seite 83 I 81 ITALIANO...
-
Seite 84: Calcolo Dell'ingrandimento
Sebbene la potenza sia variabile, ciascun strumento sotto cieli medi ha un limite al maggiore ingrandimento utile La regola generale è che la potenza 60 possa essere utilizzata per ogni pollice di apertura Per esempio, il NexStar 102SLT MAK di diametro Moltiplicando 6 per 60 si ottiene un ingrandimento utile massimo di potenza 240 Sebbene questo sia il massimo ingrandimento utile, la maggior parte delle osservazioni viene effettuata nell'intervallo da 20 a 35 di potenza per ciascun pollice di apertura, il quale è... -
Seite 85: Osservazione Celeste
Consultare la sezione “Condizioni di visibilità” più avanti nel manuale (página 84) • Per aumentare il contrasto e ottenere dettagli della superficie dei pianeti, utilizzare filtri dell'oculare Celestron I 83 ITALIANO... -
Seite 86: Condizioni Di Visibilità
OSSERVARE IL SOLE Sebbene sottovalutata da molti astronomi amatoriali, l'osservazione solare è sia gratificante sia divertente Tuttavia, a causa dell'eccessiva luminosità del Sole, devono essere prese speciali precauzioni durante l'osservazione della stella in modo da non danneggiare gli occhi o il telescopio Utilizzare un filtro solare approvato che copra l'intera apertura dell'obiettivo Rimuovere sempre il cercatore StarPointer durante l'osservazione del Sole Mai proiettare un'immagine del Sole attraverso il telescopio Potrebbe risultare in un tremendo accumulo di calore all'interno del tubo ottico Ciò... -
Seite 87: Manutenzione Del Telescopio
Ciò eviterà l'ingresso di contaminanti nel tubo ottico Le regolazioni e la pulizia interne devono essere effettuate dalla divisione di assistenza Celestron Se il telescopio necessità di pulizia interna, contattare la fabbrica per un numero di autorizzazione al reso e un preventivo... -
Seite 88: Appendice A: Specifiche Tecniche
APPENDICE A: SPECIFICHE TECNICHE Modello n. 23090 SPECIFICHE OTTICHE NexStar 102SLT Design ottico Maksutov-Cassegrain Apertura 102 mm Lunghezza focale 1325 mm Rapporto focale Rivestimenti ottici SiO2 Massimo ingrandimento utile 241x Risoluzione: Criterio di 1,37 arcosecondi Rayleigh Limite di Dawes 1,14 arcosecondi... -
Seite 89: Specifiche Elettroniche
Aggiornare il firmware del controllo manuale attraverso la porta USB senza alimentazione esterna e senza collegamento alla montatura Per aggiornare il firmware, è sufficiente collegare il cavo mini USB (non in dotazione) dal PC alla porta sul fondo del controllo manuale ed eseguire il Celestron Firmware Manager (CFM), disponibile gratuitamente alla sezione Assistenza su Celestron com... -
Seite 90: Garanzia Limitata Di Due Anni Celestron
NOTA: La presente garanzia è valida per i clienti di Stati Uniti e Canada che hanno acquistato questo prodotto da un rivenditore Celestron autorizzato negli Stati Uniti o in Canada. La garanzia al di fuori degli Stati Uniti e del Canada è valida solo per i clienti che hanno acquistato da un distributore internazionale di Celestron o da un rivenditore autorizzato Celestron nel Paese specifico. Contattare tali rivenditori per qualsiasi tipo di assistenza relativamente alla garanzia.