Herunterladen Inhalt Inhalt Diese Seite drucken
Petsafe 400-683 Betriebsanleitung

Petsafe 400-683 Betriebsanleitung

Collarless remote trainer
Inhaltsverzeichnis

Werbung

Verfügbare Sprachen
  • DE

Verfügbare Sprachen

  • DEUTSCH, seite 30
PetSafe
®
Collarless Remote Trainer
Operating Guide / Guide d'emploi
Betriebsanleitung / Bedieningsgids
Guía para el uso / Guida per l'uso
Please read this entire guide before beginning
Veuillez lire entièrement le guide avant de commencer.
Bitte lesen Sie die gesamte Betriebsanleitung vor dem
Trainingsbeginn
Lees a.u.b deze gids in zijn geheel door voordat u begint
Por favor, antes de comenzar, lea completamente esta guía.
Per favore leggere interamente questa guida prima d'iniziare

Werbung

Inhaltsverzeichnis
loading

Inhaltszusammenfassung für Petsafe 400-683

  • Seite 1 PetSafe ® Collarless Remote Trainer Operating Guide / Guide d’emploi Betriebsanleitung / Bedieningsgids Guía para el uso / Guida per l’uso Please read this entire guide before beginning Veuillez lire entièrement le guide avant de commencer. Bitte lesen Sie die gesamte Betriebsanleitung vor dem Trainingsbeginn Lees a.u.b deze gids in zijn geheel door voordat u begint...
  • Seite 2: Inhaltsverzeichnis

    Our mission is to ensure your pet’s safety by providing you the tools and techniques to successfully train your pet. If you have any questions, please contact the Customer Care Center at 1-800-732-2677 or visit our website at www.petsafe.net. __________________________________ Table of Contents How the System Works .................
  • Seite 3: How The System Works

    Trainer is pressed. Negative Tone Button (N): The button that emits an ultrasonic tone used to correct your pet. Positive Tone Button (P): The button that emits a positive tone to your pet. Indicator Light Negative Tone Button Positive Tone Button www.petsafe.net...
  • Seite 4: Operating Guide

    Operating Guide Prepare the Remote Trainer To Insert and Remove the Battery 1. Remove the screws on the back of the Remote Trainer. 2. Insert the 9-volt alkaline battery. 3. Reinstall the screws. Do not over-tighten the screws. To verify the battery has been inserted correctly, activate the Remote Trainer by pressing the Positive Tone Button (P).
  • Seite 5: Operating The Remote Trainer

    • Do not drop the Collarless Remote Trainer. • Never push the Negative Tone Button for more than two consecutive seconds. • The Collarless Remote Trainer is not intended as a defensive or protective device against vicious or aggressive animals. www.petsafe.net...
  • Seite 6: Training Guide

    Training Guide General Tips • Eliminate one misbehavior or teach one obedience command at a time. If you move too fast with training, your pet may become confused. • Be consistent. Correct your pet every time he misbehaves. • Unless you can supervise him, it is recommended that you restrict your pet from situations in which he has a history of misbehaving.
  • Seite 7: Using The Negative Tone

    4. Once the misbehavior has stopped, count out two seconds and then push the “P” button for two consecutive seconds. 5. Reward your pet following pushing the “P” button approximately once every 3 to 5 times, to help your pet maintain the association of the positive tone with reward. www.petsafe.net...
  • Seite 8: Teaching Basic Obedience

    Teaching Basic Obedience The “Sit” Command 1. Put a 10-foot leash on your pet. 2. Hold the leash and the Remote Trainer in one hand. Keep your other hand free to guide your pet into a “Sit” position. 3. Press and hold the “N” Button. 4.
  • Seite 9: The "Come" Command

    BUTTON) and praise him while you continue to back up. Press the “P” button when your pet returns to you. 11. Use your leash to prevent your pet from running past you. If your pet manages to run past you, repeat Steps 3 through 8. www.petsafe.net...
  • Seite 10: The "Stay" Command

    The “Stay” Command 1. Put a 10-foot leash on your pet. 2. Put your pet on his bed. Hold your leash in one hand and the Remote Trainer in the other. 3. Staying within 3 feet, walk the perimeter of the bed. Do not say anything to your pet.
  • Seite 11: Eliminating Unwanted Behavior

    1. No other people or pets should be in the yard during training sessions, as you do not want your pet to associate the correction with anything other than his digging. Your pet must be securely fenced in or contained during training. www.petsafe.net...
  • Seite 12: Chasing

    2. From a window or area where your pet cannot see you, wait until your pet begins to dig. 3. While your pet digs, press the “N” Button and release it when he stops digging. Only press the button while your pet is in the act of digging, and do not say anything to him.
  • Seite 13: Trash Raiding

    “N” Button. Immediately release the button when your pet leaves the temptation. 3. Do not say anything, as you want your pet to associate the correction with his behavior, not you. 4. Repeat this process in several different locations with different temptations. www.petsafe.net...
  • Seite 14: Excessive Barking

    Excessive Barking Barking is an instinctive behavior for dogs. It is impossible to keep your dog from barking entirely, but you can teach him be quiet when you give him a command. Note: This will only be effective when you are at home with your dog. 1.
  • Seite 15: Fcc Compliance

    FCC regulations. Unauthorized changes or modifi cations to the equipment that are not approved by Radio Systems Corporation are in violation of FCC regulations and could void the user’s authority to operate the equipment and void the product warranty. www.petsafe.net...
  • Seite 16: Français

    Français Merci d’avoir choisi PetSafe , première marque de solutions électroniques de dressage dans le monde. Notre mission est de garantir la sécurité de votre animal en vous offrant les moyens et les techniques pour le dresser avec succès. Si vous avez des questions, veuillez contacter notre service à...
  • Seite 17: Mode De Fonctionnement Du Système

    Bouton de signal sonore négatif (N): Émet un ultrason destiné à corriger l’animal. Bouton de signal sonore positif (P): Émet un son positif d’encouragement à l’animal. Voyant lumineux Bouton de signal sonore négatif Bouton de signal sonore positif www.petsafe.net...
  • Seite 18: Guide D'emploi

    Guide d’emploi Préparation du dresseur à distance Insertion et retrait de la pile 1. Retirez les vis au dos du dresseur à distance. 2. Insérez la pile alcaline de 9 volts. 3. Remettez les vis. Ne les serrez pas outre mesure. Pour vérifi...
  • Seite 19: Emploi Du Dresseur À Distance

    • N’appuyez jamais sur le bouton de signal sonore négatif pendant plus de deux secondes consécutives. • Le dresseur à distance sans collier n’est pas destiné à être utilisé à des fi ns défensives ni protectrices face à un animal méchant ou agressif. www.petsafe.net...
  • Seite 20: Guide De Dressage

    Guide de dressage Conseils généraux • Éliminez une seule mauvaise habitude à la fois ou apprenez à l’animal à obéir à un seul ordre à la fois. Si vous progressez trop vite, l’animal risque de ne plus comprendre ce que vous attendez de lui. •...
  • Seite 21: Utilisation Du Signal Sonore Négatif

    «P» pendant deux secondes consécutives. 5. Récompensez l’animal après avoir appuyé sur le bouton «P» environ une fois toutes les 3 ou 5 fois pour l’aider à continuer à associer le son positif avec une récompense. www.petsafe.net...
  • Seite 22: Ordres D'obéissance De Base

    Ordres d’obéissance de base «Assis!» 1. Fixez une laisse de 3 m (10 pi) au collier de l’animal. 2. Tenez la laisse et le dresseur à distance de la même main. Gardez l’autre main libre pour guider l’animal lorsque vous lui ordonnerez de s’asseoir. 3.
  • Seite 23: Viens

    BOUTON «N») et félicitez-le pendant que vous continuez à reculer. Appuyez sur le bouton «P» une fois qu’il est parvenu à votre hauteur. 11. Utilisez la laisse pour empêcher l’animal de vous dépasser en courant. S’il parvient à vous dépasser en courant, répétez les étapes 3 à 8. www.petsafe.net...
  • Seite 24: Reste

    «Reste!» 1. Fixez une laisse de 3 m (10 pi) au collier de l’animal. 2. Menez l’animal à son coin repos. Tenez la laisse d’une main et le dresseur à distance de l’autre. 3. Marchez autour de l’animal dans un périmètre de 1 m (3 pi) sans rien lui dire.
  • Seite 25: Élimination Des Comportements Indésirables

    Il doit par ailleurs se trouver dans un endroit bien clôturé pendant ces séances. www.petsafe.net...
  • Seite 26: Votre Chien Poursuit Des Objets

    2. Postez-vous à une fenêtre ou un endroit où le chien ne peut pas vous apercevoir, et attendez qu’il commence à creuser. 3. Pendant qu’il creuse, appuyez sur le bouton «N» et relâchez-le dès que le chien arrête de creuser. N’appuyez sur le bouton que lorsque le chien est en train de creuser et ne lui dites rien.
  • Seite 27: Votre Chien Fouille Dans Les Ordures

    Relâchez immédiatement le bouton dès que l’animal s’éloigne de l’objet. 3. Ne dites rien, car vous voulez que le chien associe la stimulation à son comportement et non pas à vous. 4. Répétez le processus à différents endroits avec différents objets tentants. www.petsafe.net...
  • Seite 28: Votre Chien Aboie Trop

    Votre chien aboie trop Les chiens aboient par instinct. Il est impossible d’empêcher un chien d’aboyer en permanence, mais il est possible de lui apprendre à se taire lorsque vous le lui ordonnez. Remarque : Ceci ne peut être effi cace que si vous vous trouvez chez vous avec le chien. 1.
  • Seite 29 L’acheteur est responsable devant tous les risques posés par l’utilisation de ce produit. 5. Modifi cation des modalités et conditions Radio Systems Corporation se réserve le droit de modifi er les modalités, conditions et notices selon lesquelles ce produit est livré. www.petsafe.net...
  • Seite 30: Deutsch

    Deutsch ® Wir bedanken uns, dass Sie sich für PetSafe entschieden haben, die meistverkaufte Marke in der Welt, wenn es um elektronische Ausbildungsmöglichkeiten geht. Unsere Aufgabe besteht darin, die Sicherheit Ihres Hundes zu gewährleisten, indem wir Ihnen die Geräte und Vorgehensweisen zur erfolgreichen Ausbildung Ihres Hundes zur Verfügung...
  • Seite 31: Wie Das System Funktioniert

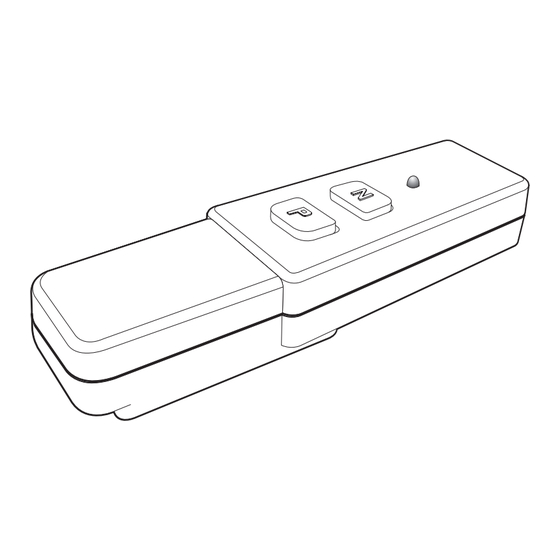
    Anzeigelicht: Das Licht, das anzeigt, wenn einer der Knöpfe am Ferntrainer betätigt wird. Negativer Tonknopf (N): Der Knopf, der einen Ultraschall zur Korrektur Ihres Hundes auslöst. Positiver Tonknopf (P): Der Knopf, der einen positiven Ton für Ihren Hund auslöst. Anzeigelicht Negativer Tonknopf Positiver Tonknopf www.petsafe.net...
  • Seite 32: Betriebsanleitung

    Betriebsanleitung Vorbereitung des Ferntrainers Zum Einlegen und Herausnehmen der Batterie 1. Entfernen Sie die Schrauben von der Rückseite des Ferntrainers. 2. Legen Sie eine 9-Volt-Alkali-Batterie ein. 3. Bringen Sie die Schrauben wieder an. Ziehen Sie die Schrauben nicht übermäßig fest an. Um zu überprüfen, ob die Batterie richtig eingelegt wurde, aktivieren Sie den Ferntrainer, indem Sie auf den positiven Tonknopf drücken (P).
  • Seite 33: Bedienung Des Ferntrainers

    • Lassen Sie den halsbandlosen Ferntrainer nicht fallen. • Drücken Sie auf den negativen Tonknopf niemals länger als zwei aufeinander folgende Sekunden. • Der halsbandlose Ferntrainer ist nicht als Instrument gedacht, mit dem man sich gegen bösartige oder aggressive Tiere verteidigt oder sich vor ihnen schützt. www.petsafe.net...
  • Seite 34: Ausbildungsanleitung

    Ausbildungsanleitung Allgemeine Tipps • Gewöhnen Sie dem Hund jeweils nur ein unerwünschtes Betragen ab, zum beispiel bringen Sie ihm jeweils nur einen Gehorsamkeitsbefehl bei. Wenn Sie zu schnell mit der Ausbildung fortschreiten, könnte Ihr Hund verwirrt werden. • Seien Sie konsequent. Korrigieren Sie Ihren Hund jedes Mal, wenn er sich falsch verhält.
  • Seite 35: Wie Sie Den Negativen Ton Verwenden

    Sekunden und drücken dann zwei aufeinander folgende Sekunden lang auf den “P”-Knopf. 5. Belohnen Sie Ihren Hund ungefähr jedes 3. oder 5. Mal im Anschluss an das Betätigen des “P”- Knopfes, um ihm Hund zu helfen, den positiven Ton weiterhin mit Belohnung zu verbinden. www.petsafe.net...
  • Seite 36: Wie Sie Die Grundzüge Des Gehorsams Lehren

    Wie Sie die Grundzüge des Gehorsams lehren Der Befehl “Sitz” 1. Legen Sie dem Hund eine 3 Meter lange Leine an. 2. Halten Sie die Leine und den Ferntrainer in einer Hand. Halten Sie die andere Hand frei, um Ihren Hund in eine “Sitz”-Position zu führen. 3.
  • Seite 37: Der "Komm"-Befehl

    “P”-Knopf, wenn Ihr Hund zu Ihnen zurück kommt. 11. Benützen Sie Ihre Leine, um zu verhindern, dass Ihr Hund an Ihnen vorbei läuft. Wenn es Ihrem Hund gelingt, an Ihnen vorbei zu laufen, wiederholen Sie Schritte 3 bis 8. www.petsafe.net...
  • Seite 38: Der "Bleib"-Befehl

    Der “Bleib”-Befehl 1. Legen Sie Ihrem Hund eine 3 Meter lange Leine an. 2. Legen Sie Ihren Hund auf sein Bett. Halten Sie Ihre Leine in der einen Hand und den Ferntrainer in der anderen. 3. Bleiben Sie innerhalb eines Abstandes von 1 Meter und gehen Sie um das Bett herum.
  • Seite 39: Das Ausmerzen Von Unerwünschtem Verhalten

    • Einen kühlen Bereich im Schatten, wo er sich hinlegen kann, und genügend Wasser. • Eine alternative Tätigkeit wie zum beispiel ein Lieblingsspielzeug. • Ausreichende Gelegenheit für Spiel, Betätigung und Aufmerksamkeit. • Ein Hof ohne Nagetiere oder Beutetiere, die er aufzuscheuchen versucht. www.petsafe.net...
  • Seite 40: Verfolgungsjagd

    1. Keine anderen Personen oder Tiere sollten im Hof sein, wenn Trainingsübungen durchgeführt werden, da Sie ja nicht wollen, dass Ihr Hund die Korrektur mit etwas anderem als seiner Grab-Tätigkeit in Verbindung bringt. Ihr Hund muss sicher eingezäunt sein oder während des Trainings in Schach gehalten werden.
  • Seite 41: Durchstöbern Des Abfalls

    2. Wenn die Schnauze Ihres Hundes das Objekt der Versuchung berührt, the button when your pet leaves the temptation. drücken und halten Sie den “N”-Knopf. Lassen Sie den Knopf sofort los, wenn Ihr Hund das verführerische Objekt gehen lässt. www.petsafe.net...
  • Seite 42: Übermäßiges Bellen

    3. Sagen Sie nichts, da Sie ja möchten, dass Ihr Hund die Korrektur mit seinem Verhalten, jedoch nicht mit Ihnen selbst in Verbindung bringt. 4. Wiederholen Sie diesen Vorgang in mehreren verschiedenartigen Umgebungen, während sie den Hund mit verschiedenen verlockenden Objekten konfrontieren.
  • Seite 43 Gebrauch oder Missbrauch dieses Produkts. Der Käufer übernimmt alle Risiken und jede Haftung für den Gebrauch dieses Produkts. 5. Änderungen von Bedingungen und Konditionen Radio Systems Corporation behält sich das Recht vor, die Bedingungen, Konditionen und Hinweise, unter denen dieses Produkt angeboten wird, zu ändern. www.petsafe.net...
  • Seite 44: Nederlands

    Als u vragen mocht hebben, neemt u dan a.u.b. contact op met de Klantenservice op 1-800-732-2677 of bezoek onze website op www.petsafe.net __________________________________ Inhoudsopgave Hoe het systeem werkt ................
  • Seite 45: Hoe Het Systeem Werkt

    Negatieve toon knop (N): De knop die een ultrasone toon uitzendt en gebruikt wordt om uw huisdier te corrigeren. Positieve toon knop (P): De knop die een positieve toon naar uw huisdier uitzendt. Controle lichtje Negatieve toon knop Positieve toon knop www.petsafe.net...
  • Seite 46: Bedieningsgids

    Bedieningsgids Voorbereiden van de trainer met afstandsbediening Plaatsen en verwijderen van de batterij 1. Verwijder de schroeven op de achterkant van de trainer met afstandsbediening. 2. Plaats de 9 volt alkaline batterij erin. 3. Plaats de schroeven terug. Schroef de schroeven niet te vast aan. Kijk na of de batterij op de juiste manier geplaatst is door de trainer met afstandsbediening te activeren door de positieve toon knop (P) in te drukken.
  • Seite 47: Bedienen Van De Trainer Met Afstandsbediening

    • Laat de trainer met afstandsbediening zonder halsband niet vallen. • Druk de negatieve toon knop nooit langer dan twee achtereenvolgende seconden in. • De trainer met afstandsbediening zonder halsband is niet bedoeld als een verdedigend of beschermend toestel tegen gevaarlijke of agressieve dieren. www.petsafe.net...
  • Seite 48: Trainingsgids

    Trainingsgids Algemene wenken • Verwijder één wangedrag of leer een gehoorzaamheidsbevel per keer aan. Als u te vlug met de training werkt, kan uw huisdier verward raken. • Blijf consequent. Corrigeer uw huisdier iedere keer wanneer hij zich niet juist gedraagt. •...
  • Seite 49: Gebruiken Van De Negatieve Toon

    “P” knop voor twee achtereenvolgende seconden in. 5. Nadat u de “P” knop hebt ingedrukt beloon uw huisdier navolgend eenmaal per 3 tot 5 keer, zodat uw huisdier zich de positieve toon met de beloning zal blijven herinneren. www.petsafe.net...
  • Seite 50: Aanleren Van Basis Gehoorzaamheid

    Aanleren van basis gehoorzaamheid Het “Zit” bevel 1. Doe een 3 meter lange riem bij uw huisdier om. 2. Houd de riem en de trainer met afstandsbediening in één hand. Houd uw andere hand vrij om uw huisdier in de “Zit” positie te leiden. 3.
  • Seite 51: Het "Kom" Bevel

    Druk op de “P” knop wanneer uw huisdier naar u terug komt. 11. Gebruik uw riem om te voorkomen dat uw huisdier langs u heen rent. Als uw huisdier langs u heen mocht rennen, herhaal dan stappen 3 tot 8. www.petsafe.net...
  • Seite 52: Het "Blijf" Bevel

    Het “Blijf ” bevel 1. Doe een drie meter lange riem bij uw huisdier om. 2. Plaats uw huisdier in zijn bed. Houd de riem in één hand en de trainer met afstandsbediening in de andere. 3. Blijf binnen een afstand van 90 cm en loop om het bed heen. Zeg niets tegen uw huisdier.
  • Seite 53: Verwijderen Van Ongewenst Gedrag

    1. Geen andere mensen of dieren moeten in de tuin aanwezig zijn gedurende de trainingssessies, want u wilt niet dat uw huisdier de correctie met andere dingen dan graven kan vergelijken. Uw huisdier moet veilig binnen een omheining of afsluiting zijn gedurende de training. www.petsafe.net...
  • Seite 54: Achterna Rennen

    2. Vanuit een raam of gedeelte waar uw huisdier u niet kan zien, moet u wachten totdat uw huisdier met graven begint. 3. Terwijl uw huisdier graaft, moet u op de “N” knop drukken en deze loslaten wanneer hij met graven stopt. Druk de knop alleen in terwijl uw hond aan het graven is, en zeg niets tegen hem.
  • Seite 55: Vuilnisbak/Zakken Openmaken

    Laat de knop onmiddellijk los wanneer hij bij de verleiding vandaan gaat. 3. Zeg niets, want u wilt dat uw huisdier de correctie in verband brengt met zijn gedrag, niet u. 4. Herhaal dit proces in enkele verschillende plekken met verschillende verleidingen. www.petsafe.net...
  • Seite 56: Overmatig Blaffen

    Overmatig blaffen Blaffen is een natuurlijk gedrag voor honden. Het is onmogelijk uw hond geheel van blaffen te onthouden, maar u kunt hem aanleren stil te zijn wanneer u hem een bevel geeft. N.B.: Dit zal alleen werken wanneer u thuis bent met uw hond. 1.
  • Seite 57 De koper aanvaardt alle risico’s en aansprakelijkheid voor het gebruik van dit product. 5. Wijziging van voorwaarden en condities Radio Systems Corporation behoudt het recht voor verandering van de voorwaarden, condities en kennisgevingen onder welke dit product is aangeboden. www.petsafe.net...
  • Seite 58: Espagñol

    Si usted tiene alguna pregunta, por favor contacte al centro de asistencia al cliente, en el número 1-800-732-2677 o visite nuestro sitio en la red www.petsafe.net. __________________________________ Índice Cómo funciona el sistema ..............
  • Seite 59: Cómo Funciona El Sistema

    Botón de tono negativo (N): El botón que emite un tono ultrasónico, utilizado para corregir a su animal. Botón de tono positivo (P): El botón que emite un tono positivo a su animal. Luz indicadora Botón para tono negativo Botón para tono positivo www.petsafe.net...
  • Seite 60: Guía Para El Uso

    Guía para el uso Preparación del amaestrador a distancia Inserción y quitado de la batería 1. Quite los tornillos que se encuentran en la parte trasera del amaestrador a distancia. 2. Inserte la batería alcalina de 9 voltios. 3. Vuelva a instalar los tornillos. No los sobreajuste. Para verifi...
  • Seite 61: Operación Del Amaestrador A Distancia

    • No deje caer el amaestrador a distancia sin collar. • Nunca presione el botón para tono negativo por más de dos segundos consecutivos. • El amaestrador a distancia sin collar no está diseñado como dispositivo de defensa o protección contra animales viciosos o agresivos. www.petsafe.net...
  • Seite 62: Guía Para El Amaestramiento

    Guía para el amaestramiento Consejos generales • Elimine una mala conducta o enseñe un comando de obediencia a la vez. Si usted avanza muy rápidamente con el amaestramiento, su animal doméstico podrá confundirse. • Sea consistente. Corrija a su animal cada vez que se comporte indebidamente. •...
  • Seite 63: Uso Del Tono Negativo

    “P” durante dos segundos consecutivos. 5. Premie a su animal continuando la presión del botón “P” aproximadamente una vez cada 3 a 5 veces, para ayudar a su animal a mantener la asociación del tono positivo con el premio. www.petsafe.net...
  • Seite 64: Enseñanza De Obediencia Básica

    Enseñanza de obediencia básica El comando “siéntate” 1. Coloque a su animal un lazo de 3 m. 2. Sostenga el lazo y el amaestrador a distancia en una mano. Deje libre su otra mano, para guiar a su animal hacia la posición de estar “sentado”. 3.
  • Seite 65: El Comando "Ven Aquí

    Presione el botón “P” cuando su animal retorne a usted. 11.Utilice su lazo para evitar que su animal pase corriendo de largo, pasándolo a usted. Si su animal logra pasar corriendo de largo, repita los pasos 3 a 8. www.petsafe.net...
  • Seite 66: El Comando "Quédate

    El comando “quédate” 1. Coloque a su animal un lazo de 3 m. 2. Coloque a su animal en su cama. Sostenga su lazo en una mano y el amaestrador a distancia en la otra. 3. Manteniéndose dentro de los 1 m, camine alrededor de la cama. No diga nada a su animal.
  • Seite 67: Eliminación De Conductas Indeseadas

    1. Ninguna otra persona o animal doméstico deberá estar en el jardín durante las sesiones de amaestramiento, pues usted no querrá que su animal asocie la corrección con ninguna otra cosa más que con su acción de cavar. Su animal debe estar seguramente cercado o contenido durante el amaestramiento. www.petsafe.net...
  • Seite 68: Perseguir

    2. Desde una ventana o área donde su animal no lo pueda ver a usted, espere hasta que su animal comience a cavar. 3. Mientras su animal cava, presione el botón “N” y libérelo cuando el animal deje de cavar. Sólo presione el botón mientras su animal esté realizando el acto de cavar, y no le diga nada.
  • Seite 69: Revolver La Basura

    3. No diga nada, pues usted quiere que el animal asocie la corrección con su mala conducta y no con usted. 4. Repita este proceso en varios sitios diferentes, con diferentes señuelos. www.petsafe.net...
  • Seite 70: Ladrar Excesivamente

    Ladrar excesivamente Ladrar es una conducta instintiva para los perros. Es imposible evitar que su perro deje de ladrar por completo, pero usted puede enseñarle a que- darse callado cuando usted le da un comando. Nota: Esto sólo será efectivo cuando usted esté en la casa con su perro. 1.
  • Seite 71 El comprador asume todos los riesgos y responsabilidad provenientes del uso de este producto. 5. Modifi cación de términos y condiciones Radio Systems Corporation se reserva el derecho de cambiar los términos, condiciones y anuncios bajo los cuales este producto es ofrecido. www.petsafe.net...
  • Seite 72: Italiano

    Italiano ® Grazie per aver scelto PetSafe , il #1 al mondo di prodotti elettronici per le soluzioni dell’addestramento. Il nostro scopo è di assicurare l’incolumità del Vostro cane mettendoVi a disposizione i mezzi e le tecniche per addestrarlo con successo. Per eventuali domande, per favore contattare il centro assistenza clienti al 1-800-732-2677 oppure visitare il nostro sito web a www.petsafe.net.
  • Seite 73: Come Funziona Il Sistema

    Bottone tono negativo (N): Il bottone che emette un suono ultrasonico per correggere il Vostro animale. Bottone tono positivo (P): Il bottone che emette un tono positivo al Vostro animale. Luce indicatrice Bottone tono negativo Bottone tono positivo www.petsafe.net...
  • Seite 74: Guida All'uso

    Guida all’Uso Preparazione dell’addestratore remoto Come inserire e togliere la batteria 1. Togliere le viti sul retro dell’addestratore remoto. 2. Inserire la batteria alcalina a 9-volt. 3. Rimettere le viti. Non stringerle troppo. Per controllare che la batteria sia stata correttamente inserita, attivate l’addestratore remoto premendo il bottone tono positivo (P).
  • Seite 75: Uso Dell'addestratore Remoto

    • Mai lasciar cadere l’addestratore remoto senza collare. • Mai premere il bottone tono negativo per oltre due secondi consecutivi. • L’addestratore remoto senza collare non è stato ideato come difesa o protezione contro animali cattivi o aggressivi. www.petsafe.net...
  • Seite 76: Guida Per L'addestramento

    Guida per l’addestramento Consigli pratici • Eliminate un vizio o insegnate un comando alla volta. Avanzare troppo velocemente nell’addestramento potrebbe confondere il Vostro animale. • Bisogna essere consistenti. Correggete l’animale ogni volta che si comporta male. • A meno che non Vi sia possibile controllarlo, si raccomanda di tener lontano il Vostro cane da situazioni in quali è...
  • Seite 77: Uso Del Tono Negativo

    4. Quando avrà smesso di farlo, contate due secondi e poi premete il bottone “P” per due secondi consecutivi. 5. Ricompensate l’animale circa una volta ogni 3 o 5 volte che il bottone “P” viene premuto per aiutarlo a mantenere l’associazione del tono positivo con la ricompensa. www.petsafe.net...
  • Seite 78: Insegnare I Comandi D'obbedienza Di Base

    Insegnare i comandi d’obbedienza di base Il comando “Siedi” 1. Mettete al Vostro cane un guinzaglio lungo 3 m. 2. Tenete il guinzaglio e l’addestratore remoto in una mano. Tenete l’altra mano libera per guidare il Vostro cane nella posizione “Siedi”. 3.
  • Seite 79: Il Comando "Vieni

    Premete il bottone “P” quando il Vostro cane Vi raggiunge. 11. Usate il guinzaglio per prevenire che il Vostro cane correndo Vi sorpassi. Se il Vostro cane riuscisse a sorpassarVi, ripetete tutte le fasi dalla 3 all’8. www.petsafe.net...
  • Seite 80: Il Comando "Stai Fermo

    Il comando “Stai fermo” 1. Mettete al Vostro cane un guinzaglio lungo 3 m. 2. Mettete il Vostro cane nel suo lettino. Tenete il guinzaglio in una mano e l’addestratore nell’altra. 3. Rimanendo ad una distanza di 1 m, camminate attorno al perimetro del lettino.
  • Seite 81: Eliminare Comportamenti Non Desiderati

    1. Durante la sessione d’addestramento, in giardino non ci devono essere altre persone o altri animali domestici, questo perché non volete che il Vostro cane associ la correzione con niente altro che il suo scavare. Durante l’addestramento il Vostro cane deve essere in un’area sicuramente recintata o contenuta. www.petsafe.net...
  • Seite 82: Rincorrere

    2. Da una fi nestra o un’area da dove il Vostro cane non Vi può vedere, aspettate fi no a che il Vostro cane inizia a scavare. 3. Mentre il Vostro cane sta scavando, premete il bottone “N” e rilasciatelo quando smette di farlo.
  • Seite 83: Razziare Le Immondizie

    Smettete di premere il bottone non appena il Vostro cane lascia la tentazione. 3. Non dite niente, perché volete che il Vostro cane associ la correzione con il suo comportamento, non con Voi. 4. Ripetete queste procedure in molti svariati luoghi con diverse tentazioni. www.petsafe.net...
  • Seite 84: Eccessivo Abbaiare

    Eccessivo abbaiare Abbaiare è un comportamento istintivo per i cani. È impossibile fermare completamente un cane dall’abbaiare, ma potete insegnargli a stare zitto quando gli date il comando. Da notare: Questo funzionerà solo quando siete a casa con il Vostro cane. 1.
  • Seite 85 Il compratore assume tutti i rischi derivanti dall’uso di questo prodotto. 5. Modifi cazioni di termini e condizioni La Ditta Radio Systems si riserva il diritto di cambiare i termini, le condizioni e gli avvisi che sono offerti con questo prodotto. www.petsafe.net...
  • Seite 86 1-800-732-2677...
  • Seite 87 www.petsafe.net...
  • Seite 88 Radio Systems Corporation 10427 Electric Ave. Knoxville, TN 37932 1-800-732-2677 www.petsafe.net 400-683-19 ©Copyright 2004, Radio Systems Corporation...

Inhaltsverzeichnis