Herunterladen Inhalt Inhalt Diese Seite drucken

Perel SCAMSET8 Bedienungsanleitung

Wifi-video-türsprechanlage mit video-aufnahme
Inhaltsverzeichnis

Werbung

Verfügbare Sprachen
  • DE

Verfügbare Sprachen

  • DEUTSCH, seite 63
SCAMSET8
WIFI VIDEO INTERCOM DOOR PHONE SYSTEM
WIFI-INTERCOM MET VIDEO-OPNAME
INTERPHONE WIFI AVEC ENREGISTREMENT VIDÉO
VIDEOPORTERO CON WIFI Y GRABACIÓN DE VÍDEO
WIFI-VIDEO-TÜRSPRECHANLAGE MIT VIDEO-AUFNAHME
SISTEMA DE VÍDEO PORTEIRO COM WIFI E GRAVAÇÃO DE VÍDEO
VIDEOCITOFONO WIFI
USER MANUAL
GEBRUIKERSHANDLEIDING
MODE D'EMPLOI
MANUAL DEL USUARIO
BEDIENUNGSANLEITUNG
MANUAL DO UTILIZADOR
MANUALE UTENTE
3
18
33
48
63
78
93

Werbung

Inhaltsverzeichnis
loading

Inhaltszusammenfassung für Perel SCAMSET8

  • Seite 1 SCAMSET8 WIFI VIDEO INTERCOM DOOR PHONE SYSTEM WIFI-INTERCOM MET VIDEO-OPNAME INTERPHONE WIFI AVEC ENREGISTREMENT VIDÉO VIDEOPORTERO CON WIFI Y GRABACIÓN DE VÍDEO WIFI-VIDEO-TÜRSPRECHANLAGE MIT VIDEO-AUFNAHME SISTEMA DE VÍDEO PORTEIRO COM WIFI E GRAVAÇÃO DE VÍDEO VIDEOCITOFONO WIFI USER MANUAL GEBRUIKERSHANDLEIDING...
  • Seite 2 SCAMSET8 V. 03 – 25/02/2016 ©Velleman nv...
  • Seite 3: Safety Instructions

    If in doubt, contact your local waste disposal authorities. Thank you for choosing Perel! Please read the manual thoroughly before bringing this device into service. If the device was damaged in transit, do not install or use it and contact your dealer.
  • Seite 4 SCAMSET8  Nor Velleman nv nor its dealers can be held responsible for any damage (extraordinary, incidental or indirect) – of any nature (financial, physical…) arising from the possession, use or failure of this product.  Due to constant product improvements, the actual product appearance might differ from the shown images.
  • Seite 5: Wall Mounting

    SCAMSET8 6. Wall-Mounting Please ensure a good wifi signal before installing! Make sure the microSD card is inserted. 1. Choose your mounting spot. Drill a hole for the wires. 2. Fix the harness using two screws. 3. Lead the wires through the hole in the harness and the wall. Install the camera unit into the harness and fix with the screw.
  • Seite 6: Wiring The System

    SCAMSET8 7. Wiring the System 1. Connect the antenna and fix it on the wall inside the house. 2. Connect the wires. connection scheme description antenna doorbell relay NO (grey) power in DC +12 V (red) Net RJ45 (orange + white)
  • Seite 7: Installing The App

    SCAMSET8 8. Installing the App Download the SafeSmart app from the Google Play or iTunes store, and install it on your mobile phone. Remember to allow the software to send notifications. Android ® ® 9. Wifi Connection to Your Mobile Phone Do not yet connect the network cable.
  • Seite 8 SCAMSET8 If two or more mobile phones are used to connect to the system, please register a different ID for each in order to receive a notification on the different mobile phones. 3. Activate the wifi by QR code. a. Enter the wifi name.
  • Seite 9 SCAMSET8 The system will only scan the QR code once. Press the reset button for 5 seconds and restart the scanning procedure. 7. Add the door phone in the list. a. Slide down to refresh and find the door phone.
  • Seite 10 SCAMSET8 Enter the door phone’s name. d. Enter your password, confirm and tap [Save]. e. Enter the device list, tap the door phone in the device list and tap [Settings] to enter the settings page. Tap [Network Settings] to enter the network settings page.
  • Seite 11 SCAMSET8 Connecting the Door Phone to a Second Mobile Phone Connecting the door phone to a second smartphone is easy, as you do not need to scan the QR code again. Simply follow the procedure below: a. Tap [+] in the device list.
  • Seite 12: Setting Date And Time

    SCAMSET8 Setting Date and Time a. Tap the door phone in the device list. b. Tap [Setting] to open the setting menu. Tap [Date and Time] to enter the settings page. a. Select your time zone (UTC+0: UK/Ireland/Portugal; UTC+1: Germany/France/Belgium/Netherlands/ Spain/Poland/Italy).
  • Seite 13 SCAMSET8 Push Notification Activate the function in order to be notified of a visit or an alarm. a. Tap [Alarm Settings] to enter the alarm settings page. b. Swipe the [Alarm Push] option to activate the function. Tap this icon to delete the ID to which the door phone does not need to send a notification.
  • Seite 14 SCAMSET8 Viewing Interface a. Tap and hold for 3 seconds to unlock the door. Wait for 6 more seconds to unlock again. date and time talk int 1 int 5 audio smooth image (320 x 180) int 2 int 6...
  • Seite 15 SCAMSET8 d. Go back to the settings page and tap [Record Settings]. e. Choose [Alarm Recording] to start the recording when the door phone button is pressed or an alarm is triggered. Choose the recording time. g. Go back to the device list, tap the door phone in the device list and tap [Playback] to enter the playback page.
  • Seite 16: Troubleshooting

    SCAMSET8 Resetting the Door Phone Press and hold the reset button for 5 seconds. The system will restart 30 seconds after the beep. Tamper Alarm When the door phone is removed from its harness with evil intent, the tamper switch will be activated.
  • Seite 17: Cleaning And Maintenance

    R&TTE Declaration of Conformity Hereby, Velleman NV declares that the radio equipment type [SCAMSET8] is in compliance with Directive 1999/5/EC. The full text of the EU declaration of conformity is available at the following internet address: www.velleman.eu.
  • Seite 18: Gebruikershandleiding

    SCAMSET8 GEBRUIKERSHANDLEIDING Inleiding Aan alle burgers van de Europese Unie Belangrijke milieu-informatie betreffende dit product Dit symbool op het toestel of de verpakking geeft aan dat, als het na zijn levenscyclus wordt weggeworpen, dit toestel schade kan toebrengen aan het milieu. Gooi dit toestel (en eventuele batterijen) niet bij het gewone huishoudelijke afval;...
  • Seite 19 SCAMSET8  De garantie geldt niet voor schade door het negeren van bepaalde richtlijnen in deze handleiding en uw dealer zal de verantwoordelijkheid afwijzen voor defecten of problemen die hier rechtstreeks verband mee houden.  Respecteer de technische specificaties. ...
  • Seite 20 SCAMSET8 6. Wandmontage Controleer of het wifi-signaal voldoende sterk is, voordat u het toestel installeert! Plaats de microSD-kaart. 1. Kies een montageplaats. Boor een gat voor de kabels. 2. Bevestig de behuizing met 2 schroeven. 3. Voer de kabels door de opening in de behuizing en de muur. Plaats de camera in de behuizing en bevestig met de schroef.
  • Seite 21: Het Systeem Aansluiten

    SCAMSET8 7. Het systeem aansluiten 1. Sluit de antenne aan en bevestig deze aan de muur binnenshuis. 2. Sluit de kabels aan. Aansluitschema antenne deurbelrelais NO (grijs) DC-voedingsingang +12 V (rood) Net RJ45 (oranje + wit) DC-voedingsingang -12 V (zwart)
  • Seite 22: Wifi-Verbinding Op Uw Mobiele Telefoon

    SCAMSET8 8. De app installeren Download de SafeSmart-app via de Google Play of iTunes store, en installeer deze op uw mobiele telefoon. Selecteer OK om berichten te ontvangen. Android ® ® 9. Wifi-verbinding op uw mobiele telefoon Sluit de netwerkkabel nog niet aan.
  • Seite 23 SCAMSET8 Als er twee of meer mobiele telefoons aangesloten worden, stel een verschillende ID in om een bericht te ontvangen op de verschillende mobiele telefoons. 3. Activeer 'Set Wifi by QR code'. a. Geef de naam van uw wifi-netwerk in.
  • Seite 24: Wifi-Verbinding Via Een Netwerkkabel

    SCAMSET8 De QR-code kan slechts één keer gescand worden. Druk op de resetknop gedurende 5 seconden en start de scanprocedure opnieuw. 7. Voeg het toestel toe aan de lijst. a. Schuif naar omlaag om te vernieuwen en om het toestel te vinden.
  • Seite 25 SCAMSET8 Geef de naam van het toestel in. d. Geef het wachtwoord in, bevestig en druk op [Save]. e. In de lijst met toestellen, selecteer het toestel en druk op [Settings] om de instellingenpagina te openen. Druk op [Network Settings] om de netwerkinstellingen te openen.
  • Seite 26 SCAMSET8 Het toestel op een tweede mobiele telefoon aansluiten Het toestel op een tweede mobiele toestel aansluiten is eenvoudig. U moet de QR-code niet opnieuw scannen. Ga als volgt te werk: a. Druk op [+] in de lijst. b. Druk op [Manual] om een tweede mobiele telefoon manueel toe te voegen.
  • Seite 27: Datum En Tijd Instellen

    SCAMSET8 Datum en tijd instellen a. Druk op het toestel in de lijst. b. Druk op [Setting] om het instelmenu te openen. Druk op [Date and Time] om de instellingenpagina te openen. a. Selecteer de tijdzone (UTC+0: Verenigd Koninkrijk / Ierland / Portugal; UTC+1: Duitsland / Frankrijk / België...
  • Seite 28 SCAMSET8 Push melding Activeer de functie om een bericht te ontvangen wanneer er iemand aanbelt of een alarm geactiveerd wordt. a. Druk op [Alarm Settings] om de alarminstellingen te openen. b. Veeg de optie [Alarm Push] om de functie te activeren.
  • Seite 29 SCAMSET8 Weergave-interface a. Houd gedurende 3 seconden ingedrukt om de deur te ontgrendelen. Wacht nog 6 seconden om opnieuw te ontgrendelen. datum en tijd spreken int 1 int 5 geluid vloeiende weergave (320 x 180) int 2 int 6 snapshot...
  • Seite 30 SCAMSET8 d. Ga terug naar de instellingenpagina en druk op [Record Settings]. e. Kies [Alarm Recording] om de opname te starten wanneer iemand aanbelt of een alarm geactiveerd wordt. Kies de opnameduur. g. Ga terug naar de lijst met toestellen, selecteer het toestel in de lijst en druk op [Playback] om de afspeelpagina te openen.
  • Seite 31: Probleemoplossing

    SCAMSET8 Het toestel resetten Houd de resetknop gedurende 5 seconden ingedrukt. Het systeem wordt 30 seconden na de pieptoon opnieuw opgestart. Sabotagealarm Wanneer het toestel van de behuizing wordt verwijderd, schakelt het sabotagealarm in. Het systeem stuurt een alarmbericht naar de aangesloten telefoon.
  • Seite 32: Reiniging En Onderhoud

    De informatie in deze handleiding kan te allen tijde worden gewijzigd zonder voorafgaande kennisgeving. R&TTE Verklaring van overeenstemming Hierbij verklaart Velleman NV, dat dit type toestel [SCAMSET8] conform is met richtlijn 1999/5/EC. Raadpleeg de volgende website voor de volledige tekst van de EU-conformiteitsverklaring: www.velleman.eu. © AUTEURSRECHT Velleman nv heeft het auteursrecht voor deze handleiding.
  • Seite 33: Consignes De Sécurité

    SCAMSET8 MODE D'EMPLOI Introduction Aux résidents de l'Union européenne Informations environnementales importantes concernant ce produit Ce symbole sur l'appareil ou l'emballage indique que l’élimination d’un appareil en fin de vie peut polluer l'environnement. Ne pas jeter un appareil électrique ou électronique (et des piles éventuelles) parmi les déchets municipaux non sujets au tri sélectif ;...
  • Seite 34: Caractéristiques

    SCAMSET8  La garantie ne s’applique pas aux dommages survenus en négligeant certaines directives de ce mode d'emploi et votre revendeur déclinera toute responsabilité pour les problèmes et les défauts qui en résultent.  Respecter les spécifications techniques.  Ni Velleman ni ses distributeurs ne peuvent être tenus responsables des dommages exceptionnels, imprévus ou indirects, quelles que soient la nature (financière, corporelle, etc.), causés par la possession,...
  • Seite 35: Montage Mural

    SCAMSET8 6. Montage mural Vérifier la puissance du signal wifi avant d'installer l'appareil ! S'assurer que la carte microSD est insérée. 1. Choisir l'emplacement de montage. Percer un trou pour les câbles. 2. Fixer le boîtier avec 2 vis. 3. Faire passer les câbles par le trou dans le boîtier et le mur. Placer la caméra dans le boîtier et fixer avec la vis.
  • Seite 36 SCAMSET8 7. Connecter le système 1. Connecter l'antenne et la fixer au mur à l'intérieur de la maison. 2. Connecter les câbles. Schéma de connexion contact de relais pour sonnette de porte NO antenne (gris) entrée d'alimentation DC +12 V (rouge) Net RJ45 (orange + blanc) entrée d'alimentation DC -12 V (blanc)
  • Seite 37: Installer L'application

    SCAMSET8 8. Installer l'application Installer l'application SafeSmart depuis Google Play ou iTunes store sur votre téléphone mobile. Sélectionner OK pour recevoir des messages. Android ® ® 9. Connexion wifi sur votre téléphone mobile Ne pas encore connecter le câble réseau.
  • Seite 38 SCAMSET8 Lorsque 2 ou plus de téléphones mobiles sont connectés, enregistrer un différent identifiant pour chaque téléphone afin de recevoir une notification sur les différents téléphones mobiles. 3. Activer 'Set Wifi by QR code'. a. Saisir le nom du réseau wifi.
  • Seite 39 SCAMSET8 Le code QR ne peut être balayé qu'une seule fois. Appuyer sur le bouton de réinitialisation durant 5 secondes et redémarrer la procédure de balayage. 7. Ajouter l'appareil à la liste. a. Faire défiler vers le bas pour actualiser et trouver l'appareil.
  • Seite 40 SCAMSET8 Saisir le nom de l'appareil. d. Entrer votre mot de passe, confirmer et taper sur [Save]. e. Ouvrir la liste d'appareils, sélectionner l'appareil dans la liste et taper sur [Settings] pour accéder la page de configuration. Taper sur [Network Settings] pour accéder aux réglages du réseau.
  • Seite 41 SCAMSET8 Connecter l'appareil à un deuxième téléphone mobile Il est facile de connecter l'appareil à un deuxième téléphone mobile sans avoir à scanner de nouveau le code QR. Procéder comme suit : a. Taper sur [+] dans la liste d'appareils.
  • Seite 42: Régler La Date Et L'heure

    SCAMSET8 Régler la date et l'heure a. Sélectionner l'appareil dans la liste. b. Taper sur [Setting] pour ouvrir le menu de configuration. Taper sur [Date and Time] pour accéder à la page de configuration. a. Sélectionner le fuseau horaire (UTC+0 : Royaume-Uni / Irlande / Portugal ; UTC+1 : Allemagne / France / Belgique / Pays-Bas / Espagne / Pologne / Italie).
  • Seite 43 SCAMSET8 Push Notification Activer la fonction pour recevoir une notification lorsque quelqu'un sonne à la porte ou une alarme se déclenche. a. Taper sur [Alarm Settings] pour accéder aux réglages d'alarme. b. Balayer l'option [Alarm Push] pour activer la fonction.
  • Seite 44: Enregistrement Et Lecture Vidéo

    SCAMSET8 Interface d'affichage a. Maintenir enfoncé pendant 3 secondes pour déverrouiller la porte. Attendre encore 6 secondes pour déverrouiller de nouveau. date et heure parler int 1 int 5 audio image fluide (320 x 180) int 2 int 6 instantanée...
  • Seite 45 SCAMSET8 d. Retourner à la page de configuration et taper sur [Record Settings]. e. Choisir [Alarm Recording] pour enregistrer lorsque quelqu'un sonne à la porte ou une alarme est activée. Choisir la durée d'enregistrement. g. Retourner à la liste d'appareils, sélectionner l'appareil dans la liste et taper sur [Playback] pour accéder à...
  • Seite 46: Problèmes Et Solutions

    SCAMSET8 Réinitialiser l'appareil Maintenir enfoncé le bouton de réinitialisation pendant 5 secondes. Le système redémarra 30 secondes après le bip. Alarme anti-sabotage Lorsque l'appareil est retiré du boîtier, l'interrupteur anti-sabotage se déclenche. Le système envoie un message d'alarme au téléphone connecté.
  • Seite 47: Nettoyage Et Entretien

    être modifiés sans notification préalable. Déclaration de conformité R&TTE Par la présente, Velleman SA, déclare que le type d'équipement [SCAMSET8] est conforme à la norme 1999/5/EC. Le texte complet de la déclaration de conformité est disponible sur la page web suivante : www.velleman.eu.
  • Seite 48: Manual Del Usuario

    Si tiene dudas, contacte con las autoridades locales para residuos. ¡Gracias por elegir Perel! Lea atentamente las instrucciones del manual antes de usar el aparato. Si ha sufrido algún daño en el transporte no lo instale y póngase en contacto con su distribuidor.
  • Seite 49 SCAMSET8  Respete las especificaciones.  Ni Velleman nv ni sus distribuidores serán responsables de los daños extraordinarios, ocasionales o indirectos, sea cual sea la índole (financiera, física, etc.), causados por la posesión, el uso o el fallo de este producto.
  • Seite 50: Montaje En Pared

    SCAMSET8 6. Montaje en pared ¡Antes de la instalación, asegúrese de que reciba una buena señal wifi! Asegúrese también de que haya introducido la tarjeta microSD. 1. Seleccione un lugar de montaje. Taladre un agujero para los cables. 2. Fije el soporte con dos tornillos.
  • Seite 51 SCAMSET8 7. Cablear el sistema 1. Conecte la antena y fíjela a la pared dentro de la casa. 2. Conecte los cables. Descripción del esquema de conexión antena relé del timbre NA (gris) entrada de alimentación DC +12 V (rojo) Red RJ45 (naranja + blanco) entrada de alimentación DC -12 V (negro)
  • Seite 52 SCAMSET8 8. Instalar la app Descargue la app ‘SafeSmart’ (Google Play o iTunes) e instálela en el smartphone. Advertencia: asegúrese de que el software pueda enviar notificaciones. Android ® ® 9. Conectar el smartphone a la red wifi Todavía no conecte el cable de red.
  • Seite 53 SCAMSET8 Si utiliza dos o más smartphones para conectarse al sistema, introduzca un código ID para cada smartphone. De esa manera, cada smartphone recibirá una notificación. 3. Active la conexión wifi con el código QR. a. Introduzca el nombre wifi.
  • Seite 54 SCAMSET8 El sistema escaneará el código QR sólo una vez. pulse el botón de reinicio durante 5 segundas e vuelva a iniciar el procedimiento para escanear 7. Añada el videoportero a la lista. a. Deslice hacia abajo para actualizar y buscar el videoportero.
  • Seite 55 SCAMSET8 Introduzca el nombre del videoportero. d. Introduzca la contraseña, confirme y pulse [Save]. e. Abra la lista de aparatos y seleccione el videoportero deseado. Luego, pulse [Settings] para entrar en la página de los ajustes. Pulse [Network Settings] para entrar en la página de los ajustes de red.
  • Seite 56 SCAMSET8 Conectar el videoportero a un segundo smartphone Es fácil conectar el videoportero a un segundo smartphone porque ya no es necesario escanear el código QR de nuevo. Proceda sencillamente de la forma siguiente: a. Pulse [+] en la lista de aparatos.
  • Seite 57: Ajustar La Fecha Y La Hora

    SCAMSET8 Ajustar la fecha y la hora a. Pulse el videoportero en la lista de aparatos. b. Pulse [Setting] para abrir el menú de ajustes. Pulse [Date and Time] para entrar en la página de los ajustes. a. Seleccione su huso horario (UTC+0: Reino Unido/Irlanda/Portugal; UTC+1: Alemania/Francia/Bélgica/Los Países Bajos/España/Polonia/Italia).
  • Seite 58 SCAMSET8 La notificación ‘Push’ Active esta función a fin de recibir una notificación en caso de una visita o una alarma. a. Pulse [Alarm Settings] para entrar en la página de los ajustes de alarma. b. Active la función [Alarm Push] al deslizar el botón.
  • Seite 59 SCAMSET8 Interfaz de visualización a. Mantenga pulsado este botón durante 3 segundos para desbloquear la puerta. Espere 6 segundos más para volver a desbloquear. fecha y hora hablar int 1 int 5 audio imagen suave (320 x 180) int 2...
  • Seite 60 SCAMSET8 Si fuera necesario, pulse [Erase SD Card] para borrar los ficheros. d. Vuelva a la página de los ajustes y pulse [Record Settings]. e. Seleccione [Alarm Recording] para iniciar la grabación en cuanto se pulse el timbre o en caso de alarma.
  • Seite 61: Solución De Problemas

    SCAMSET8 Reiniciar el videoportero Mantenga pulsado el botón de reinicio durante 5 segundos. El sistema se reiniciará 30 segundos después del bip. Interruptor de manipulación El interruptor de manipulación se activará si alguien intente quitar el videoportero del soporte. El sistema enviará...
  • Seite 62: Limpieza Y Mantenimiento

    Declaración de conformidad R&TTE Por la presente, Velleman NV declara que el tipo de equipo de radio [SCAMSET8] cumple con la norma 1999/5/EC. El texto completo de la declaración de conformidad está disponible en la siguiente página web: www.velleman.eu.
  • Seite 63: Sicherheitshinweise

    Umweltvorschriften. Falls Zweifel bestehen, wenden Sie sich für Entsorgungsrichtlinien an Ihre örtliche Behörde. Vielen Dank, dass Sie sich für Perel entschieden haben! Lesen Sie diese Bedienungsanleitung vor Inbetriebnahme sorgfältig durch. Überprüfen Sie, ob Transportschäden vorliegen. Sollte dies der Fall sein, verwenden Sie das Gerät nicht und wenden Sie sich an Ihren Händler.
  • Seite 64 SCAMSET8  Verwenden Sie das Gerät nur für Anwendungen beschrieben in dieser Bedienungsanleitung Bei falscher Anwendung dieses Gerätes erlischt der Garantieanspruch.  Bei Schäden, die durch Nichtbeachtung der Bedienungsanleitung verursacht werden, erlischt der Garantieanspruch. Für daraus resultierende Folgeschäden übernimmt der Hersteller keine Haftung.
  • Seite 65 SCAMSET8 6. Wandmontage Stellen Sie vor der Installation sicher, dass Sie ein gutes Wifi-Signal empfangen. Vergewissern Sie sich auch davon, dass Sie die MicroSD-Karte eingelegt haben. 1. Wählen Sie Ihren Montageort. Bohren Sie ein Loch für die Leitungen. 2. Befestigen Sie die Halterung mit zwei Schrauben.
  • Seite 66: Das System Verdrahten

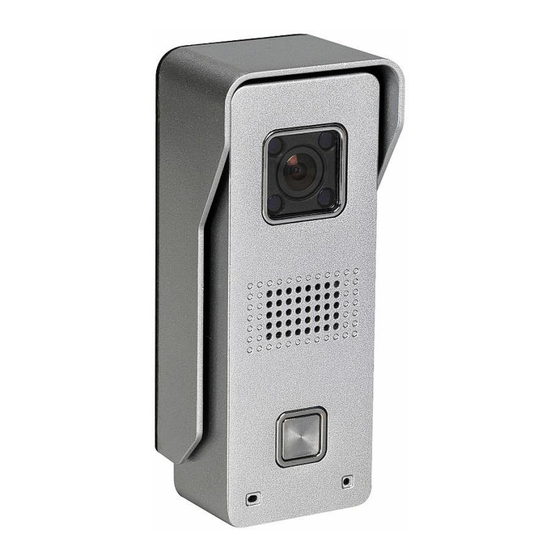
    SCAMSET8 7. Das System verdrahten 1. Schließen Sie die Antenne an und befestigen Sie diese an der Wand im Haus. 2. Schließen Sie die Leitungen an. Beschreibung des Anschlussplans Antenne Relais der Klingel NO (grau) Stromversorgungseingang DC +12 V (rot) Netz RJ45 (orange + weiß)
  • Seite 67: Die App Installieren

    SCAMSET8 8. Die App installieren Laden Sie die SafeSmart-App herunter (Google Play oder iTunes) und installieren Sie diese. Achtung: Stellen Sie sicher, dass die Software Alarmmeldungen senden kann. Android ® ® 9. Das Smartphone mit dem Wifi-Netzwerk verbinden Schließen Sie das Kabelnetzwerk noch nicht an.
  • Seite 68 SCAMSET8 Möchten Sie zwei oder mehr Smartphones mit dem System verbinden, registrieren Sie dann für jedes Smartphone eine andere ID-Nummer. Somit wird jedes Smartphone eine Alarmmeldung empfangen. 3. Aktivieren Sie die Wifi-Verbindung über den QR-Code. a. Geben Sie den Wifi-Namen ein.
  • Seite 69: Wifi-Verbindung Über Netzwerkkabel

    SCAMSET8 Das System scannt den QR-Code nur ein Mal. Drücken Sie die die Reset-Taste während 5 Sekunden und starten Sie das Scannen nochmals. 7. Fügen Sie die Türsprechanlage hinzu. a. Schieben Sie nach unten, um zu aktualisieren und die Türsprechanlage zu finden.
  • Seite 70 SCAMSET8 Geben Sie den Namen der Türsprechanlage ein. d. Geben Sie das Kennwort ein, bestätigen Sie und drücken Sie auf [Save]. e. Öffnen Sie die Geräteliste und wählen Sie die gewünschte Türsprechanlage aus. Drücken Sie danach auf [Settings], um die Seite der Einstellungen zu öffnen.
  • Seite 71: Die Türsprechanlage Mit Einem Zweiten Smartphone Verbinden

    SCAMSET8 Die Türsprechanlage mit einem zweiten Smartphone verbinden Es ist einfach, die Türsprechanlage mit einem zweiten Smartphone zu verbinden weil Sie den QR-Code nicht wieder scannen müssen. Gehen Sie einfach wie folgt vor: a. Drücken Sie in der Geräteliste auf [+].
  • Seite 72: Das Datum Und Die Uhrzeit Einstellen

    SCAMSET8 Das Datum und die Uhrzeit einstellen a. Drücken Sie in der Geräteliste auf die gewünschte Türsprechanlage. b. Drücken Sie auf [Setting], um das Konfigurationsmenü zu öffnen. Drücken Sie auf [Date and Time], um die Seite der Einstellungen zu öffnen.
  • Seite 73 SCAMSET8 Push-Meldung Aktivieren Sie diese Funktion, damit Sie bei Besuch oder Alarm eine Alarmmeldung empfangen. a. Drücken Sie auf [Alarm Settings], um in die Seite der Alarmeinstellungen zu gelangen. b. Aktivieren Sie die Funktion [Alarm Push], indem Sie die Taste schieben.
  • Seite 74: Anzeige-Schnittstelle

    SCAMSET8 Anzeige-Schnittstelle a. Halten Sie diese Taste 3 Sekunden gedrückt, um die Tür zu entriegeln. Warten Sie noch 6 Sekunden, um wieder zu entriegeln. Datum und Uhrzeit sprechen int 1 int 5 Audio sanftes Bild (320 x 180) int 2...
  • Seite 75 SCAMSET8 d. Gehen Sie zur Seite der Einstellungen zurück und drücken Sie auf [Record Settings]. e. Wählen Sie [Alarm Recording] aus, um die Aufnahme zu starten wenn der Klingeltaster gedrückt oder ein Alarm ausgelöst wird. Wählen Sie die Aufnahmedauer. g. Kehren Sie zur Geräteliste zurück und wählen Sie die gewünschte Türsprechanlage aus. Drücken Sie dann auf [Playback], um die Seite der Wiedergaben zu öffnen.
  • Seite 76: Die Türsprechanlage Auf Werkseinstellungen Zurücksetzen

    SCAMSET8 Die Türsprechanlage auf Werkseinstellungen zurücksetzen Halten Sie die Reset-Taste 5 Sekunden gedrückt. Das System startet 30 Sekunden nach dem Ertönen des akustischen Signals neu. Sabotagekontakt Der Sabotagekontakt wird eingeschaltet wenn eine Person versucht, die Türsprechanlage aus der Halterung zu nehmen. Das System wird dem Smartphone dann eine Alarmmeldung senden.
  • Seite 77: Reinigung Und Wartung

    Informationen zu diesem Produkt und die neueste Version dieser Bedienungsanleitung, siehe www.perel.eu. Alle Änderungen ohne vorherige Ankündigung vorbehalten. R&TTE Konformitätserklärung Hiermit erklärt Velleman NV, dass dieser Typ von Funkgerät [SCAMSET8] die 1999/5/EC-Norm erfüllt. Besuchen Sie folgende Website für den ganzen Text der EU-Konformitätserklärung: www.velleman.eu. © URHEBERRECHT Velleman NV besitzt das Urheberrecht für diese Bedienungsanleitung.
  • Seite 78: Manual Do Utilizador

    Em caso de dúvidas, contacte com as autoridades locais para os resíduos. Agradecemos o facto de ter escolhido a Perel! Leia atentamente as instruções do manual antes de usar o aparelho. Caso o aparelho tenha sofrido algum dano durante o transporte não o instale e entre em contacto com o seu distribuidor.
  • Seite 79 SCAMSET8  Danos causados pelo não cumprimento das normas de segurança referidas neste manual anulam a garantia e o seu distribuidor não será responsável por quaisquer danos ou outros problemas daí resultantes.  Não utilizar sem observar as especificações técnicas.
  • Seite 80: Montagem Na Parede

    SCAMSET8 6. Montagem na Parede Certifique-se de que há bom sinal wifi antes de fazer a instalação! Verifique se o cartão microSD se encontra inserido. 1. Escolha o local de montagem. Faça umfuro para passar os cabos. 2. Fixe a estrutura usando os dois parafusos.
  • Seite 81: Ligação Do Sistema

    SCAMSET8 7. Ligação do Sistema 1. Ligue a antena e fixe-a à parede no interior da casa. 2. Ligue os fios. descrição do esquema de ligação antena relé da campainha NO (cinzento) corrente DC + 12 V (vermelho) Rede RJ45 (laranja + branco)
  • Seite 82 SCAMSET8 8. Instalar a Aplicação Descarregue a aplicação SafeSmart a partir do Google Play ou loja iTunes, e instale-a no seu telefone. Não se esqueça de permitir ao software o envio de notificações. Android ® ® 9. Ligação Wifi ao seu Telemóvel Não ligue ainda o cabo de rede.
  • Seite 83 SCAMSET8 Se dois ou mais telemóveis estiverem normalmente ligados ao sistema, deve registar um ID diferente para cada um deles de forma a receber uma notificação em cada telemóvel. 3. Ative o wifi por código QR. a. Digite o nome wifi.
  • Seite 84 SCAMSET8 O sistema digitalizará o código QR uma única vez. Pressione o botão de reinicialização durante 5 segundos e reinicie o processo. 7. Adicione o intercomunicador à lista. a. Desloque-se para baixo até encontrar o intercomunicador. b. Pressione para adicionar.
  • Seite 85 SCAMSET8 Digite o nome do intercomunicador. d. Digite a sua palavra-passe, confirme e pressione [Save]. e. Aceda à lista de dispositivos, escolha o intercomunicador na lista e pressione [Settings] para ir para a página de definições. Pressione [Network Settings] para aceder à página de definições de rede.
  • Seite 86 SCAMSET8 Ligar o Intercomunicador a um Segundo Telemóvel Ligar o intercomunicador a um segundo smartphone é fácil, uma vez que não é necessário digitalizar o código QR novamente. Basta proceder conforme indicado abaixo: a. Pressione [+] na lista de dispositivos.
  • Seite 87 SCAMSET8 Acertar a data e a hora a. Escolha o intercomunicador na lista de dispositivos. b. Pressione [Setting] para abrir o menu. Pressione [Date and Time] para entrar na página das definições. a. Selecione o seu fuso horário (UTC+0: Reino Unido/Irlanda/Portugal; UTC+1: Alemanha/França/Bélgica/Holanda/ Espanha/Polónia/Itália).
  • Seite 88 SCAMSET8 Envio de Notificações Ative esta função de modo a ser notificado em caso de visitas ou alarme. a. Pressione [Alarm Settings] para aceder à página de definições do alarme. b. Selecione a opção [Alarm Push] para ativar a função.
  • Seite 89 SCAMSET8 Interface de Visualização a. Pressione durante 3 segundos para destrancar a porta. Aguarde mais 6 segundos para destrancar novamente. data e hora falar int 1 int 5 áudio imagem suave (320 x 180) int 2 int 6 capturar imagem imagem nítida (640 x 360)
  • Seite 90 SCAMSET8 d. Volte à página das definições e pressione [Record Settings]. e. Escolha [Alarm Recording] para iniciar a gravação assim que o botão do intercomunicador for pressionado ou o alarme disparar. Escolha o tempo de gravação. g. Volte à lista de dispositivos, selecione o intercomunicador na lisata e pressione [Playback] para aceder à...
  • Seite 91 SCAMSET8 Reiniciar o Intercomunicador Mantenha o botão de reinicialização pressionado durante 5 segundos. O sistema será reiniciado 30 segundo após o sinal sonoro. Alarme Sabotagem Quando o intercomunicador é removido do suporte num suposto ato de vandalismo, o interruptor de emergência é...
  • Seite 92: Limpeza E Manutenção

    Podem alterar-se as especificações e o conteúdo deste manual sem aviso prévio. Declaração de conformidade R&TTE A Velleman NV declara que o tipo de equipamento de rádio [SCAMSET8] está em conformidade com a Diretiva 1999/5/EC. O texto completo da declaração UE de conformidade está disponível no seguinte endereço: www.velleman.eu.
  • Seite 93: Manuale Utente

    è stato effettuato l’acquisto. La ringraziamo per aver scelto Perel! Si prega di leggere attentamente le informazioni contenute nel presente manuale prima di utilizzare il dispositivo. Se l’apparecchio è stato danneggiato durante il trasporto, non installarlo o utilizzarlo;...
  • Seite 94 SCAMSET8  Utilizzare il dispositivo solamente per lo scopo per il quale è stato progettato. Ogni altro tipo di utilizzo determina la decadenza della garanzia.  I danni derivanti dall’inosservanza delle indicazioni fornite nel presente manuale non sono coperti da garanzia;...
  • Seite 95: Montaggio A Parete

    SCAMSET8 6. Montaggio a parete Prima di installare il videocitofono assicurarsi che, nel punto in cui si intende collocarlo, ci sia una buona copertura del segnale wifi! Assicurarsi di aver inserito la micro SD card. 1. Scegliere il posto per l’installazione. Praticare un foro per far passare i fili.
  • Seite 96: Cablaggio Del Sistema

    SCAMSET8 7. Cablaggio del sistema 1. Collegare l'antenna e fissarla su una parete all’interno della casa. 2. Collegamento dei cavi. descrizione delle connessioni antenna relè campanello NO (grigio) alimentazione +12V DC (rosso) positivo Cavo RJ45 (arancione + bianco) alimentazione -12V DC (nero) negativo Cavo RJ45 (arancione) relè...
  • Seite 97 SCAMSET8 8. Installare l'App Scaricare l'applicazione SafeSmart da Google Play o iTunes, e installarla sullo smartphone. Configurare il software in modo che possa inviare le notifiche. Android ® ® 9. Attivare la connessione Wifi sullo smartphone Non collegare il cavo di rete.
  • Seite 98 SCAMSET8 Se vengono utilizzati due o più smartphone per gestire il sistema, è necessario registrare un ID diverso per ogni telefono in modo da poter ricevere le notifiche su ogni cellulare. 3. Attivare la connessione wifi tramite il codice QR.
  • Seite 99 SCAMSET8 Il sistema legge solo una volta il codice QR. Premere il pulsante reset per 5 secondi e riavviare la procedura di scansione. 7. Aggiungere lo smartphone alla lista. a. Far scorrere verso il basso per trovare e aggiornare il videocitofono.
  • Seite 100 SCAMSET8 Inserire il nome del videcitofono. d. Immettere la password, e confermare digitando [Save]. e. Nella finestra DEVICE LIST digitare [Settings] per accedere alle impostazioni del dispositivo. Digitare [Network Settings] per accedere alle impostazioni di rete. g. Selezionare il tipo di connessione, in questo caso [WIFI].
  • Seite 101 SCAMSET8 Collegare il videocitofono ad un secondo smartphone Collegare il videocitofono ad un secondo smartphone è facile, e non è necessario eseguire di nuovo la scansione del codice QR. Basta seguire la seguente procedura: a. Digitare [+] in [device list].
  • Seite 102: Impostare Data E Ora

    SCAMSET8 Impostare data e ora a. Nella finestra [device list] digitare sull’icona del videocitofono. b. Digitare [Setting] per aprire il menu impostazioni. Digitare [Date and Time] per entrare nella pagina relativa alle impostazioni di data e ora. a. Selezionare il fuso orario (UTC + 0: Inghilterra/Irlanda/Portogallo UTC+1: Germania/Francia/Belgio/ Paesi Bassi/Spagna/Polonia/Italia).
  • Seite 103 SCAMSET8 Push Notification Attivare la funzione in modo da essere avvisati in caso di visita o allarme. a. Digitare [Alarm Settings] per entrare nella pagina relativa delle impostazioni dell’allarme. b. Scorrere l'opzione [Alarm Push] per attivare la funzione. Digitare questa icona per eliminare l'ID a cui il videocitofono non deve inviare la notifica.
  • Seite 104 SCAMSET8 Visualizzazione dell'interfaccia a. Per sbloccare la finestra, tenere premuta l’icona per 3 secondi. Attendere altri 6 secondi per sbloccare nuovamente. data e ora interfono int 1 int 5 audio smooth image (320 x 180) int 2 int 6 foto istantanea...
  • Seite 105 SCAMSET8 Se necessario, digitare [Erase SD Card] per eliminare i file presenti sulla scheda. d. Tornare alla pagina delle impostazioni [Settings] e digitare [Record Settings]. e. Selezionare [Alarm Recording] per fare in modo che il dispositivo avvii la registrazione quando viene premuto il pulsante del videocitofono o viene attivato un allarme.
  • Seite 106: Risoluzione Dei Problemi

    SCAMSET8 Reset del videocitofono Premere e tenere premuto il pulsante di reset per 5 secondi. Il sistema verrà riavviato 30 secondi dopo il segnale acustico. Arrestare l’allarme Se il videocitofono viene rimosso dal suo supporto da qualche malintenzionato, verrà attivato l'allarme antimanomissione.
  • Seite 107: Pulizia E Manutenzione

    Dichiarazione di conformità R&TTE Con la presente, Velleman NV dichiara che il tipo di apparecchiature radio [SCAMSET8] è conforme alla direttiva 1999/5/CE. Il testo integrale della dichiarazione di conformità UE è disponibile al seguente indirizzo internet: www.velleman.eu.
  • Seite 108 gebruik of gebruik van het toestel strijdig met de voorschriften van de fabrikant. Velleman® Service and Quality Warranty - schade ten gevolge van een commercieel, professioneel of collectief Since its foundation in 1972, Velleman® acquired extensive gebruik van het apparaat (bij professioneel gebruik wordt de experience in the electronics world and currently distributes its garantieperiode herleid tot 6 maand).
  • Seite 109 improbable de que surgieran problemas a pesar de todas las - Schäden infolge einer kommerziellen, professionellen oder precauciones, es posible recurrir a nuestra garantía (véase las kollektiven Anwendung des Gerätes (bei gewerblicher Anwendung condiciones de garantía). wird die Garantieperiode auf 6 Monate zurückgeführt). - Schäden verursacht durch eine unsachgemäße Verpackung und Condiciones generales referentes a la garantía sobre unsachgemäßen Transport des Gerätes.
  • Seite 110 • Non è visibile sull’apparecchio il numero di serie. • L’unità è stata usata oltre i limiti consentiti, è stata modificata, installata impropriamente, è stata aperta o manomessa. Made in PRC Imported for Perel by Velleman nv Legen Heirweg 33, 9890 Gavere, Belgium www.perel.eu...

Inhaltsverzeichnis