Herunterladen Inhalt Inhalt Diese Seite drucken
Zanussi ZVEEW6X3 Benutzerinformation
Vorschau ausblenden Andere Handbücher für ZVEEW6X3:
Inhaltsverzeichnis

Werbung

Verfügbare Sprachen
  • DE

Verfügbare Sprachen

  • DEUTSCH, seite 80
User Manual
GETTING
STARTED?
EASY.
ZVEEW6X3
ZVEKW7XN
NL
Gebruiksaanwijzing
Magnetron
EN
User Manual
Microwave Oven
FR
Notice d'utilisation
Four à micro-ondes
DE
Benutzerinformation
Mikrowellenofen
PT
Manual de instruções
Forno microondas
ES
Manual de instrucciones
Horno de microondas
2
28
53
80
108
134

Werbung

Inhaltsverzeichnis
loading

Inhaltszusammenfassung für Zanussi ZVEEW6X3

  • Seite 1 User Manual GETTING STARTED? EASY. ZVEEW6X3 ZVEKW7XN Gebruiksaanwijzing Magnetron User Manual Microwave Oven Notice d'utilisation Four à micro-ondes Benutzerinformation Mikrowellenofen Manual de instruções Forno microondas Manual de instrucciones Horno de microondas...
  • Seite 2: Inhaltsverzeichnis

    GA NAAR ONZE WEBSITE VOOR: Advies over gebruik, brochures, het oplossen van problemen, service- en reparatie- informatie: www.zanussi.com/support Wijzigingen voorbehouden. INHOUDSOPGAVE 1. VEILIGHEIDSINFORMATIE......3 7.2 Instellen: Klokfuncties....16 1.1 De veiligheid van kinderen en 8. GEBRUIK VAN DE ACCESSOIRES..18 kwetsbare personen......
  • Seite 3: Veiligheidsinformatie

    VEILIGHEIDSINFORMATIE VEILIGHEIDSINFORMATIE Lees zorgvuldig de meegeleverde instructies voor installatie en gebruik van het apparaat. De fabrikant is niet verantwoordelijk voor verwondingen of schade die voortvloeit uit de onjuiste installatie of het onjuiste gebruik. Bewaar de instructies altijd op een veilige, toegankelijke plek voor toekomstig gebruik.
  • Seite 4 VEILIGHEIDSINFORMATIE Dit apparaat is bedoeld voor binnenshuis huishoudelijk • gebruik. Dit apparaat kan worden gebruikt in kantoren, hotelkamers, • bed & breakfast-kamers, boerderijgasthuizen en andere soortgelijke accommodaties waar dergelijk gebruik de (gemiddelde) huishoudelijke gebruiksniveaus niet overschrijdt. Alleen een erkende installatietechnicus mag dit apparaat •...
  • Seite 5 VEILIGHEIDSINFORMATIE het formaat en de vorm van het metalen voorwerp geschikt is voor bereiding in de magnetron. WAARSCHUWING: Als de deur of deurafdichtingen • beschadigd zijn, mag het apparaat niet worden gebruikt totdat het is gerepareerd door een erkende installatietechnicus. WAARSCHUWING: Alleen een erkende installatietechnicus •...
  • Seite 6: Veiligheidsvoorschriften

    VEILIGHEIDSVOORSCHRIFTEN exploderen, zelfs nadat de opwarming in de magnetron is beëindigd. Het apparaat moet regelmatig worden gereinigd en alle • voedselresten moeten worden verwijderd. Gebruik geen stoomreiniger om het apparaat schoon te • maken. Gebruik nooit agressieve reinigingsmiddelen of scherpe •...
  • Seite 7: Elektrische Aansluiting

    VEILIGHEIDSVOORSCHRIFTEN Hoogte van de voorkant van het apparaat 455 mm Hoogte van de achterkant van het apparaat 440 mm Breedte van de voorkant van het apparaat 595 mm Breedte van de achterkant van het apparaat 559 mm Diepte van het apparaat 567 mm Ingebouwde diepte van het apparaat 546 mm...
  • Seite 8: Gebruik

    VEILIGHEIDSVOORSCHRIFTEN • De elektrische installatie moet een isolatieapparaat bevatten waardoor het apparaat volledig van het lichtnet afgesloten kan worden. Het isolatieapparaat moet een contactopening hebben met een minimale breedte van 3 mm. • Dit apparaat wordt geleverd met een stekker en een netsnoer. 2.3 Gebruik WAARSCHUWING! Gevaar voor letsel, brandwonden, elektrische schokken of een explosie.
  • Seite 9: Binnenverlichting

    VEILIGHEIDSVOORSCHRIFTEN • Zorg ervoor dat het apparaat is afgekoeld. Er bestaat een risico dat de glasplaten kunnen breken. • Vervang direct de glazen deurpanelen als deze beschadigd zijn. Neem contact op met een erkend servicecentrum. • Wees voorzichtig als u de deur van het apparaat verwijdert. De deur is zwaar! •...
  • Seite 10: Beschrijving Van Het Product

    BESCHRIJVING VAN HET PRODUCT 3. BESCHRIJVING VAN HET PRODUCT 3.1 Algemeen overzicht Bedieningspaneel Knop voor verwarmingsfuncties Display Bedieningsknop Verwarmingselement Magnetrongenerator Lamp Draaiplateau-as 3.2 Accessoires Draaiplateauset Om eten te bereiden. ≤ 4 kg Grillrekset Om te grillen. 4. BEDIENINGSPANEEL 4.1 Verzonken knoppen Om het apparaat te bedienen, moet u de bedieningsknop indrukken.
  • Seite 11: Overzicht Bedieningspaneel

    BEDIENINGSPANEEL 4.2 Overzicht bedieningspaneel Bin‐ nen‐ Magne‐ Blokke‐ Instelling Draai aan de Timer ver‐ tronvermo‐ Druk op ring bevestigen knop lich‐ ting Selecteer een verwarmingsfunctie om het apparaat in te schakelen. Draai de knop voor de verwarmingsfuncties naar de uit-stand om het apparaat uit te schakelen. 4.3 Display Display met toetsfuncties.
  • Seite 12: Voorafgaand Aan Het Eerste Gebruik

    VOORAFGAAND AAN HET EERSTE GEBRUIK 5. VOORAFGAAND AAN HET EERSTE GEBRUIK WAARSCHUWING! Raadpleeg de hoofdstukken Veiligheid. 5.1 Eerste reiniging Reinig vóór het eerste gebruik het lege apparaat en stel de tijd in: 00:00 Stel de tijd in. Druk op 6. DAGELIJKS GEBRUIK WAARSCHUWING! Raadpleeg de hoofdstukken Veiligheid.
  • Seite 13: Verwarmingsfuncties

    DAGELIJKS GEBRUIK MAGNETRONVERMOGEN MAXIMUMTIJD 100 - 500 >500 Als je de deur opent, stopt de functie. Om de functie opnieuw te starten, sluit de deur. Druk op 6.3 Verwarmingsfuncties Verwarmingsfunc‐ Toepassing Opwarmen van dranken en soepen, vermogensbereik: 800 - 1000 W Vloeistof Vermogensbereik voor het opwarmen van vooraf bereide maaltijden en delicate gerechten: 300 - 700 W...
  • Seite 14: Instellen: Kook- En Bakassistent

    DAGELIJKS GEBRUIK Verwarmingsfunc‐ Toepassing Om gerechten in korte tijd te bereiden en bruin te kleuren met een lage grillintensiteit. Voor stoofschotels zoals aardappelgratin en lasagne. Ver‐ mogensbereik: 100 - 500 W Grill laag Opwarmen, koken, vermogensbereik: 100 - 1000 W Magnetron Om het menu te openen: Kook- En Bakassistent, Instellingen.
  • Seite 15 DAGELIJKS GEBRUIK Gerecht Gewicht Schapniveau/accessoire Hele kip 1.1 kg laagdraadrek; keramische of glazen braadpan Kip, twee helften 0.6 - 0.7 kg per Gebruik je favoriete kruiden. helft Hele vis 0.6 kg draaischijfglas; keramische of glazen braadpan Bedek het voedsel met een magnetronbestendig deksel met enkele gaten.
  • Seite 16: Klokfuncties

    KLOKFUNCTIES 7. KLOKFUNCTIES 7.1 Klokfuncties Klokfunctie Toepassing Wanneer de tijd is verstreken, klinkt er een geluidssignaal. Kookwekker Wanneer de timer stopt, klinkt het signaal en stopt de verwarmings‐ functie. Kooktijd Om het begin en/of het einde van het koken uit te stellen. Uitsteltijd Maximum is 23 uur 59 min.
  • Seite 17 KLOKFUNCTIES Instellen: Kookwekker Stap 1 Stap 2 Stap 3 Op het dis‐ play ver‐ schijnt: 0:00 Stel de Kookwekker in Druk op: Druk op: De timer begint onmiddellijk af te tellen. Deze functie is alleen beschikbaar voor: Grillen, Grill laag, Grill hoog. Instellen: Kooktijd Stap 1 Stap 2...
  • Seite 18: Gebruik Van De Accessoires

    GEBRUIK VAN DE ACCESSOIRES Instellen: Uitsteltijd Stap 1 Stap 2 Stap 3 Stap 4 Stap 5 Stap 6 Het dis‐ Op het play display toont: ver‐ de dag‐ schijnt: tijd --:-- Selec‐ Druk her‐ teer de Stel de Stel de STAR‐...
  • Seite 19: Extra Functies

    EXTRA FUNCTIES Grillrekset: Plaats het grillrooster met de siliconen doppen op de draaiplateauset. 9. EXTRA FUNCTIES 9.1 Blokkering Deze functie voorkomt dat de functie van het apparaat per ongeluk wordt gewijzigd. Schakel het in als het apparaat werkt – de ingestelde bereiding gaat door, het bedieningspaneel wordt vergrendeld.
  • Seite 20: Koelventilator

    AANWIJZINGEN EN TIPS 9.3 Koelventilator Als het apparaat in werking is, wordt de koelventilator automatisch ingeschakeld om de oppervlakken van het apparaat koel te houden. Als je het apparaat uitschakelt, kan de koelventilator blijven werken totdat het apparaat is afgekoeld. 10.
  • Seite 21: Kookgerei En Materialen Geschikt Voor De Magnetron

    AANWIJZINGEN EN TIPS Je kunt een hoger magnetronvermogen gebruiken om fruit en groenten te bereiden zonder ze eerst te ontdooien. 10.3 Kookgerei en materialen geschikt voor de magnetron Gebruik alleen kookgerei en materiaal in de magnetron dat hier geschikt voor is. Gebruik onderstaande tabel als referentie.
  • Seite 22: Aanbevolen Vermogensinstellingen Voor Verschillende Soorten Voedsel

    AANWIJZINGEN EN TIPS Kookgerei/materiaal Braadschalen gemaakt van metaal, bijv. email, gietijzer Bakblikken, zwarte lak of met siliconen coating Kookgerei voor gebruik in magnetron, bijv. pan voor knapperige gerechten Grillrekset 10.4 Aanbevolen vermogensinstellingen voor verschillende soorten voedsel De gegevens in de tabel dienen alleen als richtlijn. 800 - 1000 W Aanbakken aan het begin van het kookproces Vloeistoffen opwarmen...
  • Seite 23: Kooktafels Voor Testinstituten

    AANWIJZINGEN EN TIPS 300 - 400 W Smelten van Koken/opwarmen Babyvoeding op‐ Doorgaan met kaas, chocolade, Rijst sudderen van delicaat voed‐ warmen koken boter 100 - 200 W Ontdooien van fruit en Ontdooien van kaas, Ontdooien van vlees, Ontdooien van brood gebak room, boter 10.5 Kooktafels voor testinstituten...
  • Seite 24: Onderhoud En Reiniging

    ONDERHOUD EN REINIGING COMBIMAGNETRON‐ FUNCTIE Intensiteitsni‐ veau grill Aardappelgratin, 1,1 kg laag 30 - 35 Kip, 1,1 kg hoog 30 - 35 Doe het vlees in een ronde glazen kom. 11. ONDERHOUD EN REINIGING WAARSCHUWING! Raadpleeg de hoofdstukken Veiligheid. 11.1 Opmerkingen over de reiniging Reinig de voorkant van het apparaat uitsluitend met een microvezeldoek met warm water en een mild reinigingsmiddel.
  • Seite 25: Probleemoplossing

    PROBLEEMOPLOSSING 12. PROBLEEMOPLOSSING WAARSCHUWING! Raadpleeg de hoofdstukken Veiligheid. 12.1 Wat te doen als... Neem in alle gevallen die niet in deze tabel zijn opgenomen contact op met een erkend servicecentrum. Het apparaat gaat niet aan of warmt niet op Probleem Controleer of de volgende zaken van toe‐...
  • Seite 26: Service-Informatie

    ENERGIEZUINIGHEID Foutcodes 00:00 Er was een stroomstoring. Stel het tijdstip van de dag in. Als het display een foutcode weergeeft die niet in deze tabel staat, schakelt u de zekering van het huis uit en weer in om de oven opnieuw te starten. Als de foutcode opnieuw optreedt, neemt u contact op met een erkend servicecentrum.
  • Seite 27: Milieubescherming

    MENUSTRUCTUUR Selecteer de op‐ Pas de waarde - druk op om tie in de Menu Selecteer de in‐ - selecteer aan en druk op de instelling te structuur en druk stelling. om de Menu. bevestigen. Draai de knop voor de verwarmingsfuncties naar de uit-stand om Menu af te sluiten. Menu-structuur te betreden Kook- En Bakassistent Instellingen...
  • Seite 28 VISIT OUR WEBSITE TO: Get usage advice, brochures, trouble shooter, service and repair information: www.zanussi.com/support Subject to change without notice. CONTENTS 1. SAFETY INFORMATION......29 7.2 How to set: Clock functions... 41 1.1 Children and vulnerable people 8. USING THE ACCESSORIES.....43 safety...........
  • Seite 29: Safety Information

    SAFETY INFORMATION SAFETY INFORMATION Before the installation and use of the appliance, carefully read the supplied instructions. The manufacturer is not responsible for any injuries or damage that are the result of incorrect installation or usage. Always keep the instructions in a safe and accessible location for future reference.
  • Seite 30 SAFETY INFORMATION This appliance may be used in, offices, hotel guest rooms, • bed & breakfast guest rooms, farm guest houses and other similar accommodation where such use does not exceed (average) domestic usage levels. Only a qualified person must install this appliance and •...
  • Seite 31 SAFETY INFORMATION cover which gives protection against exposure to microwave energy. WARNING: Do not heat liquids and other foods in sealed • containers. They are liable to explode. Use only utensils that are suitable for use in microwave • ovens. When heating food in plastic or paper containers, observe •...
  • Seite 32: Safety Instructions

    SAFETY INSTRUCTIONS 2. SAFETY INSTRUCTIONS 2.1 Installation WARNING! Only a qualified person must install this appliance. • Remove all the packaging. • Do not install or use a damaged appliance. • Follow the installation instructions supplied with the appliance. • Always take care when moving the appliance as it is heavy. Always use safety gloves and enclosed footwear.
  • Seite 33: Electrical Connection

    SAFETY INSTRUCTIONS 2.2 Electrical connection WARNING! Risk of fire and electric shock. • All electrical connections should be made by a qualified electrician. • The appliance must be earthed. • Make sure that the parameters on the rating plate are compatible with the electrical ratings of the mains power supply.
  • Seite 34: Care And Cleaning

    SAFETY INSTRUCTIONS WARNING! Risk of damage to the appliance. • To prevent damage or discoloration to the enamel: – do not put aluminium foil directly on the bottom of cavity of the appliance. – do not put water directly into the hot appliance. –...
  • Seite 35: Service

    PRODUCT DESCRIPTION 2.6 Service • To repair the appliance contact the Authorised Service Centre. • Use original spare parts only. 2.7 Disposal WARNING! Risk of injury or suffocation. • Contact your municipal authority for information on how to dispose of the appliance. •...
  • Seite 36: Control Panel

    CONTROL PANEL Grill rack set To grill. 4. CONTROL PANEL 4.1 Retractable knobs To use the appliance press the knob. The knob comes out. 4.2 Control panel overview Microwave Confirm Timer Lock Light Press Turn the knob power setting Select a heating function to turn on the appliance. Turn the knob for the heating functions to the off position to turn the appliance off.
  • Seite 37: Before First Use

    BEFORE FIRST USE Lock Assisted Cooking Settings Microwave function indicator Timer indicators Minute minder Time Delay Uptimer End time Progress bar - for temperature or time. The bar is fully red when the appliance reaches the set temperature. 5. BEFORE FIRST USE WARNING! Refer to Safety chapters.
  • Seite 38: Heating Functions

    DAILY USE Step 2 Press: to start with default settings. The display shows: duration and microwave power. Step 3 Turn the control knob to adjust the duration. Press: Step 4 Press: . Turn the control knob to adjust the microwave power. Press: Step 5 Turn the knob for the heating functions to the off position to turn off the appliance.
  • Seite 39: How To Set: Assisted Cooking

    DAILY USE Heating function Application Preparing popcorn, power range: 700 - 1000 W Popcorn To grill thin pieces of food and to toast bread. Grill To cook food in short time and brown it with high grill intensity. Power range: 100 - 500 W. Grill High To cook food in short time and brown it with low grill intensity.
  • Seite 40: Assisted Cooking

    DAILY USE 6.5 Assisted Cooking Legend Function with microwave power. Use microwave safe accessory. Shelf level. The display shows P and a number of the dish that you can check in the table. When the function ends check if the food is ready. Dish Weight Shelf level / Accessory...
  • Seite 41: Clock Functions

    CLOCK FUNCTIONS Dish Weight Shelf level / Accessory Potato gratin 1.1 kg (raw potatoes) low wire rack; ceramic or glass casserole dish Lasagna with dry 1 - 1,5.kg noodle plates 7. CLOCK FUNCTIONS 7.1 Clock functions Clock Function Application When the timer ends, the signal sounds. Minute minder When the timer ends, the signal sounds and the heating function stops.
  • Seite 42 CLOCK FUNCTIONS How to set: Minute minder Step 1 Step 2 Step 3 The display shows: 0:00 Set the Minute minder Press: Press: Timer starts counting down immediately. This function is available only for: Grill, Grill Low, Grill High. How to set: Cooking time Step 1 Step 2 Step 3...
  • Seite 43: Using The Accessories

    USING THE ACCESSORIES How to set: Time Delay Step 1 Step 2 Step 3 Step 4 Step 5 Step 6 The dis‐ The dis‐ play play shows: shows: the time --:-- of day Select Press re‐ Set the Set the STOP Press: Press:...
  • Seite 44: Additional Functions

    ADDITIONAL FUNCTIONS Grill rack set: Place the grill rack with the silicon caps down on the turntable set. 9. ADDITIONAL FUNCTIONS 9.1 Lock This function prevents an accidental change of the appliance function. Turn it on when the appliance works - the set cooking continues, the control panel is locked. Turn it on when the appliance is off - it cannot be turned on, the control panel is locked.
  • Seite 45: Cooling Fan

    HINTS AND TIPS 9.3 Cooling fan When the appliance operates, the cooling fan turns on automatically to keep the surfaces of the appliance cool. If you turn off the appliance, the cooling fan can continue to operate until the appliance cools down. 10.
  • Seite 46: Microwave Suitable Cookware And Materials

    HINTS AND TIPS 10.3 Microwave suitable cookware and materials For the microwave use only suitable cookware and materials. Use below table as a reference. Check the cookware / material specification before use. Cookware / Material Ovenproof glass and porce‐ lain with no metal compo‐ nents, e.g.
  • Seite 47: Recommended Power Settings For Different Kinds Of Food

    HINTS AND TIPS Cookware / Material Baking tins, black lacquer or silicon-coated Cookware for microwave use, e.g. crisp pan Grill rack set 10.4 Recommended power settings for different kinds of food The data in the table is for guidance only. 800 - 1000 W Searing at the start of the cooking process Heating liquids...
  • Seite 48: Cooking Tables For Test Institutes

    HINTS AND TIPS 100 - 200 W Defrosting fruit and Defrosting cheese, Defrosting bread Defrosting meat, fish cakes cream, butter 10.5 Cooking tables for test institutes Information for test institutes Tests according to IEC 60705. Microwave function Use wire shelf unless otherwise specified. Sponge cake 0.475 Turntable...
  • Seite 49: Care And Cleaning

    CARE AND CLEANING 11. CARE AND CLEANING WARNING! Refer to Safety chapters. 11.1 Notes on cleaning Clean the front of the appliance only with a microfibre cloth with warm water and a mild detergent. Use a cleaning solution to clean metal surfaces. Cleaning Clean stains with a mild detergent.
  • Seite 50: Service Data

    TROUBLESHOOTING The appliance does not turn on or does not heat up You cannot activate or operate the appliance. The appliance is correctly connected to an electrical supply. The appliance does not heat up. The automatic switch-off is deactivated. The appliance does not heat up. The fuse is not blown.
  • Seite 51: Energy Efficiency

    ENERGY EFFICIENCY We recommend that you write the data here: Product number (PNC) ......... Serial number (S.N.) ......... 13. ENERGY EFFICIENCY 13.1 Energy saving Make sure that the appliance door is closed when the appliance operates. Do not open the appliance door too often during cooking.
  • Seite 52: Environmental Concerns

    MENU STRUCTURE Settings Key tones 1 - Beep Buzzer volume 1 - 4 2 - Click 3 - Sound off Uptimer On / Off Light On / Off Demo mode Activation Software version Check code: 2468 Reset all settings Yes / No 15.
  • Seite 53 VISITEZ NOTRE SITE WEB POUR : Obtenir des conseils d’utilisation, des brochures, un dépanneur, des informations sur le service et les réparations : www.zanussi.com/support Sous réserve de modifications. TABLE DES MATIÈRES 1. INFORMATION SUR LA SÉCURITÉ..54 7.2 Comment régler : Fonctions de l’horloge..........
  • Seite 54: Information Sur La Sécurité

    INFORMATION SUR LA SÉCURITÉ INFORMATION SUR LA SÉCURITÉ Avant d'installer et d'utiliser cet appareil, lisez soigneusement les instructions fournies. Le fabricant ne pourra être tenu pour responsable des blessures et dégâts résultant d'une mauvaise installation ou utilisation. Conservez toujours les instructions dans un lieu sûr et accessible pour vous y référer ultérieurement.
  • Seite 55 INFORMATION SUR LA SÉCURITÉ Cet appareil est conçu pour un usage domestique unique, • dans un environnement intérieur. Cet appareil peut être utilisé dans les bureaux, les • chambres d’hôtel, les chambres d’hôtes, les maisons d’hôtes de ferme et d’autres hébergements similaires lorsque cette utilisation ne dépasse pas le niveau (moyen) de l’utilisation domestique.
  • Seite 56 INFORMATION SUR LA SÉCURITÉ taille et la forme des récipients métalliques adaptés à la cuisson au micro-ondes. AVERTISSEMENT : Si la porte ou les joints de porte sont • endommagés, l'appareil ne doit pas être utilisé tant qu'il n'a pas été réparé par un professionnel qualifié. AVERTISSEMENT : Toute opération de maintenance ou •...
  • Seite 57: Consignes De Sécurité

    CONSIGNES DE SÉCURITÉ Nettoyez régulièrement l'appareil et retirez les dépôts • alimentaires. N'utilisez pas de nettoyeur à vapeur pour nettoyer l'appareil. • N'utilisez pas de produits abrasifs ni de racloirs pointus en • métal pour nettoyer la porte en verre car ils peuvent rayer la surface, ce qui peut briser le verre.
  • Seite 58: Branchement Électrique

    CONSIGNES DE SÉCURITÉ Largeur de l’arrière de l’appareil 559 mm Profondeur de l'appareil 567 mm Profondeur d’encastrement de l’appareil 546 mm Profondeur avec porte ouverte 882 mm Dimensions minimales de l’ouverture de ventila‐ 560x20 mm tion. Ouverture placée sur la partie inférieure de la face arrière Longueur du câble d’alimentation secteur.
  • Seite 59: Utilisation

    CONSIGNES DE SÉCURITÉ 2.3 Utilisation AVERTISSEMENT! Risque de blessures, de brûlures, d'électrocution ou d'explosion. • Ne modifiez pas les spécifications de cet appareil. • Assurez-vous que les orifices d'aération ne sont pas obstrués. • Ne laissez pas l'appareil sans surveillance durant son fonctionnement. •...
  • Seite 60: Éclairage Interne

    CONSIGNES DE SÉCURITÉ • Soyez prudent lorsque vous retirez la porte de l'appareil. La porte est lourde ! • Veillez à sécher la cavité, le plateau tournant et la porte après chaque utilisation. La vapeur produite durant son fonctionnement se condense sur les parois de la cavité et peuvent entraîner une corrosion.
  • Seite 61: Description De L'appareil

    DESCRIPTION DE L'APPAREIL 3. DESCRIPTION DE L'APPAREIL 3.1 Vue d’ensemble Bandeau de commande Manette de sélection des modes de cuisson Affichage Manette de commande Résistance Générateur de micro-ondes Éclairage Axe du plateau tournant 3.2 Accessoires Ensemble Plateau tournant Pour préparer les aliments. ≤...
  • Seite 62: Vue D'ensemble Du Bandeau De Commande

    BANDEAU DE COMMANDE 4.2 Vue d'ensemble du bandeau de commande Eclai‐ Puissance Confirmez Minu‐ Touches Appuyez sur Tournez la ma‐ rage du micro- la configu‐ teur Verrouil la touche nette four ondes ration Sélectionnez un mode de cuisson pour mettre en fonctionnement l’appareil. Tournez la manette des modes de cuisson sur la position Arrêt pour éteindre l’appareil.
  • Seite 63: Avant La Première Utilisation

    AVANT LA PREMIÈRE UTILISATION 5. AVANT LA PREMIÈRE UTILISATION AVERTISSEMENT! Reportez-vous aux chapitres concernant la sécurité. 5.1 Nettoyage initial Avant la première utilisation, nettoyez l’appareil à vide et réglez la durée : 0:00. Réglez l’heure. Appuyez sur la tou‐ 6. UTILISATION QUOTIDIENNE AVERTISSEMENT! Reportez-vous aux chapitres concernant la sécurité.
  • Seite 64: Modes De Cuisson

    UTILISATION QUOTIDIENNE PUISSANCE DU MICRO-ONDES DURÉE MAXIMALE 100 - 500 >500 Si vous ouvrez la porte, la fonction du micro-ondes s’arrête. Pour le redémarrer, fermez la porte. Appuyez sur la touche 6.3 Modes de cuisson Mode de cuisson Application Chauffage de boissons et de soupes, plage de puissance : 800 à 1 000 W Liquides Chauffage de plats préparés et d'aliments délicats, plage de puissance : 300 à...
  • Seite 65: Comment Régler : Cuisson Assistée

    UTILISATION QUOTIDIENNE Mode de cuisson Application Pour cuire les aliments rapidement et les faire dorer avec une faible inten‐ sité de gril. Pour les plats type gratin de pommes de terre, lasagnes. Pla‐ ge de puissance : 100 à 500 W. Intensité...
  • Seite 66 UTILISATION QUOTIDIENNE Plat Poids Niveau/Accessoire Poulet entier 1.1 kg grille basse ; cocotte en céramique ou en verre Poulet, deux 0.6 - 0.7 kg par Utilisez vos épices préférées. moitiés moitié Poisson entier 0.6 kg plaque en verre pour plateau tournant ; cocotte en céramique ou en verre Couvrez les aliments avec un couvercle adapté...
  • Seite 67: Fonctions De L'horloge

    FONCTIONS DE L'HORLOGE 7. FONCTIONS DE L'HORLOGE 7.1 Fonctions de l’horloge Fonctions de l’horlo‐ Application Lorsque le minuteur termine le décompte, le signal sonore retentit. Minuteur Lorsque le minuteur termine le décompte, le signal sonore retentit et le mode de cuisson s’arrête. Heure de cuisson Pour reporter le début et / ou la fin de la cuisson.
  • Seite 68 FONCTIONS DE L'HORLOGE Comment régler Minuteur Étape 1 Étape 2 Étape 3 L’affichage indique : 0:00 Réglez la Minuteur Appuyez sur : Appuyez sur Le minuteur commence son décompte immédiatement. Cette fonction est disponible uniquement avec : Gril, Intensité du gril faible, Intensité du gril éle‐ vée.
  • Seite 69: Utilisation Des Accessoires

    UTILISATION DES ACCESSOIRES Comment régler Départ différé Étape 1 Étape 2 Étape 3 Étape 4 Étape 5 Étape 6 L'affi‐ chage L’affi‐ indi‐ chage que : indique : l'heure --:-- actuelle Sélec‐ AR‐ Appuyez à Réglez DÉ‐ tionnez Réglez RÊTER plusieurs Appuyez Appuyez...
  • Seite 70: Fonctions Supplémentaires

    FONCTIONS SUPPLÉMENTAIRES Ensemble gril: Placez la grille avec les capuchons en sili‐ cone sur le plateau tournant. 9. FONCTIONS SUPPLÉMENTAIRES 9.1 Touches Verrouil. Cette fonction permet d’éviter une modification involontaire de la fonction de l'appareil. Activez-la lorsque l'appareil est allumé - la cuisson réglée est maintenue, le bandeau de comman‐ de est verrouillé.
  • Seite 71: Ventilateur De Refroidissement

    CONSEILS 9.3 Ventilateur de refroidissement Lorsque l'appareil fonctionne, le ventilateur de refroidissement se met automatiquement en marche pour refroidir les surfaces de l'appareil. Si vous éteignez l'appareil, le ventilateur de refroidissement peut continuer à fonctionner jusqu'à ce que l'appareil refroidisse. 10.
  • Seite 72: Ustensiles De Cuisine Et Matériaux Adaptés Aux Micro-Ondes

    CONSEILS Placez les aliments surgelés déballés sur une petite assiette retournée avec un récipient en- dessous, ou sur une grille de décongélation ou une passoire en plastique afin que l'eau de décongélation puisse s'évacuer. Retirez ensuite les morceaux décongelés. Vous pouvez utiliser une puissance de micro-ondes plus élevée pour cuire les fruits et légumes sans les décongeler.
  • Seite 73: Réglages Recommandés Pour Différents Types D'aliments

    CONSEILS Ustensiles de cuisine / Ma‐ tériaux Sachet de cuisson avec fer‐ meture de sûreté pour micro- ondes Plats à rôtir en métal, par ex. en émail, en fonte Moules à gâteaux, laqués noirs ou avec revêtement en silicone Ustensiles pour une utilisa‐ tion au micro-ondes, par ex.
  • Seite 74 CONSEILS 300 à 400 W Faire fondre du Réchauffer des Cuire / Réchauffer Faire mijoter Poursuivre la fromage, du cho‐ aliments pour des aliments déli‐ du riz cuisson colat, du beurre bébés cats 100 à 200 W Décongélation du fro‐ Décongeler des fruits Décongeler de la Décongeler du pain...
  • Seite 75: Entretien Et Nettoyage

    ENTRETIEN ET NETTOYAGE Décongélation de Ensemble 8 - 9 viande du pla‐ teau tour‐ nant Fonction combi micro-ondes Utilisez la fonction : Gril au micro-ondes. Utilisez la grille basse. FONCTION COMBI MI‐ CRO-ONDES Niveau d’inten‐ sité du gril Gratin de pommes de faible 30 - 35 terre, 1,1 kg...
  • Seite 76: Dépannage

    DÉPANNAGE Nettoyez la cavité après chaque utilisation. L’accumulation de graisse ou d’au‐ tres résidus peut provoquer un incendie. Nettoyez soigneusement la voûte de l'appareil pour éliminer les résidus et la graisse. Ne conservez pas les aliments dans l'appareil pendant plus de 20 minutes. Sé‐ Utilisation chez la cavité...
  • Seite 77: Données De Maintenance

    DÉPANNAGE Composants Problème Vérifiez si... L’éclairage ne fonctionne pas. L’ampoule est grillée. Contactez un service après-vente agréé. L'ensemble du plateau tournant fait du bruit. Des résidus d’aliments sont présents sous l’en‐ semble du plateau tournant. Codes d'erreur L’affichage indique… Vérifiez si... 0:00.
  • Seite 78: Rendement Énergétique

    RENDEMENT ÉNERGÉTIQUE 13. RENDEMENT ÉNERGÉTIQUE 13.1 Économie d'énergie Assurez-vous que la porte de l'appareil est fermée lorsque l'appareil est en fonctionnement. Évitez d'ouvrir l'appareil trop souvent pendant la cuisson. Nettoyez régulièrement le joint de porte et assurez-vous qu’il est bien en place. Dans la mesure du possible, ne préchauffez pas l'appareil avant la cuisson.
  • Seite 79: En Matière De Protection De L'environnement

    STRUCTURE DES MENUS Configurations Compteur Marche / Ar‐ Eclairage four Marche / Arrêt rêt Mode démo Code d'acti‐ Version du logiciel Contrôle vation : 2468 Réinitialiser tous les Oui/Non réglages 15. EN MATIÈRE DE PROTECTION DE L'ENVIRONNEMENT Recyclez les matériaux portant le symbole .
  • Seite 80 BESUCHEN SIE UNSERE WEBSITE, UM: Anwendungshinweise, Prospekte, Informationen zu Fehlerbehebung, Service und Reparatur zu erhalten: www.zanussi.com/support Änderungen vorbehalten. INHALTSVERZEICHNIS 1. SICHERHEITSHINWEISE......81 7.2 Einstellung: Uhrfunktionen.....94 1.1 Sicherheit von Kindern und 8. VERWENDUNG DES ZUBEHÖRS....96 schutzbedürftigen Personen....81 8.1 Einsetzen des Zubehörs....96 1.2 Allgemeine Sicherheit....
  • Seite 81: Sicherheitshinweise

    SICHERHEITSHINWEISE SICHERHEITSHINWEISE Lesen Sie vor der Montage und dem Gebrauch des Geräts zuerst die Bedienungsanleitung. Bei Verletzungen oder Schäden infolge nicht ordnungsgemäßer Montage oder Verwendung übernimmt der Hersteller keine Haftung. Bewahren Sie die Anleitung zum Nachschlagen an einem sicheren und zugänglichen Ort auf. 1.1 Sicherheit von Kindern und schutzbedürftigen Personen Das Gerät kann von Kindern ab 8 Jahren und Personen mit...
  • Seite 82: Allgemeine Sicherheit

    SICHERHEITSHINWEISE 1.2 Allgemeine Sicherheit Dieses Gerät ist nur zum Kochen bestimmt. • Dieses Gerät ist für den Hausgebrauch in einem • Einfamilienhaus in Innenräumen bestimmt. Dieses Gerät darf in Büros, Hotelzimmern, Gästezimmern in • Pensionen, Bauernhöfen und anderen ähnlichen Unterkünften verwendet werden, wenn diese Nutzung das (durchschnittliche) Nutzungsniveau im Haushalt nicht überschreitet.
  • Seite 83 SICHERHEITSHINWEISE Verwenden Sie beim Garen in der Mikrowelle keine • Metallbehälter für Speisen und Getränke. Diese Vorgabe gilt nicht, wenn der Hersteller Angaben zur Größe und Form der Metallbehälter, die geeignet für das Garen in der Mikrowelle sind, zur Verfügung gestellt hat. WARNUNG: Wenn die Tür oder Türdichtungen beschädigt •...
  • Seite 84: Sicherheitsanweisungen

    SICHERHEITSANWEISUNGEN Eier mit Schale und ganze, hart gekochte Eier dürfen nicht • im Gerät erhitzt werden, da sie explodieren können, auch nachdem die Erhitzung in der Mikrowelle beendet ist. Das Gerät muss regelmäßig gereinigt und alle Speisereste • entfernt werden. Reinigen Sie das Gerät nicht mit einem Dampfstrahlreiniger.
  • Seite 85: Elektrischer Anschluss

    SICHERHEITSANWEISUNGEN Schrankbreite 560 mm Schranktiefe 550 (550) mm Höhe der Gerätevorderseite 455 mm Höhe der Geräterückseite 440 mm Breite der Gerätevorderseite 595 mm Breite der Geräterückseite 559 mm Gerätetiefe 567 mm Geräteeinbautiefe 546 mm Tiefe bei geöffneter Tür 882 mm Mindestgröße der Belüftungsöffnung.
  • Seite 86: Gebrauch

    SICHERHEITSANWEISUNGEN • Stecken Sie den Netzstecker erst nach Abschluss der Montage in die Steckdose. Stellen Sie sicher, dass der Netzstecker nach der Montage noch zugänglich ist. • Falls die Steckdose lose ist, schließen Sie den Netzstecker nicht an. • Ziehen Sie nicht am Netzkabel, wenn Sie das Gerät von der Stromversorgung trennen möchten.
  • Seite 87: Reinigung Und Pflege

    SICHERHEITSANWEISUNGEN oder den Boden beschädigen. Schließen Sie die Möbelfront nicht, bevor das Gerät nach dem Gebrauch völlig abgekühlt ist. 2.4 Reinigung und Pflege WARNUNG! Verletzungs-, Brandgefahr sowie Risiko von Schäden am Gerät. • Schalten Sie das Gerät immer aus und ziehen Sie den Netzstecker aus der Steckdose, bevor Reinigungsarbeiten durchgeführt werden.
  • Seite 88: Gerätebeschreibung

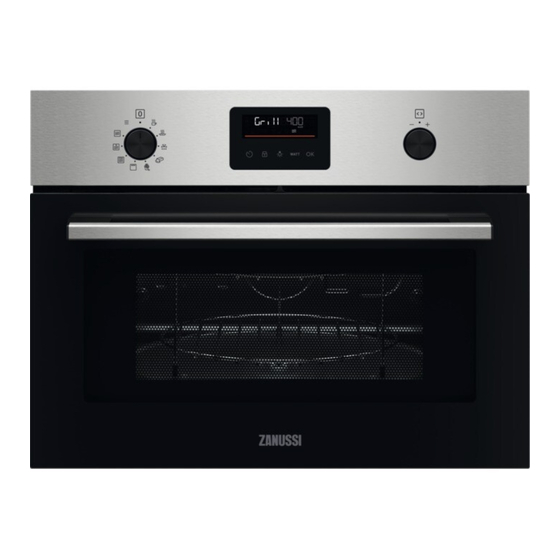
    GERÄTEBESCHREIBUNG • Schneiden Sie das Netzkabel in der Nähe des Geräts ab, und entsorgen Sie es. • Entfernen Sie das Türschloss, um zu verhindern, dass sich Kinder, oder Haustiere im Gerät einschließen. 3. GERÄTEBESCHREIBUNG 3.1 Gesamtansicht Bedienfeld Einstellknopf für die Ofenfunktionen Display Einstellknopf Heizelement...
  • Seite 89: Überblick - Bedienfeld

    BEDIENFELD 4.2 Überblick – Bedienfeld Back‐ Kurz‐ ofen‐ Bestätigen Verrie‐ Mikrowel‐ Drehen Sie den zeitwe‐ be‐ Sie die Ein‐ Drücken Sie gelung lenleistung Knopf cker leuch‐ stellung tung Wählen Sie eine Ofenfunktion, um das Gerät einzuschalten. Drehen Sie den Knopf für die Ofenfunktionen in die Aus-Position, um das Gerät auszuschalten. 4.3 Display Display mit Tastenfunktionen.
  • Seite 90: Vor Der Ersten Verwendung

    VOR DER ERSTEN VERWENDUNG 5. VOR DER ERSTEN VERWENDUNG WARNUNG! Siehe Kapitel Sicherheitshinweise. 5.1 Erste Reinigung Reinigen Sie vor dem ersten Gebrauch das leere Gerät und stellen Sie die Uhrzeit ein: 00:00 Stellen Sie die Zeit ein. Drücken Sie 6. TÄGLICHER GEBRAUCH WARNUNG! Siehe Kapitel Sicherheitshinweise.
  • Seite 91: Ofenfunktionen

    TÄGLICHER GEBRAUCH Die maximale Dauer der Mikrowellenfunktionen hängt von der eingestellten Mikrowellenleistung MIKROWELLENLEISTUNG MAXIMALE DAUER 100 - 500 >500 Wenn Sie die Tür öffnen, wird die Mikrowellenfunktion ausgeschaltet. Um sie erneut zu starten, schließen Sie die Tür. Drücken Sie 6.3 Ofenfunktionen Ofenfunktion Anwendung Aufwärmen von Getränken und Suppen, Leistungsbereich: 800 - 1000 W...
  • Seite 92: Einstellung: Koch-Assistent

    TÄGLICHER GEBRAUCH Ofenfunktion Anwendung Um Speisen in kurzer Zeit zu garen und mit niedriger Grillintensität zu bräunen. Für Aufläufe wie Kartoffelgratin, Lasagne. Leistungsbereich: 100 bis 500 W Grill, niedrig Aufwärmen, Kochen, Leistungsbereich: 100 - 1000 W Mikrowelle Aufrufen des Menüs: Koch-Assistent, Einstellungen. Menü...
  • Seite 93 TÄGLICHER GEBRAUCH Speise Gewicht Einschubebene / Zubehör Hähnchen, ganz 1.1 kg Unterer Rosthalter; Keramik- oder Glas‐ auflaufform Hähnchen, hal‐ 0.6 - 0.7 kg pro Verwenden Sie Ihre Lieblingsgewürze. biert Hälfte Fisch, ganz 0.6 kg Glasdrehscheibe; Keramik- oder Glasauf‐ laufform Bedecken Sie die Lebensmittel mit einem mikro‐ wellenfesten Deckel mit einigen Löchern.
  • Seite 94: Uhrfunktionen

    UHRFUNKTIONEN 7. UHRFUNKTIONEN 7.1 Uhrfunktionen Uhrfunktion Anwendung Nach Ablauf der Zeit ertönt der Signalton. Kurzzeit-Wecker Nach Ablauf des Timers ertönt ein akustisches Signal und die Ofen‐ funktion stoppt. Garzeitdauer Verzögerung des Starts und/oder des Endes des Kochens. Zeitvorwahl Max. 23 Std. 59 Min. Diese Funktion wirkt sich nicht auf den Betrieb des Backofens aus.
  • Seite 95 UHRFUNKTIONEN Einstellung: Kurzzeit-Wecker Schritt 1 Schritt 2 Schritt 3 Im Display wird Folgen‐ des ange‐ zeigt: 0:00 Stellen Sie Kurzzeit-We‐ Drücken Sie: Drücken Sie: cker ein. Der Countdown des Timers startet umgehend. Diese Funktion ist nur verfügbar für: Grill, Grill, niedrig, Grill, hoch. Einstellung: Garzeitdauer Schritt 1 Schritt 2...
  • Seite 96: Verwendung Des Zubehörs

    VERWENDUNG DES ZUBEHÖRS Einstellung: Zeitvorwahl Schritt Schritt 2 Schritt 3 Schritt 4 Schritt 5 Schritt 6 Im Dis‐ play wird Display Folgen‐ zeigt des an‐ die Uhr‐ gezeigt: zeit an. --:-- Wählen Drücken Stellen Stellen Sie die START Sie wie‐ Drücken Drücken Sie die...
  • Seite 97: Zusatzfunktionen

    ZUSATZFUNKTIONEN Brat- und Fettpfanne mit Einlegerost: Legen Sie den Grillrost mit den Silikonkap‐ pen nach unten auf das Drehteller-Set. 9. ZUSATZFUNKTIONEN 9.1 Verriegelung Diese Funktion verhindert ein versehentliches Verstellen der Gerätefunktion. Einschalten, wenn das Gerät in Betrieb ist – das eingestellte Garen wird fortgesetzt und das Be‐ dienfeld ist verriegelt.
  • Seite 98: Kühlgebläse

    TIPPS UND HINWEISE 9.3 Kühlgebläse Wenn das Gerät in Betrieb ist, schaltet sich das Kühlgebläse automatisch ein, um die Oberflächen des Geräts kühl zu halten. Nach dem Abschalten des Geräts kann das Kühlgebläse weiterlaufen, bis das Gerät abgekühlt ist. 10. TIPPS UND HINWEISE 10.1 Garempfehlungen Die Temperaturen und Garzeiten in den Tabellen sind nur Richtwerte.
  • Seite 99: Mikrowellengeeignetes Kochgeschirr Und Materialien

    TIPPS UND HINWEISE Tiefgekühlte Lebensmittel aus der Verpackung nehmen und auf einen umgedrehten Teller geben, der auf einem Behälter steht, damit die Auftauflüssigkeit abtropfen kann. Alternativ kann auch ein Abtaugitter oder ein Plastiksieb verwendet werden. Bereits angetaute Stücke nacheinander herausnehmen. Durch Einstellen einer höheren Mikrowellenleistung kann Obst und Gemüse ohne vorheriges Auftauen gegart werden.
  • Seite 100: Empfohlene Leistungseinstellungen Für Verschiedene Arten Von Lebensmitteln

    TIPPS UND HINWEISE Kochgeschirr / Material Bratfolie mit mikrowellenge‐ eignetem Verschluss Bratgeschirr aus Metall, z. B. Emaille, Gusseisen Backformen, schwarz lackiert oder silikonbeschichtet Kochgeschirr für die Mikro‐ welle, z. B. Knusperpfanne Brat- und Fettpfanne mit Ein‐ legerost 10.4 Empfohlene Leistungseinstellungen für verschiedene Arten von Lebensmitteln Die Angaben in der Tabelle sind Richtwerte.
  • Seite 101: Gartabellen Für Prüfinstitute

    TIPPS UND HINWEISE 300 - 400 W Schmelzen von Garen/Erwärmen Köcheln von Erwärmen von Käse, Schokola‐ von empfindlichen Weiter garen Reis Babynahrung de, Butter Speisen 100 - 200 W Auftauen von Obst Auftauen von Käse, Auftauen von Fleisch, Auftauen von Brot und Kuchen Sahne, Butter Fisch...
  • Seite 102: Reinigung Und Pflege

    REINIGUNG UND PFLEGE MIKROWELLENKOM‐ BIFUNKTION Stufe der Grill‐ intensität Kartoffelgratin, 1,1 kg niedrig 30 - 35 Hähnchen, 1,1 kg hoch 30 - 35 Legen Sie das Fleisch in einen runden Glasbehäl‐ ter. 11. REINIGUNG UND PFLEGE WARNUNG! Siehe Kapitel Sicherheitshinweise. 11.1 Hinweise zur Reinigung Reinigen Sie die Vorderseite des Geräts nur mit einem Mikrofasertuch mit war‐...
  • Seite 103: Fehlersuche

    FEHLERSUCHE 12. FEHLERSUCHE WARNUNG! Siehe Kapitel Sicherheitshinweise. 12.1 Was zu tun ist, wenn … In allen Fällen, die nicht in dieser Tabelle aufgeführt sind, wenden Sie sich bitte an einen autorisierten Kundendienst. Das Gerät schaltet sich nicht ein oder heizt nicht auf Störung Prüfen Sie, ob Folgendes zutrifft ...
  • Seite 104: Service-Daten

    ENERGIEEFFIZIENZ Fehlercodes Wenn das Display einen Fehlercode anzeigt, der nicht in dieser Tabelle enthalten ist, schalten Sie die Haussicherung aus und wieder ein, um das Gerät neu zu starten. Wenn der Fehlercode erneut angezeigt wird, wenden Sie sich an einen autorisierten Kundendienst. 12.2 Service-Daten Wenn Sie das Problem nicht selbst lösen können, wenden Sie sich an Ihren Händler oder einen autorisierten Kundendienst.
  • Seite 105: Informationen Zur Entsorgung

    MENÜSTRUKTUR Wählen Sie die – drücken, Option aus der Stellen Sie den - Wählen Wählen Sie die um die Einstel‐ Menü Struktur Wert ein und drü‐ Sie, um die Me‐ Einstellung. lung zu bestäti‐ aus und drücken nü einzugeben. cken Sie gen.
  • Seite 106 MENÜSTRUKTUR Dieses Elektro- bzw. Elektronikgerät ist mit einer durchgestrichenen Abfalltonne auf Rädern gekennzeichnet. Das Gerät darf deshalb nur getrennt vom unsortierten Siedlungsabfall gesammelt und zurückgenommen werden, es darf also nicht in den Hausmüll gegeben werden. Das Gerät kann z. B. bei einer kommunalen Sammelstelle oder ggf. bei einem Vertreiber (siehe zu deren Rücknahmepflichten unten) abgegeben werden.
  • Seite 107 MENÜSTRUKTUR Geräte beschränkt, bei denen mindestens eine der äußeren Abmessungen mehr als 50 cm beträgt. Für alle übrigen Elektro- und Elektronikgeräte muss der Vertreiber geeignete Rückgabemöglichkeiten in zumutbarer Entfernung zum jeweiligen Endnutzer gewährleisten; das gilt auch für kleine Elektrogeräte (s.o.), die der Endnutzer zurückgeben will, ohne ein neues Gerät zu kaufen.
  • Seite 108 VISITE O NOSSO WEBSITE PARA: Obter conselhos de utilização, folhetos, resolução de problemas e informações sobre assistência e reparações: www.zanussi.com/support Sujeito a alterações sem aviso prévio. ÍNDICE 1. INFORMAÇÕES DE SEGURANÇA..109 7.2 Como definir: Funções do relógio122 1.1 Segurança de crianças e pessoas 8.
  • Seite 109: Segurança De Crianças E Pessoas Vulneráveis

    INFORMAÇÕES DE SEGURANÇA INFORMAÇÕES DE SEGURANÇA Leia atentamente as instruções fornecidas antes de instalar e utilizar o aparelho. O fabricante não é responsável por quaisquer ferimentos ou danos resultantes de instalação ou utilização incorretas. Guarde sempre as instruções em local seguro e acessível para consultar no futuro.
  • Seite 110: Informações De Segurança

    INFORMAÇÕES DE SEGURANÇA Este aparelho foi concebido unicamente para utilização • doméstica num ambiente interior. Este aparelho pode ser utilizado em escritórios, quartos de • hóspedes de hotéis, quartos de hóspedes de pousadas, casas de hóspedes de turismo rural e outros alojamentos semelhantes onde tal utilização não exceda os níveis de utilização doméstica (médios).
  • Seite 111 INFORMAÇÕES DE SEGURANÇA AVISO: Em caso de danos na porta ou nos vedantes da • porta, não utilize o aparelho até que tenha sido reparado por uma pessoa qualificada. AVISO: Apenas uma pessoa qualificada pode efetuar ações • de manutenção e reparação que envolvam a remoção da cobertura que protege contra a exposição à...
  • Seite 112: Instruções De Segurança

    INSTRUÇÕES DE SEGURANÇA Não utilize agentes de limpeza abrasivos ou raspadores • metálicos afiados para limpar a porta de vidro, porque podem riscar a superfície e quebrar o vidro. Se não mantiver o aparelho limpo, a superfície pode • deteriorar-se e isso pode afetar negativamente a vida útil do aparelho e resultar numa situação perigosa.
  • Seite 113: Ligação Elétrica

    INSTRUÇÕES DE SEGURANÇA Profundidade de encastre do aparelho 546 mm Profundidade com a porta aberta 882 mm Dimensão mínima da abertura de ventilação. 560x20 mm Abertura localizada na parte inferior traseira Comprimento do cabo de alimentação elétrica. O 1350 mm cabo sai pelo canto traseiro direito Parafusos de montagem 3.5x25 mm...
  • Seite 114 INSTRUÇÕES DE SEGURANÇA • Não deixe o aparelho sem vigilância durante o funcionamento. • Desative o aparelho após cada utilização. • Tenha cuidado quando abrir a porta do aparelho com o aparelho em funcionamento. Pode sair ar quente. • Não utilize o aparelho com as mãos molhadas ou quando ele estiver em contacto com água.
  • Seite 115: Descrição Do Produto

    DESCRIÇÃO DO PRODUTO 2.5 Iluminação interna AVISO! Risco de choque elétrico. • Relativamente à(s) lâmpada(s) no interior deste produto e às lâmpadas sobressalentes vendidas separadamente: Estas lâmpadas destinam-se a suportar condições físicas extremas em eletrodomésticos, tais como temperatura, vibração, humidade, ou destinam-se a sinalizar informação relativamente ao estado operacional do aparelho.
  • Seite 116: Painel De Comandos

    PAINEL DE COMANDOS 3.2 Acessórios Conjunto do prato rotativo Para preparar alimentos. ≤ 4 kg Conjunto de prateleira para o grelhador Para grelhar. 4. PAINEL DE COMANDOS 4.1 Botões retráteis Para utilizar o aparelho, prima o botão. O botão fica saliente. 4.2 Descrição geral do painel de comandos Potência Tempo‐...
  • Seite 117: Antes Da Primeira Utilização

    ANTES DA PRIMEIRA UTILIZAÇÃO 4.3 Visor Visor com funções chave. Indicadores do visor Indicadores básicos Bloquear Cozedura assistida Definições Indicador de função de micro- ondas Indicadores do temporizador Temporizador Conta-minutos Atraso do temporizador Hora de fim crescente Barra de progresso - para temperatura ou tempo.
  • Seite 118 UTILIZAÇÃO DIÁRIA 6. UTILIZAÇÃO DIÁRIA AVISO! Consulte os capítulos relativos à segurança. 6.1 Como definir: Tipos de aquecimento Passo 1 Rodar o botão de tipos de aquecimento para selecionar a função: Grelhador. 6.2 Como definir: Funções do micro-ondas Passo 1 Rodar o botão de tipos de aquecimento para selecionar a função de microondas: Passo 2 Premir:...
  • Seite 119: Utilização Diária

    UTILIZAÇÃO DIÁRIA 6.3 Tipos de aquecimento Tipo de aqueci‐ Aplicação mento Aquecer bebidas e sopas, intervalo de potência: 800 - 1000 W Líquido Aquecer refeições pré-cozinhadas e alimentos delicados, intervalo de po‐ tência: 300 - 700 W Reaquecer Descongelar carne, peixe, bolos, gama de potência: 100 - 200 W Descongelar Derreter chocolate e manteiga, intervalo de potência: 100 - 400 W Derreter...
  • Seite 120 UTILIZAÇÃO DIÁRIA 6.4 Como definir: Cozedura assistida Cada prato deste submenu propõe um tipo de aquecimento recomendado. Utilize a função para preparar rapidamente um prato com as predefinições. Pode ajustar o tempo durante a cozedura. Passo 1 Passo 2 Passo 3 Passo 4 P1 - P12 Entre no menu.
  • Seite 121: Funções De Relógio

    FUNÇÕES DE RELÓGIO Prato Peso Nível de prateleira/acessório Brócolos 0.5 kg Couve-flor 0,5 kkg prato de vidro da mesa giratória; caçarola Couve-flor, con‐ 0.5 kg em cerâmica ou vidro gelada Adicione 50 ml de água. Cubra os alimentos com uma tampa adequada para micro-ondas com al‐ Ervilhas, conge‐...
  • Seite 122 FUNÇÕES DE RELÓGIO Função de relógio Aplicação O máximo é de 23 h 59 min. Esta função não afeta o funcionamento do forno. Temporizador cres‐ Para ligar e desligar a Temporizador crescente selecione: Menu, Defi‐ cente nições. 7.2 Como definir: Funções do relógio Como definir: Hora Passo 1 Passo 2...
  • Seite 123: Utilizar Os Acessórios

    UTILIZAR OS ACESSÓRIOS Como definir: Tempo para cozinhar Passo 1 Passo 2 Passo 3 Passo 4 O visor mos‐ tra: 0:00 Escolha uma fun‐ Prima repetida‐ ção de aqueci‐ Defina o tempo Premir: mento e defina a da cozedura. mente: temperatura.
  • Seite 124: Funções Adicionais

    FUNÇÕES ADICIONAIS 8.1 Inserir acessórios Utilize apenas materiais e recipientes adequados. Consulte “Recipientes e materiais adequados para micro-ondas” no capítulo “Sugestões e dicas”. Conjunto do prato rotativo: Cozinhe sempre os alimentos no conjunto do prato rotativo. Coloque a guia com roletes à volta do eixo do prato rotativo.
  • Seite 125: Sugestões E Dicas

    SUGESTÕES E DICAS (°C) 30 - 115 12.5 120 - 195 200 - 230 A Desativação Automática não funciona com as seguintes funções: Luz, Atraso do temporizador. 9.3 Ventoinha de arrefecimento Quando o aparelho está a funcionar, a ventoinha de arrefecimento liga-se automaticamente para manter as superfícies do aparelho frias.
  • Seite 126 SUGESTÕES E DICAS Cozinhar no microondas Cozinhe os alimentos com tampa. Se desejar obter uma crosta, cozinhe os alimentos sem tampa. Não cozinhar demasiado os pratos, regulando a potência e o tempo para um valor demasiado elevado. Os alimentos podem secar, queimar ou incendiar-se. Não utilize o aparelho para cozer ovos com casca e caracóis porque podem explodir.
  • Seite 127 SUGESTÕES E DICAS Recipiente/Material Cerâmica, porcelana ou bar‐ ro com fundo não vidrado ou pequenos orifícios, por exem‐ plo, nas pegas Plástico resistente ao calor até 200 °C Cartão, papel Película aderente para micro- ondas Película própria para assa‐ dos com fecho seguro para micro-ondas Assadeiras em metal, por exemplo, esmalte, ferro fun‐...
  • Seite 128 SUGESTÕES E DICAS 800 – 1000 W Ferver no início do processo de confeção Aquecer líquidos 500 – 700 W Descongelar e Confecionar Cozinhar legu‐ Lume brando pa‐ Aquecer pratos aquecer refei‐ pratos com ra estufados individuais ções congela‐ ovos 300 –...
  • Seite 129: Manutenção E Limpeza

    MANUTENÇÃO E LIMPEZA Pão-de-ló 0.475 Conjunto 5 - 7 de prato rotativo Rolo de carne Conjunto 18 - 20 de prato rotativo Prato de ovos no Conjunto 15 - 17 forno de prato rotativo Descongelar carne Conjunto 8 - 9 do prato rotativo Função combinada com microondas...
  • Seite 130: Resolução De Problemas

    RESOLUÇÃO DE PROBLEMAS 11.1 Notas sobre a limpeza Limpe a parte da frente do aparelho apenas usando um pano de microfibras com água morna e um detergente suave. Utilize uma solução de limpeza para limpar as superfícies metálicas. Agentes de Limpe manchas com um detergente suave.
  • Seite 131 RESOLUÇÃO DE PROBLEMAS O aparelho não liga ou não aquece O aparelho não aquece. O Bloqueio está desativado. Componentes Problema Verificar se... A lâmpada não funciona. A lâmpada está fundida. Contacte um Centro de Assistência Técnica Autorizado. O conjunto do prato rotativo faz ruído. Há...
  • Seite 132: Eficiência Energética

    EFICIÊNCIA ENERGÉTICA 13. EFICIÊNCIA ENERGÉTICA 13.1 Poupança de energia Certifique-se de que a porta do aparelho está fechada quando o aparelho funcionar. Não abra a porta do aparelho muitas vezes durante a confeção. Mantenha a junta da porta limpa e certifique-se de que está...
  • Seite 133: Preocupações Ambientais

    ESTRUTURA DO MENU Definições Temporizador cres‐ Ligado/ Ligado/Desli‐ cente Desligado gado Modo Demo Código de Versão do software Verificar ativação: 2468 Restaurar configura‐ Sim / Não ções 15. PREOCUPAÇÕES AMBIENTAIS Recicle os materiais que apresentem o símbolo . Coloque a embalagem nos contentores indicados para reciclagem.
  • Seite 134 VISITE NUESTRO SITIO WEB PARA: Obtener consejos, folletos, soluciones a problemas e información de servicio y reparación: www.zanussi.com/support Salvo modificaciones. CONTENIDO 1. INFORMACIÓN SOBRE SEGURIDAD... 135 7. FUNCIONES DEL RELOJ....... 147 1.1 Seguridad de niños y personas 7.1 Funciones de reloj....... 147 vulnerables........
  • Seite 135: Información Sobre Seguridad

    INFORMACIÓN SOBRE SEGURIDAD INFORMACIÓN SOBRE SEGURIDAD Antes de instalar y utilizar el aparato, lea atentamente las instrucciones facilitadas. El fabricante no se hace responsable de lesiones o daños producidos como resultado de una instalación o un uso incorrectos. Conserve siempre estas instrucciones en lugar seguro y accesible para futuras consultas.
  • Seite 136 INFORMACIÓN SOBRE SEGURIDAD Este aparato está diseñado para uso doméstico en • interiores. Este aparato se puede utilizar en oficinas, habitaciones de • hotel, habitaciones de Bed&Breakfast, casas de campo y otros alojamientos similares donde dicho uso no exceda (en promedio) los niveles de uso doméstico.
  • Seite 137 INFORMACIÓN SOBRE SEGURIDAD ADVERTENCIA: Si la puerta o los cierres de la puerta • sufren daños, no debe operar el aparato hasta que una persona cualificada lo haya reparado. ADVERTENCIA: Solo una persona cualificada puede • realizar tareas de reparación o mantenimiento que impliquen la extracción de una tapa que protege contra la exposición a la energía del microondas.
  • Seite 138: Instrucciones De Seguridad

    INSTRUCCIONES DE SEGURIDAD tapas abisagradas de la placa si no quiere arañar su superficie, lo que podría hacer que el cristal se hiciese añicos. Si no se mantiene el aparato en condiciones limpias, la • superficie podría deteriorarse y afectar negativamente a la vida útil del aparato y provocar situaciones de riesgo.
  • Seite 139: Conexión Eléctrica

    INSTRUCCIONES DE SEGURIDAD Fondo empotrado del aparato 546 mm Fondo con la puerta abierta 882 mm Tamaño mínimo de la abertura de ventilación. 560x20 mm Abertura situada en la parte trasera inferior Longitud del cable de alimentación. El cable está 1350 mm en la esquina derecha de la parte trasera Tornillos de montaje...
  • Seite 140: Mantenimiento Y Limpieza

    INSTRUCCIONES DE SEGURIDAD • Asegúrese de que las aberturas de ventilación no están bloqueadas. • No deje el aparato desatendido durante el funcionamiento. • Apague el aparato después de cada uso. • Tenga cuidado al abrir la puerta del aparato mientras funciona. Puede liberarse aire caliente.
  • Seite 141: Iluminación Interna

    DESCRIPCIÓN DEL PRODUCTO • Si utiliza aerosoles de limpieza para hornos, siga las instrucciones de seguridad del envase. 2.5 Iluminación interna ADVERTENCIA! Riesgo de descarga eléctrica. • En cuanto a la(s) bombilla(s) de este producto y las de repuesto vendidas por separado: Estas bombillas están destinadas a soportar condiciones físicas extremas en los aparatos domésticos, como la temperatura, la vibración, la humedad, o están destinadas a señalar información sobre el estado de funcionamiento del aparato.
  • Seite 142: Accesorios

    PANEL DE MANDOS 3.2 Accesorios Plato giratorio Para preparar comida. ≤ 4 kg Rejilla para grill Para utilizar el grill. 4. PANEL DE MANDOS 4.1 Mandos escamoteables Para usar el aparato, presione el mando. El mando sale del alojamiento. 4.2 Vista general del panel de control Potencia Tempo‐...
  • Seite 143: Pantalla

    ANTES DEL PRIMER USO 4.3 Pantalla Pantalla con funciones principales. Indicadores de pantalla Indicadores básicos Bloqueo Cocción asistida Ajustes Indicador de función de microon‐ Indicadores de temporizador Tiempo de funcio‐ Avisador Tiempo de retardo Hora de fin namiento Barra de progreso - para la temperatura o el tiempo.
  • Seite 144: Uso Diario

    USO DIARIO 6. USO DIARIO ADVERTENCIA! Consulte los capítulos sobre seguridad. 6.1 Cómo ajustar: Funciones de cocción Paso 1 Gire el mando del horno para seleccionar la función de cocción y elija una función: Grill. 6.2 Cómo ajustar: Funciones del microondas Paso 1 Gire el mando del horno para seleccionar la función de cocción y elija la función de microondas:...
  • Seite 145: Funciones De Cocción

    USO DIARIO 6.3 Funciones de cocción Función de coc‐ Aplicación ción Calentar bebidas y sopas, potencia: 800 - 1.000 W Líquido Calentar comidas preparadas y delicadas, rango de potencia: 300 - 700 Recalentar Descongelar carne, pescado, pasteles, potencia: 100 - 200 W Descongelar Fundir chocolate y mantequilla, rango de potencia: 100 - 400 W Derritiendo...
  • Seite 146: Cómo Ajustar: Cocción Asistida

    USO DIARIO 6.4 Cómo ajustar: Cocción asistida Para cada plato de este submenú se recomienda una función de cocción. Utilice la función para preparar un plato rápidamente con los ajustes predeterminados. También puede ajustar el tiempo durante la cocción. Paso 1 Paso 2 Paso 3 Paso 4...
  • Seite 147: Funciones Del Reloj

    FUNCIONES DEL RELOJ Plato Peso Nivel/accesorio de la parrilla Brócoli 0.5 kg Coliflor 0,5 kkg Coliflor, congela‐ 0.5 kg placa giratoria de vidrio; cacerola de cerá‐ mica o de vidrio Añada 50 ml de agua. Cubra la comida con una tapa apta para microondas con algunos orificios.
  • Seite 148: Cómo Ajustar: Funciones De Reloj

    FUNCIONES DEL RELOJ Función de reloj Aplicación El máximo es 23 h 59 min. Esta función no influye en el funcionamien‐ to del horno. Tiempo de funciona‐ Para encender y apagar Tiempo de funcionamiento seleccione: Menú, miento Ajustes. 7.2 Cómo ajustar: Funciones de reloj Cómo ajustar: Hora Paso 1 Paso 2...
  • Seite 149: Uso De Los Accesorios

    USO DE LOS ACCESORIOS Cómo ajustar: Tiempo de cocción Paso 1 Paso 2 Paso 3 Paso 4 La pantalla muestra: 0:00 Elija una función Pulse repetida‐ Ajuste el tiempo de cocción y la Pulse: de cocción. mente: temperatura. El temporizador comienza la cuenta atrás inmediatamente. Esta función está...
  • Seite 150: Funciones Adicionales

    FUNCIONES ADICIONALES Plato giratorio: Siempre cocine los alimentos en el plato giratorio. Coloque la guía de rodillo alrededor del eje giratorio. Coloque la bandeja de cristal giratoria sobre la guía de rodillos. Utilice únicamente el plato giratorio sumi‐ nistrado con el aparato. Rejilla para grill: Coloque la parrilla con las tapas de silico‐...
  • Seite 151: Ventilador De Refrigeración

    CONSEJOS (°C) 30 - 115 12.5 120 - 195 200 - 230 La función de desconexión automática no funciona con las siguientes funciones: Luz, Tiempo de retardo. 9.3 Ventilador de refrigeración Cuando el aparato está en funcionamiento, el ventilador de enfriamiento se enciende automáticamente para mantener frías sus superficies.
  • Seite 152: Recipientes Y Materiales Adecuados Para Microondas

    CONSEJOS Cocción por microondas Cocine la comida tapada. Cocine alimentos sin tapar solamente si desea un resultado crujiente. No recocine los platos ajustando una potencia y un tiempo demasiado elevados. La comida puede secarse, quemarse o provocar fuego. No utilice el aparato para cocinar huevos o caracoles con la cáscara porque pueden estallar. Perfore la yema de los huevos fritos antes de recalentarlos.
  • Seite 153: Ajustes De Potencia Recomendados Para Distintos Tipos De Alimentos

    CONSEJOS Material del utensilio de co‐ cina Cerámica, porcelana o barro cocido con fondo sin vidriar o con pequeños orificios, p. ej., en las asas Plástico resistente al calor hasta 200 °C Cartón, papel Película para microondas Film para asado con cierre apto para microondas Fuentes de metal, como es‐...
  • Seite 154: Tablas De Cocción Para Organismos De Control

    CONSEJOS 500 - 700 W Descongelar y Cocinar platos Estofados a fue‐ Calentar platos Cocinar verduras calentar platos de huevos go lento únicos congelados 300 - 400 W Fundir queso, Cocinar / calentar Calentar alimen‐ Continuar coci‐ chocolate, man‐ Cocer arroz alimentos delica‐...
  • Seite 155: Mantenimiento Y Limpieza

    MANTENIMIENTO Y LIMPIEZA Descongelar carne Plato gira‐ 8 - 9 torio Función de combi microondas Use la función: Grill microondas. Use la rejilla para grill baja. FUNCIÓN DE COMBI MICROONDAS Nivel de inten‐ sidad del grill Patatas gratinadas, 1,1 bajo 30 - 35 Pollo, 1,1 kg alto...
  • Seite 156: Solución De Problemas

    SOLUCIÓN DE PROBLEMAS Limpie todos los accesorios después de cada uso y déjelos secar. Antes de lim‐ piar, espere hasta que la mesa giratoria esté fría. Existe riesgo de rotura de la mesa giratoria. Use solo un paño suave humedecido en agua tibia y detergente suave.
  • Seite 157: Datos De Servicio

    EFICACIA ENERGÉTICA Código de error La pantalla muestra… Compruebe que... 00:00 Se ha producido un corte de corriente. Ajuste la hora. Si la pantalla muestra un código de error que no está en esta tabla, apague y encienda el fusible de la vivienda para reiniciar el aparato.
  • Seite 158: Aspectos Medioambientales

    Seleccione la op‐ - seleccio‐ : pulse para ción de la estruc‐ Ajuste el valor y Seleccione el ne para acceder confirmar el tura Menú y pul‐ ajuste. pulse al Menú. ajuste. Gire el mando de las funciones de cocción hasta la posición de apagado para salir de Menú. Menú...
  • Seite 160 WWW.ZANUSSI.COM/SHOP...

Diese Anleitung auch für:

Zvekw7xn

Inhaltsverzeichnis